Table of Contents (Start)
- Topics
- Introducing SevOne
- Login
- Startup Wizard
- Dashboard
- Global Search - Advanced Search
- Report Manager
- Report Attachment Wizard
- Report Properties
- Report Interactions
- Instant Graphs
- TopN Reports
- Alerts
- Alert Archives
- Alert Summary
- Instant Status
- Status Map Manager
- Edit Maps
- View Maps
- FlowFalcon Reports
- NBAR Reports
- Logged Traps
- Unknown Traps
- Trap Event Editor
- Trap Destinations
- Trap Destination Associations
- Policy Browser
- Create and Edit Policies
- Webhook Definition Manager
- Threshold Browser
- Create and Edit Thresholds
- Probe Manager
- Discovery Manager
- Device Manager
- New Device
- Edit Device
- Object Manager
- High Frequency Poller
- Device Summary
- Device Mover
- Device Groups
- Object Groups
- Object Summary
- Object Rules
- VMware Browser
- AWS Plugin
- Azure Plugin (Public Preview)
- Calculation Plugin
- Database Manager
- Deferred Data Plugin
- DNS Plugin
- HTTP Plugin
- ICMP Plugin
- IP SLA Plugin
- JMX Plugin
- NAM
- NBAR Plugin
- Portshaker Plugin
- Process Plugin
- Proxy Ping Plugin
- SDWAN Plugin
- SNMP Plugin
- VMware Plugin
- Web Status Plugin
- WMI Plugin
- xStats Plugin
- Indicator Type Maps
- Device Types
- Object Types
- Object Subtype Manager
- Calculation Editor
- xStats Source Manager
- User Role Manager
- User Manager
- Session Manager
- Authentication Settings
- Preferences
- Cluster Manager
- Maintenance Windows
- Processes and Logs
- Metadata Schema
- Baseline Manager
- FlowFalcon View Editor
- Map Flow Objects
- FlowFalcon Views
- Flow Rules
- Flow Interface Manager
- MPLS Flow Mapping
- Network Segment Manager
- Flow Protocols and Services
- xStats Log Viewer
- SNMP Walk
- SNMP OID Browser
- MIB Manager
- Work Hours
- Administrative Messages
- Enable Flow Technologies
- Enable JMX
- Enable NBAR
- Enable SNMP
- Enable Web Status
- Enable WMI
- IP SLA
- SNMP
- SevOne Data Publisher
- Quality of Service
- Perl Regular Expressions
- Trap Revisions
- Integrate SevOne NMS With Other Applications
- Email Tips and Tricks
- SevOne NMS PHP Statistics
- SevOne NMS Usage Statistics
- Glossary and Concepts
- Map Flow Devices
- Trap v3 Receiver
- Guides
- Quick Start Guides
- AWS Quick Start Guide
- Azure Quick Start Guide (Public Preview)
- Data Miner Quick Start Guide
- Flow Quick Start Guide
- Group Aggregated Indicators Quick Start Guide
- IP SLA Quick Start Guide
- JMX Quick Start Guide
- Metadata Quick Start Guide
- RESTful API Quick Start Guide
- Self-monitoring Quick Start Guide
- SevOne NMS Admin Notifications Quick Start Guide
- SNMP Quick Start Guide
- Synthetic Indicator Types Quick Start Guide
- Topology Quick Start Guide
- VMware Quick Start Guide
- Web Status Quick Start Guide
- WMI Quick Start Guide
- xStats Quick Start Guide
- xStats Adapter - Accedian Vision EMS (TM) Quick Start Guide
- Deployment Guides
- Automated Build / Rebuild (Customer) Instructions
- Generate a Self-Signed Certificate or a Certificate Signing Request
- SevOne Best Practices Guide - Cluster, Peer, and HSA
- SevOne Data Platform Security Guide
- SevOne NMS Implementation Guide
- SevOne NMS Installation Guide - Virtual Appliance
- SevOne NMS Advanced Network Configuration Guide
- SevOne NMS Installation Guide
- SevOne NMS Port Number Requirements Guide
- SevOne NMS Upgrade Process Guide
- SevOne Physical Appliance Pre-Build BIOS and RAID Configuration Guide
- SevOne SAML Single Sign-On Setup Guide
- Cloud Platforms
- Other Guides
- Quick Start Guides
Automated Build / Rebuild (Customer) Instructions
SevOne Documentation
All documentation is available from the IBM SevOne Support customer portal.
© Copyright International Business Machines Corporation 2024.
All right, title, and interest in and to the software and documentation are and shall remain the exclusive property of IBM and its respective licensors. No part of this document may be reproduced by any means nor modified, decompiled, disassembled, published or distributed, in whole or in part, or translated to any electronic medium or other means without the written consent of IBM.
IN NO EVENT SHALL IBM, ITS SUPPLIERS, NOR ITS LICENSORS BE LIABLE FOR ANY DAMAGES, WHETHER ARISING IN TORT, CONTRACT OR ANY OTHER LEGAL THEORY EVEN IF IBM HAS BEEN ADVISED OF THE POSSIBILITY OF SUCH DAMAGES, AND IBM DISCLAIMS ALL WARRANTIES, CONDITIONS OR OTHER TERMS, EXPRESS OR IMPLIED, STATUTORY OR OTHERWISE, ON SOFTWARE AND DOCUMENTATION FURNISHED HEREUNDER INCLUDING WITHOUT LIMITATION THE WARRANTIES OF DESIGN, MERCHANTABILITY OR FITNESS FOR A PARTICULAR PURPOSE, AND NONINFRINGEMENT.
IBM, the IBM logo, and SevOne are trademarks or registered trademarks of International Business Machines Corporation, in the United States and/or other countries. Other product and service names might be trademarks of IBM or other companies. A current list of IBM trademarks is available on ibm.com/trademark.
About
This document provides customer instructions for building / rebuilding a PAS or DNC, which can then be incorporated into a new or existing cluster or can be used to replace a lost node. It will NOT restore any lost data.
This process can help recover a lost cluster node, but it will not recover any lost data.
This guide is for hardware deployments only.
Starting SevOne NMS 6.7.0, MySQL has moved to MariaDB 10.6.12 .
Prerequisites / Assumptions
-
Customer has obtained or created on boot media (USB, DVD, etc.) with the required NMS recovery installation files. NOTE: For further details, see the appendix on boot media.
-
Customer must have physical access to the console of the target SevOne PAS hardware and a minimum USB stick size of 32GB.
-
Customer knows the required network settings to be installed:
-
Hostname
-
The network interface which should be used (e.g. eth0)
-
IP Address, in dotted decimal notation (e.g. 10.10.10.30)
-
Netmask, in dotted decimal notation (e.g. 255.255.255.0)
-
Broadcast address, in dotted decimal notation (e.g. 10.10.10.255)
-
Default Gateway, in dotted decimal notation (e.g. 10.10.10.1)
-
-
Customer knows the submodel capacity of the NMS installation. (e.g. 100K.)
Installation using ISO
NOTE: Depending on your NMS version, the specific options and numbering may vary from the screen shots below.
-
Insert boot media (or verify that SD card is present) with recovery installation files. Please refer to section Appendix - Obtain/Create Boot Media for boot media details.
-
Reset power on the server.
-
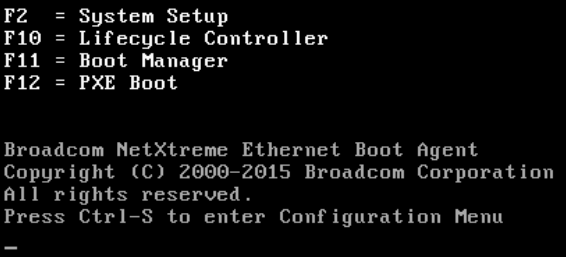
When the option appears, press F11 to enter Boot Manager.
-
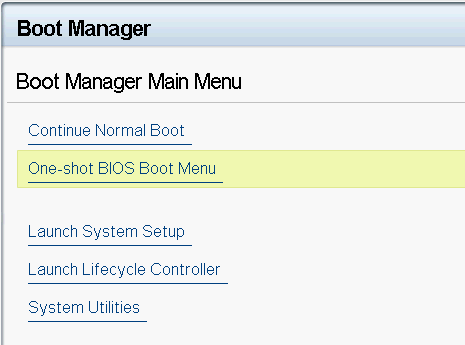
In Boot Manager Main Menu, select One-shot BIOS Boot Menu.
-
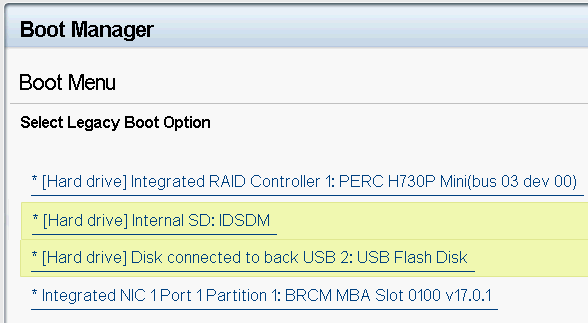
In Boot Menu, find and select the boot media (USB, DVD or SD card).
-
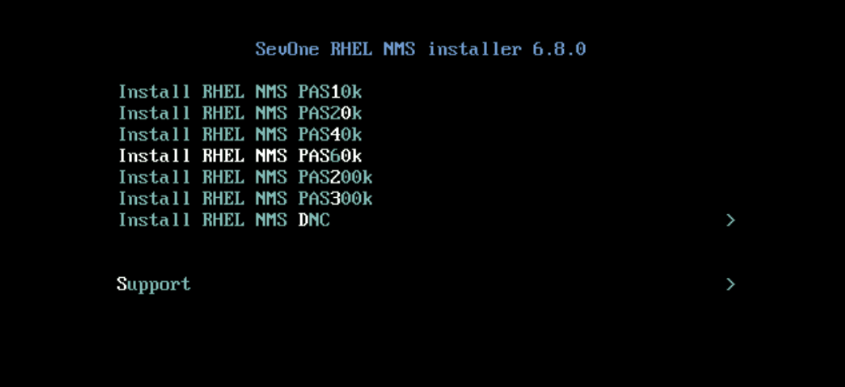
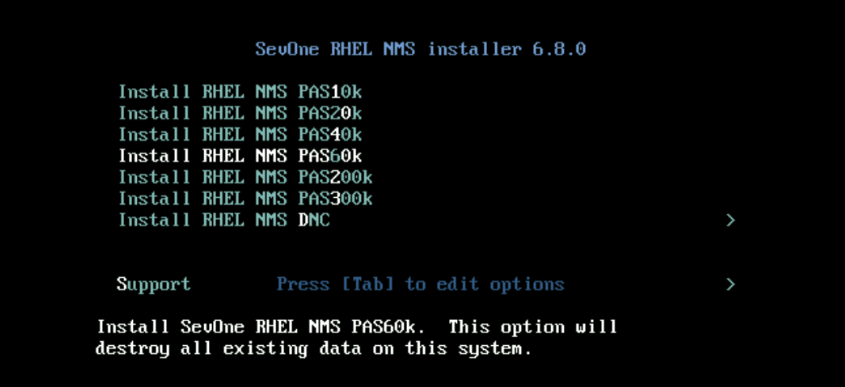
Select the appropriate NMS platform type for this model.
for FULL build / rebuild,If you select a NMS model from the list below i.e., PAS10k or PAS20k, etc., you will build a new appliance. Everything existing on the selected appliance at present, will be wiped out. Please proceed with CAUTION!

In this example, Install RHEL NMS PAS60k is selected. By choosing a NMS model, your selected appliance, i.e., PAS60k, will be completely wiped out and SevOne will start the installation.
for PARTIAL build / rebuild,If you want to perform a partial build, i.e., build a new appliance and preserve your /data folder, then select the Support option in the screenshot below followed by the <RETURN> key. Enter the default password, supportuser .
You will have an option to rebuild the PAS or DNC appliance.
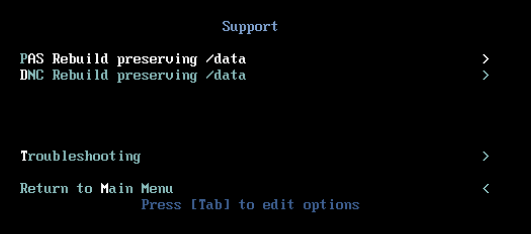
Based on the option (PAS or DNC) chosen, it will rebuild your selected appliance while preserving the /data folder.
Let's choose PAS Rebuild preserving /data.
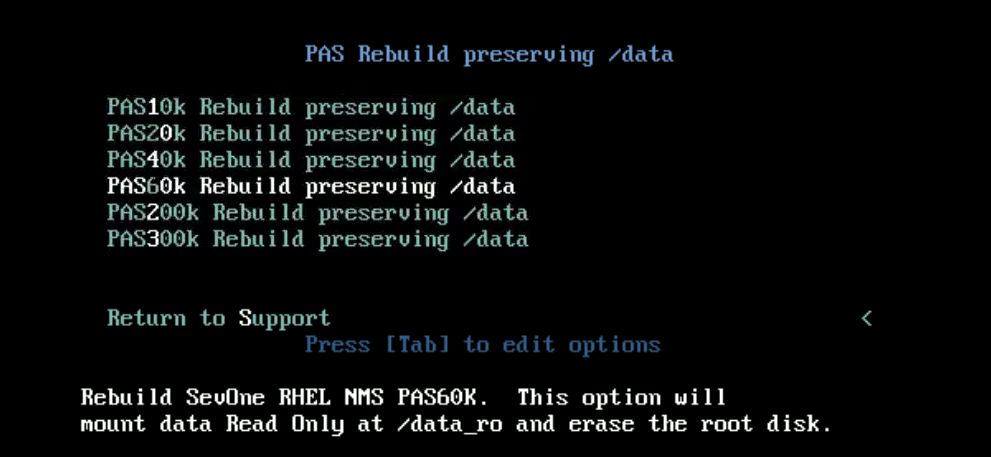
In the screenshot above, PAS60k Rebuild preserving /data is selected. Click the <RETURN> key to rebuild SevOne RHEL NMS PAS60k. This option will mount data Read Only at /data_ro and erase the root disk.To re-mount /data_ro partition to its original location, /data, using a text editor of your choice, modify /etc/fstab file properly. By doing this, the data for the selected PAS or DNC prior to the rebuild, will be restored. For assistance with this, please contact SevOne Support.
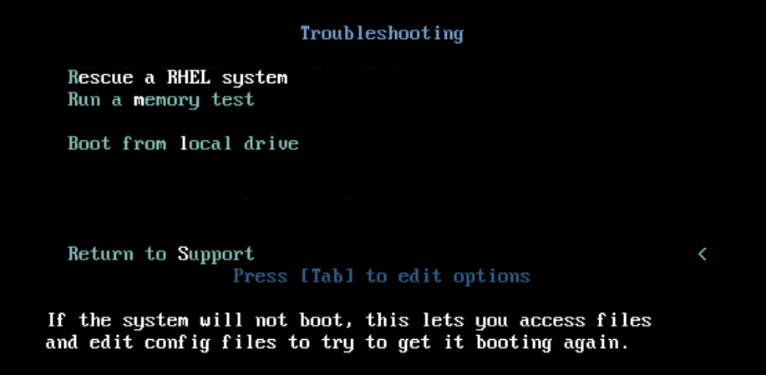
If you choose Troubleshooting followed by the <RETURN> key, you will have the following options.
-
Rescue a RHEL system - if your system does not reboot, it will allow you to access and edit your configuration files to try to get the system to boot again.
-
Run a memory test - if you system is having issues, a problem with your system memory may be the cause. Use this utility to check if the memory is working correctly.
-
Boot from local drive - allows you to boot from the local drive.
-
-
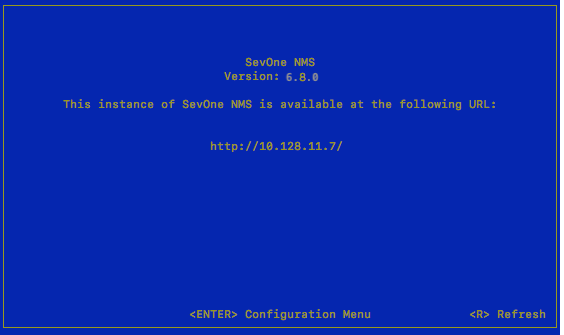
On successful completion, you will see the SevOne version screen, showing the IP address of your appliance.
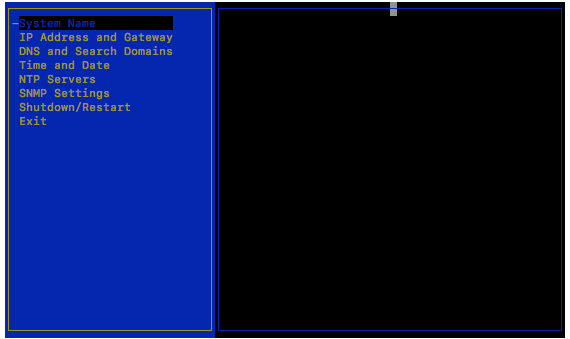
The "SevOne NMS Version … Configuration Menu" enables you to enter your company's network settings onto the appliance. You need the following information:
-
System Name (Host Name)
-
Host IP address and sub-netmask
-
Broadcast address
-
Default Gateway IP address
-
DNS primary & secondary IP address
-
NTP (Time Server) IP address
-
SNMP Settings
-
Domain Name
On the first page, press Enter to display the logon page that controls access to the Configuration Menu.
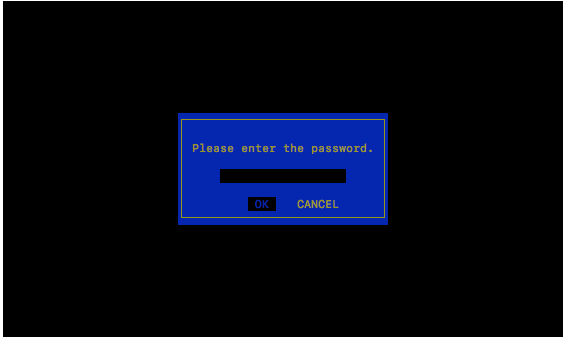
-
-
Enter the default password, supportuser.
When you log in here for the first time, you are logging as the user support. Steps for changing the default password for the support user are in the OS-level User Names and Passwords section. It is important that you change the default password.
Failure to change the default password presents a significant security risk.
Press Enter to display the system configuration menu.
-
System Name in the left menu is selected.
-
Press Enter to display the System Name fields on the right.
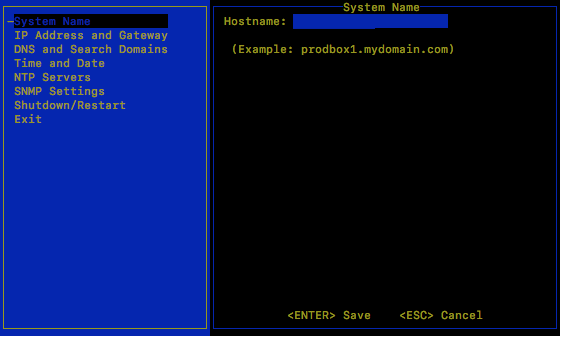
-
In the Hostname field, enter the hostname for the SevOne NMS appliance.
-
Press Enter to save the System Name settings and return the focus to the menu on the left.
-
-
Press the down arrow to select IP Address and Gateway and press Enter to display the IP address and gateway fields on the right .
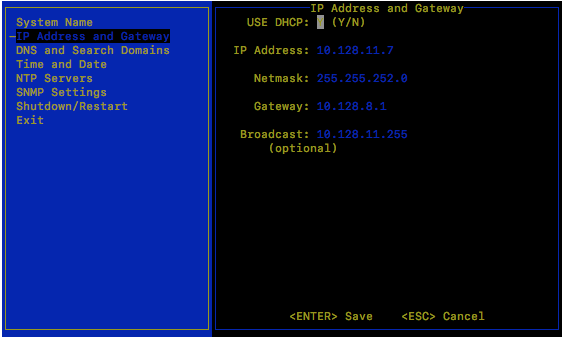
If your network uses DHCP, type Y to disable the following fields and skip the IP Address and Gateway steps. If your network does not use DHCP, type N and complete the following fields.
-
In the IP Address field, enter IP address of the SevOne NMS appliance and press Tab.
-
In the Netmask field, enter the netmask of the SevOne NMS appliance and press Tab.
-
In the Gateway field, enter the IP address of the SevOne NMS appliance and press Tab.
-
In the Broadcast field, enter the SevOne NMS broadcast IP address.
-
Press Enter to save the IP Address and Gateway settings and return the focus to the menu on the left.
-
-
Press the down arrow to select DNS and Search Domains and press Enter to display the DNS and Search Domains fields on the right.
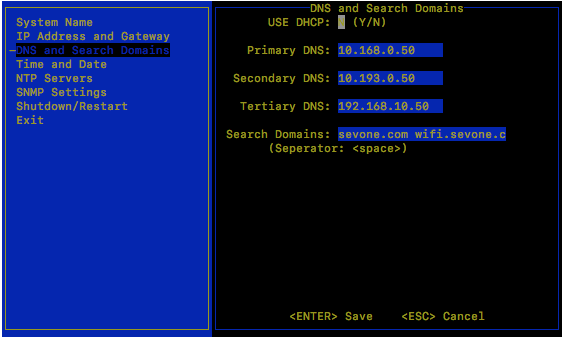
-
In the Primary DNS field, enter the IP address of the DNS server for SevOne NMS to use first and press Tab.
-
In the Secondary DNS field, enter the IP address for SevOne NMS to use second, if applicable and press Tab.
-
In the Tertiary DNS field, enter the IP address of the DNS server for SevOne NMS to use third, if applicable and press Tab.
-
In the Search Domains field, enter the domain names or IP addresses for the search domains for SevOne NMS to use (separated by a space).
-
Press Enter to save the DNS and Search Domains settings and return the focus to the menu on the left.
-
-
Press the down arrow to select Time and Date and press Enter to display the Time and Date fields on the right .
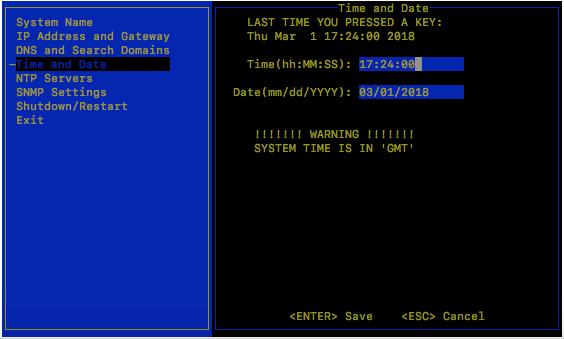
-
Confirm that the time and date are correct for Greenwich Mean Time (GMT) (a.k.a. Coordinated Universal Time (UTC)). This is the SevOne NMS system time. You define time and date settings for users, devices, and reports via the SevOne NMS GUI in a later step.
-
If needed, enter the time and date using the appropriate format in the fields provided.
-
Press Enter to save the Time and Date settings and to return the focus to the menu on the left.
-
-
Press the down arrow to select NTP Servers and press Enter to display the NTP Servers fields on the right.
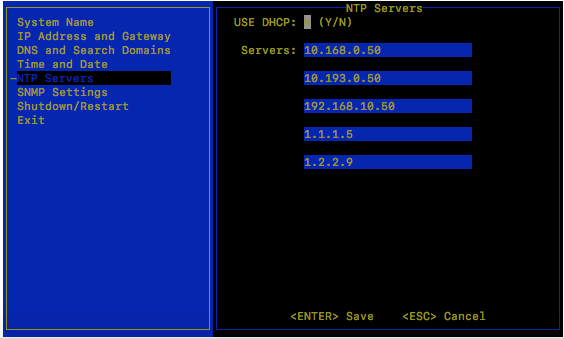
If your network uses DHCP, type Y to disable the following fields and skip the IP Address and Gateway steps. If your network does not use DHCP, type N and complete the following fields.
-
In the Servers field, enter the DNS name or IP address of the time server for SevOne NMS to use to maintain time settings.
-
Press Enter to save the NTP Servers settings and to return the focus to the menu on the left.
-
-
Press the down arrow to select SNMP Settings and press Enter to display the SNMP Settings fields on the right.
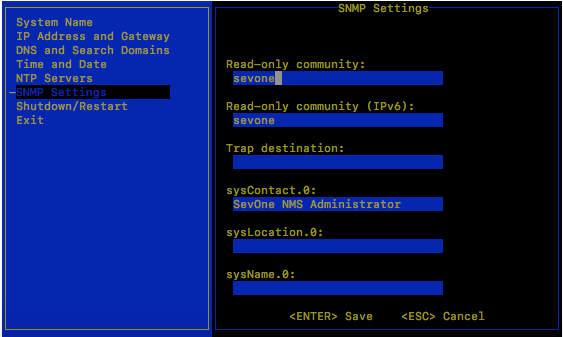
-
In the Read Only Community field, enter the SNMP read community string for other devices to use to poll SNMP data on this appliance when communicating via IPv4 and press Tab.
-
In the Read Only Community (IPv6) field, enter the SNMP read community string for other devices to use to poll SNMP data on this appliance when communicating via IPv6 and press Tab.
-
In the Trap Destination field, enter the IP address or hostname of the destination where traps this appliance generates are to be sent and press Tab.
-
In the sysContact.0 field, enter the text you get when you SNMP walk the sysContact OID and press Tab.
-
In the sysLocation.0 field, enter the text you get when you SNMP walk the sysLocation OID and press Tab.
-
In the sysName.0 field, enter the text you get when you SNMP walk the sysName OID.
-
Press Enter to save the SNMP Servers settings and to return the focus to the menu on the left.
-
-
If you changed the System Name settings or the IP Address and Gateway settings, press the down arrow to select Shutdown and Restart and press Enter to display a Shutdown option and a Reboot option on the right.
For all other configuration setting changes, you can press the down arrow to select Exit.
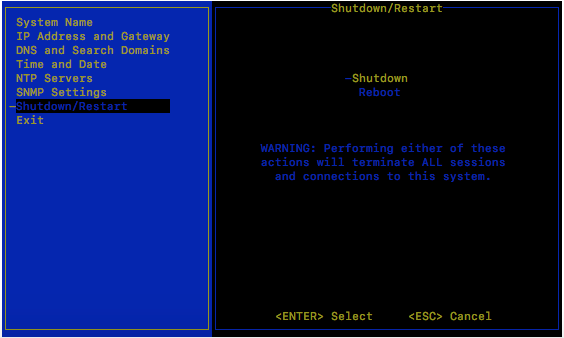
In the Shutdown/Restart section select an option and press Enter to shut down or reboot the SevOne NMS appliance.
If you select Exit, when you press Enter, the changes will be save and some services may restart and the initial Configuration Menu Welcome page appears.
You can now disconnect the monitor and keyboard.
-
In the configshell, you will see a URL. From another computer, please verify that you are able to access this URL. Also, the IP Address should match.
Firewall rules should be applied prior to testing this step.
Once you have gained access to the appliance and the appliance is part of the cluster, use SevOne-change-ip scripts instead of configshell to change the configuration of the appliance.
Installation from ISO using iDRAC
If the connection from the iDRAC to the hardware appliance is poor, loading files on the virtual media may suffer. For this case, a direct connection to the appliance is recommended.
-
The latest ISO file can be downloaded from IBM Passport Advantage ( https://www.ibm.com/software/passportadvantage/pao_download_software.html ) via Passport Advantage Online . However, if you are on a legacy / flexible SevOne contract and do not have access to IBM Passport Advantage but have an active Support contract, please contact SevOne Support Team for the file.
-
Logon to iDRAC.
-
Click the window for the virtual console on the lower-right corner to open the virtual console.
-
Click Virtual Media button.
-
Click Connect Virtual Media button.
-
Under Map CD/DVD, click Choose File button and select the ISO file obtained from IBM Passport Advantage via Passport Advantage Online or SevOne Support Team.
-
Click Map Device button.
-
Click Close button.
-
Click Boot button and select Virtual CD/DVD/ISO.
-
Click Yes button.
-
Click Power button and then, click Power On System or Power Cycle System (cold boot) if the system was already on, click the Yes button if prompted.
-
Select the product and version to install from the boot menu and allow installation to complete.
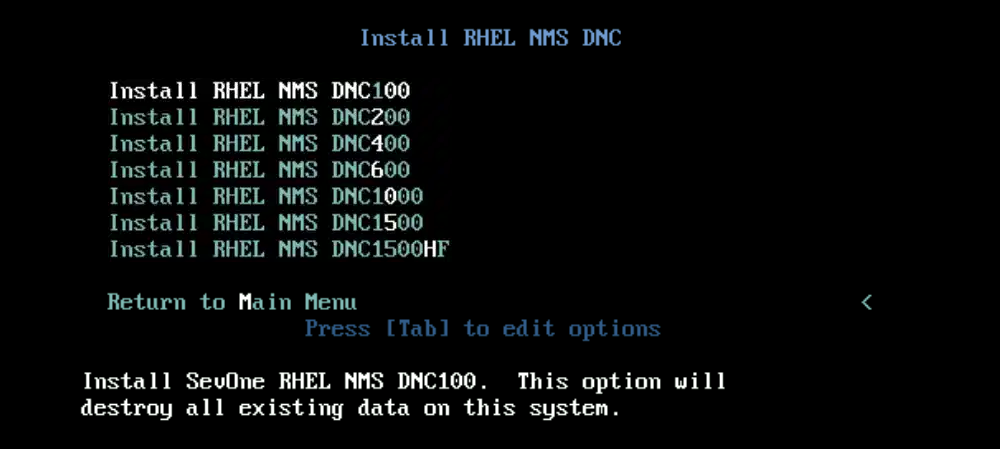
To view the list of DNC, click Install RHEL NMS DNC.
OS-level User Names and Passwords
You will need to change the default passwords for the admin, root, and support user accounts. This is important for security reasons.
Failure to change the default passwords presents a significant security risk. This publication includes default passwords and this document has probably been made available to the public.
Change Admin Password
The admin user is not used by any SevOne utilities. It exists for administrators/customers. This password should be changed on all peers. Perform the following steps to change the password for admin.
-
SSH into your SevOne NMS appliance and log in as admin.
-
At the Password prompt, enter adminuser.
login as: adminUsing keyboard-interactive authentication.Password:Using keyboard-interactive authentication.You are required to change your password immediately (root enforced)Changing passwordforadmin.(current) UNIX password: -
You will be prompted and required to change the admin user password. Enter a new password at the prompt.
-
Exit the session when you are done.
Change Root Password
SevOne NMS uses the root account for everything. This password should be changed on all peers. Perform the following steps to change the password for root.
-
SSH into your SevOne NMS appliance and log in as root.
-
At the Password prompt, enter dRum&5853.
login as: rootUsing keyboard-interactive authentication.Password:root@sevone:~ [19:39:26] $ -
Execute the following command:
$ passwdlogin as: rootUsing keyboard-interactive authentication.Password:root@sevone:~ [19:41:16] $passwdChanging passwordforuser root.New password: -
At the prompt New password, enter a new password for the root user.
-
At the prompt Retype new password, enter the new password again.
-
Exit the session when you are done.
Change Support Password
The support user is used by configshell. Configshell does not store the password for this account anywhere. You will need the password you specify here when logging in to configshell. This password should be changed on all peers. Perform the following steps to change the password for support.
-
SSH into your SevOne NMS appliance and log in as support.
-
At the Password prompt, enter supportuser.
login as: supportUsing keyboard-interactive authentication.Password:Using keyboard-interactive authentication.You are required to change your password immediately (root enforced)Changing passwordforsupport.(current) UNIX password: -
You will be prompted and required to change the support user password. Enter a new password at the prompt.
-
Exit the session when you are done.
Enable Firewall
On appliances that are running RHEL, the firewall will be disabled. This applies to both appliances with new SevOne NMS installs and appliances that were previously running CentOS, then moved to RHEL. Perform the following steps to enable the firewall.
-
SSH into the appliance as root.
-
Execute the following command to enable firewalld.
$/usr/bin/systemctlenablefirewalld -
Execute the following command to start firewalld.
$/usr/bin/systemctlstart firewalld -
Execute the following command to identify custom ports.
$netstat-tupletActive Internet connections (only servers)Proto Recv-Q Send-Q Local Address Foreign Address State User Inode PID/Programnametcp 0 0 0.0.0.0:ssh0.0.0.0:* LISTEN root 515537 70512/sshdtcp 0 0 localhost:mmcc 0.0.0.0:* LISTEN root 982646 206874/SevOne-mastetcp 0 0 0.0.0.0:https 0.0.0.0:* LISTEN root 909604 194384/nginx: mastetcp 0 0 localhost:pharos 0.0.0.0:* LISTEN root 903924 193160/messageswitctcp 0 0 localhost:ita-agent 0.0.0.0:* LISTEN root 890957 189990/SevOne-datadtcp 0 0 localhost:60123 0.0.0.0:* LISTEN root 890899 189990/SevOne-datadtcp 0 0 localhost:60124 0.0.0.0:* LISTEN root 896321 191424/SevOne-ips-ctcp 0 0 localhost:60126 0.0.0.0:* LISTEN root 898164 191872/SevOne-ocdtcp 0 0 0.0.0.0:snmp 0.0.0.0:* LISTEN root 913422 194796/snmpdtcp 0 0 localhos:xmltec-xmlmail 0.0.0.0:* LISTEN prometheus 905473 193521/pushgatewaytcp 0 0 localhost:smux 0.0.0.0:* LISTEN root 913425 194796/snmpdtcp 0 0 localhost:9095 0.0.0.0:* LISTEN root 897640 191872/SevOne-ocdtcp 0 0 localhost:cslistener 0.0.0.0:* LISTEN root 927427 197405/php-fpm: mastcp 0 0 localhost:discp-client 0.0.0.0:* LISTEN quagga 931752 198339/zebratcp 0 0 localhost:ircu-2 0.0.0.0:* LISTEN ingestion 895678 191375/SevOne-ingestcp 0 0 localhost:redis 0.0.0.0:* LISTEN redis 904778 193510/redis-servertcp 0 0 localhost:jetdirect 0.0.0.0:* LISTEN prometheus 905217 193398/node_exportetcp 0 0 localhost:nsc-posa 0.0.0.0:* LISTEN quagga 932576 198341/bgpdtcp 0 0 0.0.0.0:sunrpc 0.0.0.0:* LISTEN root 15313 1/systemdtcp 0 0 0.0.0.0:http 0.0.0.0:* LISTEN root 909602 194384/nginx: mastetcp 0 0 localhost:sgi-esphttp 0.0.0.0:* LISTEN root 564775 75973/soatcp 0 0 localhos:personal-agent 0.0.0.0:* LISTEN root 564779 75973/soatcp6 0 0 [::]:33717 [::]:* LISTEN kafka 922030 196146/javatcp6 0 0 [::]:ssh[::]:* LISTEN root 515539 70512/sshdtcp6 0 0 [::]:https [::]:* LISTEN root 909605 194384/nginx: mastetcp6 0 0 [::]:8123 [::]:* LISTEN root 31856 1592/(squid-1)tcp6 0 0 [::]:snmp [::]:* LISTEN root 913423 194796/snmpdtcp6 0 0 [::]:XmlIpcRegSvc [::]:* LISTEN kafka 928765 196146/javatcp6 0 0 localhost:eforward [::]:* LISTEN kafka 921865 195873/javatcp6 0 0 [::]:60007 [::]:* LISTEN root 899670 192260/SevOne-requetcp6 0 0 [::]:mysql [::]:* LISTEN mysql 315413 34172/mysqldtcp6 0 0 [::]:opsession-prxy [::]:* LISTEN mysql 314375 33715/mysqldtcp6 0 0 [::]:sunrpc [::]:* LISTEN root 15315 1/systemdtcp6 0 0 [::]:webcache [::]:* LISTEN restapi 951715 194898/javatcp6 0 0 [::]:http [::]:* LISTEN root 909603 194384/nginx: mastetcp6 0 0 [::]:11347 [::]:* LISTEN kafka 921342 195873/javaudp 0 0 0.0.0.0:52518 0.0.0.0:* squid 31855 1592/(squid-1)udp 0 0 localhost:40676 0.0.0.0:* root 913414 194796/snmpdudp 0 0 0.0.0.0:bootpc 0.0.0.0:* root 26792 1356/dhclientudp 0 0 0.0.0.0:sunrpc 0.0.0.0:* root 15314 1/systemdudp 0 0 0.0.0.0:ntp 0.0.0.0:* root 25007 1215/chronydudp 2176 0 0.0.0.0:snmp 0.0.0.0:* root 913415 194796/snmpdudp 0 0 0.0.0.0:snmptrap 0.0.0.0:* root 902773 193126/SevOne-trapdudp 0 0 localhost:323 0.0.0.0:* root 25005 1215/chronydudp 0 0 localhost:syslog 0.0.0.0:* root 912596 194713/syslog-ngudp 0 0 0.0.0.0:17860 0.0.0.0:* root 902769 193126/SevOne-trapdudp 0 0 0.0.0.0:palace-5 0.0.0.0:* root 898156 191805/SevOne-netfludp6 0 0 [::]:sflow [::]:* root 916463 195266/sflowtooludp6 0 0 [::]:sunrpc [::]:* root 15316 1/systemdudp6 0 0 [::]:ntp [::]:* root 25017 1215/chronydudp6 0 0 [::]:snmp [::]:* root 913421 194796/snmpdudp6 0 0 [::]:snmptrap [::]:* root 902774 193126/SevOne-trapdudp6 0 0 localhost:323 [::]:* root 25006 1215/chronydudp6 0 0 [::]:50222 [::]:* squid 31854 1592/(squid-1)udp6 0 0 [::]:13640 [::]:* restapi 915760 194898/javaudp6 0 0 [::]:palace-5 [::]:* root 898157 191805/SevOne-netfludp6 0 0 [::]:38979 [::]:* restapi 915759 194898/java -
Execute the following command to add a custom port to the firewall. Replace <portNumber> with the number of the port you want to add. Replace <connectionType> with tcp or udp.
$ firewall-cmd --zone=public --add-port=<portNumber>/<connectionType> --permanent -
Execute the following command to reload the firewall and apply changes.
$ firewall-cmd --reload -
Exit the session when you are done.
Shut Down and Reboot SevOne NMS
SevOne NMS can run for extended periods of time. Occasionally it is necessary to shutdown or reboot an appliance. SevOne NMS stores data in cache and writes to the disk on a regular basis. The following shell commands back up the memory ring tables to the database on the disk to ensure that you do not lose data.
To shutdown SevOne NMS.
$ SevOne-shutdown shutdown
To reboot SevOne NMS.
$ SevOne-shutdown rebootAppendix - Obtain/Create Boot Media
In order to perform a build / rebuild installation, you must first have bootable media with the correct NMS recovery installation files.
If your NMS hardware shipped during or since August 2016, it should have included an inserted SD card for this purpose. If this is the case, and if you have not upgraded to a more recent version of NMS, you can skip the rest of this appendix and start the Installation Steps using that SD card as your bootable media.
Otherwise, you must download a recovery installation ISO and use it to build boot media.
-
Contact SevOne Support and request a download link.
-
When you receive your download link, click it and download the ISO file. (NOTE: Download links expire and must be used within 24 hours of sending.)
-
Create bootable media from this ISO. (Please see the grid below for instructions by media type and OS)
RHEL_NMS_v6.8.0.iso - if x = 8 and y = 0, version is for SevOne NMS 6.8.0 release. Please obtain the latest file from IBM Passport Advantage via Passport Advantage Online o r SevOne Support Team .
|
Medium |
OS |
How to create bootable from ISO... |
|
|
USB |
Windows |
Make sure you select the right device from the device drop down. |
|
|
Mac |
Command Line |
diskutil and dd diskutil
$ diskutil list/dev/disk0 (internal, physical): #: TYPE NAME SIZE IDENTIFIER 0: GUID_partition_scheme *121.3 GB disk0 1: EFI EFI 209.7 MB disk0s1 2: Apple_HFS Macintosh HD 120.5 GB disk0s2 3: Apple_Boot Recovery HD 650.0 MB disk0s3 /dev/disk1 (external, physical): #: TYPE NAME SIZE IDENTIFIER 0: NONAME *8.0 GB disk1 $ diskutil unmountDisk /dev/disk1 Unmount of all volumes on disk1 was successfulDo not destroy your OS!
Make sure you get the right device from diskutil list. If you dd
$ sudo dd if=RHEL_NMS_v<6.x.y version>.iso of=/dev/rdisk[DISKNUMBER] bs=1m &Raw paths!
If your disk is located at /dev/disk2, make sure you use of=/dev/ rdisk2 .
|
|
|
User Interface |
|
Make sure you select the right device from the device drop down. |
|
|
Linux |
|
Use Startup Disk Creator, Disks, Disk Utility, or dd
Make sure you get the right device from dmesg. If you enter dd
dd if=RHEL_NMS_v<6.x.y version>.iso of=/dev/YourUsbDevice &while $(kill -USR1 $!);do sleep 1;done |
|
|
DVD |
Windows |
|
Right click RHEL_NMS_v<6.x.y version>.iso -> Burn Disc Image OR
Right click
RHEL_NMS_v<6.x.y version>.iso
-> Open With... -> |
|
Mac |
|
Select the ISO file in Finder, and choose |
|
|
Linux |
|
Right-click the ISO file and use Brasero or any other DVD writing utility. |
|