Table of Contents (Start)
- Topics
- Introducing SevOne
- Login
- Startup Wizard
- Dashboard
- Global Search - Advanced Search
- Report Manager
- Report Attachment Wizard
- Report Properties
- Report Interactions
- Instant Graphs
- TopN Reports
- Alerts
- Alert Archives
- Alert Summary
- Instant Status
- Status Map Manager
- Edit Maps
- View Maps
- FlowFalcon Reports
- NBAR Reports
- Logged Traps
- Unknown Traps
- Trap Event Editor
- Trap Destinations
- Trap Destination Associations
- Policy Browser
- Create and Edit Policies
- Webhook Definition Manager
- Threshold Browser
- Create and Edit Thresholds
- Probe Manager
- Discovery Manager
- Device Manager
- New Device
- Edit Device
- Object Manager
- High Frequency Poller
- Device Summary
- Device Mover
- Device Groups
- Object Groups
- Object Summary
- Object Rules
- VMware Browser
- AWS Plugin
- Azure Plugin (Public Preview)
- Calculation Plugin
- Database Manager
- Deferred Data Plugin
- DNS Plugin
- HTTP Plugin
- ICMP Plugin
- IP SLA Plugin
- JMX Plugin
- NAM
- NBAR Plugin
- Portshaker Plugin
- Process Plugin
- Proxy Ping Plugin
- SDWAN Plugin
- SNMP Plugin
- VMware Plugin
- Web Status Plugin
- WMI Plugin
- xStats Plugin
- Indicator Type Maps
- Device Types
- Object Types
- Object Subtype Manager
- Calculation Editor
- xStats Source Manager
- User Role Manager
- User Manager
- Session Manager
- Authentication Settings
- Preferences
- Cluster Manager
- Maintenance Windows
- Processes and Logs
- Metadata Schema
- Baseline Manager
- FlowFalcon View Editor
- Map Flow Objects
- FlowFalcon Views
- Flow Rules
- Flow Interface Manager
- MPLS Flow Mapping
- Network Segment Manager
- Flow Protocols and Services
- xStats Log Viewer
- SNMP Walk
- SNMP OID Browser
- MIB Manager
- Work Hours
- Administrative Messages
- Enable Flow Technologies
- Enable JMX
- Enable NBAR
- Enable SNMP
- Enable Web Status
- Enable WMI
- IP SLA
- SNMP
- SevOne Data Publisher
- Quality of Service
- Perl Regular Expressions
- Trap Revisions
- Integrate SevOne NMS With Other Applications
- Email Tips and Tricks
- SevOne NMS PHP Statistics
- SevOne NMS Usage Statistics
- Glossary and Concepts
- Map Flow Devices
- Trap v3 Receiver
- Guides
- Quick Start Guides
- AWS Quick Start Guide
- Azure Quick Start Guide (Public Preview)
- Data Miner Quick Start Guide
- Flow Quick Start Guide
- Group Aggregated Indicators Quick Start Guide
- IP SLA Quick Start Guide
- JMX Quick Start Guide
- Metadata Quick Start Guide
- RESTful API Quick Start Guide
- Self-monitoring Quick Start Guide
- SevOne NMS Admin Notifications Quick Start Guide
- SNMP Quick Start Guide
- Synthetic Indicator Types Quick Start Guide
- Topology Quick Start Guide
- VMware Quick Start Guide
- Web Status Quick Start Guide
- WMI Quick Start Guide
- xStats Quick Start Guide
- xStats Adapter - Accedian Vision EMS (TM) Quick Start Guide
- Deployment Guides
- Automated Build / Rebuild (Customer) Instructions
- Generate a Self-Signed Certificate or a Certificate Signing Request
- SevOne Best Practices Guide - Cluster, Peer, and HSA
- SevOne Data Platform Security Guide
- SevOne NMS Implementation Guide
- SevOne NMS Installation Guide - Virtual Appliance
- SevOne NMS Advanced Network Configuration Guide
- SevOne NMS Installation Guide
- SevOne NMS Port Number Requirements Guide
- SevOne NMS Upgrade Process Guide
- SevOne Physical Appliance Pre-Build BIOS and RAID Configuration Guide
- SevOne SAML Single Sign-On Setup Guide
- Cloud Platforms
- Other Guides
- Quick Start Guides
SevOne NMS Upgrade Process Guide
SevOne Documentation
All documentation is available from the IBM SevOne Support customer portal.
© Copyright International Business Machines Corporation 2024.
All right, title, and interest in and to the software and documentation are and shall remain the exclusive property of IBM and its respective licensors. No part of this document may be reproduced by any means nor modified, decompiled, disassembled, published or distributed, in whole or in part, or translated to any electronic medium or other means without the written consent of IBM.
IN NO EVENT SHALL IBM, ITS SUPPLIERS, NOR ITS LICENSORS BE LIABLE FOR ANY DAMAGES, WHETHER ARISING IN TORT, CONTRACT OR ANY OTHER LEGAL THEORY EVEN IF IBM HAS BEEN ADVISED OF THE POSSIBILITY OF SUCH DAMAGES, AND IBM DISCLAIMS ALL WARRANTIES, CONDITIONS OR OTHER TERMS, EXPRESS OR IMPLIED, STATUTORY OR OTHERWISE, ON SOFTWARE AND DOCUMENTATION FURNISHED HEREUNDER INCLUDING WITHOUT LIMITATION THE WARRANTIES OF DESIGN, MERCHANTABILITY OR FITNESS FOR A PARTICULAR PURPOSE, AND NONINFRINGEMENT.
IBM, the IBM logo, and SevOne are trademarks or registered trademarks of International Business Machines Corporation, in the United States and/or other countries. Other product and service names might be trademarks of IBM or other companies. A current list of IBM trademarks is available on ibm.com/trademark.
About
If you are performing an upgrade, you may use SevOne's Self-Service Upgrade tool. For details, please refer to section using Self-Service Upgrade .
SevOne NMS 6.8 has migrated from CentOS 8 Stream to RHEL 8.9
Upgrade to SevOne NMS 6.8.x - when performing an upgrade to SevOne NMS 6.8.x, you must be on SevOne NMS 6.7.x. If you have SevOne NMS prior to version 6.7.0, you must first upgrade to SevOne NMS 6.7.x before continuing with an upgrade to SevOne NMS 6.8.x.
Downgrade from SevOne NMS 6.8.x - can only downgrade to the SevOne NMS 6.7.x version you upgraded from. For example,
-
if you upgraded from SevOne NMS 6.7.0 to SevOne NMS 6.8.x and now would like to downgrade, you will downgrade back to SevOne NMS 6.7.0.
-
if you upgraded from SevOne NMS 6.7.2 to SevOne NMS 6.8.x and now would like to downgrade, you will downgrade back to SevOne NMS 6.7.2.
-
assume you have upgraded from SevOne NMS 6.7.2 to SevOne NMS 6.8.0 and then, you have upgraded again from SevOne NMS 6.8.0 to SevOne NMS 6.8.1. If you need to downgrade, you can downgrade from SevOne NMS 6.8.1 to SevOne NMS 6.8.0 only. Downgrading to SevOne NMS 6.7.2 is not possible - this is because the system does a backup during each upgrade. When the user upgrades from SevOne NMS 6.7.2 to SevOne NMS 6.8.0, a backup is created for SevOne NMS 6.7.2 in /opt directory ( for non-Openstack cluster) and in /data/upgrade directory (for Openstack cluster). Now, if the user does another upgrade from SevOne NMS 6.8.0 to SevOne NMS 6.8.1, a backup is created for SevOne NMS 6.8.0 and the backup originally created for SevOne NMS 6.7.2 is lost. In this scenario, you will not be able to backup from SevOne NMS 6.8.1 to SevOne NMS 6.8.0 to SevOne NMS 6.7.2. Only downgrade to SevOne NMS 6.8.0 is possible in this scenario.
You must first upgrade to SevOne NMS 6.7.x before upgrading to SevOne NMS 6.8.x. For upgrade details, please refer to SevOne NMS Upgrade Process Guide for version <= 6.7.0.
SevOne NMS 6.8.x requires Red Hat Enterprise Linux (RHEL) 8.9.
When upgrading from SevOne NMS 6.7.x to SevOne NMS 6.8.x, the upgrade process automatically upgrades the environment from CentOS 8 Stream to RHEL 8.9 using the Command Line Interface. If you encounter any problems during the upgrade, please contact SevOne Support.
Starting SevOne NMS 6.1.0, SevOne stores backups of installed hot-patch bundles in /opt/patches.
/opt/patches is a reserved directory; please refrain from making any modifications.
This document provides details on how to upgrade/downgrade using:
-
Command Line Interface - please refer to section using Command Line Interface to Upgrade.
-
Self-Service Upgrades - please refer to section using Self-Service Upgrade.
Self-Service Upgrades-
For Self Service Upgrades, SevOne requests the customer to raise a proactive ticket to make SevOne Support aware that the customer will be performing this. By doing this, SevOne Support can assist the customer with the upgrade preparation and readiness.
-
If there are Solutions such as SD-WAN, WiFi, and SDN present on your cluster, then please check the product Compatibility Matrix on SevOne Support Customer Portal before proceeding with the upgrade.
-
For add-ons/customizations, please engage SevOne's Platform Services team before the upgrade.
-
If you are running SevOne Data Insight and you encounter the SOA check rpm error during post-checks, you may ignore the reported error. However, if you see the error during pre-checks, please contact SevOne Support.
-
For all platforms, if / is greater than 80GB, then 45GB of free disk space is required.
In addition to this,
-
on a cluster without Openstack,
-
free disk space on / must be greater than 20GB.
-
-
on a cluster with Openstack,
-
free disk space on /data must be greater than 20GB.
-
In this guide if there is,
-
[any reference to master] OR
-
[[if a CLI command contains master] AND/OR
-
[its output contains master]],
it means leader.
And, if there is any reference to slave, it means follower.
Execute the following steps when there is a
potential IP address overlap between the customer's network and SevOne's Docker IP address range 172.17.0.0/16.
$ vi /etc/docker/daemon.json{ "bip": "172.17.0.1/24"}$ systemctl restart docker
Ansible can be utilized to upgrade SevOne NMS. Please make a request on SevOne Support Portal for the latest forward / reverse migration tarball files along with the signature tools required for the upgrade.
-
all the required ports are open. Please refer to SevOne NMS Port Number Requirements Guide for details.
-
you have the required CPUs, total vCPU cores, RAM (GB), Hard Drives, etc. based on SevOne NMS Installation Guide - Virtual Appliance > section Hardware Requirements.
Due to technology advancements, resource requirements may change.
Performing a SevOne NMS version upgrade on a virtual machine deployment means that the deployment on the virtual machine was done on a prior SevOne NMS version. As such, the current virtual machine's hardware specifications would be on SevOne NMS version the virtual machine that was previously deployed on or upgraded to. If the target SevOne NMS version of this upgrade has different hardware specifications than the current configuration on the virtual machine, it is important that the hardware resources are aligned prior to the upgrade based on the current documented requirements of target version of SevOne NMS upgrade.
For example, SevOne NMS 5.7.2.7 had 50GB as / (root) partition requirement. Let's assume your virtual machine is currently on SevOne NMS 5.7.2.7 and you want to upgrade to the target SevOne NMS version where the / (root) partition requirement has changed to 150GB. Because of / (root) partition requirement change, you will have to increase the disk size on the / (root) partition of your virtual machine to 150GB before performing the SevOne NMS upgrade.
If CPUs, total vCPU cores, and RAM (GB) do not match the target version requirements, please discuss with your infrastructure team to align the resources required for your virtual machine.
If the Hard Disk space requires an increase to align with SevOne NMS' target version requirements, the following must be considered.
-
contact your infrastructure team to increase the disk space on your virtual machine at the hypervisor end.
-
once the disk space has been resized successfully at the hypervisor level, before starting the upgrade, the following procedure must be completed with instructions in section FAQs > How to expand a Logical Volume? below.
If your virtual machine has any custom requirements/specifications higher than the documented specifications in SevOne NMS Installation Guide - Virtual Appliance > section Hardware Requirements, please contact your Technical Account Manager to discuss the details of your custom requirements.
-
using Command Line Interface to Upgrade
Upgrade Steps
As of SevOne NMS 6.5.0, if your flow template contains field 95, then you will see the following name changes in the flow template.
|
Field # |
Pre-existing Field Name |
New Field Name |
|
95 |
Application Tag |
Application ID |
|
45010 |
Engine ID-1 |
Application Engine ID |
|
45011 |
Application ID |
Application Selector ID |
-
Using ssh, log in to SevOne NMS appliance (Cluster Leader of SevOne NMS cluster) as root.
$sshroot@<NMS appliance> -
Check the version your NMS appliance is running on. For example, the output below indicates that your NMS appliance is on SevOne NMS 6.7.0. To proceed with the upgrade to SevOne NMS 6.8.x, you must be on SevOne NMS 6.7.x.
Example$ SevOne-show-versionSevOne version: 6.7.0kernel version: 4.18.0-499.el8.x86_64#1 SMP Thu Jun 22 12:08:06 UTC 2023nginx version: 0.0.0MySQL version: 10.6.12-MariaDBPHP version: 8.1.24SSH/SSLversion: OpenSSH_8.0p1, OpenSSL 1.1.1k FIPS 25 Mar 2021REST API version: 2.1.46, Buildtime2023-11-03T02:08:30+0000, Hash 5f7c534Hardware Serial Number: VMware-42Intel(R) Xeon(R) CPU2 cores @ 2199.998MHz8GB RAM33GB SWAP498 GB / PartitionIf Openstack cluster,$mkdir/data/upgrade$cd/data/upgrade -
Verify the OS version. Confirm that version is CentOS 8 Stream. As you are currently on SevOne NMS 6.7.0, your operating system must be CentOS 8 Stream.
$cat/etc/redhat-releaseCentOS Stream release 8 -
Using scp, copy the signature tools checksum file (signature-tools-<latest version>-build.<###>.tgz.sha256.txt) received from SevOne to /opt directory. For example, s ignature-tools-2.0.2-build.1.tgz.sha256.txt.
-
Using scp, copy the signature tools file (signature-tools-<latest version>-build.<###>.tgz) received from SevOne to /opt directory. For example, s ignature-tools-2.0.2-build.1.tgz.
-
Verify the signature tools checksum file from /opt directory.
$cd/opt$ sha256sum --check signature-tools-<latest version>-build.<###>.tgz.sha256.txtExample$ sha256sum --check signature-tools-v2.0.2-build.1.tgz.sha256.txt -
Extract the signature tools tar file.
$tar-xzvf signature-tools-<latest version>-build.<###>.tgz -C /Example$tar-xzvf signature-tools-v2.0.2-build.1.tgz -C / -
Using scp, copy the forward tarball file (<forward SevOne NMS tarball>.tar.gz) received from SevOne to /opt directory but if Openstack, to /data/upgrade. For example, tarball file for SevOne NMS 6.8.0.
-
Using scp, copy the checksum file (<SevOne NMS>.sha256.txt) received from SevOne to /opt directory. However, if Openstack, to /data/upgrade directory.
-
Change directory.
not Openstack$cd/optfor Openstack$cd/data/upgrade -
(optional) Validate the signature for the forward tarball.
$ SevOne-validate-image -i v6.8.0-build<###>.tar.gz -s v6.8.0-build<###>.tar.gz.sha256.txtExample: if valid & trusted certificate is used,$ SevOne-validate-image -i v6.8.0-build19.tar.gz -s v6.8.0-build19.tar.gz.sha256.txtImage signed by SevOne Release on Mon, 05 Feb 2024 12:29:16 +0000.The certificate is trusted.Certificate subject=commonName = International Business Machines CorporationorganizationalUnitName = IBM CCSSorganizationName = International Business Machines CorporationlocalityName = ArmonkstateOrProvinceName = New YorkcountryName = USCertificate issuer=commonName = DigiCert Trusted G4 Code Signing RSA4096 SHA384 2021 CA1organizationName = DigiCert, Inc.countryName = USINFO: Checking the signature of the imageThe image can be installed.Please contact SevOne Support Team if the certificate is not trusted or the signature does not match.
-
Validate the signature and install the forward tarball.
If you want to upgrade using the self-service upgrade, please refer to section using Self-Service Upgrade. Else, continue.
$ SevOne-validate-image -i v6.8.0-build<###>.tar.gz -s v6.8.0-build<###>.tar.gz.sha256.txt \--installer nmsExample$ SevOne-validate-image -i v6.8.0-build19.tar.gz -s v6.8.0-build19.tar.gz.sha256.txt \--installer nmsIt can take ~60 - 75 minutes to perform the upgrade - please wait until it completes and you see something similar to the following.
Example......... cleanup : Remove nmsUpgradeRepo ------------------------------------------------------------------------------------------------------------------------- 0.89scleanup : ChecksymlinkfornmsDowngradeRepo ------------------------------------------------------------------------------------------------------------ 0.63scleanup : Remove dereferencedsymlink------------------------------------------------------------------------------------------------------------------- 0.03scleanup : Remove nmsDowngradeRepo ----------------------------------------------------------------------------------------------------------------------- 0.63scleanup : Copy ansible.cnf to other appliances ---------------------------------------------------------------------------------------------------------- 0.02scleanup : Upgrade: Remove the flagfileforAWS metadata namespaces checkifupgrading to 6.5.0 or higher ----------------------------------------------- 0.03scleanup : Upgrade: Remove the flagfileforAWS metadata namespaces checkifupgrading to 6.6.0 or higher ----------------------------------------------- 0.02scleanup : Downgrade: Remove aws-nms-collector containers (NMS-80065) ------------------------------------------------------------------------------------ 0.01scleanup : Downgrade: Remove AWS-related metadata namespaces and attributes (NMS-80065) ------------------------------------------------------------------ 0.01scleanup : Downgrade: Remove AWS-related metadata mappingsin6.6.0 -------------------------------------------------------------------------------------- 0.01scleanup : Downgrade: Remove AWS-related metadata namespaces and attributesin6.6.0 --------------------------------------------------------------------- 0.01scleanup : Checkifpackage compat-openssl10 is present and remove it ------------------------------------------------------------------------------------ 2.23scleanup : Clean out upgrade/downgradedirectories from/optand the package lists ----------------------------------------------------------------------- 5.05scleanup : Clean up mariadb temporary files -------------------------------------------------------------------------------------------------------------- 0.03scleanup : Clean up mysql temporary files ---------------------------------------------------------------------------------------------------------------- 0.03scleanup : Clean up RHEL upgrade temporary files --------------------------------------------------------------------------------------------------------- 0.64sTurning on SevOne-masterslaved after the upgrade has finished ------------------------------------------------------------------------------------------- 5.35sLet cluster_state table know upgrade has finished ------------------------------------------------------------------------------------------------------- 0.02sRemove hosts.inifile----------------------------------------------------------------------------------------------------------------------------------- 0.61sAdd upgrade entryinnms_upgrade_history tableindatabase ---------------------------------------------------------------------------------------------- 0.03s===============================================================================root@sevone:/opt/ansible[6.7.0] [04:01:45] $Option --installer-opts allows flags to be passed to the installer. The following options are case-sensitive parameters. If more than one flag/parameter is passed, you must pass them in single / double-quotes.
IMPORTANT: For pre-upgrade flags -e and -f,Flag -e can be added to option --installer-opts to skip the pre-upgrade errors.
Flag -f can be added to option --installer-opts to skip the pre-upgrade checks and to force the install.
However, there are certain pre-checks that do not get skipped even if -e or -f flag is passed. For example, when performing an upgrade, your current SevOne NMS version must be a version that is prior to the SevOne NMS version you are upgrading to. Otherwise, you will get 'Starting version of NMS should be less than the forward version of NMS.' message.
-
-a: Avoid playbook tags to run.
-
-c: Prevents hosts.ini from being automatically regenerated. If this flag is not passed as an option, hosts.ini will be automatically regenerated.
-
-e: Skip pre-upgrade errors if found, applicable only when run WITHOUT -f option.
-
-f: Skip pre-upgrade checks and force install.
-
-n: Don't start in a screen session. Used for automated builds.
-
-s: Run the upgrade without the UI logger.
-
-x: Run pre-upgrade checks with --hub-spoke-network option.
-
-h: Show this help.
For example,
To run the upgrade by skipping pre-upgrade checks all together,$ SevOne-validate-image -i v6.8.0-build<###>.tar.gz -s v6.8.0-build<###>.tar.gz.sha256.txt \--installer nms --installer-opts -fExample$ SevOne-validate-image -i v6.8.0-build19.tar.gz -s v6.8.0-build19.tar.gz.sha256.txt \--installer nms --installer-opts -fTo run the upgrade with the hub-spoke flag,$ SevOne-validate-image -i v6.8.0-build<###>.tar.gz -s v6.8.0-build<###>.tar.gz.sha256.txt \--installer nms --installer-opts -xExample$ SevOne-validate-image -i v6.8.0-build19.tar.gz -s v6.8.0-build19.tar.gz.sha256.txt \--installer nms --installer-opts -x-
The installer starts a screen session named ansible-{version} .
The screen session on the terminal must not be detached as the ongoing process is in the memory and packages may no longer be available on the appliance during the upgrade.
After the ansible-playbook execution completes in the screen, you must exit the screen session.
Using a separate ssh connection to the boxes while upgrading, may show some PHP / other warnings on the terminal. SevOne recommends you to wait until after the upgrade process completes successfully.
-
Packages on all peers / hosts are updated at the same time. [tag: prepare_rpm, install_rpm, docker_setup]
-
Database migrations are run on the clustermaster (mysqlconfig and mysqldata) and active peers (mysqldata only). [tag: database]
-
System patches are run on all peers at the same time. [tag: systempatches]
-
Cleanup actions on all hosts is performed last. [tag: cleanup]
-
SevOne NMS 6.7.0 is installed on your machine.
Upgrade opens a TUI (Text-based User Interface) or Terminal User Interface window which splits the progress into 3 columns.
If you are unable to interact with the screen session, you must still be able to view the progress in the Column 1. Allow the upgrade to complete.
-
Column 1: Host panel - shows the progress per host.
-
Column 2: Tasks panel - shows the tasks being executed.
-
Column 3: Logs panel - shows the logs associated with each task.
FYI-
Press F1 to show / hide HELP.
-
Ctrl+C - kills ansible execution.
To navigate between panel / column, press:
-
1 - to select Column 1 (Host panel)
-
2 - to select Column 2 (Tasks panel)
-
3 - to select Column 3 (Logs panel)
-
up arrow - to move cursor / log up
-
down arrow - to move cursor / log down
-
left arrow - to move cursor / log left
-
right arrow - to move cursor / log right
To detach from screen mode, Ctrl+A followed by the letter d. To attach to the screen mode, enter screen r.
Upgrade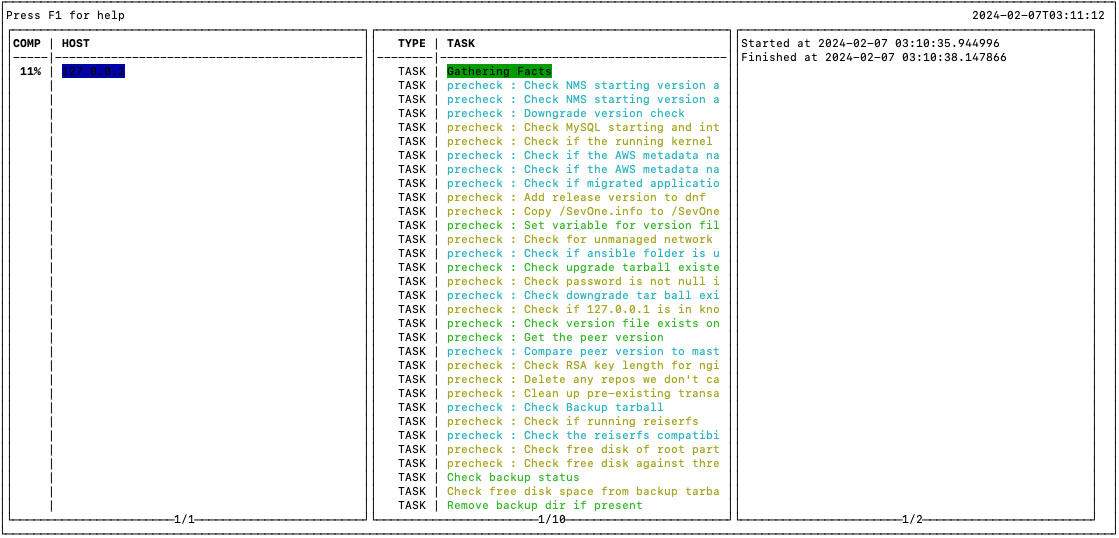 Click on F1 to show the HELP menu in the logger
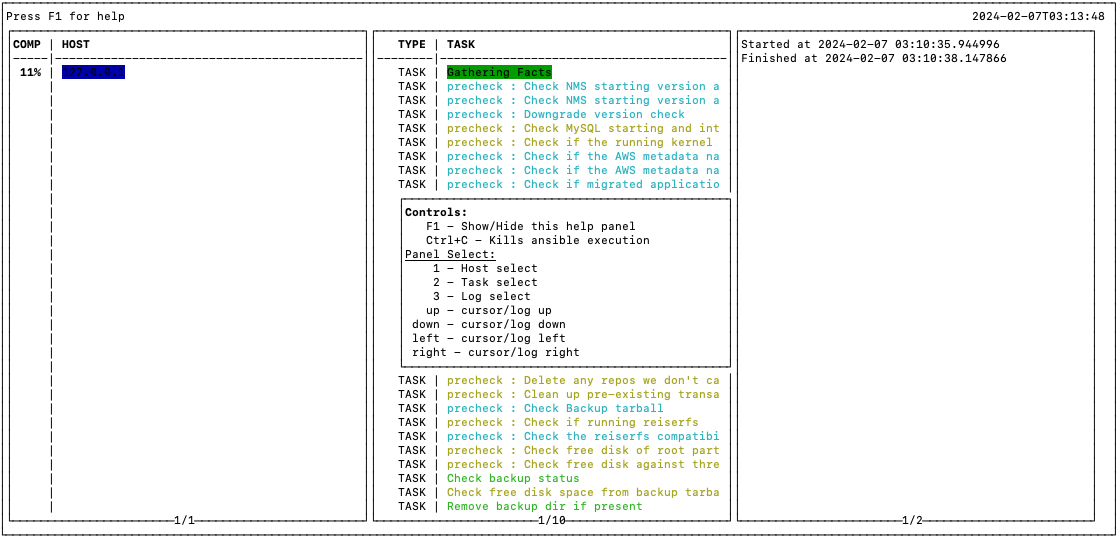
-
-
-
-
After successfully upgrading to SevOne NMS 6.8.x, check the version to ensure that you are on SevOne NMS 6.8.x. i.e., SevOne NMS 6.8.0 as shown in the example below.
Example$ SevOne-show-versionSevOne version: 6.8.0kernel version: 4.18.0-499.el8.x86_64#1 SMP Thu Jun 22 12:08:06 UTC 2023nginx version: 0.0.0MySQL version: 10.6.12-MariaDBPHP version: 8.1.27SSH/SSLversion: OpenSSH_8.0p1, OpenSSL 1.1.1k FIPS 25 Mar 2021REST API version: 2.1.47, Buildtime2024-02-05T08:20:05+0000, Hash 3dd4faaHardware Serial Number: VMware-42Intel(R) Xeon(R) CPU2 cores @ 2199.997MHz8GB RAM33GB SWAP498 GB / Partition
For post-Upgrade steps, please refer to section post-Upgrade Steps below.
using Command Line Interface to Downgrade
Downgrade Steps
-
Using ssh, log in to SevOne NMS appliance (Cluster Leader of SevOne NMS cluster) as root.
$sshroot@<NMS appliance> -
Confirm that NMS appliance is running version SevOne NMS 6.8.x. i.e., SevOne NMS 6.8.0 as shown in the example below.
Example$ SevOne-show-versionSevOne version: 6.8.0kernel version: 4.18.0-499.el8.x86_64#1 SMP Thu Jun 22 12:08:06 UTC 2023nginx version: 0.0.0MySQL version: 10.6.12-MariaDBPHP version: 8.1.27SSH/SSLversion: OpenSSH_8.0p1, OpenSSL 1.1.1k FIPS 25 Mar 2021REST API version: 2.1.47, Buildtime2024-02-05T08:20:05+0000, Hash 3dd4faaHardware Serial Number: VMware-42Intel(R) Xeon(R) CPU2 cores @ 2199.997MHz8GB RAM33GB SWAP498 GB / Partitionif Openstack cluster,$mkdir/data/downgrade$cd/data/downgrade -
Verify the OS version. Confirm that version is Red Hat Enterprise Linux .
$cat/etc/redhat-releaseRed Hat Enterprise Linux release 8.9 (Ootpa) -
Using scp, copy the signature tools checksum file (signature-tools-<latest version>-build.<###>.tgz.sha256.txt) received from SevOne to /opt directory. For example, s ignature-tools-2.0.2-build.1.tgz.sha256.txt.
-
Using scp, copy the signature tools file (signature-tools-<latest version>-build.<###>.tgz) received from SevOne to /opt directory. For example, s ignature-tools-2.0.2-build.1.tgz.
-
Verify the signature tools checksum file.
$ sha256sum --check signature-tools-<latest version>-build.<###>.tgz.sha256.txtExample$ sha256sum --check signature-tools-v2.0.2-build.1.tgz.sha256.txt -
Extract the signature tools tar file to /opt directory.
$tar-xzvf signature-tools-<latest version>-build.<###>.tgz -C /Example$tar-xzvf signature-tools-v2.0.2-build.1.tgz -C / -
Using scp, copy the reverse tarball file (<reverse SevOne NMS tarball>.tar.gz) received from SevOne to /opt directory but if Openstack, to /data/upgrade. For example, tarball file for SevOne NMS 6.7.<x>.
<x> must be the version of SevOne 6.7 from which the upgrade to SevOne NMS 6.8.x was performed. For example, if upgrade was done from SevOne NMS 6.7.2 to SevOne NMS 6.8.0, to downgrade you will need the tarball for SevOne NMS 6.7.2.
-
Using scp, copy the checksum file (<reverse SevOne NMS tarball>.sha256.txt) received from SevOne to /opt directory. However, if Openstack, to /data/upgrade directory.
-
Change directory.
not Openstack$cd/optfor Openstack$cd/data/downgrade -
(optional) Validate the signature for the reverse tarball.
$ SevOne-validate-image -i v6.8.0-to-v6.7.0-build<###>.tar.gz -s v6.8.0-to-v6.7.0-build<###>.tar.gz.sha256.txtExample$ SevOne-validate-image -i v6.8.0-to-v6.7.0-build19.tar.gz -s v6.8.0-to-v6.7.0-build19.tar.gz.sha256.txtINFO: Extracting code-signing certificates from imagefile...Image signed by SevOne Release on Mon, 05 Feb 2024 11:43:50 +0000.The certificate is trusted.Certificate subject=commonName = International Business Machines CorporationorganizationalUnitName = IBM CCSSorganizationName = International Business Machines CorporationlocalityName = ArmonkstateOrProvinceName = New YorkcountryName = USCertificate issuer=commonName = DigiCert Trusted G4 Code Signing RSA4096 SHA384 2021 CA1organizationName = DigiCert, Inc.countryName = USINFO: Checking the signature of the imageThe image can be installed.IMPORTANTWhen downgrading from SevOne NMS 6.8.x, you can only downgrade to SevOne NMS 6.7.x version you upgraded from.
-
Before starting the downgrade, c lean up the /opt directory (for non-Openstack) or /data directory (for Openstack), especially the installRPM.tar file and the ansible folder.
not Openstack$rm/opt/installRPMs.tar$rm-rf/opt/ansiblefor Openstack$rm/data/installRPMs.tar$rm-rf/data/downgrade/ansible -
Validate the signature and install the reverse tarball.
$ SevOne-validate-image -i v6.8.0-to-v6.7.0-build<###>.tar.gz -s v6.8.0-to-v6.7.0-build<###>.tar.gz.sha256.txt \--installer reverseExample$ SevOne-validate-image -i v6.8.0-to-v6.7.0-build19.tar.gz -s v6.8.0-to-v6.7.0-build19.tar.gz.sha256.txt \--installer reverseIt can take ~30 - 35 minutes to perform the downgrade - please wait until it completes and you see something similar to the following.
Example.........cleanup : Remove nmsDowngradeRepo ----------------------------------------------------------------------------------------------------------------------- 0.61scleanup : Copy ansible.cnf to other appliances ---------------------------------------------------------------------------------------------------------- 0.02scleanup : Upgrade: Remove the flagfileforAWS metadata namespaces checkifupgrading to 6.5.0 or higher ----------------------------------------------- 0.03scleanup : Upgrade: Remove the flagfileforAWS metadata namespaces checkifupgrading to 6.6.0 or higher ----------------------------------------------- 0.02scleanup : Downgrade: Remove aws-nms-collector containers (NMS-80065) ------------------------------------------------------------------------------------ 0.02scleanup : Downgrade: Remove AWS-related metadata namespaces and attributes (NMS-80065) ------------------------------------------------------------------ 0.02scleanup : Downgrade: Remove AWS-related metadata mappingsin6.6.0 -------------------------------------------------------------------------------------- 0.02scleanup : Downgrade: Remove AWS-related metadata namespaces and attributesin6.6.0 --------------------------------------------------------------------- 0.02scleanup : Checkifpackage compat-openssl10 is present and remove it ------------------------------------------------------------------------------------ 0.02scleanup : Clean out upgrade/downgradedirectories from/optand the package lists ----------------------------------------------------------------------- 4.75scleanup : Clean up mariadb temporary files -------------------------------------------------------------------------------------------------------------- 0.02scleanup : Clean up mysql temporary files ---------------------------------------------------------------------------------------------------------------- 0.02scleanup : Clean up RHEL upgrade temporary files --------------------------------------------------------------------------------------------------------- 0.02sTurning on SevOne-masterslaved after the upgrade has finished ------------------------------------------------------------------------------------------- 5.32sLet cluster_state table know downgrade has finished ----------------------------------------------------------------------------------------------------- 0.02sRemove hosts.inifile----------------------------------------------------------------------------------------------------------------------------------- 0.59s===============================================================================root@sevone:/opt/ansible[6.8.0] [04:20:52] $Option --installer-opts allows flags to be passed to the installer. The following options are case-sensitive parameters. If more than one flag/parameter is passed, you must pass them in single / double-quotes.
-
-a: Avoid playbook tags to run.
-
-e: Skip pre-upgrade errors if found, applicable only when run WITHOUT -f option.
-
-f: Skip pre-upgrade checks and force install.
-
-n: Don't start in a screen session. Used for automated builds.
-
-s: Run the upgrade without the UI logger.
-
-x: Run pre-upgrade checks with --hub-spoke-network option.
-
-h: Show this help.
For example,
To run the downgrade by skipping pre-upgrade checks all together,$ SevOne-validate-image -i v6.8.0-to-v6.7.0-build<###>.tar.gz -s v6.8.0-to-v6.7.0-build<###>.tar.gz.sha256.txt \--installer reverse --installer-opts -fExample$ SevOne-validate-image -i v6.8.0-to-v6.7.0-build19.tar.gz -s v6.8.0-to-v6.7.0-build19.tar.gz.sha256.txt \--installer reverse --installer-opts -fTo run the downgrade with the hub-spoke flag,$ SevOne-validate-image -i v6.8.0-to-v6.7.0-build<###>.tar.gz -s v6.8.0-to-v6.7.0-build<###>.tar.gz.sha256.txt \--installer reverse --installer-opts -xExample$ SevOne-validate-image -i v6.8.0-to-v6.7.0-build19.tar.gz -s v6.8.0-to-v6.7.0-build19.tar.gz.sha256.txt \--installer reverse --installer-opts -xTo run the downgrade by skipping pre-upgrade check errors,$ SevOne-validate-image -i v6.8.0-to-v6.7.0-build<###>.tar.gz -s v6.8.0-to-v6.7.0-build<###>.tar.gz.sha256.txt \--installer reverse --installer-opts -eExample$ SevOne-validate-image -i v6.8.0-to-v6.7.0-build19.tar.gz -s v6.8.0-to-v6.7.0-build19.tar.gz.sha256.txt \--installer reverse --installer-opts -e-
The installer starts a screen session named ansible-{version}.
The screen session on the terminal must not be detached as the ongoing process is in the memory and packages may no longer be available on the appliance during the downgrade.
After the ansible-playbook execution completes in the screen, you must exit the screen session.
Using a separate ssh connection to the boxes while downgrading, may show some PHP / other warnings on the terminal. SevOne recommends you to wait until after the downgrade process completes successfully.
-
If you are downgrading from SevOne NMS 6.8.x to SevOne NMS 6.7.x, the o perating system is downgraded from R ed Hat Enterprise Linux to CentOS 8 Stream. Otherwise, this step is skipped. [tag: os_downgrade]
When downgrading the operating system from CentOS 8 Stream to CentOS 7, all services are shut down. This step results in removal of all CentOS 8 Stream packages and packages such as ansible-python3, screen, etc. which are responsible in the downgrade process.
After the downgrade, a reboot is required.
-
Packages on all peers / hosts are updated at the same time. [tag: prepare_rpm, install_rpm, docker_setup]
-
Reverse database migrations are run on the clustermaster (mysqlconfig and mysqldata) and active peers (mysqldata only). [tag: database]
-
System patches are run on all peers at the same time. [tag: systempatches]
-
Cleanup actions on all hosts is performed last. [tag: cleanup]
-
If you were on SevOne NMS 6.8.0, SevOne NMS 6.7.0 is now installed on your machine.
Downgrade opens a TUI (Text-based User Interface) or Terminal User Interface window which splits the progress into 3 columns .
If you are unable to interact with the screen session, you must still be able to view the progress in the Column 1 . Allow the downgrade to complete.
-
Column 1: Host panel - shows the progress per host.
-
Column 2: Tasks panel - shows the tasks being executed.
-
Column 3 : Logs panel - shows the logs associated with each task.
FYI-
Press F1 to show / hide HELP.
-
Ctrl+C - kills ansible execution.
To navigate between panel / column, press:
-
1 - to select Column 1 (Host panel)
-
2 - to select Column 2 (Tasks panel)
-
3 - to select Column 3 (Logs panel)
-
up arrow - to move cursor / log up
-
down arrow - to move cursor / log down
-
left arrow - to move cursor / log left
-
right arrow - to move cursor / log right
To detach from screen mode, Ctrl+A followed by the letter d. To attach to the screen mode, enter screen r.
Downgrade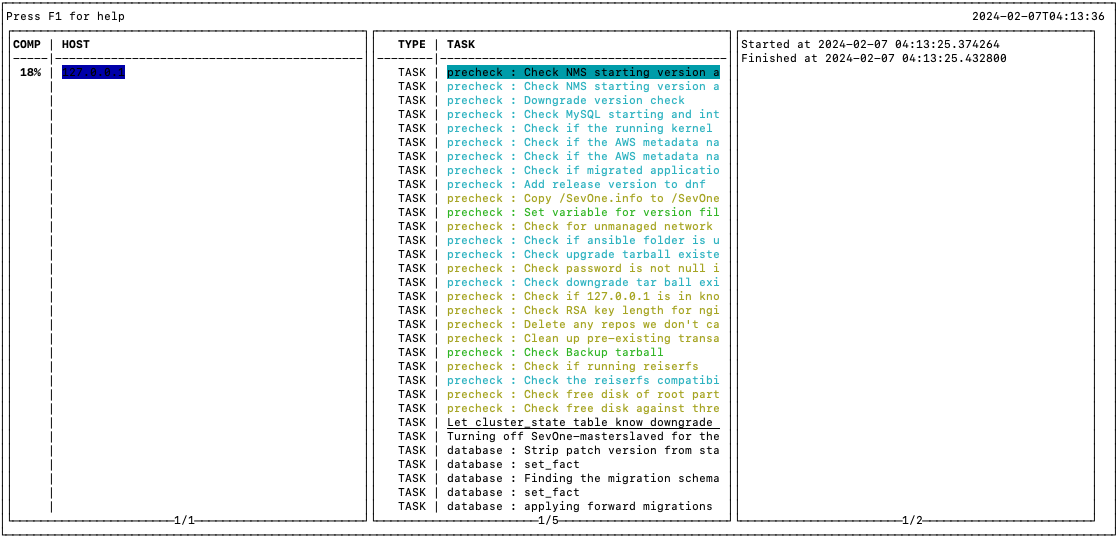 Click on F1 to show the HELP menu in the logger
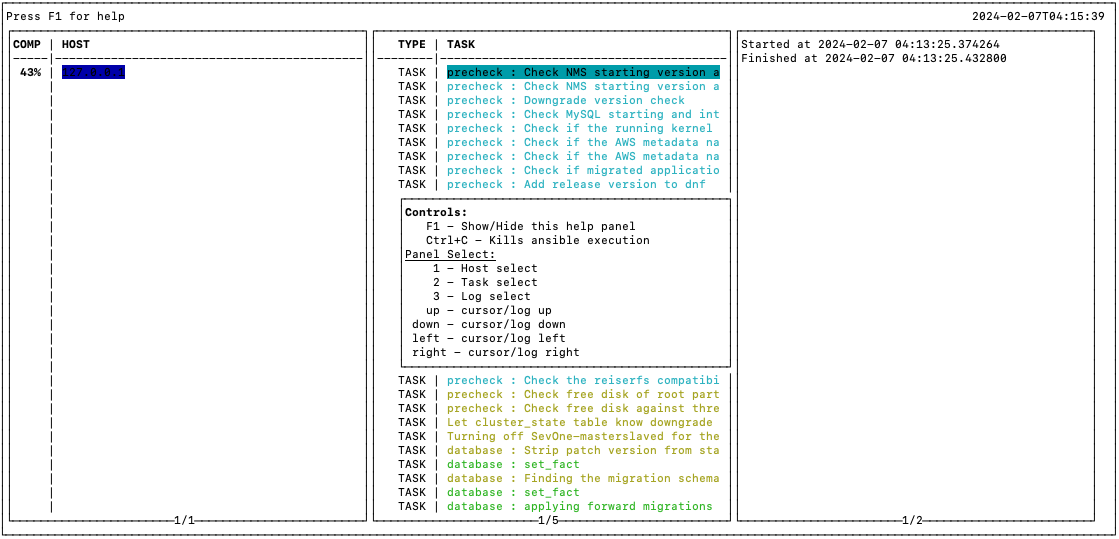
-
-
-
-
Once the downgrade is complete, check the kernel packages installed.
Check kernel version$ SevOne-show-versionOR$ rpm -qa |grepkernelOR$uname-rKernel automatically gets updated as part of the downgrade and n ot every NMS release has a new kernel.
Depending on the NMS release, kernel versions must be:
SevOne NMS Version
Kernel Version
NMS 6.8.0
4.18.0-513.11.1.el8_9.x86_64
NMS 6.7.0
4.18.0-499.el8.x86_64
Kernel version is based on the NMS release.
Kernel version must be based on the NMS release. If not, you must reboot the entire cluster by executing the step below to apply the new kernel otherwise, reboot is not required.
$ SevOne-shutdownreboot -
Confirm that NMS appliance is running version SevOne NMS 6.7.0.
$ SevOne-show-versionSevOne version: 6.7.0kernel version: 4.18.0-499.el8.x86_64#1 SMP Thu Jun 22 12:08:06 UTC 2023nginx version: 0.0.0MySQL version: 10.6.12-MariaDBPHP version: 8.1.24SSH/SSLversion: OpenSSH_8.0p1, OpenSSL 1.1.1k FIPS 25 Mar 2021REST API version: 2.1.46, Buildtime2023-11-03T02:08:30+0000, Hash 5f7c534Hardware Serial Number: VMware-42Intel(R) Xeon(R) CPU2 cores @ 2199.997MHz8GB RAM33GB SWAP498 GB / Partition -
C lean up the /opt directory (for SevOne NMS >= 5.7.2.30) or /data directory (for Openstack) after the downgrade, especially the installRPM.tar file and the ansible folder.
not Openstack$rm/opt/installRPMs.tar$rm-rf/opt/ansiblefor Openstack$rm/data/installRPMs.tar$rm-rf/data/downgrade/ansible -
Execute the following command to identify errors, if any.
$ SevOne-act check checkout --full-cluster --verbose
Check Docker Services
Post downgrade, ensure that docker services running/enabled prior to the downgrade are still running/enabled.
-
Using ssh, log in to SevOne NMS appliance as root.
$sshroot@<NMS appliance> -
Check docker service is running / enabled.
Check for actual containers. For example, soa$ dockerpsCONTAINER ID IMAGE COMMAND CREATED STATUS PORTS NAMESd0a2508fc3cd docker.sevone.com/soa:v6.7.0-build.74"/entrypoint.sh"5 hours ago Up 5 hours soaCheck whether docker service is active$ SevOne-peer-do"systemctl is-active docker.service"--- Gathering peer list...--- Runningcommandon 127.0.0.1...active[ OKAY ]Check whether docker service is enabled$ SevOne-peer-do"systemctl is-enabled docker.service"--- Gathering peer list...--- Runningcommandon 127.0.0.1...enabled[ OKAY ] -
Restart SOA.
$ supervisorctl restart soa
Log Files
Log File can be found in /var/SevOne/ansible-downgrade/<fromVersion-toVersion>/<timestamp>/<peerIP>.log .
For example, /var/SevOne/ansible-downgrade/v6.8.0-v6.7.0/<timestamp>/<peerIP>.log
-
Each peer will have its own log file located on the cluster leader
-
A new log file will be created for each run of the downgrade and is split by the timestamp folder
using Self-Service Upgrade
For access to Self-Service Upgrade files, please open a case on SevOne Support Portal with a request marked as Self-Service Upgrade Request.
For Self Service Upgrades, port 9443 is required on your Cluster Leader. However, you may change the port and reconfigure the installer to run on any port.
To change the port on which the Graphical User Interface installer runs, go to Cluster Manager > Cluster Settings tab > Ports subtab. You may change the SevOne-gui-installer Port to any value desired. If cluster-wide firewall setting is enabled, this will automatically add the new port to the allowed ports list.
Obtain URL from Installer
Obtain the URL by using the GUI Installer or Command Line Interface. Enter the URL obtained in the browser of your choice to perform the steps in section Upgrade Stages.
using GUI Installer
SevOne NMS > Administration > Cluster Manager > Cluster Upgrade tab appears on the active Cluster Leader only.
Cluster Upgrade tab enables you to upgrade the artifact via the SFTP server, run the installer to use the newly downloaded the upgrade artifact, and obtain the URL. In addition to this, it also contains the cluster upgrade history.
The GUI installer returns the URL, for example, https://10.49.11.196:9443/. Enter the URL in the browser of your choice and proceed to the steps mentioned in Upgrade Stages.
Please refer to SevOne NMS Administration Guide > Cluster Manager > Cluster Upgrade section for details on how to obtain access to SevOne GUI installer.
using Command Line Interface
-
Perform steps 1 - 11 in section using Command Line Interface to Upgrade > subsection Upgrade Steps above.
-
Execute the following command to install the Self-Service Upgrade installer on your appliance.
$ SevOne-validate-image -i v6.8.0-build<###>.tar.gz -s v6.8.0-build<###>.tar.gz.sha256.txt \--installer nms-guiExample$ SevOne-validate-image -i v6.8.0-build19.tar.gz -s v6.8.0-build19.tar.gz.sha256.txt \--installer nms-guiThe installer returns the URL, for example, https://10.49.11.196:9443/.
###################################################################################### SevOne-gui-installer ####################################################################################### Note: please open https://10.49.11.196:9443 in web browser to access GUI ## ###################################################################################### -
Enter the URL, https://10.49.11.196:9443/, in the browser of your choice and proceed to the steps mentioned in Upgrade Stages.
Upgrade Stages
-
Using the browser of your choice, enter the URL that the installer has returned in the step above. For example, https://10.49.11.196:9443/.
-
Enter the login credentials to launch the upgrade stages.
Below are various stages the upgrade performs using the graphical user interface. Please wait for the stage to complete successfully before moving to the next stage.
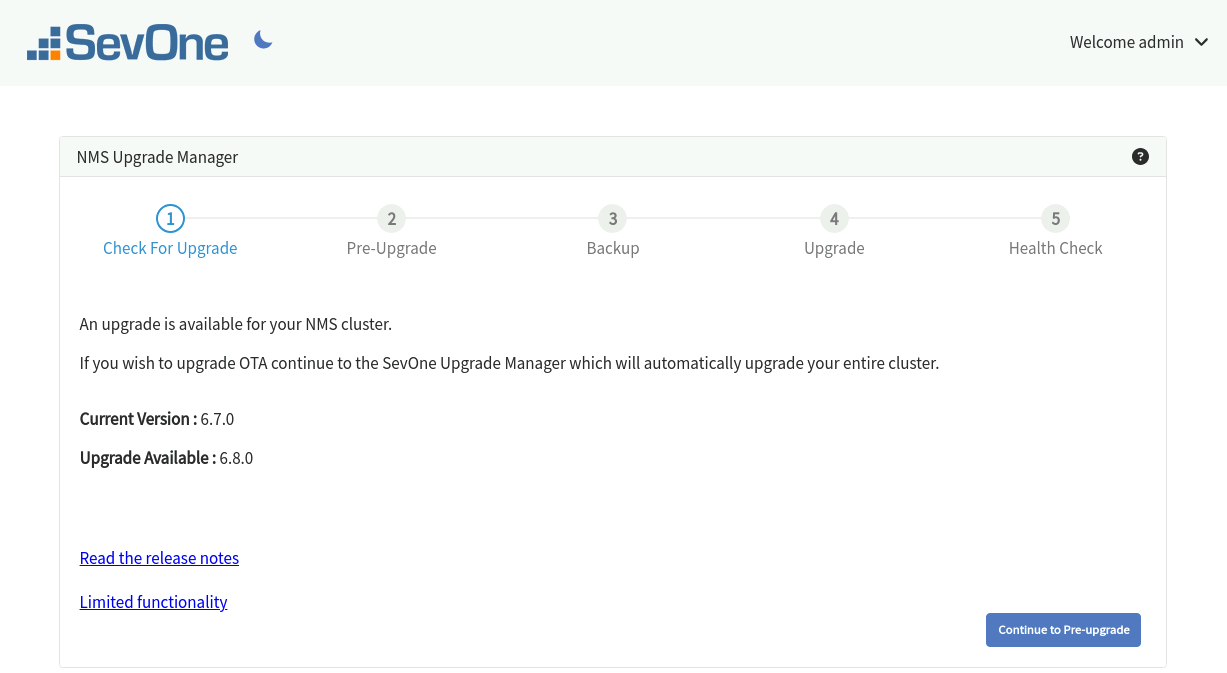
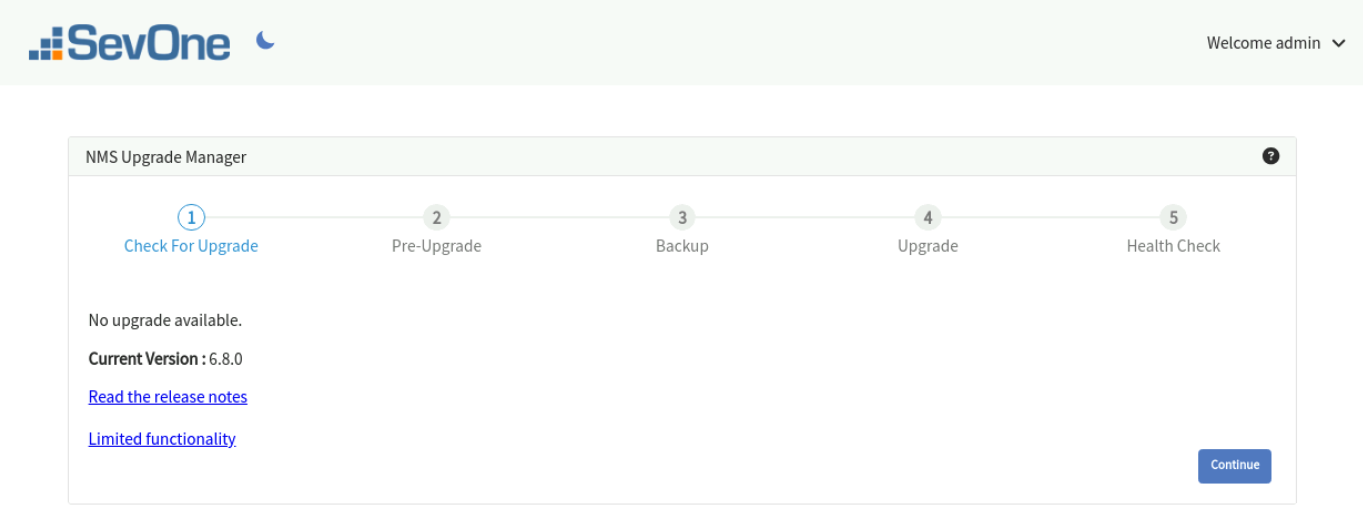
Check For Upgrade Stage
This stage checks whether an update is available for the SevOne NMS cluster.
-
 - denotes that you can toggle to dark theme.
 -
Current Version - denotes the current version of your SevOne NMS cluster.
-
Upgrade Available - denotes the version of the available update. The upgrade artifact (tarball) must be located in /opt directory of the Active Cluster Leader for this stage to detect an available update. However, if Openstack cluster, the upgrade artifact (tarball) must be located in /data/upgrade directory.
-
Read the release notes - provides the link to the release notes of SevOne NMS version you are upgrading to.
-
Limited functionality - provides the upgrade statistics for the cluster and testing parameters such as,
-
Total upgrade time
-
Estimated disruption to polling
-
Estimated disruption to netflow
-
Estimated disruption to alerting
-
Estimated disruption to SURF UI (user interface)
-
Estimated disruption to SURF reporting
-
Estimated disruption to reporting from DI (Data Insight)
-
Provided testing parameters for the testing environment of each estimation above
Statistics may vary based on your cluster size and testing environment variables.
-
-
If there is an artifact for a version higher than your current SevOne NMS version, you may proceed to the next stage by clicking on Continue to Pre-upgrade.
During stages pre-upgrade, upgrade, and health check, you will observe task status updates.
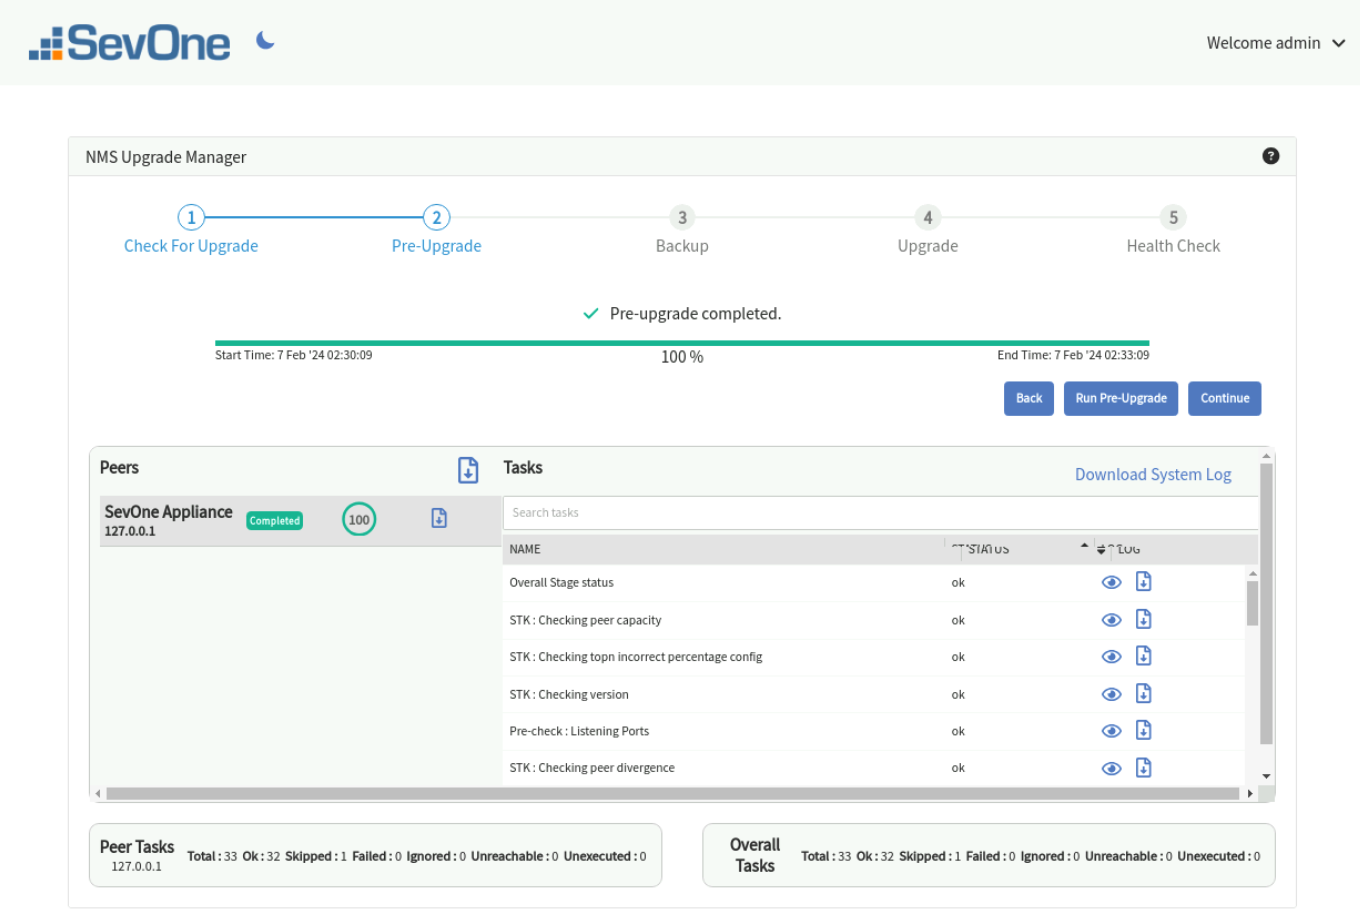
Pre-Upgrade Stage
The Pre-Upgrade stage runs only pre-upgrade checks against your SevOne NMS cluster to ensure your system is ready for the upgrade.
Click Run Pre-Upgrade to ensure that SevOne NMS cluster is in good health for the upgrade. Some of the checks include:
-
Interpeer connectivity
-
MySQL replication and overall NMS health
-
Free disk space
Running the Pre-upgrade checks may take a few minutes.
-
The top part shows the overall state and progress of the pre-upgrade checks. The status can be in progress, successful, or failed.
-
Under Peers , is a list of peers, peer-wise status, and the completion progress. The status of a peer can be:
-
Unreachable - denotes the peer is unreachable while running the pre-checks.
-
Failed - denotes that some checks have failed on the peer.
-
Completed - denotes that the checks have completed successfully.
Example
By selecting a row in the Peers section, you can view the status of each task on the individual peer. The search box allows you to search on the tasks in the list.
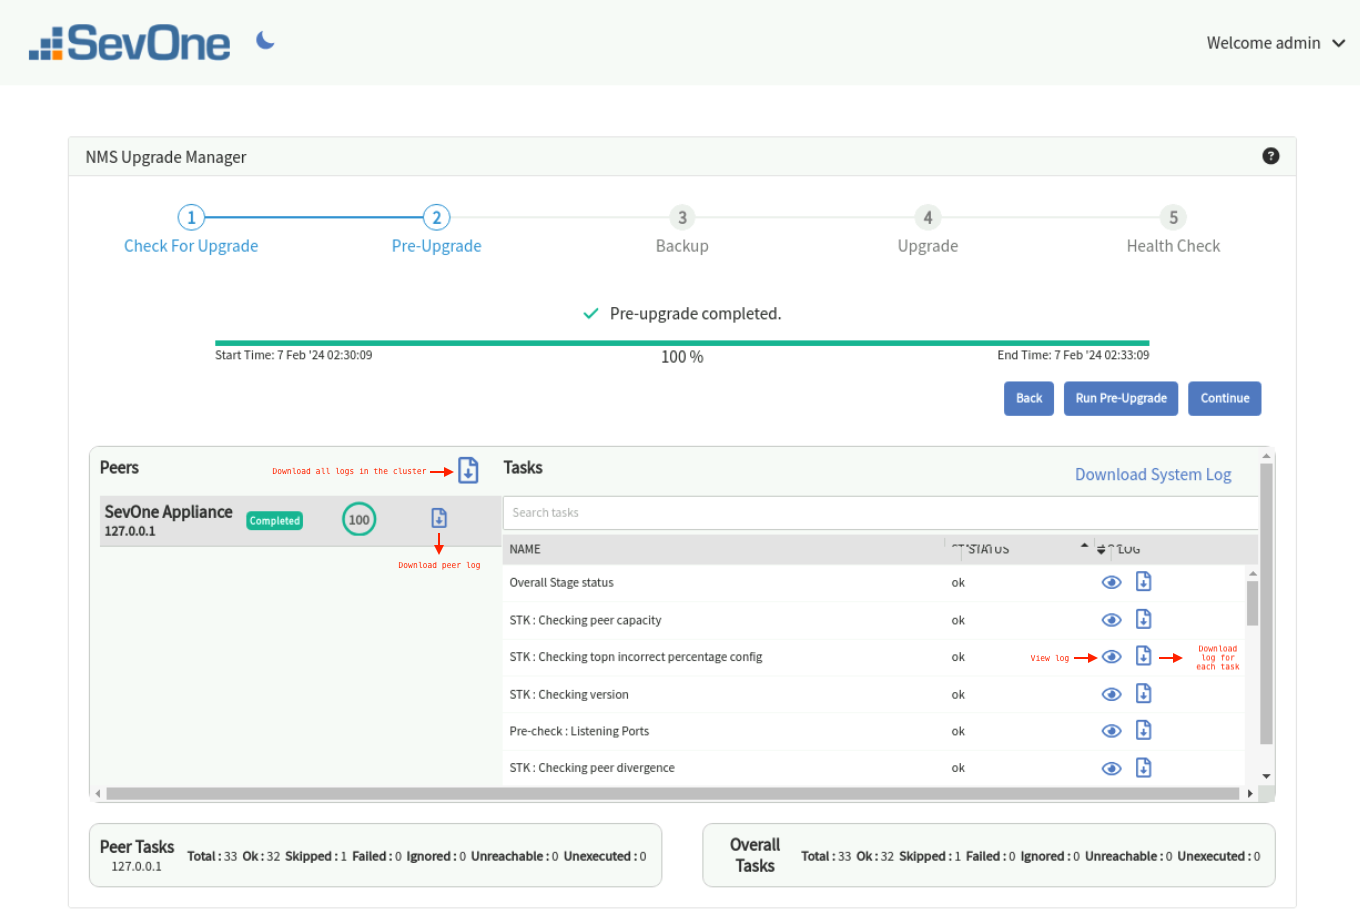
Each
 in the screenshot above performs different downloads. You may download:
-
a peer log
-
log for each task in the peer
-
all logs in the cluster
Click Download System Log to download the system log to a file.
All downloaded files are saved in your default download folder.When completed, you can view and download logs,
 , for each task.
When you click
 , you get a Log Viewer pop-up. Click Copy to clipboard to copy the contents in the log viewer and paste it to a file.
Log Viewer[{"content": {"changed":true,"cmd": ["/usr/local/scripts/SevOne-act","stk","topn-incorrect-percentage-config"],"delta":"0:00:00.184822","end":"2024-02-07 07:33:08.587215","rc": 0,"start":"2024-02-07 07:33:08.402393","stderr_lines": [""],"stdout_lines": ["[ OK ] No Errors Detected"]},"ended":"2024-02-07 07:33:08.640538+00:00","peer_name":"127.0.0.1","started":"2024-02-07 07:33:07.771467+00:00","status":"ok","task_name":"STK : Checking topn incorrect percentage config"}] -
-
-
Summary - the bottom summary of the stage indicates the breakup of the tasks for the selected peer and the entire cluster.

-
Total - denotes the total number of tasks on the peer or overall tasks on the cluster.
-
Ok - denotes the number of tasks which have run successfully.
-
Skipped - denotes the number of tasks skipped. Not all tasks may run on all peers. Some tasks may run only on the Cluster Leader or the Active appliances and some may not run on certain appliance types such as, DNC. In such cases, there may be skipped tasks for certain peers.
-
Failed - denotes the number of tasks which have failed. You can see individual logs for each task for any selected peer.
-
Ignored : denotes the tasks/checks for which failures are ignored. Failure of these tasks/checks will not cause the stage to fail.
-
Unreachable - denotes the number of tasks which have failed because the peer was unreachable. This is the first task after the peer has become unreachable and the remaining tasks will not be executed.
-
Unexecuted - denotes the n umber of tasks that were not executed. This can be because the peer was unreachable and/or the checks were stopped in between.
Some checks such as md5-hack and lsof may fail. At this time, the results from these two checks are being ignored in the overall check status. If either of these two checks fail, the pre-upgrade stage will still show as Passed. However, if any other check is failing and an upgrade needs to be forced, then the upgrade can be performed using the CLI.
It is highly recommended to contact the SevOne Support if any pre-check is failing.
-
After the pre-upgrade stage has completed successfully, click Continue to go to the Backup stage.
Backup Stage
The backup is run before the actual upgrade is performed. Click Run Backup and wait until the backup has completed successfully. This stage executes a few scripts to backup the database and a few folders critical to the system. This stage runs on the Cluster Leader and is optional.
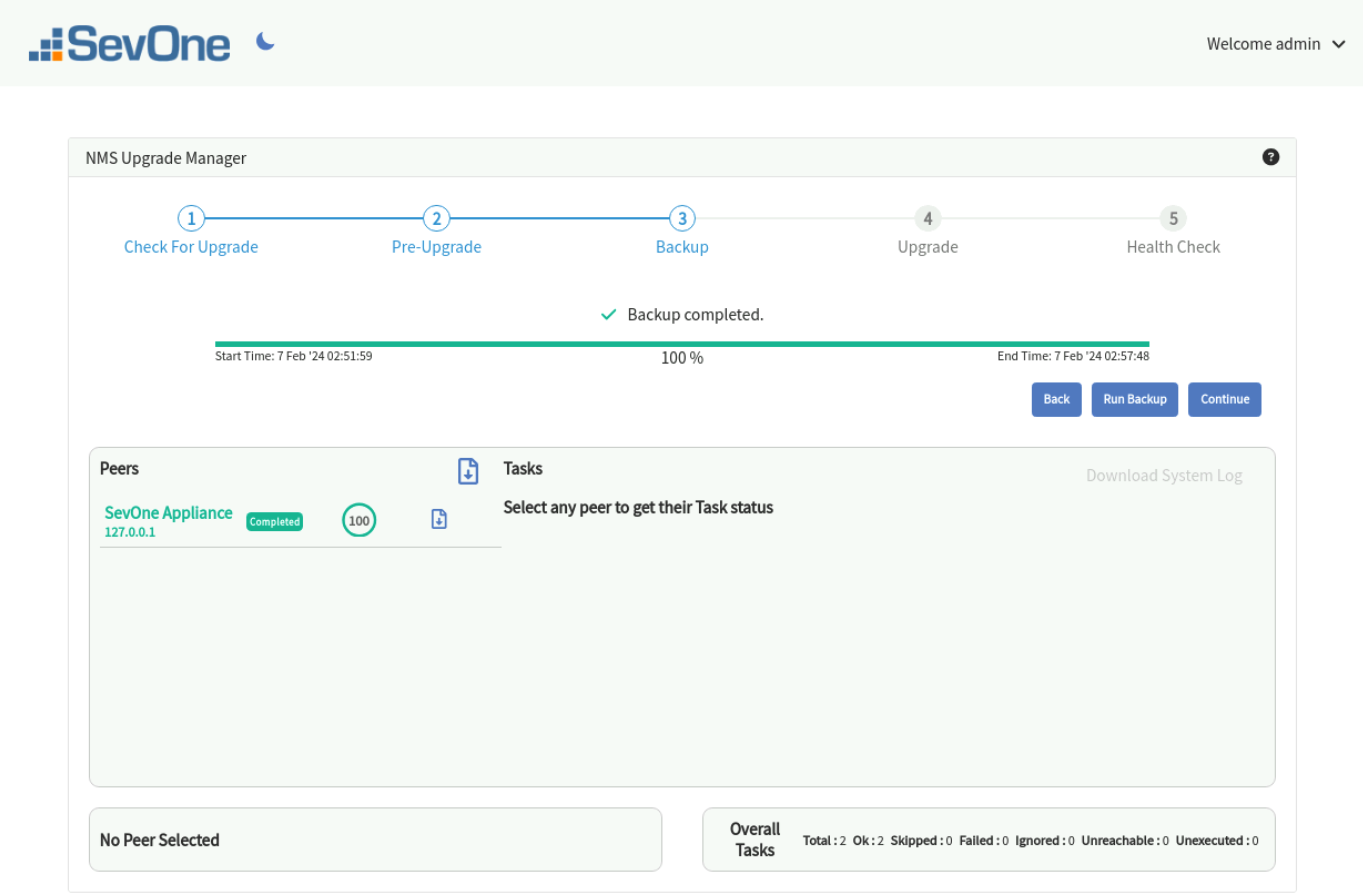
When a peer is selected, it displays the list of tasks for the selected peer. The search box provides the capability to search in the task list.
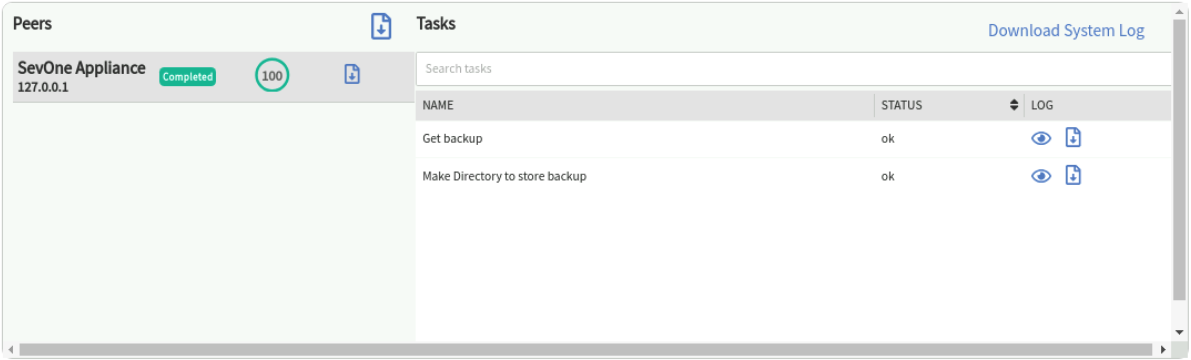
Backup may take some time on large clusters.
When backup has completed successfully, click Continue.
Upgrade Stage
Please do not close or refresh the tab once you start the Upgrade stage. This stage can take several minutes.
At this stage, the actual NMS upgrade is performed to the latest version. You will have limited functionality while upgrade is in progress. Click Run Upgrade. The User Interface workflow is identical to the Pre-Upgrade Stage. You are allowed to run the upgrade from the User Interface if and only if the pre-checks have succeeded. Most of the User Interface components are the same as the Pre-Upgrade checks. You can view individual peers and the overall cluster status. The bottom summary panel shows the peer and overall status. In case of upgrade, the execution will stop on a peer at the first failed task. The remaining tasks will show as Unexecuted in the bottom summary panel.

The search box under Tasks provides the capability to search in the task list.
After the upgrade stage has completed successfully, you are now ready to perform the Health Check. Click Continue.
Health Check Stage
The target release must have the new kernel version. Prior to performing the health check, you must reboot the machine to load the new kernel and to start all services. Please do not skip this step.
$ SevOne-shutdown rebootClick Run Health Check to run SevOne NMS health checks after a successful upgrade. The checks are identical to the pre-upgrade checks.
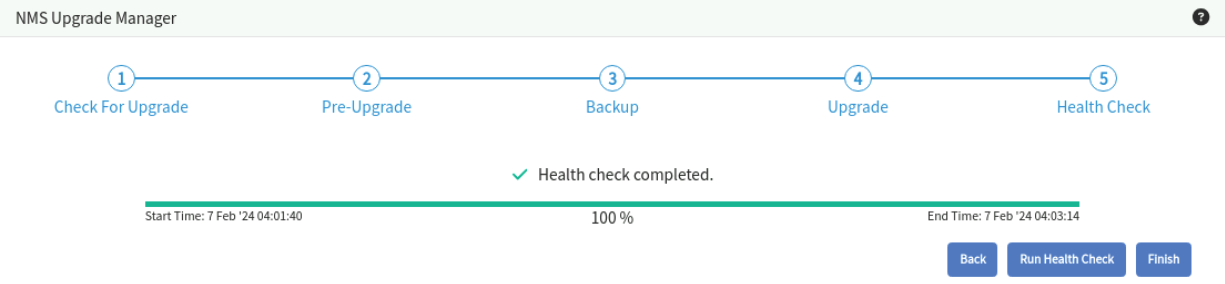
When a peer is selected, it displays the list of tasks for the selected peer. The search box provides the capability to search in the task list.

After the health check has completed successfully, you may click on Finish to complete the upgrade and return back to Check For Upgrade Stage. Whenever the next upgrade is available, you may proceed to upgrade your SevOne NMS cluster again.
From Command Line Interface, confirm that NMS appliance is running version SevOne NMS 6.8.0.
$ SevOne-show-versionSevOne version: 6.8.0kernel version: 4.18.0-499.el8.x86_64 #1 SMP Thu Jun 22 12:08:06 UTC 2023nginx version: 0.0.0MySQL version: 10.6.12-MariaDBPHP version: 8.1.27SSH/SSL version: OpenSSH_8.0p1, OpenSSL 1.1.1k FIPS 25 Mar 2021REST API version: 2.1.47, Build time 2024-02-05T08:20:05+0000, Hash 3dd4faaHardware Serial Number: VMware-42 Intel(R) Xeon(R) CPU 2 cores @ 2199.998MHz 8GB RAM 33GB SWAP 498 GB / Partition
Perform a cleanup by removing the ansible directory and installRPMs.tar file.
$ rm -rf /opt/ansible$ rm /opt/installRPMs.tarAfter successful completion of the upgrade, you may go to the post-Upgrade Stage where besides other steps, a reboot maybe required. However, you may choose to not reboot at this time. In this case, if you open or refresh the GUI Installer, you will see an Internal Server Error. To fix this without performing a reboot, execute the following command to restart the service and access the URL; for example, https://10.49.11.196:9443/.
$ systemctl restart sevone-installer-gunicorn.servicepost-Upgrade Stage
After all the upgrade stages have completed successfully, please refer to section post-Upgrade Steps below.
FAQs
How do I change the port on which the installer runs?
The default port is 9443 . You may change the port from SevOne NMS > Administration > Cluster Manager > Cluster Settings tab > Ports subtab > field SevOne-gui-installer Port. After changing the port, you must regenerate the installer URL from Administration > Cluster Manager > Cluster Upgrades tab > click Run Installer.
SevOne recommends you to use any free port (i.e., port that is not used by any other service) in the range 1024 - 65535.
Execute the following command to check port availability.
$ netstat -anp |grep tcp |grep LISTEN |grep <port_number_desired>If no process is found listening to <port_number_desired>, it can be used as a custom port to run the installer.
Custom certificates are already deployed on SevOne NMS server. Can the same custom certificates be used instead of the self-signed certificates used by the installer?
Self-Service Upgrade running on gunicorn server uses the self-signed certificates of the nginx server by default.
"SSL_CERT_PATH": "/etc/nginx/ssl/nginx.crt","SSL_KEY_PATH": "/etc/nginx/ssl/nginx.key"Execute the following command to restart gunicorn.
$ systemctl restart sevone-installer-gunicornIf the custom certificate is based on hostname, execute the following steps.
-
Using a text editor of your choice, edit /opt/sevone_installer/SevOne-django-settings.sh file.
$vi/opt/sevone_installer/SevOne-django-settings.sh
-
Update the variables.
# Change IP, HOSTNAME (variables value to hostname or ip address# whichever set in valid SSL cert), SSL_CERT_PATH & SSL_KEY_PATHIP='<hostname_of server>'HOSTNAME='<hostname_of_server>'/opt/sevone_install/SevOne-django-settings.sh file contains the following by default.
# Use nginx cert and key, generate open-ssl if (nginx cert/key) doesn't exist.NGINX_CERT='/etc/nginx/ssl/nginx.crt'NGINX_KEY='/etc/nginx/ssl/nginx.key'if[[ -f"$NGINX_CERT"&& -f"$NGINX_KEY"]];thenSSL_CERT_PATH="$NGINX_CERT";SSL_KEY_PATH="$NGINX_KEY";
-
Run SevOne-django-settings.sh script.
$ ./opt/sevone_installer/SevOne-django-settings.sh -
Restart gunicorn.
$ systemctl restart sevone-installer-gunicorn
Which address should variables SEVONE_INSTALLER_BIND_IP and url contain?
The upgrade script, SevOne-validate-image, creates the following files.
-
/opt/sevone_installer/config.json
-
/opt/sevone_installer/build/static/env.json
Variable SEVONE_INSTALLER_BIND_IP in config.json file contains the IPv6 address or the IP address / FQDN of the Cluster Leader stored in the peers table.
In case where proxy is set, the config.json and env.json files must be updated manually and the installer service must be restarted. Execute the following steps.
-
Using a text editor of your choice, edit /opt/sevone_installer/config.json to change the IP address to the proxy IP address / FQDN of the Cluster Leader in variable SEVONE_INSTALLER_BIND_IP. If you are using certificates, then FQDN of the Cluster Leader must be assigned to variable SEVONE_INSTALLER_BIND_IP.
-
Using a text editor of your choice, edit /opt/sevone_installer/build/static/env.json to change the IP address to the proxy IP address / FQDN of the Cluster Leader in variable url. If you are using certificates, then FQDN of the Cluster Leader must be assigned to variable url.
-
Change directory to /opt/sevone_installer.
$ cd /opt/sevone_installer$ python3 manage.py collectstatic$ systemctl restart sevone-installer-gunicorn.serviceWhy does the User Interface report 'No update available' on the front page?
The upgrade artifact must be placed in /opt directory or /data/upgrade directory (for Openstack) of the active Cluster Leader for the installer to detect an upgrade. If the SevOne NMS cluster is already on the target version, the installer will not detect an available upgrade path and return a message that no update is available.
What happens if pre-check fails?
If pre-checks fail, you will not be allowed to continue with the upgrade. This is intentional. SevOne does not support forcing an upgrade on corrupted environments. However, you can force an upgrade from the CLI, just like before, and then monitor the progress from the User Interface.
What happens if upgrade fails?
If upgrade fails, you may download the cluster and/or individual peer logs and contact SevOne Support from the link in error message. For debugging, old steps of checking the upgrade in screen and logs/retry attempts all remain the same.
Can two upgrades be run at the same time?
No. Two upgrades cannot be run at the same time. If an upgrade is running and a new installer instance is launched, it will show the status of the ongoing upgrade only.
One of my peers is unreachable. Will I still be able to upgrade from the installer UI?
No. All peers must be reachable from the Cluster Leader to run an upgrade. The requirements are the same as before. However, if after starting an upgrade, a peer becomes unreachable, you can see its status on the installer's User Interface and the upgrade will stop, like before.
What happens if there is a failover after the upgrade?
Nothing has changed here. Like before, the installer does not handle HSA failover. If there is a failover after setting up the installer, the setup will have to be done separately on the now active Cluster Leader.
The installer is not coming up at the given URL. How can I see what is wrong?
-
Make sure you are accessing the URL with https and, accept the certificate warning.
-
Check the status of the installer service systemctl status sevone-installer-gunicorn.service.
-
If systemctl status sevone-installer-gunicorn.service is running and you are still unable to access the URL then, check the gunicorn log file for more details.
-
/var/log/SevOne-gui-installer/gunicorn.log OR
-
/var/log/SevOne-gui-installer/access.log
-
-
Check request status codes 500 or 404 in /var/log/SevOne-gui-installer/access.log.
Can I run the installer from any peer?
No. The installer has to be run from the active Cluster Leader only.
Can I run this server in debug mode?
This is NOT RECOMMENDED! Please contact SevOne Support prior to doing this.
-
Check log files in /var/log/SevOne-gui-installer/.
-
Stop installer service systemctl stop sevone-installer-gunicorn.service if it is running.
-
Using the text editor of your choice, edit /opt/sevone_installer/sevone_installer/settings.py file. Change variable DEBUG to TRUE.
-
Run development web server like python3 manage.py runserver 0.0.0.0:1234.
How can I upgrade the SOA version?
-
Using ssh, log in to SevOne NMS appliance (Cluster Leader of SevOne NMS cluster) as root.
$sshroot@<NMS appliance> -
Check the current SOA version.
Example$ rpm -qa |grepsoaSevOne-soa-6.7.0-1.177.el8.x86_64If you need to upgrade the SOA version, then continue with the steps below. Else, you are all set.
-
Using scp, copy the SOA .rpm file to /opt directory but if Openstack, to /data/upgrade to the Cluster Leader and its peers.
The latest SOA .rpm file can be downloaded from IBM Passport Advantage ( https://www.ibm.com/software/passportadvantage/pao_download_software.html ) via Passport Advantage Online . However, if you are on a legacy / flexible SevOne contract and do not have access to IBM Passport Advantage but have an active Support contract, please contact SevOne Support Team for the file.
-
Upgrade SOA version. This step will perform the upgrade and restart SOA.
Examplenot Openstack$ SevOne-peer-do'rpm -Uvh /opt/SevOne-soa-6.8.0-1.19.el8.x86_64'for Openstack$ SevOne-peer-do'rpm -Uvh /data/upgrade/SevOne-soa-6.8.0-1.19.el8.x86_64' -
Check the SOA version to make sure that it is on the version you have upgraded SOA to.
Example$ rpm -qa |grepsoaSevOne-soa-6.8.0-1.19.el8.x86_64
How to expand a Logical Volume?
Please refer to section Expand Logical Volume below.
How do I monitor the metrics supported for AWS?
Please refer to AWS Quick Start Guide for details.
What browsers are supported?
Latest versions of Chrome, Firefox, and Safari are supported. Internet Explorer (IE) is not supported.
How much time does the upgrade / downgrade take?
|
Upgrade / Downgrade |
Average Time Taken |
|
Upgrade from NMS 6.7.x to NMS 6.8.x |
~ 60 - 75 minutes |
|
Downgrade from NMS 6.8.x to NMS 6.7.x |
~ 40-45 minutes |
Debugging
-
Ansible logs can be found in the /var/SevOne/SevOne-upgrade-ansible.log on the Cluster Leader.
-
If there are failures, resolve them on the relevant peers, and re-run the upgrade to start playbook execution again and the upgrade will start over.
-
Failures on individual peers get recorded in the retry_files folder (in the parent ansible directory with the IP address of all the failed hosts)
-
There are tags for each step of the upgrade, so in case there is a failure and you would like to kick off the upgrade for tasks remaining after a certain section, you can do that.
-
For example, if you know ALL the peers have successfully completed the package upgrade phase, and the upgrade failed in the database section; you can kickoff the upgrade again like shown below. When upgrading from 6.7.0 to 6.8.0,
startingNMSversion = 6.7.0
upgradeNMSversion = 6.8.0
The command will run the playbook for all tasks except the packages tag aka the RPM upgrade section.$ ansible-playbook -i hosts.ini main.yml \--extra-vars"startingVersion={startingNMSversion} forwardVersion={upgradeNMSversion}"\--tags="database, systempatches, cleanup"-v; -
If you know a certain subsection of peers have finished the upgrade completely, you can also remove them from the hosts inventory before restarting the upgrade script. This will result in kicking off all the tasks for all the hosts except the ones you removed from the inventory.
-
post-Upgrade Steps
The operating system only requires a reboot post-SevOne NMS upgrade if the upgraded NMS version has a higher kernel version than the kernel version prior to upgrade. Every appliance in the cluster must be rebooted to load the new kernel and to start all services on each appliance. There are two possible options to restart the appliances in the cluster after an upgrade and you can choose any one of the following preferred options.
Option 1: Reboot appliances by performing failover between Primary / Secondary
Option 2: Reboot appliances without failover
IMPORTANT: In either option, please make sure to successfully restart all the other appliances first before performing the restart operation on the Cluster Leader active appliance.
Continue with the steps below after the upgrade has completed successfully.
If the updater process is running, the command to shutdown/reboot an appliance will not proceed and you will get a message suggesting you to use the --force option.
It is not recommended to use the force operation as it can lead to short-term data loss. Updater is scheduled to start running every 2 even hours at 30 minutes past the hour. For example, starting at 00:30, 02:30, 04:30, etc. The updater process is expected to run for approximately 1800 seconds (30 minutes). However, on very large and busy appliances, it can sometimes take a few minutes longer. Due to this, plan to reboot the appliances at times when the updater process is not running.
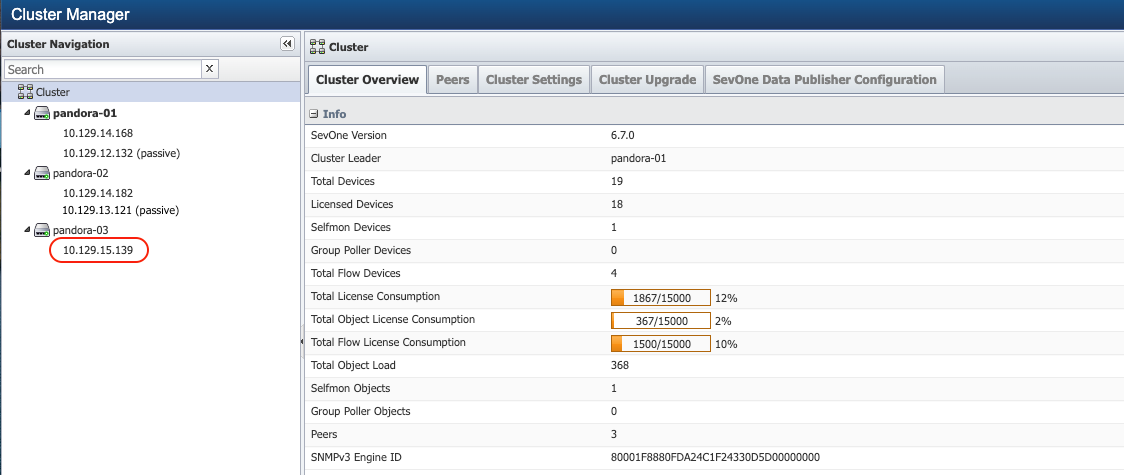
Find Cluster Leader
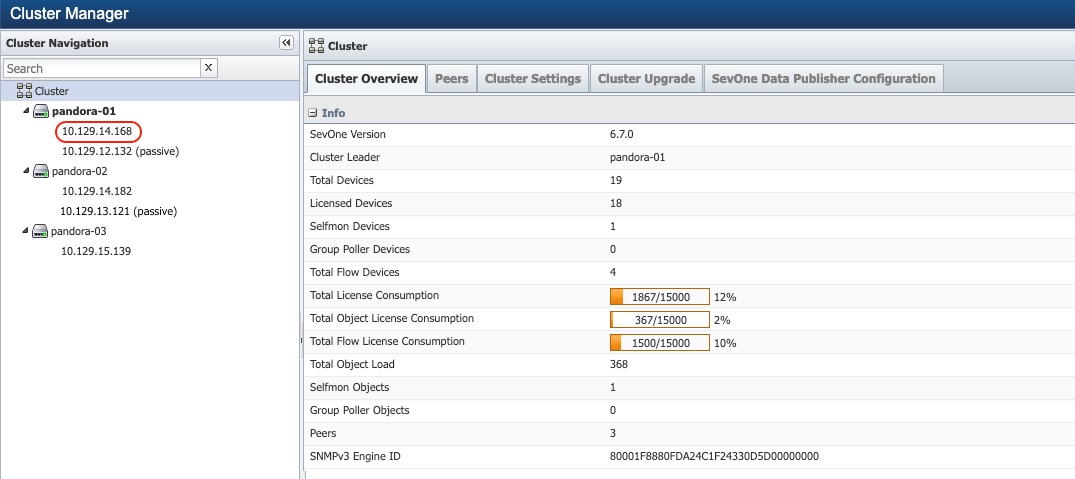
Prior to rebooting the appliances in the cluster using one of the options mentioned above, you must make note of the appliance that is the Cluster Leader in the cluster. From Administration > Cluster Manager > Cluster Overview tab > field Cluster Leader provides the name of the appliance that is the leader. For example, pandora-01 as shown in the screenshot below, is the Cluster Leader.

(Option 1) Reboot appliances by performing failover between Primary / Secondary
It is not necessary to perform failover / failback while performing reboot of appliances, but to minimize the polling downtime due to a reboot, this option can be used to perform failover, reboot, and failback between the primary / secondary appliances.
It is possible that the secondary appliance may be the active appliance of the pair at the time of the upgrade. In this steps below, it is assumed and referenced that the primary appliance is active and the secondary appliance is passive. You must always check which appliance is the current active / passive appliance of the pair before continuing with the steps below.
The failover operation must be done manually on a per peer basis, and it is not recommended to perform failover on more than one peer at the same time. However, the reboot of multiple appliances can be done in batches of 4 to 5 appliances at the same time. It is important to note that the failover steps for Cluster Leader pair must be done last once all other appliances have been rebooted.
The failover operation is not possible on single appliance peers that do not have an associated secondary appliance. For such peers, the appliance will still require a reboot when restarting the active appliances.
Reboot Secondary appliances first (including Cluster Leader Secondary appliance)
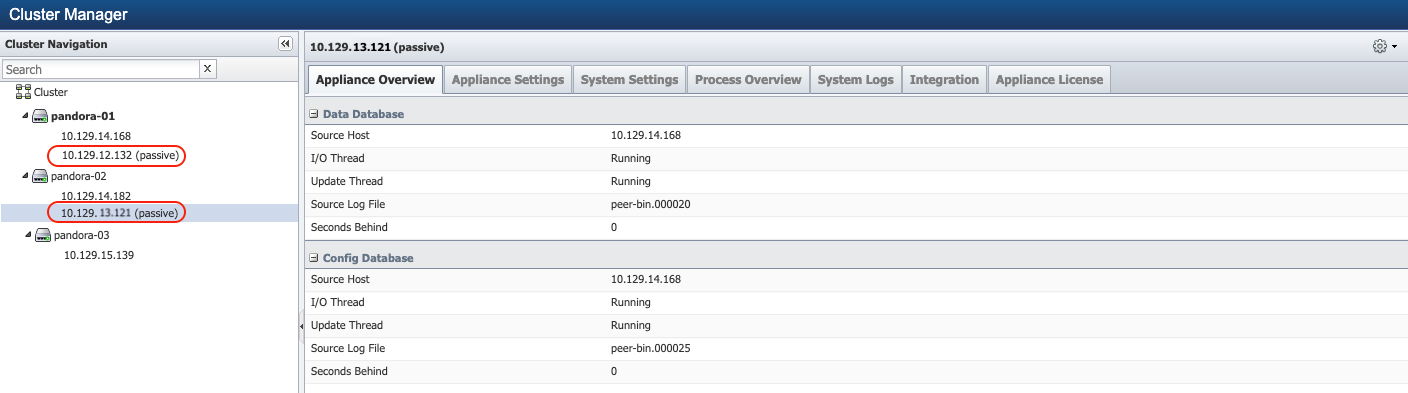
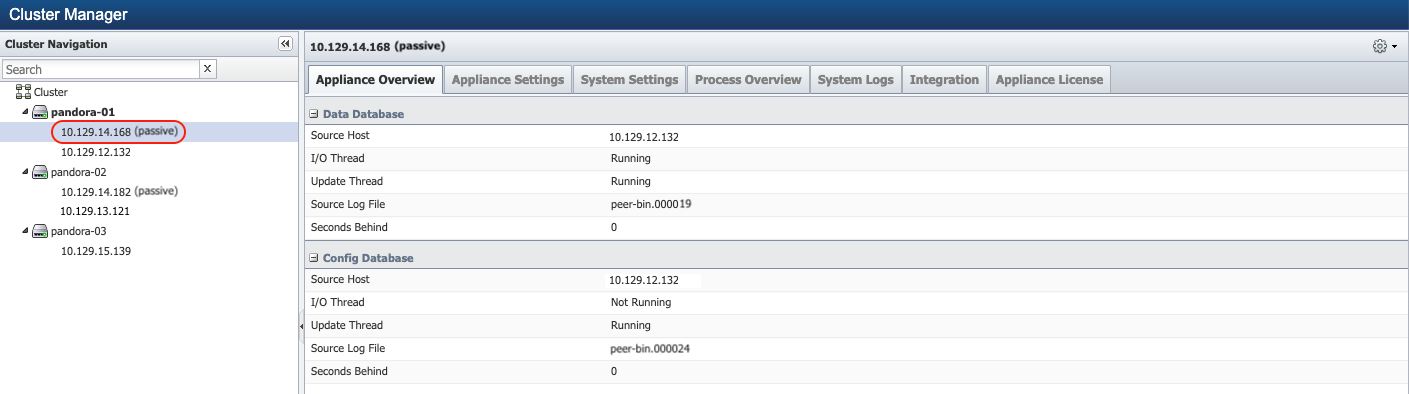
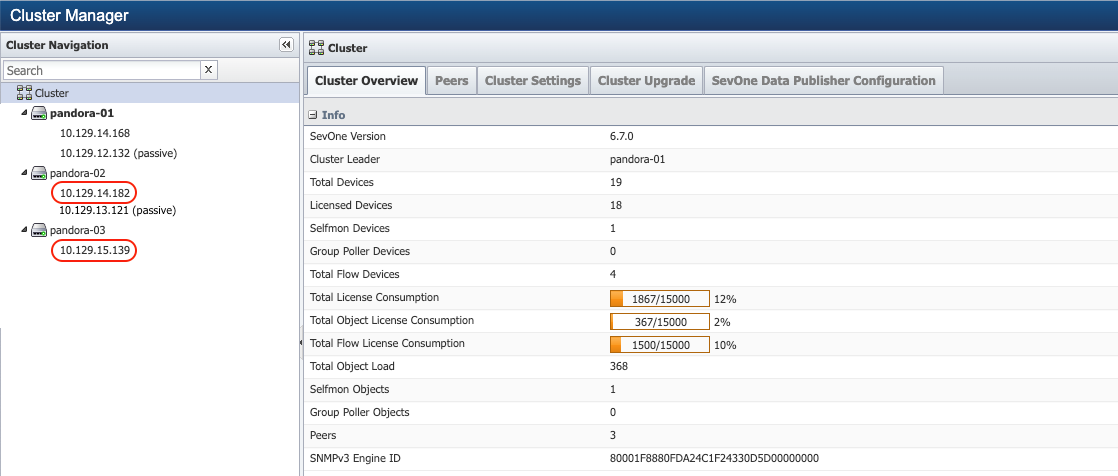
Identify to confirm the passive appliance of the pair. From Administration > Cluster Manager > left navigation bar, expand the peer to identify which appliance of the pair is currently passive. For example, 10.129.13.121 as shown in the screenshot below, is the passive appliance of the pair.
-
Using ssh, log in to each SevOne NMS passive appliance as root, including the Cluster Leader passive appliance.
$sshroot@<NMS'passive'appliance> -
Reboot the passive appliance.
$ SevOne-shutdownrebootRepeat the steps above for each passive appliance including the Cluster Leader passive appliance.
Multiple passive appliances of different peers can be restarted at the same time in batches. SevOne recommends performing no more than 4 to 5 appliances at the same time to keep the operation manageable.
Check and confirm replication status after reboot of Secondary appliances
Once the passive appliance is back up after reboot, confirm the replication is good for each pair - replication can take a few minutes. Execute the following commands to check the system uptime and replication status for the appliance that was rebooted.
$ uptime$ SevOne-act check replication$ SevOne-masterslave-statusBefore proceeding to the next step, ensure that replication checks report no errors.
Perform the failover operation to make Secondary the active appliance (all peers except Cluster Leader)
You may now perform the fail over operation. From Administration > Cluster Manager > left navigation bar, expand the peer to select the active appliance of the pair. In the upper-right corner, click  and select option Fail Over. For additional details, please refer to Cluster Manager > section Appliance Level Actions.
Fail Over operation can take a few minutes to complete. You may need to refresh the browser to reflect the new state of the peer after the failover.
Check replication state after failover of the appliances
Once the failover is complete, confirm that the replication is good for each pair. This may take a few minutes for replication to catch up if the replication is lagging. Execute the following commands to check the system uptime and replication status for the appliance that was rebooted.
$ SevOne-act check replication$ SevOne-masterslave-statusBefore proceeding to the next step, ensure that replication checks report no errors.
You are now ready to restart the primary appliances.
Perform restart of Primary appliance(s) (all peers except Cluster Leader)
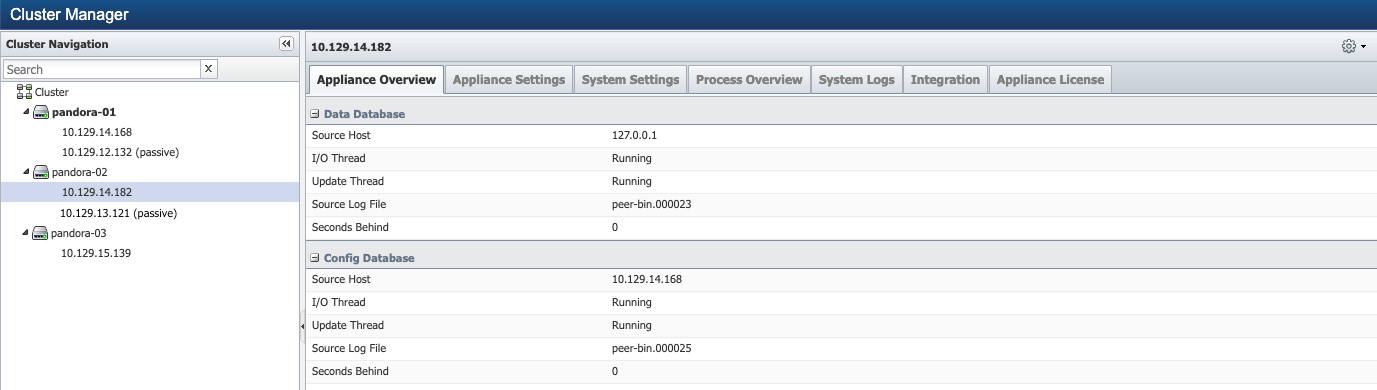
After the failover, the secondary appliances that were rebooted in the previous step will now be the current active appliance and the primary appliance will now be in the current passive state. Identify to confirm the passive appliance of the pair from the User Interface > Administration > Cluster Manager. In the left navigation bar, expand the peer to identify which appliance of the pair is currently passive of the pair.
Refresh the browser to confirm that the failovers are successful and the primary appliances are now reported as passive.

Now, log in using SSH to the passive appliances as root and perform the reboot.
Do not restart the Cluster Leader active appliance at this time.
$ SevOne-shutdown reboot
Multiple passive appliances of different peers can be restarted at the same time in batches. SevOne recommends performing no more than 4 to 5 appliances at the same time to keep the operation manageable. Please ensure that you do not restart the Cluster Leader appliance at this time.
Perform failover operation to make Primary as active appliance (all peers except Cluster Leader)
You may now perform the fail over operation. From Administration > Cluster Manager > left navigation bar, expand the peer to select the active appliance of the pair. In the upper-right corner, click
and select option Fail Over. For additional details, please refer to Cluster Manager > section Appliance Level Actions.
Fail Over operation can take a few minutes to complete. You may need to refresh the browser to reflect the new state of the peer after the failover.
Check replication state after failover of the appliances
Once the failover is complete, confirm the replication is good for each pair - replication can take a few minutes. Execute the following commands to check the system uptime and replication status for the appliance that was rebooted.
$ uptime$ SevOne-act check replication$ SevOne-masterslave-statusBefore proceeding to the next step, ensure that replication checks report no errors.
Reboot all peers with single appliance (peers that do not have a Secondary)
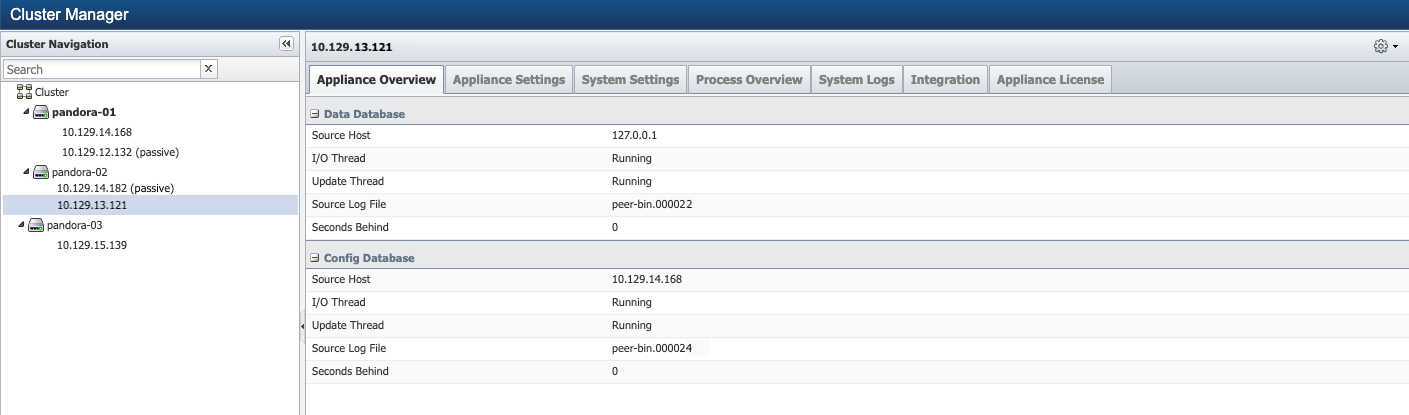
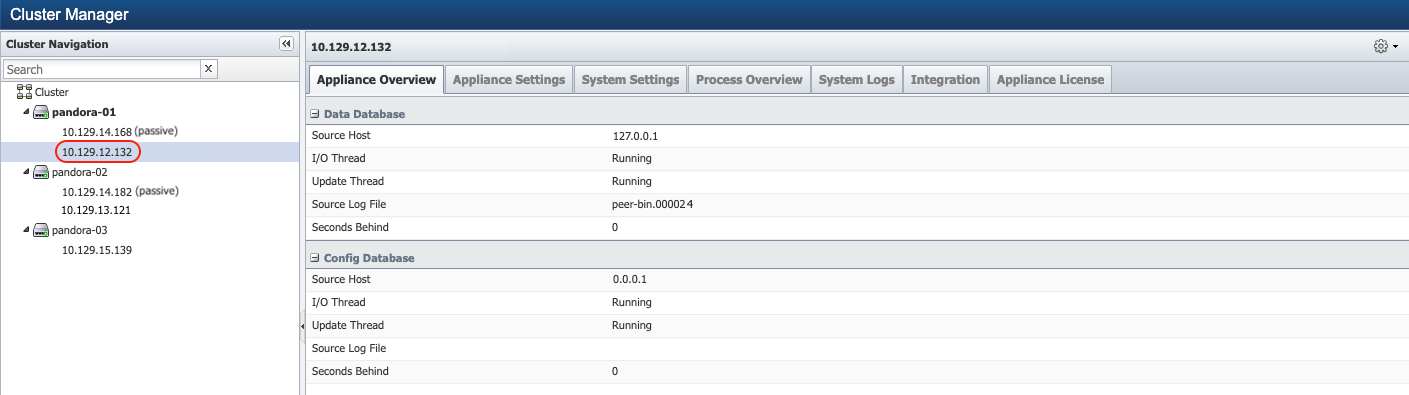
Identify all appliances that do not have any secondary appliances. From Administration > Cluster Manager > left navigation bar, expand the peers to identify which peer has a single appliance. For example, 10.129.15.139 as shown in the screenshot below, does not have any associated passive appliance.
Now, log in using SSH to all single primary appliances as root and perform the reboot.
Please ensure that you do not restart the Cluster Leader appliance at this time.
$ SevOne-shutdown rebootPerform failover operation to make Cluster Leader Secondary as the active appliance
Before failing over the Cluster Leader, perform a cluster wide check on replication to ensure no errors are reported.
If Hub-Spoke environment, please add –hub-spoke-network option to the command below.
$ SevOne-act check replication --full-cluster
You may now perform the fail over operation for the Cluster Leader peer. From Administration > Cluster Manager > left navigation bar, expand the peer to select the active appliance of the Cluster Leader pair. In the upper-right corner, click
and select option Fail Over. For additional details, please refer to Cluster Manager > section Appliance Level Actions.
This will perform the failover of the Cluster Leader to make the Cluster Leader Secondary as the active appliance. Fail Over operation can take a few minutes to complete. Refresh the browser to confirm that the failover is successful and the Primary appliances are now reported as passive.
Check replication state after failover of the Cluster Leader appliance
Once the passive appliance is back up after reboot, confirm the replication is good for each pair - replication can take a few minutes. Execute the following commands from the Primary appliance using the Command Line Interface to confirm the replication status.
$ SevOne-act check replication$ SevOne-masterslave-status
Before proceeding to the next step, ensure that replication checks report no errors.
Perform reboot of Cluster Leader Primary appliance
After the failover, the Cluster Leader Secondary appliance will now be the active appliance and, the Primary appliance will be in the passive state. Identify to confirm the passive appliance of the pair from the User Interface > Administration > Cluster Manager. In the left navigation bar, expand the Cluster Leader peer to identify which appliance of the pair is currently passive of the pair.
Refresh the browser to confirm that the failovers are successful and the Cluster Leader primary appliance is now reported as passive.
Now, log in using SSH to Cluster Leader passive appliance as root and perform the reboot.
$ SevOne-shutdown rebootPerform failover operation to make Cluster Leader Primary as active appliance
You may now perform the fail over operation. From Administration > Cluster Manager > left navigation bar, identify the active appliance of the Cluster Leader pair and select the active appliance of the pair. In the upper-right corner, click
and select option Fail Over. For additional details, please refer to Cluster Manager > section Appliance Level Actions.
Fail Over operation can take a few minutes to complete. You may need to refresh the browser to reflect the new state of the peer after the failover.

Check replication state after failover of the appliances
Once the failover is complete, confirm the replication is good for the Cluster Leader peer - replication can take a few minutes. Execute the following commands from the Secondary appliance using the Command Line Interface to confirm the replication status.
$ SevOne-act check replication$ SevOne-masterslave-status(Option 2) Reboot appliances without failover
If the upgrade is in a complete maintenance window and an outage on polling is acceptable for the duration of the restart of the appliances, then you can choose to perform the restart of the appliances in any order. However, SevOne always recommends restart of the passive appliances first and then, restart the active appliances for all the peers.
Reboot Secondary appliances first (including Cluster Leader Secondary appliance)
Identify to confirm the passive appliance of the pair. From Administration > Cluster Manager > left navigation bar, expand the peer to identify which appliance of the pair is currently passive. For example, 10.129.13.121 as shown in the screenshot below, is the passive appliance of the pair.
-
Using ssh, log in to each SevOne NMS passive appliance as root, including the Cluster Leader passive appliance.
$sshroot@<NMS'passive'appliance> -
Reboot the passive appliance.
$ SevOne-shutdownrebootRepeat the steps above for each passive appliance including the Cluster Leader passive appliance.
Multiple passive appliances of different peers can be restarted at the same time in batches. SevOne recommends performing no more than 4 to 5 appliances at the same time to keep the operation manageable.
Perform restart of the Primary appliance(s) (all peers except Cluster Leader)
Identify to confirm the active appliance of the pair from the User Interface > Administration > Cluster Manager. In the left navigation bar, expand the peer to identify which appliance of the pair is currently active of the pair.
Now, log in using SSH to the active appliance(s) as root and perform the reboot.
Do not restart the Cluster Leader active appliance at this time.
$ SevOne-shutdown reboot
Multiple passive appliances of different peers can be restarted at the same time in batches. SevOne recommends performing no more than 4 to 5 appliances at the same time to keep the operation manageable. Please ensure that you do not restart the Cluster Leader appliance at this time.
Perform reboot of Cluster Leader Primary appliance
Once all other appliances in the cluster have been restarted, the Cluster Leader primary appliance must be restarted. Identify to confirm the active appliance of the Cluster Leader pair from the User Interface > Administration > Cluster Manager. In the left navigation bar, expand the Cluster Leader peer to identify which appliance of the pair is currently active of the pair.
Now, log in using SSH to the Cluster Leader active appliance as root and perform the reboot.
$ SevOne-shutdown rebootConfirm all appliances in cluster have restarted
Execute the following script from the active Cluster Leader.
$ for IP in $(SevOne-peer-list); do echo -en "IP: $IP \t"; ssh $IP 'echo -e "Hostname: $(hostname) \t System Uptime: $(uptime)" '; doneIf any appliance's system uptime reflects that the system may have been missed to be restarted, please follow the steps for restarting the appliance using the failover procedure (as necessary).
Cluster Leader does not need to be restarted again.
Load Kernel & Start Services
-
Perform some cleanup.
$rm/opt/installRPMs.tar$rm-rf/opt/ansible -
After the reboot completes successfully, SSH back to your active Cluster Leader of SevOne NMS cluster to check the installed kernel packages. Please see the table below to confirm that you have the correct kernel version.
Check kernel version$ SevOne-show-versionOR$ rpm -qa |grepkernelOR$uname-rKernel automatically gets updated as part of the upgrade and n ot every NMS release has a new kernel.
Depending on the NMS release, kernel versions must be:
SevOne NMS Version
Kernel Version
NMS 6.8.0
4.18.0-513.11.1.el8_9.x86_64
NMS 6.7.0
4.18.0-499.el8.x86_64
Kernel version is based on the NMS release.
Kernel version must be based on the NMS release. If not, you must reboot the entire cluster by executing the step below to apply the new kernel otherwise, reboot is not required.
$ SevOne-shutdownreboot -
Verify the Operating System version. Confirm that version is Red Hat Enterprise Linux after the upgrade.
$cat/etc/redhat-releaseRed Hat Enterprise Linux release 8.9 (Ootpa) -
Execute the following command to identify errors, if any.
$ SevOne-act check checkout --full-cluster --verbose
Check Docker Services
Post upgrade, ensure that docker services running/enabled prior to the upgrade are still running/enabled.
-
Using ssh, log in to SevOne NMS appliance as root.
$sshroot@<NMS appliance> -
Check docker service is running / enabled.
Check for actual containers. For example, soa$ dockerpsCONTAINER ID IMAGE COMMAND CREATED STATUS PORTS NAMES675c0f79c08f docker.s1artrtp1.s1.devit.ibm.com/soa:v6.8.0-build.2"/entrypoint.sh"31 minutes ago Up 31 minutes soaCheck whether docker service is active$ SevOne-peer-do"systemctl is-active docker.service"--- Gathering peer list...--- Runningcommandon 127.0.0.1...active[ OKAY ]$ SevOne-peer-do"systemctl is-enabled docker.service"Check whether docker service is enabled$ SevOne-peer-do"systemctl is-enabled docker.service"--- Gathering peer list...--- Runningcommandon 127.0.0.1...enabled[ OKAY ] -
Restart SOA.
$ supervisorctl restart soa
Log Files
Log File can be found in /var/SevOne/ansible-upgrade/<fromVersion-toVersion>/<timestamp>/<peerIP>.log.
For example, /var/SevOne/ansible-upgrade/v6.7.0-v6.8.0/<timestamp>/<peerIP>.log
-
Each peer will have its own log file located on the Cluster Leader.
-
A new log file will be created for each run of the upgrade and is split by the timestamp folder.
Expand Logical Volume
The details provided below apply only when you need to increase the hard disk space of your virtual machine for the hardware component that you want to upgrade with the requirements mentioned in SevOne NMS Installation Guide - Virtual Appliance > section Hardware Requirements.
If you have low storage space and need to increase the capacity of your virtual machine's partitions, the steps below will help extend the storage by using Logical Volume Manager (LVM).
For documentation purposes, in the steps below, it is assumed the customer domain is on VMware vSphere Client. Follow similar steps if your environment is on OpenStack/KVM, AWS, Azure, etc.
Customer Domain
-
Open your VMware vSphere Client.
Your pages may vary from the screenshots in the steps below.
-
Search the virtual machine for the hardware component you want to upgrade. For example, vDNC100_CentOS and its IP address is 10.168.117.98.
-
Right-click on the virtual machine and select Edit Settings.
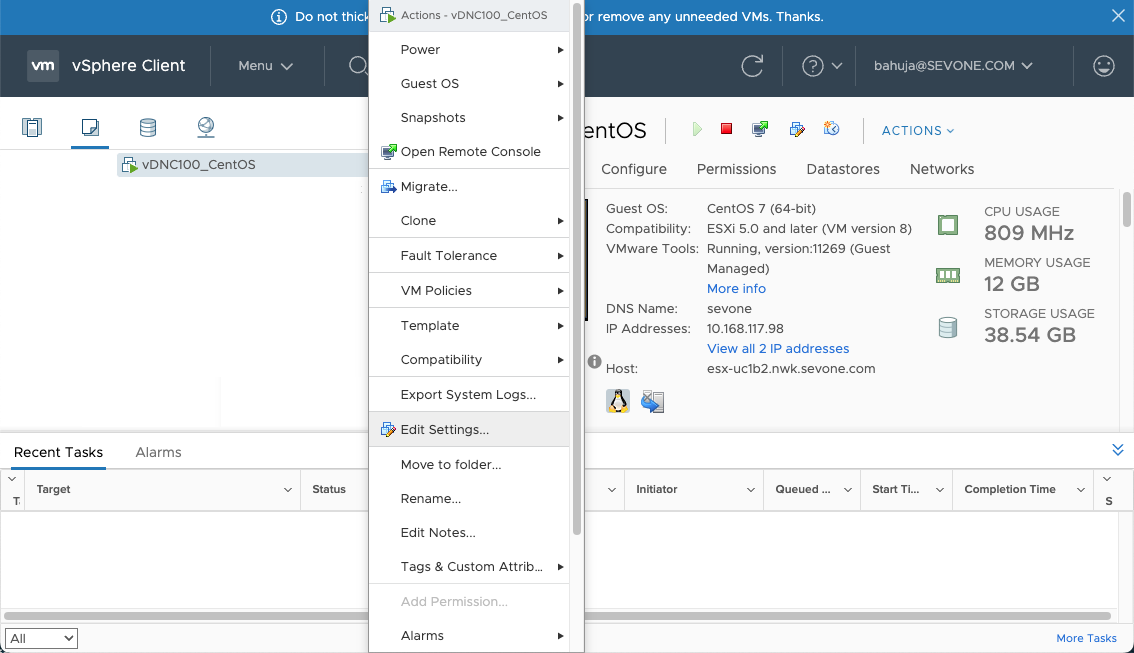 Example
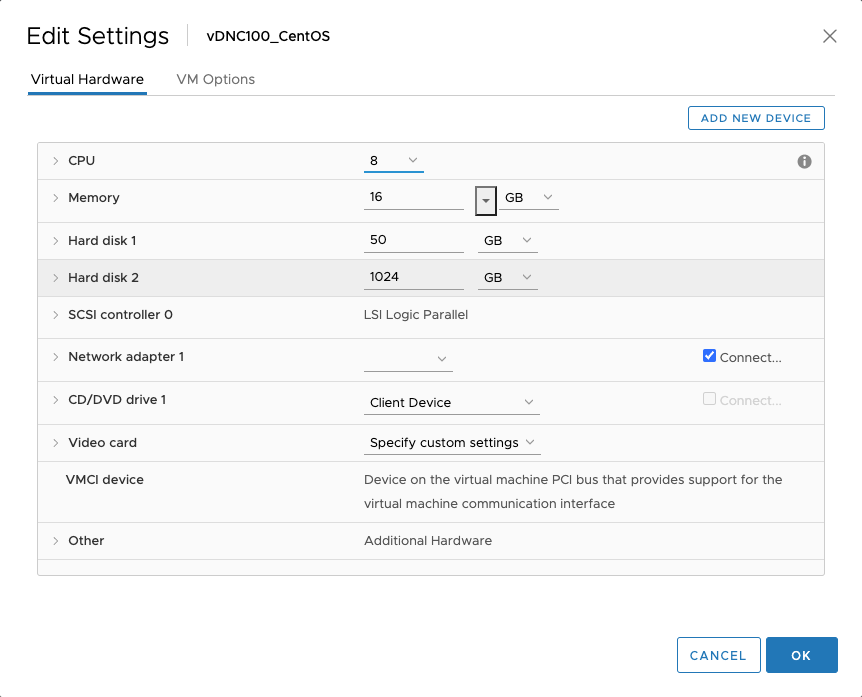
where,
-
Hard disk 1 is your root partition (/) and is set to 50GB.
-
Hard disk 2 is your data partition (/data) and is set to 1024GB.
You will see the current settings of your virtual machine.
-
SevOne Domain
-
SSH into your SevOne NMS virtual machine and log in as root.
$sshroot@<virtual machine IP address orhostname>Example$sshroot@10.168.117.98 -
Execute the following commands in the order shown below.
-
lsblk command reads the sysfs filesystem and udev db to gather information.
$ lsblkNAME MAJ:MIN RM SIZE RO TYPE MOUNTPOINTfd0 2:0 1 4K 0 disksda 8:0 0 50G 0 disk├─sda1 8:1 0 2M 0 part├─sda2 8:2 0 500M 0 part/boot└─sda3 8:3 0 49.5G 0 part├─cl-root 253:0 0 45.5G 0 lvm /└─cl-swap 253:1 0 4G 0 lvm [SWAP]sdb 8:16 0 1T 0 disk└─sdb1 8:17 0 1024G 0 part└─data_vg-data_lv 253:2 0 1024G 0 lvm/datasr0 11:0 1 1024M 0 romYou will see that sda3 is 49.5G.
-
View the existing partitions and storage devices.
$ parted -l |head-12Model: VMware Virtual disk (scsi)Disk/dev/sda: 53.7GBSector size (logical/physical): 512B/512BPartition Table: msdosDisk Flags:Number Start End Size Type File system Flags1 1049kB 3146kB 2097kB primary2 3146kB 527MB 524MB primary xfs boot3 527MB 53.7GB 53.2GB primary lvmDisk /dev/sda currently has 53.7GB.
-
The pvs command provides physical volume information in a configurable form, displaying one line per physical volume.
$ pvsPV VG Fmt Attr PSize PFree/dev/sda3cl lvm2 a-- <49.51g 0/dev/sdb1data_vg lvm2 a-- <1024.00g 0 -
The pvdisplay allows you to see the attributes of one or more physical volumes like size, physical extent size, space used for the volume group descriptor area and so on. In the command below, physical volume is passed to obtain its. For example, /dev/sda3.
$ pvdisplay/dev/sda3--- Physical volume ---PV Name/dev/sda3VG Name clPV Size <49.51 GiB / not usable 0Allocatableyes(but full)PE Size 4.00 MiBTotal PE 12674Free PE 0Allocated PE 12674PV UUID tJa0zz-UQEc-nKHh-mvoo-RfM6-NMM9-fyeaZCFree PE is 0 for /dev/sda3.
-
Based on target version's hardware requirements mentioned in SevOne NMS Installation Guide - Virtual Appliance, if you need to increase your hard disk based on the specifications, go to your VMware vSphere Client > choose your virtual machine for example, vDNC100_CentOS and its IP address is 10.168.117.98. Right-click on the virtual machine and select Edit Settings. Increase your Hard disk 1 from 50GB to 150GB and click OK in the lower-right corner.
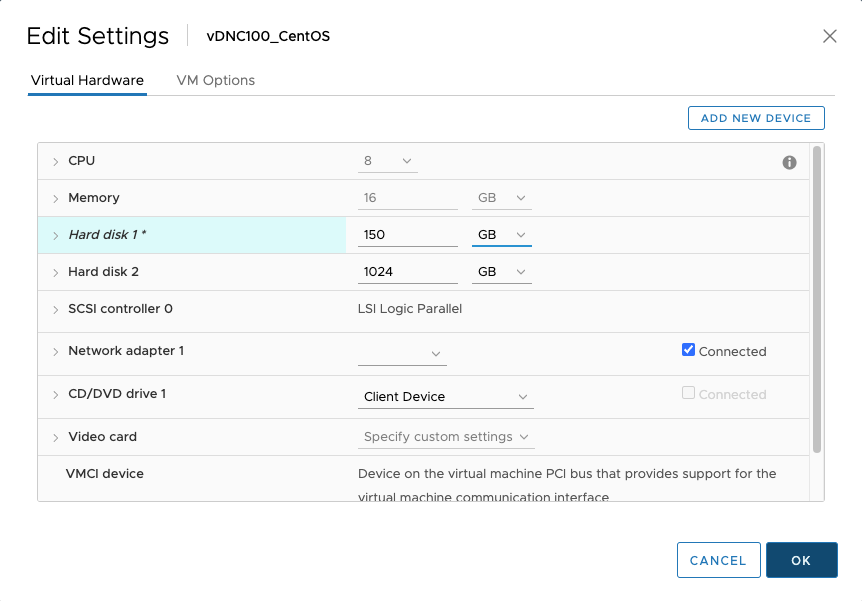
Hard disk 1 change from 50GB to 150GB will only take effect after the logical volume is extended by executing the lvextend command as shown below.
-
The vgs command provides volume group information in a configurable form, displaying one line per volume group.
$ vgsVG#PV #LV #SN Attr VSize VFreecl 1 2 0 wz--n- <49.51g 0data_vg 1 1 0 wz--n- <1024.00g 0 -
The vgdisplay command displays volume group properties (such as size, extents, number of physical volumes, etc.) in a fixed form. In the command below, VG Name, cl, is passed to obtain the attributes of this physical volume.
$ vgdisplay cl--- Volume group ---VG Name clSystem IDFormat lvm2Metadata Areas 1Metadata Sequence No 3VG Accessread/writeVG Status resizableMAX LV 0Cur LV 2Open LV 2Max PV 0Cur PV 1Act PV 1VG Size <49.51 GiBPE Size 4.00 MiBTotal PE 12674Alloc PE / Size 12674 / <49.51 GiBFree PE / Size 0 / 0VG UUID 7cMstg-INr3-loF0-vT2N-ghpb-IBJx-bzXuv7VG Size is 49.51 GiB.
-
Rescan to see that disk has resized from 53687091200 (50GB) to 161061273600 (150GB).
$echo1>/sys/class/block/sda/device/rescan; dmesg -T |tail-2[Thu Dec 8 16:44:33 2022] sd 0:0:0:0: [sda] 314572800 512-byte logical blocks: (161 GB/150GiB)[Thu Dec 8 16:44:33 2022] sda: detected capacity change from 53687091200 to 161061273600 -
View the existing partitions and storage devices again.
$ parted -l |head-12Model: VMware Virtual disk (scsi)Disk/dev/sda: 161GBSector size (logical/physical): 512B/512BPartition Table: msdosDisk Flags:Number Start End Size Type File system Flags1 1049kB 3146kB 2097kB primary2 3146kB 527MB 524MB primary xfs boot3 527MB 53.7GB 53.2GB primary lvmDisk, /dev/sda, has been resized to 161GB.
-
Now, resize the disk partition from 50GB to 150GB.
ExampleFor this example, at the prompts below, you will enter the following in the order listed.
-
print - will show you the disk size.
-
print free - shows the free space available. In the example below, you will see the following.
Number Start End Size Type File system Flags32.3kB 1049kB 1016kB Free Space1 1049kB 3146kB 2097kB primary2 3146kB 527MB 524MB primary xfs boot3 527MB 53.7GB 53.2GB primary lvm53.7GB 161GB 107GB Free Space -
resizepart - resizes the partition.
-
at prompt Partition number?, enter 3 (this is obtainted from the Number column in the example above).
-
at prompt End? [53.7GB]?, enter 161GB (this is obtained from the End column in the example above).
-
-
print - verifies the disk size change to 161GB.
-
quit - allows you to quit parted utility.
$ parted/dev/sdaGNU Parted 3.1Using/dev/sdaWelcome to GNU Parted! Type'help'to view a list of commands.(parted) printModel: VMware Virtual disk (scsi)Disk/dev/sda: 161GBSector size (logical/physical): 512B/512BPartition Table: msdosDisk Flags:Number Start End Size Type File system Flags1 1049kB 3146kB 2097kB primary2 3146kB 527MB 524MB primary xfs boot3 527MB 53.7GB 53.2GB primary lvm(parted) printfreeModel: VMware Virtual disk (scsi)Disk/dev/sda: 161GBSector size (logical/physical): 512B/512BPartition Table: msdosDisk Flags:Number Start End Size Type File system Flags32.3kB 1049kB 1016kB Free Space1 1049kB 3146kB 2097kB primary2 3146kB 527MB 524MB primary xfs boot3 527MB 53.7GB 53.2GB primary lvm53.7GB 161GB 107GB Free Space(parted) resizepartPartition number? 3End? [53.7GB]? 161GB(parted) printModel: VMware Virtual disk (scsi)Disk/dev/sda: 161GBSector size (logical/physical): 512B/512BPartition Table: msdosDisk Flags:Number Start End Size Type File system Flags1 1049kB 3146kB 2097kB primary2 3146kB 527MB 524MB primary xfs boot3 527MB 161GB 160GB primary lvm(parted) quitInformation: You may need to update/etc/fstab.$ -
-
Check to see if the disk is resized.
$ parted -l |head-12Model: VMware Virtual disk (scsi)Disk/dev/sda: 161GBSector size (logical/physical): 512B/512BPartition Table: msdosDisk Flags:Number Start End Size Type File system Flags1 1049kB 3146kB 2097kB primary2 3146kB 527MB 524MB primary xfs boot3 527MB 161GB 160GB primary lvmFor partition 3, you will see that the End column now has 161GB.
-
Now, you need to resize the physical volume in Logical Volume Manager. The pvs command provides physical volume information in a configurable form, displaying one line per physical volume.
$ pvsPV VG Fmt Attr PSize PFree/dev/sda3cl lvm2 a-- <49.51g 0/dev/sdb1data_vg lvm2 a-- <1024.00g 0 -
Display the physical volume is /dev/sda3, for example.
$ pvdisplay/dev/sda3--- Physical volume ---PV Name/dev/sda3VG Name clPV Size <49.51 GiB / not usable 0Allocatableyes(but full)PE Size 4.00 MiBTotal PE 12674Free PE 0Allocated PE 12674PV UUID tJa0zz-UQEc-nKHh-mvoo-RfM6-NMM9-fyeaZCFree PE is still 0 for /dev/sda3.
-
Resize the Physical Volumne.
$ pvresize/dev/sda3Physical volume"/dev/sda3"changed1 physical volume(s) resized or updated / 0 physical volume(s) not resized -
After resizing the physical volume, display the physical volume is /dev/sda3, for example, again.
$ pvdisplay/dev/sda3--- Physical volume ---PV Name/dev/sda3VG Name clPV Size 149.45 GiB / not usable <1.57 MiBAllocatableyesPE Size 4.00 MiBTotal PE 38259Free PE 25585Allocated PE 12674PV UUID tJa0zz-UQEc-nKHh-mvoo-RfM6-NMM9-fyeaZCFree PE is now 25585 for /dev/sda3.
-
You are now ready to extend the logical volume and filesystem using lvextend command with all, 100%, of available free space.
-
Display information related to file systems about total and available space for root partition.
$df-hT /Filesystem Type Size Used Avail Use% Mounted on/dev/mapper/cl-rootxfs 46G 17G 29G 37% /Size is 46G for 50GB hard disk.
-
lvs command provides logical volume information in a configurable form, displaying one line per logical volume.
$ lvsLV VG Attr LSize Pool Origin Data% Meta% Move Log Cpy%Sync Convertroot cl -wi-ao---- <45.51gswap cl -wi-ao---- 4.00gdata_lv data_vg -wi-ao---- <1024.00g -
lvdisplay command displays the properties of LVM logical volumes. For example, logical volume, cl, in the example below.
$ lvdisplay cl--- Logical volume ---LV Path/dev/cl/swapLV Name swapVG Name clLV UUID jj8N64-6UPp-WWQz-UKGj-TAxf-MwXW-HJCu7nLV Write Accessread/writeLV Creation host,timelocalhost, 2017-12-07 22:10:11 +0000LV Status available# open 2LV Size 4.00 GiBCurrent LE 1024Segments 1Allocation inheritRead ahead sectors auto- currentlysetto 8192Block device 253:1--- Logical volume ---LV Path/dev/cl/rootLV Name rootVG Name clLV UUID Jqecl2-YErD-8zwd-JHOG-MPZB-lmdI-HdcT8uLV Write Accessread/writeLV Creation host,timelocalhost, 2017-12-07 22:10:11 +0000LV Status available# open 1LV Size <45.51 GiBCurrent LE 11650Segments 1Allocation inheritRead ahead sectors auto- currentlysetto 8192Block device 253:0 -
You are now ready to extend the logical volume using lvextend command.
$ lvextend -l+100%FREE -r/dev/cl/rootSize of logical volume cl/rootchanged from <45.51 GiB (11650 extents) to <145.45 GiB (37235 extents).Logical volume cl/rootsuccessfully resized.meta-data=/dev/mapper/cl-rootisize=512 agcount=4, agsize=2982400 blks= sectsz=512 attr=2, projid32bit=1= crc=1 finobt=0 spinodes=0data = bsize=4096 blocks=11929600, imaxpct=25= sunit=0 swidth=0 blksnaming =version 2 bsize=4096 ascii-ci=0 ftype=1log =internal bsize=4096 blocks=5825, version=2= sectsz=512 sunit=0 blks, lazy-count=1realtime =none extsz=4096 blocks=0, rtextents=0data blocks changed from 11929600 to 38128640 -
Check the root partition size for /dev/cl/root.
$ lvdisplay/dev/cl/root--- Logical volume ---LV Path/dev/cl/rootLV Name rootVG Name clLV UUID Jqecl2-YErD-8zwd-JHOG-MPZB-lmdI-HdcT8uLV Write Accessread/writeLV Creation host,timelocalhost, 2017-12-07 22:10:11 +0000LV Status available# open 1LV Size <145.45 GiBCurrent LE 37235Segments 1Allocation inheritRead ahead sectors auto- currentlysetto 8192Block device 253:0 -
Display information related to file systems about total and available space for root partition.
$df-hT /Filesystem Type Size Used Avail Use% Mounted on/dev/mapper/cl-rootxfs 146G 17G 129G 12% /You will see that the root partition has been updated and resized. It is now 146G.
-
Exit from Command Line Interface.
$exit -
Your virtual machine resource requirements now align with what is required by SevOne NMS' target version. You may now proceed with the steps to perform the upgrade.
-