Table of Contents (Start)
- Topics
- Introducing SevOne
- Login
- Startup Wizard
- Dashboard
- Global Search - Advanced Search
- Report Manager
- Report Attachment Wizard
- Report Properties
- Report Interactions
- Instant Graphs
- TopN Reports
- Alerts
- Alert Archives
- Alert Summary
- Instant Status
- Status Map Manager
- Edit Maps
- View Maps
- FlowFalcon Reports
- NBAR Reports
- Logged Traps
- Unknown Traps
- Trap Event Editor
- Trap Destinations
- Trap Destination Associations
- Policy Browser
- Create and Edit Policies
- Webhook Definition Manager
- Threshold Browser
- Create and Edit Thresholds
- Probe Manager
- Discovery Manager
- Device Manager
- New Device
- Edit Device
- Object Manager
- High Frequency Poller
- Device Summary
- Device Mover
- Device Groups
- Object Groups
- Object Summary
- Object Rules
- VMware Browser
- AWS Plugin
- Azure Plugin (Public Preview)
- Calculation Plugin
- Database Manager
- Deferred Data Plugin
- DNS Plugin
- HTTP Plugin
- ICMP Plugin
- IP SLA Plugin
- JMX Plugin
- NAM
- NBAR Plugin
- Portshaker Plugin
- Process Plugin
- Proxy Ping Plugin
- SDWAN Plugin
- SNMP Plugin
- VMware Plugin
- Web Status Plugin
- WMI Plugin
- xStats Plugin
- Indicator Type Maps
- Device Types
- Object Types
- Object Subtype Manager
- Calculation Editor
- xStats Source Manager
- User Role Manager
- User Manager
- Session Manager
- Authentication Settings
- Preferences
- Cluster Manager
- Maintenance Windows
- Processes and Logs
- Metadata Schema
- Baseline Manager
- FlowFalcon View Editor
- Map Flow Objects
- FlowFalcon Views
- Flow Rules
- Flow Interface Manager
- MPLS Flow Mapping
- Network Segment Manager
- Flow Protocols and Services
- xStats Log Viewer
- SNMP Walk
- SNMP OID Browser
- MIB Manager
- Work Hours
- Administrative Messages
- Enable Flow Technologies
- Enable JMX
- Enable NBAR
- Enable SNMP
- Enable Web Status
- Enable WMI
- IP SLA
- SNMP
- SevOne Data Publisher
- Quality of Service
- Perl Regular Expressions
- Trap Revisions
- Integrate SevOne NMS With Other Applications
- Email Tips and Tricks
- SevOne NMS PHP Statistics
- SevOne NMS Usage Statistics
- Glossary and Concepts
- Map Flow Devices
- Trap v3 Receiver
- Guides
- Quick Start Guides
- AWS Quick Start Guide
- Azure Quick Start Guide (Public Preview)
- Data Miner Quick Start Guide
- Flow Quick Start Guide
- Group Aggregated Indicators Quick Start Guide
- IP SLA Quick Start Guide
- JMX Quick Start Guide
- Metadata Quick Start Guide
- RESTful API Quick Start Guide
- Self-monitoring Quick Start Guide
- SevOne NMS Admin Notifications Quick Start Guide
- SNMP Quick Start Guide
- Synthetic Indicator Types Quick Start Guide
- Topology Quick Start Guide
- VMware Quick Start Guide
- Web Status Quick Start Guide
- WMI Quick Start Guide
- xStats Quick Start Guide
- xStats Adapter - Accedian Vision EMS (TM) Quick Start Guide
- Deployment Guides
- Automated Build / Rebuild (Customer) Instructions
- Generate a Self-Signed Certificate or a Certificate Signing Request
- SevOne Best Practices Guide - Cluster, Peer, and HSA
- SevOne Data Platform Security Guide
- SevOne NMS Implementation Guide
- SevOne NMS Installation Guide - Virtual Appliance
- SevOne NMS Advanced Network Configuration Guide
- SevOne NMS Installation Guide
- SevOne NMS Port Number Requirements Guide
- SevOne NMS Upgrade Process Guide
- SevOne Physical Appliance Pre-Build BIOS and RAID Configuration Guide
- SevOne SAML Single Sign-On Setup Guide
- Cloud Platforms
- Other Guides
- Quick Start Guides
Discovery Manager
The Discovery Manager enables you to manage discovery and to scan your network for everything that SevOne NMS can ping. This enables you to add multiple devices into SevOne NMS so that you can monitor the data from your network.
To access the Discovery Manager from the navigation bar, click the Devices menu and select Discovery Manager.
The Discovery Manager has four tabs.
-
The Watched Subnets tab enables you to define subnet blocks and IP address ranges to ping anything that is able to be pinged in specific segments of your network.
-
The Candidates tab displays everything in the network segments that was successfully pinged. No data is collected from candidates. The Candidates tab enables you to add anything that was successfully pinged into SevOne NMS for data collection, reports, alerts, etc.
-
The Discovery Queue tab appears selected by default to enable you to view the status of the discovery of the object on the devices that are in SevOne NMS.
-
The Device Notes tab enables you to view the notes discovery creates. These notes help you troubleshoot plugin configuration issues and enable you to communicate such things as device outage plans.
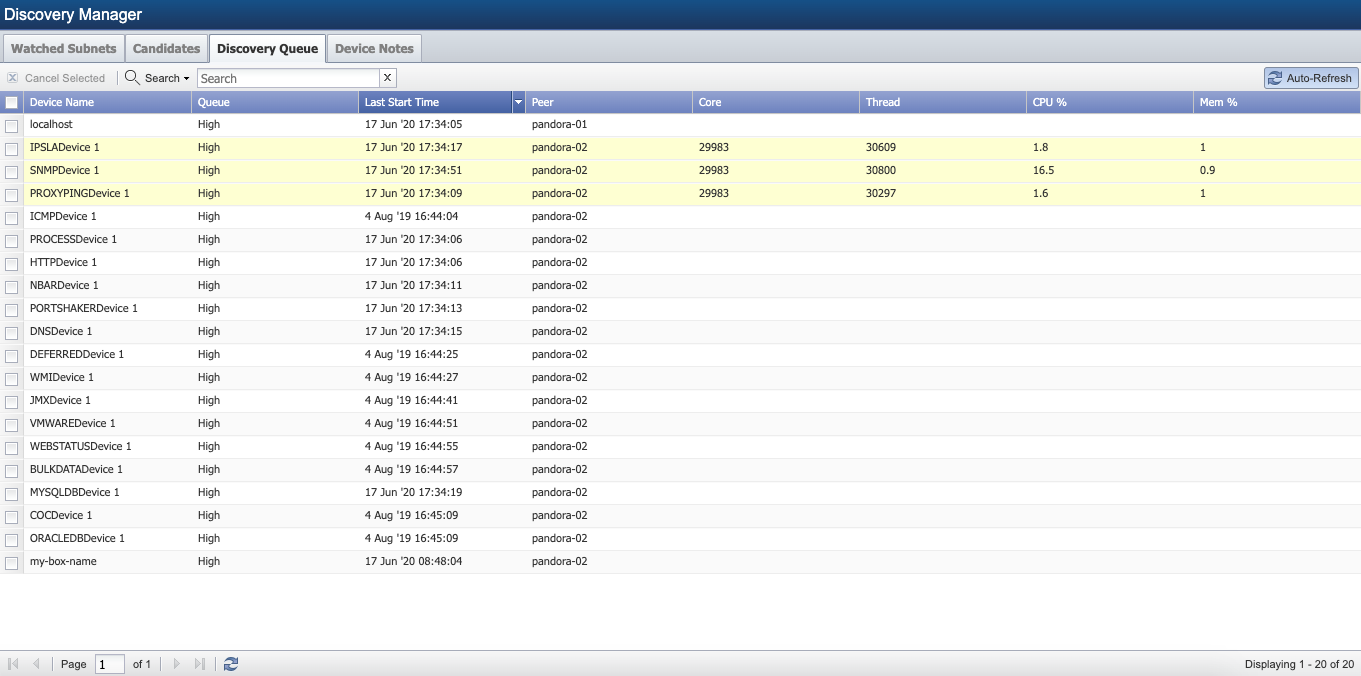
Discovery Queue
The Discovery Queue tab displays the status of the discovery of the objects on the devices that are in SevOne NMS. This tab does not display information about candidates because objects on candidates are not discovered or polled by SevOne NMS.
Discovery Options
There are two concurrent discovery queues.
-
High Priority Queue - For devices in the high priority discovery queue, SevOne NMS first discovers the device that was most recently queued with the high priority followed by the other devices in the high priority queue in the last in first out sequence.
-
Low Priority Queue - For devices in the low priority discovery queue, SevOne NMS first discovers the device that has been in the low priority queue the longest in the first in first out sequence.
There are two discovery processes.
-
Manual Discovery - The Manual Discovery process runs every two minutes to discover objects such as interfaces, CPUs, and their indicators on the devices you manually mark for discovery on the Device Manager. Typically the Manual Discovery process runs in the high priority queue but you can choose to decrease the Manual Discovery process to the low priority queue.
-
Automatic Discovery - The Automatic Discovery process runs as you schedule it to occur on the Cluster Manager > Peer Settings tab to discover interfaces, CPUs, etc. on all devices in SevOne NMS even if you do not mark the device for discovery. Automatic Discovery runs in the low priority discovery queue.
Manage Discovery
The Discovery Queue tab displays the following information. Select the check box for each device on which to stop discovery and click Cancel Selected to stop discovery.
-
Device Name - Displays the device name.
-
Queue - Displays Low for the low discovery queue or displays High for the high discovery queue.
-
Last Start Time - Displays the time the discovery process started.
-
Peer – Displays the name of the peer that performs the discovery and polls the device.
-
Core - Displays the identification of the core discovery process. A core discovery process spawns multiple discovery threads. Threads with the same Core ID are created by the same process.
-
Thread - Displays the identification of the thread that is currently performing the discovery action. A thread only discovers one device and then the thread is destroyed.
-
CPU % - Displays the percentage of CPU usage when the device is discovered.
-
Mem % - Displays the percentage of memory that the discovery action consumes. Discoveries with abnormally high memory usage may indicate a problem with the polled device. The discovery thread terminates when it consumes too much memory.
Watched Subnets
The Watched Subnets tab displays the list of subnets to scan for candidates and devices in your network.
-
Subnet Name - Displays the name of the subnet to scan.
-
Start IP Address - Displays the low end of the IP address range to scan.
-
End IP Address - Displays the high end of the IP address range or the subnet mask to scan.
-
Scan Time - Displays scan start time when you schedule the subnet to scan occur on a regular basis.
-
Scan Time Zone - Displays the time zone for the scheduled scan time.
-
Scan Peer - Displays the name of the peer that performs the scan of your network.
-
Scan Action - Displays Add Device when anything the scan finds is to be added to SevOne NMS as a device on the Device Manager for discovery and polling. Displays Add Candidate when anything the scan finds is displayed on the Candidates tab on the Discovery Manager. No metrics are collected from candidates.
-
Status - Displays a progress bar when the subnet is being scanned.
-
Check SNMP - Displays Yes when you want to check for SNMP on all devices being scanned or displays No when you do not want to check for SNMP on the devices being scanned.
Manage Subnets
The Watched Subnets tab enables you to create any number of subnet blocks and IP address ranges to scan your network on a regular schedule for items that can be pinged.
-
Click Cancel Scan to cancel all scans that are currently in progress or select the check box for specific subnets and click Cancel Scan.
-
Click Scan Now to start a scan of all subnets or select the check box for specific subnets and click Scan Now.
Perform the following steps to manage subnets scans.
-
Click Add Subnet or click
 to display the Add/Edit Subnet pop-up.
 -
In the Subnet Name field, enter the name of the subnet block or IP address range.
-
Click the Peer drop-down and select the peer that is to send out the ping commands to the network segment.
-
Click the Action drop-down.
-
Select Add Device to add everything that is able to be pinged to the Device Manager for object discovery and data polling.
-
Select Add Candidate to display everything that is able to be pinged on the Candidates tab where you can select specific candidates to add to the for object discovery and data polling. No metrics are collected from candidates.
-
-
Select the Check SNMP check box to check for SNMP on all devices being scanned.
-
Click Schedule to display the Scan Time pop-up. If you do not schedule the subnet scan, the scan occurs only when you click Scan Now.
-
Click the Days tabs to scan the network on the dates that appear with a darker shade. Click Weekends to scan on weekend and/or click Weekdays to scan on weekdays.
-
Click the Start Time drop-down and select the time to start the scan.
-
Click the Time Zone drop-down and select a time zone.
-
Click Add to add the scan time to the Selected list.
-
Repeat these steps to add additional scan times. Each scan time must be unique.
-
Click Save to save the scan times.
-
-
Select one of the following options:
-
Select IP Address Range to create an IP address range and perform the following steps.
-
In the Start IP Address field, enter the low end of the IP address range.
-
In the End IP Address field, enter the high end of the IP address range.
-
-
Select Subnet Block to create a subnet block and perform the following steps.
-
In the IP Address field, enter an IP address.
-
In the Subnet Mask field, enter a subnet mask.
-
-
-
Select the Create Device Group for Subnet check box to create a device group for the devices you add to SevOne NMS as a result of the scan for the subnet.
-
Click Add to add the block or range to the list to watch.
-
Repeat the previous steps to create additional ranges.
-
If you do not schedule the subnet to scan on a regular basis, select the check box for the subnet and click Scan Now. If you schedule the subnet to scan on a regular basis, the subnet is scanned on the schedule you define until you remove the subnet.
Candidates
The Candidates tab displays the results of the scans that occur from the Watched Subnets tab. No metrics are collected from candidates.
Candidates List Filters
Perform the following steps to filter the candidates that display in the list.
-
Select the check box for each candidate to manage, click
 , and select the following options.
 -
Select Block to prevent the candidate from being promoted to as device in SevOne NMS.
-
Select Unblock to enable users to promote the candidate to a device in SevOne NMS.
-
Select Remove to remove the candidate/device from the list. The candidate/device can reappear in the list the next time a scheduled scan occurs.
-
-
Click Hide Devices to remove the devices SevOne NMS currently monitors and polls from the display or click Show Devices to display the devices that are in SevOne NMS in the list.
-
Click Hide Blocked to remove the candidates you block from the list or click Show Blocked to display the candidates you block in the list.
-
Select the check box for each candidate you want to promote to a device in SevOne NMS and click Add Devices to add the candidates as devices in SevOne NMS. When the device is in SevOne NMS, its objects are discovered and metrics are polled for reports and alerts. When the Status column displays In SevOne NMS you cannot re-add the device.
Candidate List
Candidates are grouped by the subnet scan that found the candidate and 
 enable you to contract or expand each subnet group section. Click on a row to display additional information. The Edit Device topic describes this additional information. For a candidate, the additional information section enables you to add the candidate as a device and to edit the SNMP settings to attempt to detect SNMP availability. If you choose to add a candidate to SevOne NMS, you can change these settings on the Edit Device page.
-
Candidate Name – Displays the candidate/device name.
-
IP Address – Displays the candidate/device IP address.
-
Pingable – Displays
 when SevOne NMS can ping the candidate/device or displays
  when SevOne NMS cannot ping the candidate/device.
 -
SNMP – Displays
when you enable the candidate/device to send SNMP data to SevOne NMS or displays
when SevOne NMS cannot detect SNMP availability on the candidate/device. For details, please refer to section Enable SNMP in SevOne NMS System Administration Guide. -
Peer – Displays the name of the peer that would discover and poll the device if you were to add the candidate to SevOne NMS.
-
Status – Displays one of the following.
-
Candidate – Black normal font indicates this is a candidate. No objects are discovered and no metrics are polled for reports or alerts from a candidate. You must add the candidate as a device to SevOne NMS if you want to poll the objects on the device for metrics to include in reports and alerts.
-
In Progress – This candidate is being added as a device to SevOne NMS but no objects have been discovered on the device and no poll metrics are available for reports or alerts.
-
In SevOne NMS – Blue italic font indicates the device is in SevOne NMS and data is being polled and monitored for reports and alerts. The Device Manager displays all devices in SevOne NMS.
-
Blocked – Red italic font indicates a candidate is blocked and you cannot add the candidate as a device to SevOne NMS.
-
-
Click
next to a candidate to edit the IP Address and Peer columns and to display additional information. -
The additional information section on the right displays the settings that would be used in the device configuration should you choose to add the candidate as a device in SevOne NMS. The additional information provides the following buttons.
-
Click Add Device to add the candidate as a device in SevOne NMS. You can then edit these configuration settings on the Edit Device page.
-
Click Edit SNMP Settings to edit the candidate SNMP settings.
-
Add Candidates
Perform the following steps to add a single candidate to the list. See the Import Multiple Candidates section below to import multiple candidates via a .csv import wizard.
-
Click Add Candidate to display the Add Candidate pop-up.
-
In the IP Address field, enter the IP address of the candidate.
-
In the Candidate Name field, enter the name of the candidate.
-
Click the Peer drop-down and select the peer to scan for the candidate and to monitor the candidate if you add the candidate to SevOne NMS as a device.
-
Click the SNMP Version drop-down and select the SNMP version the candidate uses.
-
For SNMPv1 and SNMPv2, in the SNMP Read Community String field, enter the SNMP read community string for SevOne NMS to use to monitor the candidate should you choose to add the candidate as a device.
-
For SNMPv3, perform the following steps.
-
In the SNMP Username field, enter the user name SevOne NMS needs to authenticate onto the device.
-
Click the SNMP Authentication Type drop-down.
-
Select None (usmNoAuthProtocol) to not use an authentication method to send or receive messages.
-
Select MD5 (usmHMACMD5AuthProtocol) to use MD5 authentication protocol for messages.
-
Select SHA (usmHMACSHAAuthProtocol) to use SHA authentication protocol for messages.
-
-
If you select MD5 or SHA in the previous step, in the SNMP Password field, enter the password SevOne NMS needs to authenticate onto the device.
-
Click the SNMP Encryption Type drop-down.
-
Select None to not use encryption to send or receive messages.
-
Select AES to use the Advanced Encryption Standard encryption method.
-
Select DES to use the Data Encryption Standard encryption method.
-
-
If you select AES or DES in the previous step, in the SNMP Encryption Key field, enter the localized key the authentication protocol on the device requires to authenticate messages.
-
In the SNMP Context Name - (Optional) Enter the SNMP context name which defines a collection of management information that is accessible to an SNMP entity. Context can be a physical or logical system, a collection of multiple systems, or even a subset of a system.
-
-
-
Click Save.
Import Multiple Devices and Candidates
The Import CSV wizard enables you to import multiple devices and candidates. On the Candidates tab click Import CSV to display the Import CSV wizard.
You must use the Previous and Next buttons on this wizard to navigate the pages sequentially.
Welcome
The Welcome wizard page enables you to download a .csv file for devices/candidates that use SNMPv1 and SNMPv2 and to download a .csv file for devices/candidates that use SNMPv3.
-
Click the Download SNMPv2 CSV Example link and/or the Download SNMPv3 CSV Example link to open the sample.csv files with a .csv editing application.
-
Complete the fields on the spreadsheet.
-
Save the file to a location that is accessible to SevOne NMS.
-
Click Next to display the Upload File wizard page.
Import File Fields
Use any spreadsheet application to create a .csv format file with the following information. The .csv file(s) must be encoded in UTF-8. You must complete all required fields and you can leave the optional fields blank (delimited by a comma).
SNMPv1 and SNMPv2
Name, IP Address, Description, 1st Level Device Group/Device Group1,1st Level Device Group / Device Group2, 1st Level Device Group/Device Group3, 1st Level Device Group/Device Group4, SNMP Ver, SNMP Port, SNMP RO, SNMP RW, Poll Frequency, Time Zone, Peer
SNMPv3
Name, IP Address, Description, 1st Level Device Group/Device Group1, 1st Level Device Group/ Device Group2, 1st Level Device Group/Device Group3, 1st Level Device Group/Device Group4, SNMP Ver, SNMP Port, SNMP Username, SNMP Password, Authentication Type, Encryption Type, Encryption Key, SNMP RO, SNMP RW, Poll Frequency, Time Zone, Peer, SNMP Context Name
The fields in the file are:
-
Name - (Required) This can be a FQDN, a common name, or the IP address for the device/candidate (SevOne recommends that you do not use the IP address for the device/candidate name).
-
IP Address - (Required) Enter an IP address for the device/candidate. If the device/candidate name is DNS resolvable, this does not have to be the actual IP address because the default settings on the Cluster Manager > Cluster Settings tab enable SevOne NMS to update this to the appropriate IP address upon first discovery.
-
Description - (Optional) Users can search for devices/candidates by description.
-
Group 1, Group 2, Group 3, Group 4 - (Optional) Enter up to four device group names. You define device groups on the Device Groups page. If you have not defined device groups yet, you can leave these blank. The .csv file enables you to associate a device/candidate with up to four device groups. Use the / (slash) as the delimiter between the upper level device groups down to the device group level into which to add the device/candidate and use the , (comma) as the delimiter between each group name field (1st Level Group/2nd Level Group, Type/Router, Location/Delaware, Manufacturer/Cisco).
-
SNMP Ver - (Required if you want to use SNMP performance trending) Enter the SNMP version number 1, 2, or 3.
-
SNMP Port - (Optional) Enter the SNMP port number on the device/candidate from which SevOne NMS is to collect SNMP data. Leave this blank to default to port 161.
-
SNMP Username - (Required for SNMPv3 only) Enter the user name SevOne NMS needs to authenticate onto the device/candidate.
-
SNMP Password - (Required for SNMPv3 only) Enter the password SevOne NMS needs to authenticate onto the device/candidate.
-
Authentication Type - (Required for SNMPv3 only) Enter one of the following: None, MD5, or SHA.
-
Encryption Type - (Required for SNMPv3 only) If you enter either MD5 or SHA for the Authentication Type, enter one of the following: None, AES, or DES.
-
Encryption Key - (Required for SNMPv3 only) If you enter either AES or DES for the Encryption Type, enter the encryption key SevOne NMS needs to authenticate onto the device/candidate.
-
SNMP Read Community String - (Required if the device/candidate uses a string that is different from the strings on the Cluster Manager) Enter the SNMP read community string.
-
SNMP Write Community String - (Required if the device/candidate uses a string that is different from the strings on the Cluster Manager) Enter the SNMP write community string.
-
Poll Frequency - (Optional) Enter the polling frequency in minutes. Leave this blank to default to a five minute poll frequency.
-
Time Zone - (Optional) Enter the time zone of the physical location of the device/candidate. Leave blank to use the time zone from the Cluster Manager > Cluster Settings tab. For thresholds and work hours calculation, you should enter the device/candidate time zone. NOTE: Time zone format should be according to IANA Time Zone specifications.
-
Peer - (Optional) When you have a multi-peer SevOne NMS cluster and you want to specify the peer to discover and poll the device/candidate, enter the name of the peer. If you leave this blank in a multi-peer cluster, the peer on which you run the Import CSV wizard discovers and polls the device/candidate. Leave this blank in a single peer cluster.
-
SNMP Context Name - (Optional) Enter the SNMP context name which defines a collection of management information that is accessible to an SNMP entity. Context can be a physical or logical system, a collection of multiple systems, or even a subset of a system.
Upload File
The Upload File wizard page enables you to upload the .csv file that contains the devices/candidates to import.
-
Click
 to display the File Upload pop-up.
 -
Navigate the file hierarchy and select the .csv file to import.
-
On the pop-up, click Open to display the file name in the wizard.
-
Click Next. Devices/candidates are imported and the Data Validation page appears.
Data Validation
The Data Validation wizard page display any errors that are in the .csv file that prevented the import of device/candidates.
-
Open the .csv file and correct the errors.
-
Return to the Upload File wizard page and attempt to upload the file again.
-
When the Data Validation page displays that the import was successful, click Next.
Import Settings
The Import Settings wizard page enables you to test the SNMP connectivity of the devices/candidates, to have DNS resolve the IP address then use the DNS name for the device/candidate, and to associate the device/candidates with a device group/device type for the display on the Candidates tab.
-
Select the Test SNMP Connectivity check box to confirm that the device/candidate has been enabled to send SNMP data to SevOne NMS. For details, please refer to section Enable SNMP in SevOne NMS System Administration Guide.
-
Select the DNS Resolve the IP Address and Replace Name check box to use DNS to resolve the device/candidate IP address and rename the device/candidate to the resolved name.
-
Click the Add To Device Group drop-down and select a device group/device type to associate the devices/candidates to.
-
Select one of the following Import As options:
-
Devices - to add the devices to SevOne NMS for discovery and polling. Devices display on the Device Manager.
-
Candidates - to add candidates to the Candidates tab on the Discovery Manager. No objects are discovered on candidates and no metrics are polled.
-
-
Click Next.
Import Summary
The Import Summary wizard page displays the progress of the import. When the import is complete, a message appears to indicate how many devices/candidates were added.
Click Finish to close the wizard.
Device Notes
The Device Notes tab enables you to view the notes discovery creates. These notes help you troubleshoot plugin configuration issues and to communicate such things as device outage plans.
Notes List Filters
The Filters section enables you to define the notes to appear in the list. You must select a device and click Apply Filter to display notes. After you select a device, all other filters are optional and cumulative.
If a device has more than 3500 notes that meet your filter criteria, notes are exported to an .html format file.
-
Click Filters to expand the Filters section.
-
Click the Filter by drop-down and select an option to filter by Device or Device Group.
-
Device
-
Click the Device drop-down and select one or more devices.
-
-
Device Group
-
Click the Device Group drop-down and select one or more device groups.
-
-
-
All other filters are optional and cumulative.
-
Click the Severities drop-down and select each note severity level to display. The default Cluster Manager > Cluster Settings tab creates discovery notes for all severities except the Debug level.
-
Click the Time Span drop-down and select a time span.
-
Click the Time Zone drop-down and select a time zone.
-
In the Search field, enter the keywords to search on.
-
Select the Display Notes Added by Users check box to display notes users add for the device.
-
Select the Display notes added by discovery check box to display notes discovery creates.
-
Select the Display Object Configuration Changes Created During Discovery check box to display notes the object generates that pertain to configuration changes that occur during discovery.
-
-
Click Apply Filter.
Notes List
The notes list displays the notes that meet your filter criteria, color coded by severity. Notes can have eight severity levels and the Cluster Manager > Cluster Settings tab enables you to define which severity levels are to create notes.
-
Device Name - Displays the device name.
-
Severity – Displays the note severity.
-
Time – Displays the note creation time.
-
Message – Displays the note content.
-
Actions - Click on
 to view the entire message when the note exceeds the allotted space.
Manage Notes
You can export the list of device notes to an .html format or to a .csv format.
-
Click Export HTML to export the notes to an .html file. When there are more than 3500 notes that meet your filter criteria, notes export even if you do not click this.
-
Click Export CSV to export the notes to a .csv file.
Perform the following steps to add a note. Notes you add have the Notice severity level.
-
Click Add Note to display the Add Note pop-up.
Add Note is only available for a single device selection.
-
Enter the note text.
-
Click Save.
The (manually added) Message in the Notes section can be viewed, edited, or deleted.
Discovery Hooks
Discovery Hooks scripts must be written in PHP and implemented as a Class that extends DiscoveryHookDevice.class. The class name must match the script file name. The class must implement discoveryHook() function that will be triggered on each discovery.
-
SevOne-act discovery-hooks install - Installs a hook script that will be triggered on each discovery for the devices that are in the device groups or types passed as arguments to the command. Enter SevOne-act discovery-hooks install --help for the required/optional arguments that can be passed to the script. For example,
--filepath (Required) Hook filename including the full file path.
--enabled (Optional) Sets Enable flag. Possible values: 0, 1. Default 1
--args (Optional) JSON string containing hook specific arguments
-
SevOne-act discovery-hooks uninstall - Uninstalls the hook script that is already installed. Only --filename must be added as arguments.
-
SevOne-act discovery-hooks list-installed-hooks - Lists all installed hook scripts.
-
SevOne-act discovery-hooks list-hook-types - Lists the type of the scripts. Basically they are two types:
-
Implemented by SevOne
-
Implemented by Customer or Professional Services
-
Install QoS Discovery Hooks
To install QoS Discovery Hooks, from the command line interface (CLI), execute the following command from any SevOne NMS peer.
$ SevOne-act discovery-hooks install --filepath /usr/share/php5/SetQoSDeviceHook.php --args {\"objectTypeName\":\"QoS\"}View Installed QoS Discovery Hooks
To view the installed QoS Discovery Hooks, execute the following command.
$ SevOne-act discovery-hooks list-installed-hooksUninstall / Disable QoS Discovery Hooks
To uninstall or to disable the QoS Discovery Hooks, execute the following commands.
$ SevOne-act discovery-hooks uninstall --filename SetQoSDeviceHook$ SevOne-act discovery-hooks update --filename SetQoSDeviceHook --enabled 0QoS Discovery Hooks use REST API to obtain the device information and crypto keys to decrypt sensitive information received from the REST API.
Manual support of crypto keys is not expected.