Table of Contents (Start)
- Topics
- Introducing SevOne
- Login
- Startup Wizard
- Dashboard
- Global Search - Advanced Search
- Report Manager
- Report Attachment Wizard
- Report Properties
- Report Interactions
- Instant Graphs
- TopN Reports
- Alerts
- Alert Archives
- Alert Summary
- Instant Status
- Status Map Manager
- Edit Maps
- View Maps
- FlowFalcon Reports
- NBAR Reports
- Logged Traps
- Unknown Traps
- Trap Event Editor
- Trap Destinations
- Trap Destination Associations
- Policy Browser
- Create and Edit Policies
- Webhook Definition Manager
- Threshold Browser
- Create and Edit Thresholds
- Probe Manager
- Discovery Manager
- Device Manager
- New Device
- Edit Device
- Object Manager
- High Frequency Poller
- Device Summary
- Device Mover
- Device Groups
- Object Groups
- Object Summary
- Object Rules
- VMware Browser
- AWS Plugin
- Azure Plugin (Public Preview)
- Calculation Plugin
- Database Manager
- Deferred Data Plugin
- DNS Plugin
- HTTP Plugin
- ICMP Plugin
- IP SLA Plugin
- JMX Plugin
- NAM
- NBAR Plugin
- Portshaker Plugin
- Process Plugin
- Proxy Ping Plugin
- SDWAN Plugin
- SNMP Plugin
- VMware Plugin
- Web Status Plugin
- WMI Plugin
- xStats Plugin
- Indicator Type Maps
- Device Types
- Object Types
- Object Subtype Manager
- Calculation Editor
- xStats Source Manager
- User Role Manager
- User Manager
- Session Manager
- Authentication Settings
- Preferences
- Cluster Manager
- Maintenance Windows
- Processes and Logs
- Metadata Schema
- Baseline Manager
- FlowFalcon View Editor
- Map Flow Objects
- FlowFalcon Views
- Flow Rules
- Flow Interface Manager
- MPLS Flow Mapping
- Network Segment Manager
- Flow Protocols and Services
- xStats Log Viewer
- SNMP Walk
- SNMP OID Browser
- MIB Manager
- Work Hours
- Administrative Messages
- Enable Flow Technologies
- Enable JMX
- Enable NBAR
- Enable SNMP
- Enable Web Status
- Enable WMI
- IP SLA
- SNMP
- SevOne Data Publisher
- Quality of Service
- Perl Regular Expressions
- Trap Revisions
- Integrate SevOne NMS With Other Applications
- Email Tips and Tricks
- SevOne NMS PHP Statistics
- SevOne NMS Usage Statistics
- Glossary and Concepts
- Map Flow Devices
- Trap v3 Receiver
- Guides
- Quick Start Guides
- AWS Quick Start Guide
- Azure Quick Start Guide (Public Preview)
- Data Miner Quick Start Guide
- Flow Quick Start Guide
- Group Aggregated Indicators Quick Start Guide
- IP SLA Quick Start Guide
- JMX Quick Start Guide
- Metadata Quick Start Guide
- RESTful API Quick Start Guide
- Self-monitoring Quick Start Guide
- SevOne NMS Admin Notifications Quick Start Guide
- SNMP Quick Start Guide
- Synthetic Indicator Types Quick Start Guide
- Topology Quick Start Guide
- VMware Quick Start Guide
- Web Status Quick Start Guide
- WMI Quick Start Guide
- xStats Quick Start Guide
- xStats Adapter - Accedian Vision EMS (TM) Quick Start Guide
- Deployment Guides
- Automated Build / Rebuild (Customer) Instructions
- Generate a Self-Signed Certificate or a Certificate Signing Request
- SevOne Best Practices Guide - Cluster, Peer, and HSA
- SevOne Data Platform Security Guide
- SevOne NMS Implementation Guide
- SevOne NMS Installation Guide - Virtual Appliance
- SevOne NMS Advanced Network Configuration Guide
- SevOne NMS Installation Guide
- SevOne NMS Port Number Requirements Guide
- SevOne NMS Upgrade Process Guide
- SevOne Physical Appliance Pre-Build BIOS and RAID Configuration Guide
- SevOne SAML Single Sign-On Setup Guide
- Cloud Platforms
- Other Guides
- Quick Start Guides
SevOne NMS Advanced Network Configuration Guide
SevOne NMS Documentation
All documentation is available from the IBM SevOne Support customer portal .
© Copyright International Business Machines Corporation 2024.
All right, title, and interest in and to the software and documentation are and shall remain the exclusive property of IBM and its respective licensors. No part of this document may be reproduced by any means nor modified, decompiled, disassembled, published or distributed, in whole or in part, or translated to any electronic medium or other means without the written consent of IBM.
IN NO EVENT SHALL IBM, ITS SUPPLIERS, NOR ITS LICENSORS BE LIABLE FOR ANY DAMAGES, WHETHER ARISING IN TORT, CONTRACT OR ANY OTHER LEGAL THEORY EVEN IF IBM HAS BEEN ADVISED OF THE POSSIBILITY OF SUCH DAMAGES, AND IBM DISCLAIMS ALL WARRANTIES, CONDITIONS OR OTHER TERMS, EXPRESS OR IMPLIED, STATUTORY OR OTHERWISE, ON SOFTWARE AND DOCUMENTATION FURNISHED HEREUNDER INCLUDING WITHOUT LIMITATION THE WARRANTIES OF DESIGN, MERCHANTABILITY OR FITNESS FOR A PARTICULAR PURPOSE, AND NONINFRINGEMENT.
IBM, the IBM logo, and SevOne are trademarks or registered trademarks of International Business Machines Corporation, in the United States and/or other countries. Other product and service names might be trademarks of IBM or other companies. A current list of IBM trademarks is available on ibm.com/trademark.
In this guide if there is,
-
[any reference to master] OR
-
[[if a CLI command contains master] AND/OR
-
[its output contains master]],
it means leader.
And, if there is any reference to slave, it means follower.
Starting SevOne NMS 6.7.0, MySQL has moved to MariaDB 10.6.12 .
Configure Network Bonding
Since bonding is a network-level configuration which is also dependent on the network infrastructure, it has limited implication to the NMS operation irrespective of which bonding mode is used as long as the IP address is available over the network.
SevOne has only tested the active-backup mode and the steps below are based on this configuration. If you prefer to use an alternate bonding mode which is supported by the operating system and its infrastructure, you may configure the same by referring to its operating system documentation.
The bonding mode can be one of the following. Please adjust as necessary if you desire a mode other than active-backup. Ensure that your infrastructure supports the selected bonding mode. Please refer to the following links for details.
|
Mode |
Description |
|
0 (balance-rr) |
Round-robin policy: Transmit packets in sequential order from the first available follower through the last. This mode provides load balancing and fault tolerance. |
|
1 (active-backup) |
Active-backup policy: Only one follower in the bond is active. A different follower becomes active if, and only if, the active follower fails. The bond's MAC address is externally visible on only one port (network adapter) to avoid confusing the switch. This mode provides fault tolerance. The primary option affects the behavior of this mode. |
|
2 (balance-xor) |
XOR policy: Transmit based on [(source MAC address XOR'd with destination MAC address) modulo follower count]. This selects the same follower for each destination MAC address. This mode provides load balancing and fault tolerance. |
|
3 (broadcast) |
Broadcast policy: transmits everything on all follower interfaces. This mode provides fault tolerance. |
|
4 (802.3ad) |
IEEE 802.3ad Dynamic link aggregation: Creates aggregation groups that share the same speed and duplex settings. Uses all followers in the active aggregator according to the 802.3ad specification. Prerequisites
|
|
5 (balance-tlb) |
Adaptive transmit load-balancing: Channel bonding that does not require any special switch support. The outgoing traffic is distributed according to the current load (computed relative to the speed) on each follower. Incoming traffic is received by the current follower. If the receiving follower fails, another follower takes over the MAC address of the failed receiving follower. Prerequisite
|
|
6 (balance-alb) |
Adaptive load-balancing: Includes balance-tlb plus receive load-balancing (rlb) for IPV4 traffic, and does not require any special switch support. The receive load-balancing is achieved by ARP negotiation. The bonding driver intercepts the ARP Replies sent by the local system on their way out and overwrites the source hardware address with the unique hardware address of one of the followers in the bond such that different peers use different hardware addresses for the server. |
Create Bonded Interface
using NMCLI
Execute the following steps.
-
U sing ssh , log into SevOne NMS appliance as root .
$sshroot@<NMS appliance> -
Create bonded interface. For example, bond0.
Example$ nmcli connection addtypebond con-name bond0 ifname bond0 \ip4 10.168.116.5/22gw4 10.168.116.1 ipv4.method manual \ipv6.method ignore \bond.options"mode=active-backup,miimon=100,downdelay=400,updelay=400"Connection'bond0'(e8048f88-80e5-43c1-a981-3bcb9b8ccc69) successfully added.
-
Add the first interface to bond0 created above.
Example$ nmcli connection addtypebond-slave ifname ens160 master bond0Connection'bond-slave-ens160'(fe926d34-0e12-46e3-a07c-fa78e5e0c8a3) successfully added.
-
Bring the connection up for the first follower interface.
Example$ nmcli conn up bond-slave-ens160Connection successfully activated (D-Bus active path:/org/freedesktop/NetworkManager/ActiveConnection/51).
-
Set the first follower interface to the primary interface for the bond0.
$ nmcli device modify bond0 +bond.options"primary=ens160"Connection successfully reapplied to device'bond0'.
-
For each additional interface, add it as a follower and then, bring it up.
$ nmcli connection addtypebond-slave ifname ens33 master bond0Connection'bond-slave-ens33'(073517f9-723a-4abe-a97e-fc10077f0ef3) successfully added.$ nmcli connection up bond-slave-ens33Connection successfully activated (D-Bus active path:/org/freedesktop/NetworkManager/ActiveConnection/51).
using NMTUI
-
Using ssh , log into SevOne NMS appliance as root .
$sshroot@<NMS appliance>
-
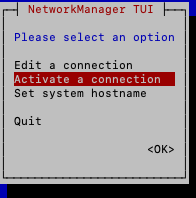
Enter NMTUI.
$ nmtui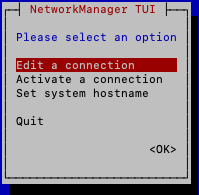
-
Select Edit a connection and click <RETURN>.
-
Navigate to <Add> and click <RETURN>.
-
Choose Bond from New Connection list.
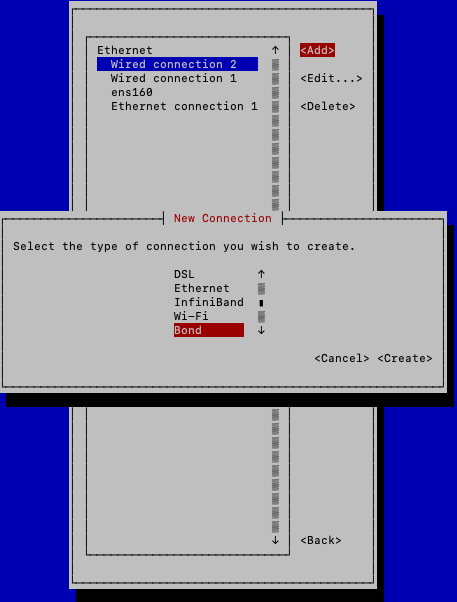
-
Navigate to <Create> and click <RETURN>.
-
You are in Edit Connection to create your new bonded interface.
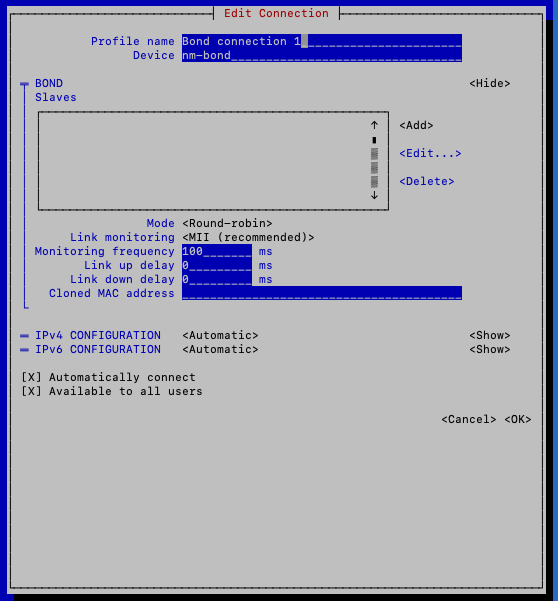
Add a follower for every interface in the setup, change the mode of the interface, and adjust other settings.
-
When adding followers, choose Ethernet from New Connection list.
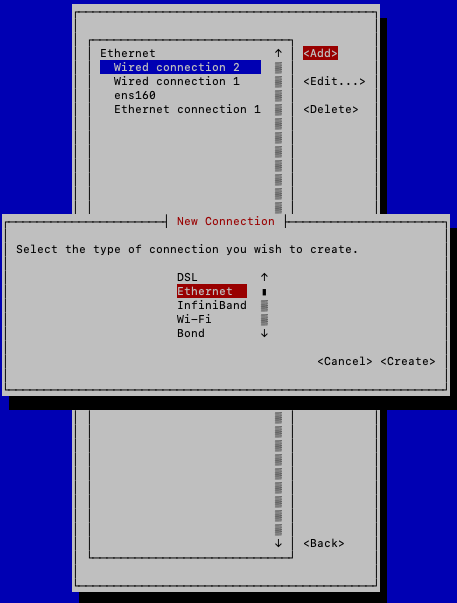
-
Add a proper Device name. The device name must be the interface name. For example, ens160, eth1, eth2.
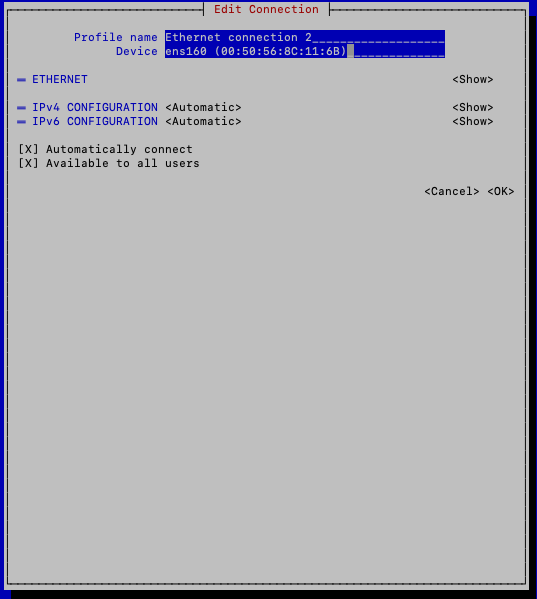
-
Navigate to <OK> to save the configuration.
-
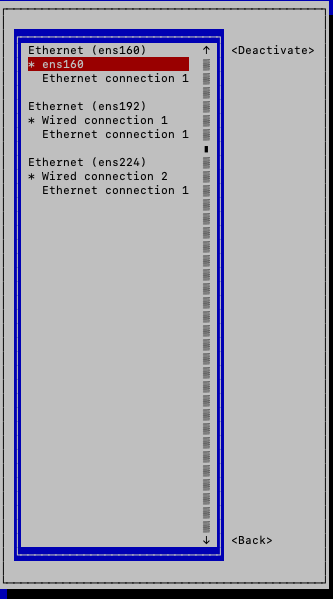
Select Activate a connection to confirm that all connections are active.
-
All active follower/bond interfaces show an asterisk ( * ) to the left of its name. If you do not see an asterisk, go to the connection and activate it.
-
Execute the following command to view the list of active network connections. All follower interfaces along with bond0 interface must appear in the list.
Example$ nmcli connectionNAME UUID TYPE DEVICEbond0 9aa751f6-828d-42dc-90ad-764ee6eb1b8f bond bond0ens160 e2f7df86-55c8-4227-a00d-0f048e030b1a ethernet ens160Wired connection 1 69c7ab6d-d760-3ba3-acfc-9ff7f05e6453 ethernet ens192Wired connection 2 3a9ca5e0-9c9e-3bee-9329-d3482093de2c ethernet ens224Ethernet connection 1 8331fa43-b8fb-4afe-95e8-a801508d3d8b ethernet --
-
Verify the configurations.
The output in the examples below are for active-backup mode. The bonding options / configuration may vary for different deployments. It is recommended that the configuration is verified according to the mode selected.
Examples$cat/etc/sysconfig/network-scripts/ifcfg-bond0BONDING_OPTS="downdelay=400 miimon=100 mode=active-backup updelay=400"TYPE=BondBONDING_MASTER=yesPROXY_METHOD=noneBROWSER_ONLY=noBOOTPROTO=noneIPADDR=10.168.116.5PREFIX=22GATEWAY=10.168.116.1DEFROUTE=yesIPV4_FAILURE_FATAL=noIPV6INIT=noNAME=bond0UUID=f3fa06e0-66b7-47d6-aff3-3a3db27ba596DEVICE=bond0ONBOOT=yes$cat/proc/net/bonding/bond0Ethernet Channel Bonding Driver: v3.7.1 (April 27, 2011)Bonding Mode: fault-tolerance (active-backup)Primary Slave: ens160 (primary_reselect always)Currently Active Slave: ens160MII Status: upMII Polling Interval (ms): 100Up Delay (ms): 400Down Delay (ms): 400Slave Interface: ens160MII Status: upSpeed: 10000 MbpsDuplex: fullLink Failure Count: 0Permanent HW addr: 00:50:56:8c:11:13Slave queue ID: 0Slave Interface: ens33MII Status: upSpeed: 1000 MbpsDuplex: fullLink Failure Count: 0Permanent HW addr: 00:50:56:8c:2c:d0Slave queue ID: 0
-
From another appliance, verify that you are able to ping the IP address of bond0 created in the example above.
$ping10.168.116.5PING 10.168.116.5 (10.168.116.5): 56 data bytes64 bytes from 10.168.116.5: icmp_seq=0 ttl=63time=0.293 ms64 bytes from 10.168.116.5: icmp_seq=1 ttl=63time=0.331 ms64 bytes from 10.168.116.5: icmp_seq=2 ttl=63time=0.249 ms64 bytes from 10.168.116.5: icmp_seq=3 ttl=63time=0.285 msIf the ping does not respond, restart the network service on the appliance you are bonding.
$ systemctl restart network
Configure Virtual IP (VIP)
Introduction
As of SevOne NMS 6.1 release, new and existing / upgraded configurations of VIP do not work. Please contact SevOne Support to obtain a temporary fix. This issue is not applicable to SevOne NMS versions <= v5.7.2.32.
Configure Virtual IP (VIP) section applies to both IPv4 and IPv6.
In SevOne NMS, the role of polling a device or collecting flows is assigned to a peer. A peer may be:
-
a standalone appliance with no resiliency or
-
a pair of two appliances for the purpose of resilience and availability of the peer
To achieve the resiliency of a SevOne NMS peer, a standby secondary appliance, generally known as a Hot Standby Appliance (HSA) for a polling peer, or a Hot Standby for a Dedicated Netflow Collector (HDNC), is added to a make a pair along with the primary appliance.
Generally, the primary appliance (PAS or DNC) assumes the active role and is responsible for polling and/or flow collection from the devices designated on that peer. Initially, the secondary appliance assumes the passive role and is on standby, while it is constantly updated by replicating from the primary, and at the same time, consistently ensuring that the primary appliance is available and is able to communicate with the pair.
A secondary appliance may assume the active role if the primary appliance becomes unavailable due to any reason (after the specified duration of the failover time setting), thereby providing the capability for that peer to continue polling and/or receive flows and continue to perform the NMS functions.
For the purpose of all internal NMS operations and inter-peer communication within the cluster, SevOne NMS uses the Base IP address of the appliance that is attached and configured on the Interface for the server. A user can access SevOne NMS graphical user interface portal by reaching the Base IP (or via a resolved hostname) of the primary or secondary appliance, irrespective of the appliance being in active or passive role.
The interaction of SevOne NMS peer with the polled devices, or for devices sending flows to SevOne NMS, the Base IP address of the active appliance in the pair is used for the communication. If a failover happens or if there is a condition of a network disconnect between the primary and secondary appliances, then the passive appliance is promoted to an active role for that peer. In such cases of transitioning of the active role from the primary to the secondary appliance or vice versa, the transition of NMS services is transparent to the user, as long as the devices are able to communicate over the required network ports with the primary/secondary appliance's Base IP address.
In SevOne NMS, the Base IP address is a requirement and is configured and bound to the primary interface. There are different operational or business use-case scenarios where the user may require an access to a SevOne NMS peer in a PAS/HSA pair using a single floating IP address called Virtual IP (VIP) address that is not bound to any single server's physical interface.
Use-Cases
Below are a few common use-case scenarios where a user may prefer to have access to a NMS peer pair using a single Virtual IP address.
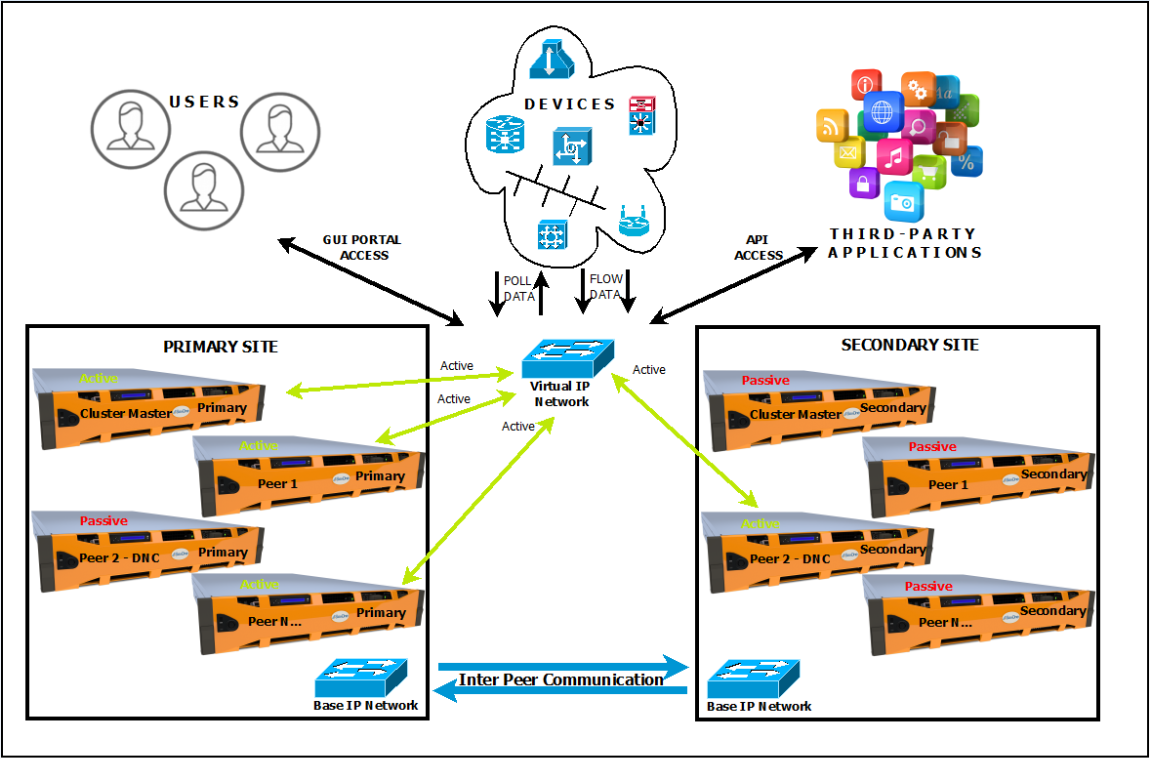
Single point of access to NMS Cluster Graphical User Interface portal
A SevOne NMS cluster can be accessed using the IP address or FQDN of any of the member appliances in the cluster for the graphical user interface portal access. SevOne NMS administrators may want to provide access to the cluster using a single IP address or FQDN which points to a single peer - it may be the Cluster Leader peer or any other peer in the cluster. A VIP configuration on that specific pair ensures that access to SevOne NMS will always be maintained via the active polling peer.
Poll devices via a single IP address
Generally, the devices being polled on a peer pair require that the device is able to communicate with SevOne NMS via both, the primary and the secondary appliances of the pair. In some configurations, for example, where the user has strict access control required for the devices, it requires the device to have Access Control Lists (ACL) configured for both, primary and secondary NMS appliances. This increases the administrative overhead, especially if there are thousands of devices across the environment.
The user prefers to have the ability to poll devices on SevOne NMS peer using a single IP address, irrespective of the primary or the secondary appliance being the active poller at any given time. In such scenarios, a Virtual IP can be configured for the peer in SevOne NMS, and as long as the Virtual IP has network connectivity with the device on the required ports, polling can happen via the VIP.
The default route in SevOne NMS is always expected to be via the Base IP address. SevOne NMS does not support the change of default route to be the virtual IP on any SevOne NMS peer. If your network policy requires the device traffic to be routed via the virtual IP because it does not permit that device traffic via the Base IP of the appliance, then you will need to set up the static routes on SevOne NMS peer appliances to achieve the communication to the devices via the virtual IP.
Send Network Flows to SevOne NMS on a single IP address configured on Flow devices
Flow devices which send network flows to SevOne NMS require configuration of the device(s) to send flows to both, SevOne NMS primary and secondary appliances to ensure that flows are available when a failover happens.
To avoid the extra configuration and the extra bandwidth requirement to send the same flows to two different servers, the user may prefer to configure the flow device to send the flows to a single IP address. In such cases, the user may configure a VIP on SevOne NMS and configure the network flow device on their end to send the flows to the VIP address. No additional static route configuration is required on the NMS peer/DNC when devices are sending flows to the VIP as long as the user network allows the NetFlow traffic from the device to SevOne NMS peer appliances on the specific port configured for receiving flows on SevOne NMS.
Third-party Application Integration with SevOne NMS
The user may have third-party applications that integrate with SevOne NMS using the SevOne API. It may be a challenge for the user's third-party applications to be able to track the failure of SevOne NMS appliances in a pair, to continue to send the requests to the available appliance in case the active appliance were to fail or become unavailable.
The user may configure a VIP on the target NMS Peer pair and then the third-party application can be configured to send the API requests to the required VIP address of the peer.
Prerequisites
-
SevOne NMS 6.x
-
SevOne NMS Primary (PAS) IP address
-
SevOne NMS Secondary (HSA) IP address
-
Network address of the PAS/HSA
-
Network IP Prefix of the PAS/HSA IP address
-
IP address of the gateway of PAS/HSA network
-
SevOne NMS Peer Id for the pair where the Virtual IP will be configured
-
Virtual IP Address to be configured on the NMS Pair
-
Virtual IP Address Network IP Prefix to be configured on the SevOne NMS Pair
-
Network address of the Virtual IP
-
Cluster Leader Active Appliance's IP Address
-
Static Route Information for Virtual IP (optional, only if custom static routes are required)
Configuration of Virtual IP is not supported with only a standalone peer. A secondary appliance must be added to the primary appliance before configuring Virtual IP on that peer pair.
If SevOne NMS peer is configured with a Virtual IP, you are required to use Static IP configuration for both, the Base IP and the Virtual IP in the NMS network configuration. Using DHCP may automatically overwrite the network configuration settings and result in an unexpected behavior such as, removal of the Virtual IP-specific configuration.
The Base IP address is configured as the default index (IPADDR) on the network interface and the Virtual IP is then set as the next index at IPADDR1 and PREFIX1.
SevOne has only tested Virtual IP configuration in SevOne NMS where the Virtual IP address belongs to the same network subnet as the Base IP address. There may be various different customer network scenarios specific to different environments, and it may work if the Virtual IP is on a different subnet, provided the customer network supports such configuration at the network/firewall level. This may even require additional custom static routes configured on SevOne NMS for meeting this requirement. However, this is not in scope of SevOne tested configurations.
The default route in SevOne NMS is always expected to be via the Base IP address. The default route cannot be changed to use the Virtual IP on any SevOne NMS peer.
Configuration Steps
To configure a Virtual IP on SevOne NMS with the CentOS Operating System Platform, the easiest way is to open a Command Line Interface (CLI) session as root user for the primary and secondary pair where the Virtual IP is to be configured. Execute the following steps.
Create Variables
Create variables by populating them in single-quotes, with the specific values that apply to your setup. These variables must be created and set on both the PAS and HSA.
$ pas_ip='<IP address of the PAS Appliance>' $ hsa_ip='<IP address of HSA Appliance>' $ base_network='<Base IP Network address>' $ base_prefix='<Base Network IP address Network Prefix>' $ base_gateway='<Base Network Default Gateway IP address>'$ peer_id=$(mysqlconfig -Ne "select server_id from net.peers where \primary_ip = HEX(INET6_ATON(\"$pas_ip\" )) ")$ vip='<Virtual IP address>' $ vip_prefix='<Virtual IP address Network Prefix>'$ vip_network='<Virtual IP Network Address>'# Optional (only required for Static Routes)ext_network='<IP address for External Device/Application Network requiring static route>'ext_prefix='<IP address Network Prefix for External Network>'vip_gateway='<IP address of the Gateway for the External Network>'Using ssh, log into SevOne NMS appliance (PAS) as root.
$ ssh root@<PAS appliance>PAS$ pas_ip='10.168.117.48' PAS$ hsa_ip='10.168.117.58' PAS$ base_network='10.168.116.0' PAS$ base_prefix='22' PAS$ base_gateway='10.168.116.1'PAS$ peer_id=$(mysqlconfig -Ne "select server_id from net.peers where \primary_ip = HEX(INET6_ATON(\"$pas_ip\" )) ")PAS$ vip='10.168.118.64' PAS$ vip_prefix='22'PAS$ vip_network='10.168.116.0'# Optional (only required for Static Routes)PAS$ ext_network='10.128.24.0'PAS$ ext_prefix='22'PAS$ vip_gateway='10.168.116.3'Using ssh, log into SevOne NMS appliance (HSA) as root.
$ ssh root@<HSA appliance>HSA$ pas_ip='10.168.117.48' HSA$ hsa_ip='10.168.117.58' HSA$ base_network='10.168.116.0' HSA$ base_prefix='22' HSA$ base_gateway='10.168.116.1'HSA$ peer_id=$(mysqlconfig -Ne "select server_id from net.peers where \secondary_ip = HEX(INET6_ATON(\"$hsa_ip\" )) ")HSA$ vip='10.168.118.64' HSA$ vip_prefix='22'HSA$ vip_network='10.168.116.0'# Optional (only required for Static Routes)HSA$ ext_network='10.128.24.0'HSA$ ext_prefix='22'HSA$ vip_gateway='10.168.116.3'Use Network Prefix for Virtual IP
To add the Virtual IP to the connection, you need your Virtual IP (VIP) address and the Network Prefix. For configuring a Virtual IP, you must use the Network Prefix as the Netmask cannot be used.
-
PREFIXn - The Network prefix used for all configurations except aliases and ippp devices. It takes precedence over NETMASK when both PREFIX and NETMASK are set.
-
NETMASKn - The Subnet mask useful for aliases and ippp devices. For all other configurations, use PREFIX instead.
Configure Virtual IP on Primary (PAS) and Secondary (HSA)
Perform the following steps on both, PAS and HSA appliances, to configure the Virtual IP on the NMS pair.
This section assumes that the PAS is the current Active Appliance of the PAS/HSA pair.
Check Existing Network Connections
PAS$ nmcli connection showPAS$ nmcli connection showNAME UUID TYPE DEVICEens160 afe20483-ba17-4955-aed6-1706093e8b88 ethernet ens160HSA$ nmcli connection showHSA$ nmcli connection showNAME UUID TYPE DEVICEens160 d6ad7e7f-87bb-42f4-9481-bff76859081d ethernet ens160Set appropriate Network Connection Name as a Variable
In the following example, connection name is ens160. You may change the network connection name to the name specific to your environment based on the output from the previous command .
You must use the correct connection by setting the variable with the correct connection name as t here may be other active connections in your environment. For example, a docker setup on your SevOne NMS.
The connection names may differ on a physical PAS or vPAS. In the example above, it is ens160 but it could be any other valid network connection name such as, en0, as an example.
PAS$ connection_name='ens160'HSA$ connection_name='ens160'Copy Current Connection's Configuration File for Passive Appliance VIP Configuration
Copy the current configuration file which will be used when the appliance is a passive appliance in follower replication mode.
PAS$ cp -a /etc/sysconfig/network-scripts/ifcfg-${connection_name} \/etc/sysconfig/network-scripts/vip-disabled-ifcfg-${connection_name}HSA$ cp -a /etc/sysconfig/network-scripts/ifcfg-${connection_name} \/etc/sysconfig/network-scripts/vip-disabled-ifcfg-${connection_name}Update Network Connection to add Virtual IP Address and Network Prefix for Active Appliance VIP Configuration
You must update the active connection identified in Check Existing Network Connections with the Virtual IP address and its Network Prefix. By executing the following command, it updates the network configuration files but does not automatically calculate the IP Subnet to identify the Network Prefix.
You may use the online IP Subnet Calculator (http://www.calculator.net/ip-subnet-calculator.html) or a similar tool to identify the Network Prefix.
PAS$ nmcli connection modify ${connection_name} +ipv4.addresses "$vip/$vip_prefix"HSA$ nmcli connection modify ${connection_name} +ipv4.addresses "$vip/$vip_prefix"PAS$ nmcli connection modify ${connection_name} +ipv6.addresses "$vip/$vip_prefix"HSA$ nmcli connection modify ${connection_name} +ipv6.addresses "$vip/$vip_prefix"Configure Network Configuration Scripts for Network Connection to use Virtual IP
SevOne NMS requires that the default route is set via the Base IP address. It is not supported to have the default route to be configured over the Virtual IP address since all inter-peer communication in SevOne NMS happens via the Base IP address. Static routes may be configured for custom requirements - please refer to section Custom Static Route for Virtual IP.
Verify Network Configuration Files (no Static Routes)
The network configuration files must be verified to ensure that they are updated correctly.
PAS$ cat /etc/sysconfig/network-scripts/ifcfg-${connection_name}If the configuration is using a static IP for the Base IP address on the connection, then the Virtual IP is set as the next index at IPADDR1 and PREFIX1.
If using DHCP, it may automatically override the settings of this configuration and have an unexpected behavior such as, removal of the Virtual IP as it uses the same configuration file. The Static IP configuration must be used for both, the Base IP and the Virtual IP.
PAS$ cd /etc/sysconfig/network-scriptsPAS$ cat /etc/sysconfig/network-scripts/ifcfg-${connection_name}TYPE=EthernetPROXY_METHOD=noneBROWSER_ONLY=noBOOTPROTO=noneDEFROUTE=yesIPV4_FAILURE_FATAL=noIPV6INIT=yesIPV6_AUTOCONF=yesIPV6_DEFROUTE=yesIPV6_FAILURE_FATAL=noIPV6_ADDR_GEN_MODE=stable-privacyNAME=ens160UUID=afe20483-ba17-4955-aed6-1706093e8b88DEVICE=ens160ONBOOT=yesIPADDR=10.168.117.48PREFIX=22GATEWAY=10.168.116.1IPADDR1=10.168.118.64PREFIX1=22HSA$ cat /etc/sysconfig/network-scripts/ifcfg-${connection_name}If the configuration is using a static IP for the Base IP address on the connection, then the Virtual IP is set as the next index at IPADDR1 and PREFIX1.
If using DHCP, it may automatically override the settings of this configuration and have an unexpected behavior such as, removal of the Virtual IP as it uses the same configuration file. The Static IP configuration must be used for both, the Base IP and the Virtual IP.
HSA$ cd /etc/sysconfig/network-scripts/HSA$ cat /etc/sysconfig/network-scripts/ifcfg-${connection_name}TYPE=EthernetPROXY_METHOD=noneBROWSER_ONLY=noBOOTPROTO=noneDEFROUTE=yesIPV4_FAILURE_FATAL=noIPV6INIT=yesIPV6_AUTOCONF=yesIPV6_DEFROUTE=yesIPV6_FAILURE_FATAL=noIPV6_ADDR_GEN_MODE=stable-privacyNAME=ens160UUID=d6ad7e7f-87bb-42f4-9481-bff76859081dDEVICE=ens160ONBOOT=yesIPADDR=10.168.117.58PREFIX=22GATEWAY=10.168.116.1IPADDR1=10.168.118.64PREFIX1=22If static routes are not required, then please skip to and execute the steps in section Move and Link Updated Network Connection's Configuration Files.
Custom Static Route for Virtual IP (optional)
The default route is always required to be configured via the Base IP address on SevOne NMS as all Inter-Peer Communication (IPC) happens via the Base IP address.
Other non-IPC network traffic with SevOne NMS peers such as, polling of devices, third-party applications integration, etc. may be restricted on the Base IP network in the customer environment based on the network policies. In such cases, customer may have to set up custom static routes based on their own network environment for all such non-IPC traffic to happen via the Virtual IP network. By default, it always uses the Base IP as the default route and may fail to communicate.
Static routes may not be necessary for receiving flows from network devices to the Virtual IP on SevOne NMS (Peer or DNC). This is because the network flows are forwarded as UDP traffic from the devices to SevOne NMS. However, customer network must be configured to allow the network flow traffic to arrive on the Virtual IP on the designated ports that are configured in SevOne NMS to receive flows.
Static Routes (if required)
Please skip this section if static routes are not required.
As of SevOne NMS 6.1 release, the operating system has changed from CentOS 7 to CentOS 8. Due to this, the following is important.
The static route configuration file format has changed in CentOS 8. Hence, existing static route configurations need to be migrated to the new format. If SevOne NMS is configured with VIP using static routes and SevOne NMS has been upgraded to SevOne NMS 6.1 or SevOne NMS 6.2, it will require the routes to be migrated to the new format. Please contact SevOne Support for the migration of static route configurations.
-
Configure the static routes for the network connection. The static routes are added to the route configuration file for the network connection. Once configured as shown in the steps below, the settings will be configured persistently and will remain even after a system restart. The existing network routes configured on the server will be maintained. SevOne recommends backup of the existing route configurations and ensure that the new static routes do not conflict with the existing routes.
for PASPAS$ls-l/etc/sysconfig/network-scripts/route-${connection_name}PAS$cat/etc/sysconfig/network-scripts/route-${connection_name}PAS$cp-ap/etc/sysconfig/network-scripts/route-${connection_name} \/etc/sysconfig/network-scripts/backup-route-${connection_name}.$(date+%Y%m%d-%H%M%S)for HSAHSA$ls-l/etc/sysconfig/network-scripts/route-${connection_name}HSA$cat/etc/sysconfig/network-scripts/route-${connection_name}HSA$cp-ap/etc/sysconfig/network-scripts/route-${connection_name} \/etc/sysconfig/network-scripts/backup-route-${connection_name}.$(date+%Y%m%d-%H%M%S) -
Static routes can be set using the same format as the Linux Command Line Interface (CLI) ip route command. There are various configuration options for static routes however, the following shows how to configure one persistent static route to be managed by SevOne NMS. The static route configuration must be handled manually if additional persistent static routes are needed or if the static routes require specific options configured. For more details, please refer to https://access.redhat.com/documentation/en-us/red_hat_enterprise_linux/8/html/configuring_and_managing_networking/configuring-static-routes_configuring-and-managing-networking.
Configure Static Routes for network connectionSevOne NMS only supports the scripted method of configuration for static routes format as shown below. The command format using predefined variables below cannot be used for additional static route options OR if configuring more than one static route. For additional options and/or static routes, configure and maintain the static routes manually by following the operating system vendor link above. It is a good practice to always maintains a backup of the manually configured static routes configuration files.
for PASPAS$cd/etc/sysconfig/network-scriptsPAS$echo"ADDRESS0=${ext_network}"> \/etc/sysconfig/network-scripts/route-${connection_name}PAS$echo"NETMASK0=$(ipcalc ${ext_network}/${ext_prefix} \--netmask |sed-n -e's/^.*NETMASK=//p')" \>>/etc/sysconfig/network-scripts/route-${connection_name}PAS$echo"GATEWAY0=${vip_gateway}"\>>/etc/sysconfig/network-scripts/route-${connection_name}PAS$echo"OPTIONS0=\"src ${vip}\""\>>/etc/sysconfig/network-scripts/route-${connection_name}for HSAHSA$cd/etc/sysconfig/network-scriptsHSA$echo"ADDRESS0=${ext_network}"> \/etc/sysconfig/network-scripts/route-${connection_name}HSA$echo"NETMASK0=$(ipcalc ${ext_network}/${ext_prefix} \--netmask |sed-n -e's/^.*NETMASK=//p')" \>>/etc/sysconfig/network-scripts/route-${connection_name}HSA$echo"GATEWAY0=${vip_gateway}"\>>/etc/sysconfig/network-scripts/route-${connection_name}HSA$echo"OPTIONS0=\"src ${vip}\""\>>/etc/sysconfig/network-scripts/route-${connection_name}
Verify Network Configuration Files (optional, only if including Static Routes)
The network configuration files must be verified to ensure that they are updated correctly.
PAS$ cat /etc/sysconfig/network-scripts/ifcfg-${connection_name}# Optional (this file exists only if Static Routes are configured)PAS$ cat /etc/sysconfig/network-scripts/route-${connection_name}PAS$ cd /etc/sysconfig/network-scripts PAS$ cat /etc/sysconfig/network-scripts/ifcfg-${connection_name}TYPE=EthernetPROXY_METHOD=noneBROWSER_ONLY=noBOOTPROTO=noneDEFROUTE=yesIPV4_FAILURE_FATAL=noIPV6INIT=yesIPV6_AUTOCONF=yesIPV6_DEFROUTE=yesIPV6_FAILURE_FATAL=noIPV6_ADDR_GEN_MODE=stable-privacyNAME=ens160UUID=afe20483-ba17-4955-aed6-1706093e8b88DEVICE=ens160ONBOOT=yesIPADDR=10.168.117.48PREFIX=22GATEWAY=10.168.116.1IPADDR1=10.168.118.64PREFIX1=22# Optional (this file exists only if Static Routes are configured)PAS$ cat /etc/sysconfig/network-scripts/route-${connection_name}ADDRESS0=10.128.24.0NETMASK0=255.255.252.0GATEWAY0=10.168.116.3OPTIONS0="src 10.168.118.64"HSA$ cat /etc/sysconfig/network-scripts/ifcfg-${connection_name} # Optional (this file exists only if Static Routes are configured)HSA$ cat /etc/sysconfig/network-scripts/route-${connection_name}HSA$ cd /etc/sysconfig/network-scriptsHSA$ cat /etc/sysconfig/network-scripts/ifcfg-${connection_name}TYPE=EthernetPROXY_METHOD=noneBROWSER_ONLY=noBOOTPROTO=noneDEFROUTE=yesIPV4_FAILURE_FATAL=noIPV6INIT=yesIPV6_AUTOCONF=yesIPV6_DEFROUTE=yesIPV6_FAILURE_FATAL=noIPV6_ADDR_GEN_MODE=stable-privacyNAME=ens160UUID=d6ad7e7f-87bb-42f4-9481-bff76859081dDEVICE=ens160ONBOOT=yesIPADDR=10.168.117.58PREFIX=22GATEWAY=10.168.116.1IPADDR1=10.168.118.64PREFIX1=22# Optional (this file exists only if Static Routes are configured)HSA$ cat /etc/sysconfig/network-scripts/route-${connection_name}ADDRESS0=10.128.24.0NETMASK0=255.255.252.0GATEWAY0=10.168.116.3OPTIONS0="src 10.168.118.64"Move and Link Updated Network Connection's Configuration Files
Move Appropriate Files
Move the updated configuration file /etc/sysconfig/network-scripts/ifcfg-<connection_name> to /etc/sysconfig/network-scripts/vip-enabled-ifcfg-<connection_name> file which will be used by SevOne NMS when the appliance is the Active appliance in master (i.e., leader) replication mode.
PAS$ mv /etc/sysconfig/network-scripts/ifcfg-${connection_name} \/etc/sysconfig/network-scripts/vip-enabled-ifcfg-${connection_name}HSA$ mv /etc/sysconfig/network-scripts/ifcfg-${connection_name} \/etc/sysconfig/network-scripts/vip-enabled-ifcfg-${connection_name}Link Appropriate Files
Create the soft links to the correct Virtual IP configuration files based on the appliance's current role in SevOne NMS to the network connection configuration file. The network connection configuration file ifcfg-${connection_name} on the Active appliance must point to the vip-enabled-ifcfg-${connection_name} file and the Passive appliance must point to the vip-disabled-ifcfg-${connection_name} file.
PAS$ cd /etc/sysconfig/network-scripts/ PAS$ ln -sf vip-enabled-ifcfg-${connection_name} ifcfg-${connection_name} PAS$ ls -l /etc/sysconfig/network-scripts/ifcfg-${connection_name} HSA$ cd /etc/sysconfig/network-scripts/HSA$ ln -sf vip-disabled-ifcfg-${connection_name} ifcfg-${connection_name} HSA$ ls -l /etc/sysconfig/network-scripts/ifcfg-${connection_name}Update 'virtual_ip' for Current Peer (in the Config Database instance of the Cluster Leader)
To enable SevOne NMS to use the Virtual IP Address, update the virtual_ip column in the peers table for the pair. The update to the database must be performed from the Cluster Leader appliance by updating the config database instance.
PAS$ cluster_master_ip=$(mysqlconfig -Ne "select ip_normalize(ip) \from net.peers where master = 1")PAS$ cmd=$(echo "update net.peers set virtual_ip = HEX(INET6_ATON( '${vip}' )) \where server_id = $peer_id")PAS$ ssh $cluster_master_ip "mysqlconfig -e \"$cmd\" "PAS$ mysqlconfig -e "select * from net.peers where server_id = $peer_id \G"HSA$ mysqlconfig -e "select * from net.peers where server_id = $peer_id \G"PAS$ cluster_master_ip=$(mysqlconfig -Ne "select ip_normalize(ip) \from net.peers where master = 1") PAS$ cmd=$(echo "update net.peers set virtual_ip = HEX(INET6_ATON('${vip}')) \where server_id = ${peer_id}") PAS$ ssh $cluster_master_ip "mysqlconfig -e \"$cmd\" " PAS$ mysqlconfig -e "select * from net.peers where server_id = $peer_id \G"************************* 1. row ************************* server_id: 1 name: jb-vip-01 ip: 0AA87530 primary_ip: 0AA87530 secondary_ip: 0AA8753A active_appliance: PRIMARY disabled: 0 virtual_ip: 0AA87640 master: 1 user: root pass: capacity: 10000 interface_limit: 33 flow_limit: 10000 netflow_interface_count: 0 server_load: 614 flow_load: 0 model: PAS proxy_port: 8123 proxy_user: 99bnqiHZEpVSRH/61I/xuQ== proxy_pass: 99bnqiHZEpVSRH/61I/xuQ==group_poller_device_count: 0group_poller_object_count: 0 selfmon_device_count: 1 selfmon_object_count: 69Update MySQL Permissions (Optional)
This applies only if specific static routes are enabled.
If specific static routes are enabled for the pair during SevOne NMS Virtual IP configuration, MySQL permissions must be granted for IP address, $vip, to all pairs in the cluster. Execute the steps below.
-
Identify the IP Address of the Cluster Leader.
$sshroot@<PAS appliance>PAS$ cluster_master_ip=$(mysqlconfig -Ne \"select ip_normalize(ip) from net.peers where master = 1") -
SSH into the Cluster Leader and execute SevOne-fix-mysql-permissions.
PAS$ssh$cluster_master_ip"/usr/local/scripts/SevOne-fix-mysql-permissions" -
Verify the pair (PAS/HSA) can connect to the Cluster Leader without being rejected.
on PAS$sshroot@<PAS appliance>PAS$ mysql -h $cluster_master_ip -u root -pon HSA$sshroot@<HSA appliance>HSA$ mysql -h $cluster_master_ip -u root -p
Reboot Appliances
Reboot the appliances to ensure that the new network configurations have been applied.
PAS$ SevOne-shutdown rebootHSA$ SevOne-shutdown rebootVerify Virtual IP
Verify Virtual IP (no Static Routes)
The Virtual IP must be up only on the active appliance. Ensure that the Virtual IP on the passive appliance is not up. Execute the following commands.
# <connection_name> must be your connectionPAS$ ip addr show <connection_name> PAS$ ip route show PAS$ route -n PAS$ ip addr show ens1602: ens160: <BROADCAST,MULTICAST,UP,LOWER_UP> mtu 1500 qdisc mq state UP group default qlen 1000 link/ether 00:50:56:be:3b:9f brd ff:ff:ff:ff:ff:ff inet 10.168.117.48/22 brd 10.168.119.255 scope global noprefixroute ens160 valid_lft forever preferred_lft forever inet 10.168.118.64/22 brd 10.168.119.255 scope global secondary noprefixroute ens160 valid_lft forever preferred_lft forever inet6 fe80::dfe8:13cd:2fde:454d/64 scope link noprefixroute valid_lft forever preferred_lft foreverPAS$ ip route showdefault via 10.168.116.1 dev ens160 proto static metric 10010.168.116.0/22 dev ens160 proto kernel scope link src 10.168.117.48 metric 10010.168.116.0/22 dev ens160 proto kernel scope link src 10.168.118.64 metric 100172.17.0.0/24 dev docker0 proto kernel scope link src 172.17.0.1PAS$ route -nKernel IP routing tableDestination Gateway Genmask Flags Metric Ref Use Iface0.0.0.0 10.168.116.1 0.0.0.0 UG 100 0 0 ens16010.168.116.0 0.0.0.0 255.255.252.0 U 100 0 0 ens16010.168.116.0 0.0.0.0 255.255.252.0 U 100 0 0 ens160172.17.0.0 0.0.0.0 255.255.255.0 U 0 0 0 docker0# <connection_name> must be your connectionHSA$ ip addr show <connection_name> HSA$ ip route show HSA$ route -nHSA$ ip addr show ens1602: ens160: <BROADCAST,MULTICAST,UP,LOWER_UP> mtu 1500 qdisc mq state UP group default qlen 1000 link/ether 00:50:56:be:81:da brd ff:ff:ff:ff:ff:ff inet 10.168.117.58/22 brd 10.168.119.255 scope global noprefixroute ens160 valid_lft forever preferred_lft forever inet6 fe80::9696:45e5:b048:1b93/64 scope link noprefixroute valid_lft forever preferred_lft foreverHSA$ ip route showdefault via 10.168.116.1 dev ens160 proto static metric 10010.168.116.0/22 dev ens160 proto kernel scope link src 10.168.117.58 metric 100172.17.0.0/24 dev docker0 proto kernel scope link src 172.17.0.1HSA$ route -nKernel IP routing tableDestination Gateway Genmask Flags Metric Ref Use Iface0.0.0.0 10.168.116.1 0.0.0.0 UG 100 0 0 ens16010.168.116.0 0.0.0.0 255.255.252.0 U 100 0 0 ens160172.17.0.0 0.0.0.0 255.255.255.0 U 0 0 0 docker0Verify Virtual IP (Static Routes configured)
The Virtual IP must be up only on the active appliance. Ensure that the Virtual IP on the passive appliance is not up. Execute the following commands.
# <connection_name> must be your connectionPAS$ ip addr show <connection_name> PAS$ ip route show PAS$ route -n PAS$ ip addr show ens1602: ens160: <BROADCAST,MULTICAST,UP,LOWER_UP> mtu 1500 qdisc mq state UP group default qlen 1000 link/ether 00:50:56:be:3b:9f brd ff:ff:ff:ff:ff:ff inet 10.168.117.48/22 brd 10.168.119.255 scope global noprefixroute ens160 valid_lft forever preferred_lft forever inet 10.168.118.64/22 brd 10.168.119.255 scope global secondary noprefixroute ens160 valid_lft forever preferred_lft forever inet6 fe80::dfe8:13cd:2fde:454d/64 scope link noprefixroute valid_lft forever preferred_lft foreverPAS$ ip route showdefault via 10.168.116.1 dev ens160 proto static metric 10010.128.24.0/22 via 10.168.116.3 dev ens160 proto static src 10.168.118.6410.168.116.0/22 dev ens160 proto kernel scope link src 10.168.117.48 metric 10010.168.116.0/22 dev ens160 proto kernel scope link src 10.168.118.64 metric 100172.17.0.0/24 dev docker0 proto kernel scope link src 172.17.0.1PAS$ route -nKernel IP routing tableDestination Gateway Genmask Flags Metric Ref Use Iface0.0.0.0 10.168.116.1 0.0.0.0 UG 100 0 0 ens16010.128.24.0 10.168.116.3 255.255.252.0 UG 0 0 0 ens16010.168.116.0 0.0.0.0 255.255.252.0 U 100 0 0 ens16010.168.116.0 0.0.0.0 255.255.252.0 U 100 0 0 ens160172.17.0.0 0.0.0.0 255.255.255.0 U 0 0 0 docker0# <connection_name> must be your connectionHSA$ ip addr show <connection_name> HSA$ ip route show HSA$ route -nHSA$ ip addr show ens1602: ens160: <BROADCAST,MULTICAST,UP,LOWER_UP> mtu 1500 qdisc mq state UP group default qlen 1000 link/ether 00:50:56:be:81:da brd ff:ff:ff:ff:ff:ff inet 10.168.117.58/22 brd 10.168.119.255 scope global noprefixroute ens160 valid_lft forever preferred_lft forever inet6 fe80::9696:45e5:b048:1b93/64 scope link noprefixroute valid_lft forever preferred_lft foreverHSA$ ip route showdefault via 10.168.116.1 dev ens160 proto static metric 10010.168.116.0/22 dev ens160 proto kernel scope link src 10.168.117.58 metric 100172.17.0.0/24 dev docker0 proto kernel scope link src 172.17.0.1HSA$ route -nKernel IP routing tableDestination Gateway Genmask Flags Metric Ref Use Iface0.0.0.0 10.168.116.1 0.0.0.0 UG 100 0 0 ens16010.168.116.0 0.0.0.0 255.255.252.0 U 100 0 0 ens160172.17.0.0 0.0.0.0 255.255.255.0 U 0 0 0 docker0Remove Virtual IP (VIP) Configuration
Remove Virtual IP (VIP) Configuration section applies to both IPv4 and IPv6 .
This section provides the details on how to remove VIP configuration from SevOne NMS. If the VIP configuration is no longer required, the following steps enables the user to remove the VIP configuration from any NMS primary or secondary appliance.
To remove Virtual IP configuration from SevOne NMS peer pair, the following points must be kept in mind.
-
It is assumed that steps in section Configure Virtual IP (VIP) were used to configure Virtual IP. If any other process was followed, the steps to remove Virtual IP may not work as expected.
-
If any custom/static routes are configured and still required, you must retain those routing configurations. The steps below remove the interface rules file. Please reconfigure the rules file as per the new requirements without the Virtual IP.
-
Ensure that all the devices and NMS configurations currently using the Virtual IP for polling or receiving flows, are able to communicate over the Base IP (if not already configured) to minimize the impact of data loss when removing the Virtual IP configuration. Please ensure that the devices are configured to communicate via the Base IP of both, the Primary and Secondary appliances of the pair.
Perform the following steps on both, PAS (primary) and HSA (secondary) appliances of the NMS peer for which the Virtual IP configuration needs to be removed.
This section assumes that the PAS is the current Active Appliance of the PAS/HSA pair.
-
Check existing network connections.
for PASPAS$ nmcli connection showExample: Network ConnectionsPAS$ nmcli connection showNAME UUID TYPE DEVICEens160 afe20483-ba17-4955-aed6-1706093e8b88 ethernet ens160for HSAHSA$ nmcli connection showExample: Network ConnectionsHSA$ nmcli connection showNAME UUID TYPE DEVICEens160 d6ad7e7f-87bb-42f4-9481-bff76859081d ethernet ens160 -
Set appropriate network connection name as a variable. In the following example, connection name is ens160 . You may change the network connection name to the name specific to your environment based on the output from the previous command .
You must use the correct connection by setting the variable with the correct connection name as there may be other active connections in your environment. For example, a docker setup on your SevOne NMS.
The connection names may differ on a physical PAS or vPAS. In the example above, it is ens160 but it could be any other valid network connection name such as, en0, as an example.
Example: for PASPAS$ connection_name='ens160'Example: for HSAHSA$ connection_name='ens160' -
Backup the existing configuration files.
for PASPAS$cd/etc/sysconfig/network-scriptsPAS$mkdirvip-bkup-$(date+%d%b%y)PAS$cp-ap -L *${connection_name}* vip-bkup-$(date+%d%b%y)for HSAHSA$cd/etc/sysconfig/network-scriptsHSA$mkdirvip-bkup-$(date+%d%b%y)HSA$cp-ap -L *${connection_name}* vip-bkup-$(date+%d%b%y) -
Update the cluster's peers table. Perform the commands on the PAS.
for PASPAS$ peer_id=$(mysqldata -BNe "selectvalue fromlocal.settings \where setting='server_id';" )PAS$ cluster_master_ip=$(mysqlconfig net -BNe "selectip_normalize(ip) \from peers where master = 1")PAS$ cmd=$(echo"update net.peerssetvirtual_ip = NULL \where server_id = ${peer_id}")PAS$ssh$cluster_master_ip"mysqlconfig -e \"$cmd\" "PAS$ mysqlconfig -e"select * from net.peers where server_id = ${peer_id} \G" -
Update the operating system network configuration.
for PASPAS$cd/etc/sysconfig/network-scriptsPAS$ unlink ifcfg-ens160PAS$mvvip-disabled-ifcfg-ens160 ifcfg-ens160for HSAHSA$cd/etc/sysconfig/network-scriptsHSA$ unlink ifcfg-ens160HSA$mvvip-disabled-ifcfg-ens160 ifcfg-ens160 -
Remove network configuration files for Virtual IP and static routes.
This step removes the interface specific routes. Please perform the necessary steps manually if the static routes are configured for any other purpose other than the Virtual IP for this interface.
for PASPAS$rmvip-enabled-ifcfg-ens160 route-ens160for HSAHSA$rmvip-enabled-ifcfg-ens160 route-ens160 -
Verify the network configuration file has no Virtual IPs configured. Also, confirm that the Base IP is correctly configured in the network configuration file.
for PASPAS$ls-l/etc/sysconfig/network-scripts/ifcfg-${connection_name}PAS$cat/etc/sysconfig/network-scripts/ifcfg-${connection_name}ExamplePAS$ls-l/etc/sysconfig/network-scripts/ifcfg-${connection_name}-rw-r--r--. 1 root root 334 Feb 11 09:26/etc/sysconfig/network-scripts/ifcfg-ens160PAS$cat/etc/sysconfig/network-scripts/ifcfg-${connection_name}TYPE=EthernetPROXY_METHOD=noneBROWSER_ONLY=noBOOTPROTO=noneDEFROUTE=yesIPV4_FAILURE_FATAL=noIPV6INIT=yesIPV6_AUTOCONF=yesIPV6_DEFROUTE=yesIPV6_FAILURE_FATAL=noIPV6_ADDR_GEN_MODE=stable-privacyNAME=ens160UUID=afe20483-ba17-4955-aed6-1706093e8b88DEVICE=ens160ONBOOT=yesIPADDR=10.168.117.48PREFIX=22GATEWAY=10.168.116.1for HSAHSA$ls-l/etc/sysconfig/network-scripts/ifcfg-${connection_name}HSA$cat/etc/sysconfig/network-scripts/ifcfg-${connection_name}ExampleHSA$ls-l/etc/sysconfig/network-scripts/ifcfg-${connection_name}-rw-r--r--. 1 root root 334 Feb 11 09:28/etc/sysconfig/network-scripts/ifcfg-ens160HSA$cat/etc/sysconfig/network-scripts/ifcfg-${connection_name}TYPE=EthernetPROXY_METHOD=noneBROWSER_ONLY=noBOOTPROTO=noneDEFROUTE=yesIPV4_FAILURE_FATAL=noIPV6INIT=yesIPV6_AUTOCONF=yesIPV6_DEFROUTE=yesIPV6_FAILURE_FATAL=noIPV6_ADDR_GEN_MODE=stable-privacyNAME=ens160UUID=d6ad7e7f-87bb-42f4-9481-bff76859081dDEVICE=ens160ONBOOT=yesIPADDR=10.168.117.58PREFIX=22GATEWAY=10.168.116.1IMPORTANTSevOne strongly recommends that both, primary and secondary, appliances are restarted to ensure that the network configuration has been applied correctly after removal of the Virtual IP.
If a data collection outage is to be avoided, please restart the secondary appliance first.
for HSAHSA$ SevOne-shutdownrebootThen, failover the active role to the secondary appliance, confirm that everything is as expected with polling and graphs before restarting the primary appliance.
Now, restart the primary appliance and set the active role to the primary appliance.
for PASPAS$ SevOne-shutdownrebootIf removal of Virtual IP configuration is followed as a part of the steps to Change Virtual IP (VIP) Configuration, restart of NMS appliances is not required at this stage. You may Remove Virtual IP (VIP) Configuration and Configure Virtual IP (VIP) and then, perform the reboot of the appliances to avoid multiple reboots.
Change Virtual IP (VIP) Configuration
Before changing the Virtual IP configuration, ensure that all the devices and NMS configurations which are currently using the VIP for the purpose of polling or receiving flows will now be able to communicate over the new Virtual IP (if not already configured) to minimize the impact of data loss after changing the Virtual IP configuration. It has to be ensured that the devices are configured to communicate via the new Virtual IP of both, the Primary and Secondary appliances of the pair.
To change the Virtual IP configuration, execute the steps in,
Change IP Address
This section describes how to change the IP address on a SevOne appliance.
If the new IP address does not match the current subnet or the new IP address results in destination host unreachable, you must contact SevOne Support to connect a crash cart and reconfigure the server from the configshell. Please backup your network configuration files in a temporary directory before making any changes.
If you are currently connected to the network session for the IP address intended to be changed, it is NOT recommended to perform any modifications on it directly. Any modifications to the intended network must be performed while connected to the console either via iDRAC (for physical appliance) or the Hypervisor (for virtual appliance).
Change IP address using 'SevOne-change-ip' command
SevOne-change-ip is an interactive command that guides you through changing the IP address of a SevOne appliance. It will make all the necessary updates to the peers table and also, run the necessary fix commands.
-
All appliances in the cluster must be reachable at the time of running the SevOne-change-ip command. If any appliance in the cluster is currently unreachable, then the change of IP address must not be performed as the changes may fail to propagate to the unreachable peers.
-
Up on completion of change IP address command, you will be prompted to reboot your system.
SevOne-change-ip command does not support Virtual IP, bonded interfaces, or multiple interfaces present on the device. For such configurations, use the manual procedure documented below.
$ SevOne-change-ip -i=== Interface name ens160=== Current Peer Info:--- Bootproto: /etc/sysconfig/network-scripts/ifcfg-ens160:none--- Hostname: sevone--- IP: /etc/sysconfig/network-scripts/ifcfg-ens160:10.129.25.96--- Netmask: --- Broadcast: --- Gateway: Enter the new hostname (default: sevone): nw-masterEnter the new IP address (default: /etc/sysconfig/network-scripts/ifcfg-ens160:10.129.25.96): 10.129.27.166Enter the new netmask address (default: ): 255.255.252.0Enter the new brd address (default: ): 10.129.27.255Enter the new gateway address (default: ): 10.129.24.1=== Backing up configuration files=== Updating IP Address=== Writing Host File Header=== Changing the hostname=== Setting for ens160=== Adding Hosts file settings=== Updating kafka-server.propertieszookeeper: stoppedzookeeper: startedkafka: stoppedkafka: started=== Updating server2.cnf=== Updating api IP address<<< Reading API directory from '/SevOne/appliance/settings/api/directory'.>>> Writing '10.129.27.166' to '/SevOne/appliance/settings/api/ip'.--- Reading api.wsdl...--- Replacing "www.sevone.com\/soap3" with "10.129.27.166\/soap3".<<< Clearing WSDL cache.--- All done.=== Updating peers table for Others=== Updating peers table for IP = 10.129.27.166--- Updating primary IP=== Checking that we updated the peers table correctly--- Successfully updated the peers table=== Preventing wrongful failover--- Successfully updated the peers table=== Updating peer replicationSetting replication master for 10.129.25.47Setting replication master for 10.129.26.192 configSetting replication master for 10.129.26.192 data=== Printing updated peers table--- Peer 2:--- Hostname: PEER--- IP: 10.129.25.47--- Primary IP: 10.129.25.47--- Peer 1:--- Hostname: sevone--- IP: 10.129.27.166--- Primary IP: 10.129.27.166--- Secondary IP: 10.129.26.192=== Updating web proxy configuration--- Updating web proxy config on 10.129.25.96--- Web proxy will restart on reboot--- Successfully updated web proxy config on 10.129.25.96--- Updating web proxy config on 10.129.26.192--- Successfully updated web proxy config on 10.129.26.192--- Updating web proxy config on 10.129.25.47--- Successfully updated web proxy config on 10.129.25.47=== Updating peer MySQL permissions--- Updating MySQL permission settings for peer(10.129.25.96)--- Updating MySQL permission settings for peer(10.129.26.192)--- Updating MySQL permission settings for peer(10.129.25.47)=== Removing autogenerated MySQL UUID's=== Done Updating IP Address=== Removing backupsYou must restart the appliance for these changes to take effectRestart now? [yes/no] yesRebooting now. Run 'SevOne-fix-ssh-keys' after reboot.Change IP Address Manually
The IP address of a SevOne appliance can be changed manually by using NMCLI or NMTUI.
Where applicable, it is recommended that the IP address is changed using the SevOne-change-ip command and not done manually. However, in situations where it is not possible to use the command, changes will need to be made manually to the network configuration and in the NMS database tables.
using NMCLI
Execute the following steps to change the IP address manually using NMCLI.
-
Using ssh , log into SevOne NMS appliance as root .
$sshroot@<NMS appliance> -
Execute the following command to view all the interfaces.
$ nmcliens160: connected to ens160"VMware VMXNET3"ethernet (vmxnet3), 00:50:56:BE:C7:12, hw, mtu 1500ip4 defaultinet4 10.129.27.33/22route4 0.0.0.0/0route4 10.129.24.0/22inet6 fe80::250:56ff:febe:c712/64route6 fe80::/64route6 ff00::/8docker0: unmanaged"docker0"bridge, 02:42:A9:B2:4F:F5, sw, mtu 1500lo: unmanaged"lo"loopback (unknown), 00:00:00:00:00:00, sw, mtu 65536DNS configuration:servers: 10.168.0.50 10.168.16.50 10.205.8.50domains: wifi.sevone.com wilm.sevone.com sevone.com network.qainterface: ens160 -
To modify an interface, execute the following command.
$ nmcli connection modify <interface name> ipv4.address <ip_address/prefix>Example$ nmcli connection modify ens160 ipv4.address 10.129.27.55/22The default gateway, default via, must be in the subnet of the new IP address. However, if the default gateway also needs to be modified, execute following command.
$ nmcli connection modify ens160 ipv4.gateway <Gateway_IP>
Example$ nmcli connection modify ens160 ipv4.gateway 10.129.24.0
using NMTUI
Execute the following steps to change the IP address manually using NMTUI.
-
Using ssh , log into SevOne NMS appliance as root .
$sshroot@<NMS appliance> -
To modify an interface, execute the following command.
$ nmtui edit <interface name>Example$ nmtui edit ens160Navigate to the IP address to modify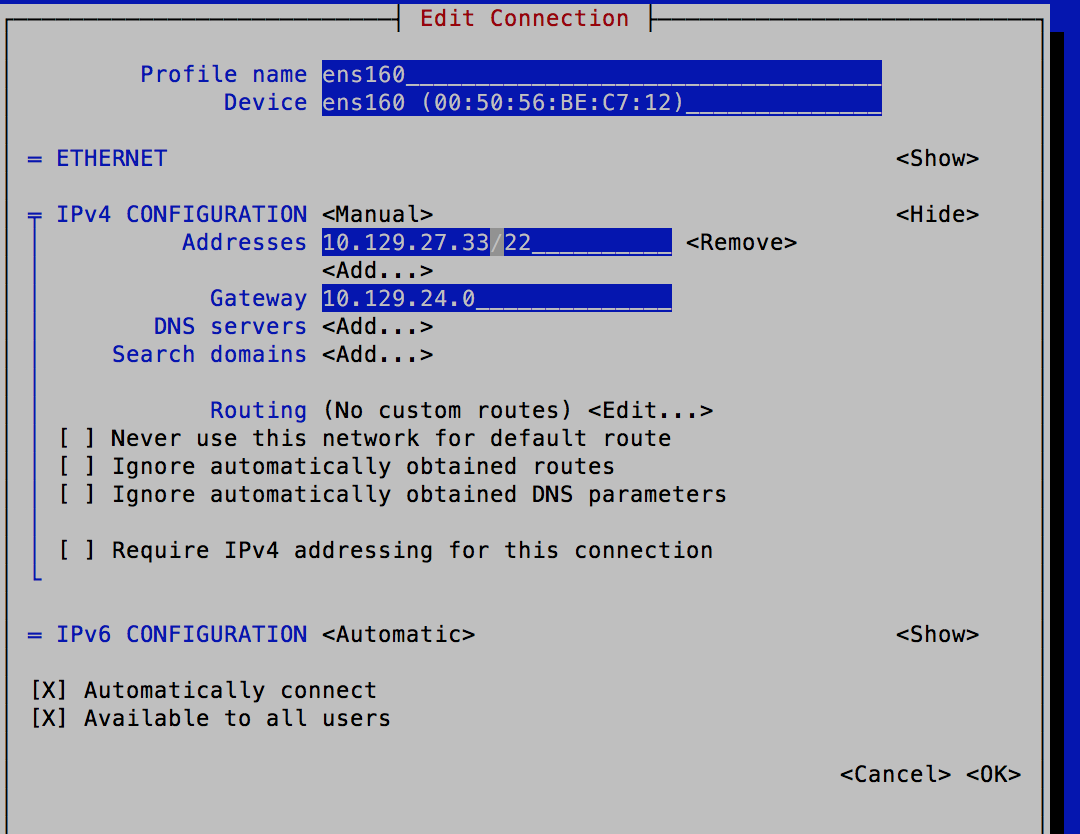
It is not recommended to change the settings by editing the network configuration file. You may view the interface settings in /etc/sysconfig/network-scripts/ifconfig-<interface_name> configuration file, but NMCLI or NMTUI must be used to make changes.
Verify IP Address Change at Network-Level
$ cat /etc/sysconfig/network-scripts/ifcfg-ens160# Generated by dracut initrdNAME=ens160DEVICE=ens160ONBOOT=yesNETBOOT=yesUUID=e2f7df86-55c8-4227-a00d-0f048e030b1aIPV6INIT=yesBOOTPROTO=noneTYPE=EthernetPROXY_METHOD=noneBROWSER_ONLY=noDEFROUTE=yesIPV4_FAILURE_FATAL=noIPV6_AUTOCONF=yesIPV6_DEFROUTE=yesIPV6_FAILURE_FATAL=noIPADDR=10.129.27.33PREFIX=22GATEWAY=10.129.24.0Change IP Address in NMS Configuration
Depending on the NMS appliance on which the network IP address change has been performed, the NMS configuration for that NMS appliance must be updated to reflect the change. Based on the appliance type (primary / secondary) and current role (active / passive), use one of the applicable options below.
IP Address Changed for 'active' Cluster Leader Appliance
Execute the following step to change the replication IP when the IP address has been changed for an 'active' Cluster Leader appliance. All other active peer's replication host must be updated. The script below must be executed on the Cluster Leader.
Please replace the script below with your IP address before executing it.
NEWMASTERIP="<new_master_or_leader_ip>";PEERIPS=$(ssh ${NEWMASTERIP} "/usr/local/scripts/mysqlconfig net -e \"SELECT ip_normalize(ip) \FROM peers WHERE master != 1 \" --skip-column-names"); # This following is executed on all peers in the clusterfor IP in $PEERIPS; do echo "--- updating replication source on $IP" ssh ${IP} "/usr/local/scripts/mysqlconfig net -e \"STOP SLAVE; \CHANGE MASTER TO master_host='${NEWMASTERIP}', \master_port=3307; START SLAVE \" "; done;IP Address Changed for 'active' Peer
Execute the following step to change the replication IP when the IP address has been changed for an 'active' peer (i.e., other than the Cluster Leader appliance). If the IP address has been changed for an active appliance in a pair, you must execute the following commands on its secondary / passive appliances.
Please replace the commands below with your IP address before executing it.
$ mysqldata -e "STOP SLAVE; CHANGE MASTER TO master_host='<MASTER_IP>', \master_port=3306; START SLAVE"$ mysqlconfig -e "STOP SLAVE; CHANGE MASTER TO master_host='<MASTER_IP>', \master_port=3307; START SLAVE"Update NMS 'net.peers' Table
Please ensure all peer's table updates are done on the Cluster Leader active appliance.
Please set the IP address and Primary / Secondary appliance in the command below IF the change of IP address is for an active appliance of a HSA pair.
$ mysqlconfig -e "update peers set \ip=HEX(INET6_ATON('<IP_ADDRESS>')), \[primary|secondary]_ip=HEX(INET6_ATON('<IP_ADDRESS>')) \where server_id='<SERVER_ID>' "$ mysqlconfig -e "update peers set \ip=HEX(INET6_ATON('<IP_ADDRESS>')),\primary_ip=HEX(INET6_ATON('<IP_ADDRESS>')) \where server_id='<SERVER_ID>' "OR
$ mysqlconfig -e "update peers set \ip=HEX(INET6_ATON('<IP_ADDRESS>')),\secondary_ip=HEX(INET6_ATON('<IP_ADDRESS>')) \where server_id='<SERVER_ID>' "OR
$ mysqlconfig -e "update peers set \ip=HEX(INET6_ATON('<IP_ADDRESS>')),\primary_ip=HEX(INET6_ATON('<IP_ADDRESS>')) \where server_id='<SERVER_ID>' "Please set the IP address and Primary / Secondary appliance in the command below IF the change of IP address is for a passive appliance of a HSA pair.
$ mysqlconfig -e "update peers set \[primary|secondary]_ip=HEX(INET6_ATON('<IP_ADDRESS>')) \where server_id='<SERVER_ID>' "$ mysqlconfig -e "update peers set \primary_ip=HEX(INET6_ATON('<IP_ADDRESS>')) \where server_id='<SERVER_ID>' "OR
$ mysqlconfig -e "update peers set \secondary_ip=HEX(INET6_ATON('<IP_ADDRESS>')) \where server_id='<SERVER_ID>' "Fix MySQL Permissions
Execute the following command from the Cluster Leader active appliance.
$ SevOne-fix-mysql-permissionsFix Hosts on All Peers
The following command must be executed from Cluster Leader active appliance.
$ SevOne-peer-do "SevOne-fix-hosts-file -y"Update API IP Address
Execute the following command on the NMS appliance where the IP address has been changed.
Please replace the command below with your IP addresses before executing it.
$ SevOne-api-change-ip <IP_ADDRESS>Restart Daemons
Restart the daemons cluster-wide by executing the command below from Cluster Leader.
$ SevOne-peer-do "supervisorctl restart SevOne-masterslaved SevOne-requestd"Reboot Appliance
If the IP address on the appliance has changed, please reboot the appliance for the new IP address to take effect.
$ SevOne-shutdown rebootChange from IPv4 to IPv6
To change your SevOne NMS from IPv4 to IPv6, execute the steps below.
-
Using ssh, log into SevOne NMS Cluster Leader as root.
$sshroot@<SevOne NMS Cluster Leader IP address orhostname> -
Disable SevOne-masterslaved cluster-wide.
$ SevOne-peer-do"supervisorctl stop SevOne-masterslaved" -
This step must be performed on each peer.
Please do not change the IP address of the Cluster Leader until the IP address of all the peers in the cluster have been changed first.
-
Using ssh, log into SevOne NMS peer as root.
$sshroot@<SevOne NMS peer IP address orhostname> -
Run steps in section Change IP address using 'SevOne-change-ip' command to change the IP address of the peer you are logged into.
-
Repeat steps a. and b. until you have changed the IP address of each peer in the cluster.
-
Once the IP address of all the peers has been changed, change the IP address of the Cluster Leader. IP address of the Cluster Leader must always be changed last.
-
-
Ensure that each peer can talk to every other applicable peer in the cluster. Execute the following command.
$ SevOne-act check peers -
Re-enable SevOne-masterslaved cluster-wide. You must be on Cluster Leader.
$sshroot@<SevOne NMS Cluster Leader IP address orhostname>$ SevOne-peer-do"supervisorctl start SevOne-masterslaved"
Change Hostname
If SevOne NMS appliance is in a cluster, do not change the hostname of the appliance using the Operating System tools or the configshell.
To change the hostname of a NMS appliance that is already in its final state of Cluster Configuration, requires some key NMS configurations to be updated and services to be restarted. SevOne recommends to perform the hostname change for a NMS appliance only after it is configured in the NMS cluster.
Change of NMS appliance hostname requires a reboot, causing an outage; please plan accordingly.
Execute the following steps to change the hostname of the NMS appliance.
-
Using ssh, log into SevOne NMS appliance as root.
$sshroot@<NMS appliance> -
Execute the following command to check the hostname. In the example below, you will see that Static hostname is pandora-01.
Example$ hostnamectlStatichostname: pandora-01Icon name: computer-vmChassis: vmMachine ID: 599fd36b0ef74afcbb645c76a3075353Boot ID: 12dc46f1f87b4856b045f8583428d711Virtualization: vmwareOperating System: CentOS Linux 7 (Core)CPE OS Name: cpe:/o:centos:centos:7Kernel: Linux 3.10.0-1127.10.1.el7.x86_64Architecture: x86-64 -
Run the following script to change the hostname. At the prompt, enter the new hostname.
$ SevOne-change-hostnameCurrent Hostname = <contains currenthostname>. Enter New Hostname: <enter the newhostname>Example$ SevOne-change-hostnameCurrent Hostname = pandora-01. Enter New Hostname: regulus-01 -
Reboot the appliance.
Example$ SevOne-shutdownrebootAfter the reboot, all the necessary services are restarted.
If SSL certificates are being used, ensure that the certificates are updated at the same time and there is continuity and accessibility to NMS.
-
Using ssh, log back into SevOne NMS appliance as root.
$sshroot@<NMS appliance> -
Execute the following command to confirm the hostname change. In the example below, you will see that Static hostname is now regulus-01.
Example$ hostnamectlStatichostname: regulus-01Icon name: computer-vmChassis: vmMachine ID: 599fd36b0ef74afcbb645c76a3075353Boot ID: 12dc46f1f87b4856b045f8583428d711Virtualization: vmwareOperating System: CentOS Linux 7 (Core)CPE OS Name: cpe:/o:centos:centos:7Kernel: Linux 3.10.0-1127.10.1.el7.x86_64Architecture: x86-64
Peer Communication over NAT
Overview
This topic describes the firewalld NAT configuration to support SevOne NMS clusters over Network Address Translation (NAT). It provides a solution for the IP Table NAT configuration to communicate with peers.
-
If peers in a cluster are on different networks, they should be able to communicate with each other using the static NAT IP address. The primary and its secondary appliance cannot be split between two different networks.
-
After enabling firewalld in the NAT configuration, please check the firewalld services and ports configuration.
-
Only static NAT is supported. Dynamic NAT and PAT (Port Address Translation) are not supported.
-
NAT configuration over Hub-and-Spoke is not supported.
-
If the NMS cluster is configured with Virtual IP addresses, firewalld NAT configuration is not supported.
-
Peers may contain either NAT IP or physical IP in the peers table. NAT rules should be able to apply accordingly.
-
Must work in hybrid deployment model.
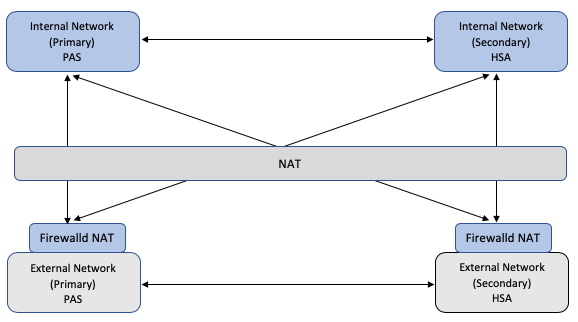
Network Architecture
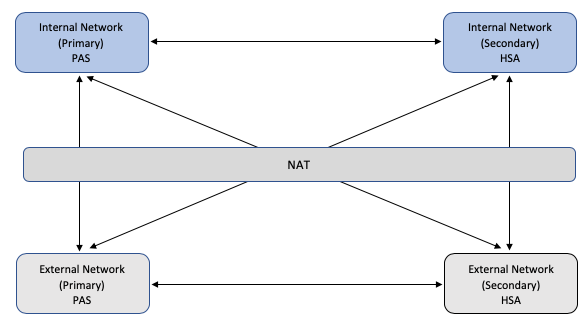
Network Address
When a customer does not want to expose internal IP addresses to the external network, NAT is applied to the internal IP addresses when routing to the external network. There is no need to use a NAT'd IP for Internal Network communications.
NAT IP addresses are routable between External Network and Internal Network only. The hosts in the internal network must use the physical internal IP address to route to other hosts in the internal network.
Only static NAT (one-to-one NAT) is supported. Dynamic NAT/PAT are not supported.
As an example, the basic network addressing scheme is summarized as shown in the table below.
|
|
Route To |
||||
|
Internal Network |
External Network |
||||
|
Route From |
Internal Network |
Physical IP Address |
Physical IP Address |
||
|
External Network |
NAT IP Address |
Physical IP Address |
|||
There might be NAT addressing in both directions so that routing from Internal Network to External Network will also require use of a NAT address assigned by the External Network owner.
As an extension to this, a single NMS cluster might have peers in multiple External Networks (for example, an MSP shared cluster supporting multiple customers) and the Internal peers may appear at different NAT addresses to each External Network (a Hub-and-spoke configuration which is currently not supported).
SevOne NMS Peers
SevOne NMS peer functions as a Cluster Leader, a polling PAS or a DNC. A peer typically comprises of two appliances - a primary and a secondary appliance. The standalone peers have only the primary appliance. The primary and secondary appliances may be located in separate subnets or separate physical Data Centers. However, both appliances in a peer reside either in the internal network or the external network. A peer is never split between the internal network and the external network.
Each appliance in the network must have its own unique physical IP address.
If the NMS cluster is configured with Virtual IP addresses, firewalld NAT configuration is not supported.
SevOne NMS Peers Table
In SevOne NMS, the peers table maintains one record for each peer. Each peer can have only one IP address assigned to its primary and one IP address to its secondary (if a secondary exists). The peer will always be referred by the IP address of the current active appliance for the peer and there can optionally be one Virtual IP assigned to each peer.
The peers table is replicated to all peers and is identical on all peers in the cluster.
For SevOne NMS to function properly, apart from hub-and-spoke clusters, all peers must be reachable in a fully meshed configuration using the peering addresses contained in the peers table.
In standard configuration, SevOne NMS is unable to support the network architecture in which peers in the internal network are addressed using their physical addresses from other peers within the internal network and NAT addresses from peers in the external network.
This would require a different version of the peers table on different peers, or the ability to store the NAT addresses in the peers table in addition to physical addresses. However, this is currently not supported in SevOne NMS.
firewalld
firewalld is a firewall management tool for Linux operating systems which supports the processing of IP packet filtering rules, including NAT, on the Linux host.
By applying firewalld NAT rules, except for hub-and-spoke clusters, it is possible to ensure a full-mesh connectivity between SevOne NMS peers while supporting SevOne NMS clustering and the common peers table addressing in the normal way without any changes to the SevOne NMS application.
Deployment Scenarios
firewalld NAT rules can be applied either on the internal network appliances or on the external network appliances within a given SevOne NMS cluster. Both schemes achieve the same effect.
The choice of where to deploy the firewalld NAT rules depends on the deployment model for the cluster and the history of whether the cluster has already been built in one or other data center.
Typically, it is preferable to deploy firewalld NAT rules to the minimal number of appliances, or to avoid applying rules to appliances which have already been added to an NMS cluster since this may necessitate changes to the NMS Peers IP addressing:
-
In a typical scenario, where the majority of the NMS cluster is in the internal network and only the DNC peers are located in the external network, it would typically be preferable to first build the cluster in the internal network, apply firewalld NAT rules to the external network peers when DNCs are added.
-
If there are no appliances in the external network then there is no need to apply any firewalld NAT rules and the cluster can be built in a normal way. If peers are added to the external network at a later stage then firewalld NAT rules must be applied on the external peers to avoid changes to the internal peers.
SevOne recommends that in all cases firewalld NAT rules must be applied to the peer appliances before attempting to add the peer to the NMS cluster. If firewalld NAT rules need to be applied to an existing NMS cluster, apply NAT rules to non-NAT'd servers only so that we won't need to change the peers table entry.
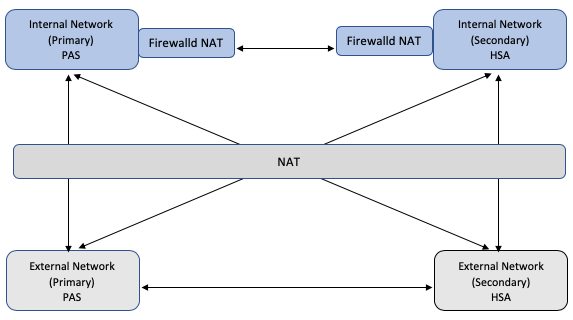
Apply firewalld NAT to Internal Network Peers
In this model, the NMS peering address maintained in the peers table is the NAT IP address of the internal peers and the physical IP address of the external peers.
firewalld NAT rules are applied to the internal peers to enable them to communicate with each other using the NAT IP addresses within the internal network.
External peers do not require any firewalld NAT configuration as they can route to the internal peers using the NAT IP addresses stored in the NMS peers table.
firewalld NAT Rules
The firewalld NAT rules are applied to each internal host.
|
Table |
Chain |
Rule |
Description |
|
NAT |
OUTPUT |
DNAT |
Destination address translation from NAT IP address to physical IP address for each internal network host. |
|
NAT |
INPUT |
SNAT |
Source address translation from physical IP address to NAT IP address for each internal network host. |
|
NAT |
Post-Routing |
SNAT |
Source address translation from physical IP address to NAT IP address for the local host. |
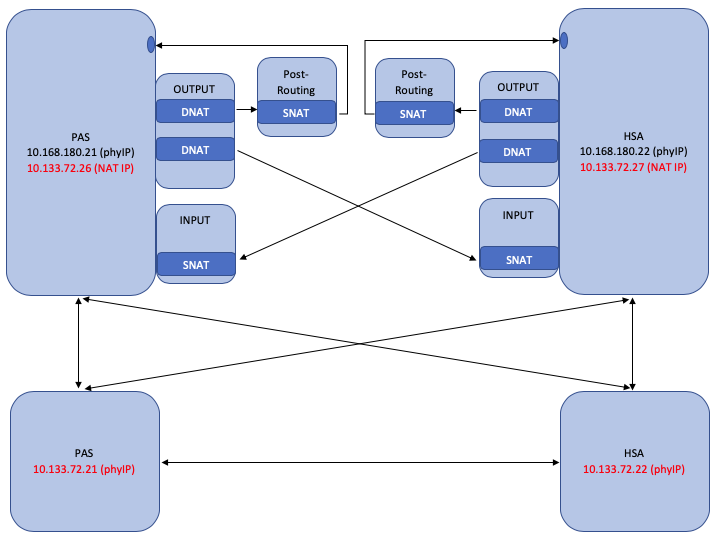
The NMS cluster peers table has the following peers.
|
Peer 1 |
NAT IP Address |
10.133.72.26 |
10.133.72.27 |
Internal Network |
|
Peer 2 |
Physical IP Address |
10.133.72.21 |
10.133.72.22 |
External Network |
The host, 10.133.72.26 has the following firewalld NAT rules.
ipv4 nat OUTPUT 0 -d 10.133.72.26 -j DNAT --to-destination 10.168.180.21ipv4 nat OUTPUT 0 -d 10.133.72.27 -j DNAT --to-destination 10.168.180.22ipv4 nat POSTROUTING 0 -d 10.168.180.21 -j SNAT --to-source 10.133.72.26ipv4 nat INPUT 0 -s 10.168.180.22 -j SNAT --to-source 10.133.72.27
Add Peer to Internal Network
firewalld NAT configuration must be applied to an internal peer before adding it to the NMS cluster.
-
Create or update the nat.csv file containing the physical and NAT IP addresses of each internal peer including the new internal peer which is being added.
-
Update hosts.ini file containing all hosts where NAT rules are applied along with the new internal peer which is being added.
-
Ensure that the new peer has ssh connectivity prior to applying a new peer.
-
Update firewalld NAT rules on all other existing internal peers and add it on a new peer. Please refer to section Implementation for details.
-
Check that the new internal peer has connectivity to/from all other peers in the cluster using the NAT IP address of the new internal peer.
-
Add the new internal peer to the NMS cluster using its NAT IP address.
Add Peer to External Network
-
No firewalld NAT configuration changes are required.
-
Add the external network peer to the NMS cluster using the physical IP address.
Apply firewalld NAT to External Network
In this model, the NMS peering address is the physical IP address of all peers in both internal and external networks.
firewalld NAT rules are applied to each of the external peers to enable them to communicate with the internal peers using the physical IP addresses of internal peers.
Internal peers do not require any firewalld NAT rules configuration since they can route to the external network and the internal peers using their physical addresses.
firewalld NAT Rules
The firewalld NAT rules are applied to each external host.
|
Table |
Chain |
Rule |
Description |
|
NAT |
OUTPUT |
DNAT |
Destination address translation from physical IP address to NAT IP address for each internal network host. |
|
NAT |
INPUT |
SNAT |
Source address translation from NAT IP address to physical IP address for each internal network host. |

The NMS cluster peers table has the following peers.
|
Peer 1 |
Physical IP Address |
10.168.180.21 |
10.168.180.22 |
Internal Network |
|
Peer 2 |
Physical IP Address |
10.133.72.21 |
10.133.72.22 |
External Network |
The external network peer appliances contain the following firewalld NAT rules.
ipv4 nat OUTPUT 0 -d 10.168.180.21 -j DNAT --to-destination 10.133.72.26ipv4 nat OUTPUT 0 -d 10.168.180.22 -j DNAT --to-destination 10.133.72.27ipv4 nat INPUT 0 -s 10.133.72.26 -j SNAT --to-source 10.168.180.21ipv4 nat INPUT 0 -s 10.133.72.27 -j SNAT --to-source 10.168.180.22Add Peer to Internal Network
firewalld NAT configuration must be applied or updated to any existing external peers before an internal peer is added to the cluster.
-
Create or update the nat.csv file containing the physical and NAT IP addresses of each internal peer including the new internal peer which is being added.
-
Create or update hosts.ini file containing external hosts.
-
Apply or update firewalld NAT rules to all existing external peers. Please refer to section Implementation for details.
-
Check that the new internal peer has connectivity to/from all other peers in the cluster using the physical IP address of the new internal peer.
-
Add the new internal peer to the NMS cluster using its physical IP address.
Add Peer to External Network
firewalld NAT configuration must be applied to the new external peer before it is added to the NMS cluster.
-
Confirm that the existing nat.csv file includes all internal peers.
-
Check for ssh connection with the new external peer.
-
Update/create hosts.ini file with the new external peer.
-
Apply the firewalld NAT rules using command in section Implementation.
-
Check that the new external peer has connectivity to/from all other peers in the cluster using their physical IP addresses.
-
Add the new external peer to the NMS cluster using its physical IP address.
Implementation
If iptables.service is already installed and running, it will not add rules through firewalld and will exit the execution.
Create nat.csv & hosts.ini files
-
Using a text editor of your choice, create a nat.csv text file in any directory. For example, /etc/SevOne/nat. The nat.csv file must contain the physical and NAT IP addresses for all internal appliances (where NAT is applied). The format of the .csv file is as follows.
<physical IP 1>,<NAT IP 1><physical IP 2>,<NAT IP 2>...The nat.csv file does not contain the header row.
Example10.168.180.21, 10.133.72.2610.168.180.22, 10.133.72.27
-
Using a text editor of your choice, create a hosts.ini text file in any directory. For example, /etc/SevOne/nat. The hosts.ini file must contain the host IP addresses where NAT rules are applied. The format of the .csv file is as follows.
<hostip1><hostip2>...The hosts.ini file does not contain the header row.
Example10.133.72.2110.133.72.22
Generate firewalld NAT Rules
-
Execute the following command to generate NAT rules on all peers mentioned in the hosts.ini file.
$ SevOne-act firewall apply-nat --natfile/etc/SevOne/nat/nat.csv \--ipfile/etc/SevOne/nat/hosts.iniThe script detects the IP address of the local host and determines the appropriate firewalld NAT rules depending on whether the rules are being applied to a NAT’d host (Internal Network) or a non-NAT’d host (External Network).
-
If the rules are not as expected, correct the nat.csv file. To verify if the NAT rules are correct, please execute the command in Verify Rules.
-
Execute the following command to flush the rules.
$ SevOne-act firewall flush-nat --ipfile/etc/SevOne/nat/hosts.ini -
Apply NAT rules again.
$ SevOne-act firewall apply-nat --natfile/etc/SevOne/nat/nat.csv \--ipfile/etc/SevOne/nat/hosts.ini
-
-
To verify if rules are successfully added, execute the following command on each host to check the firewalld NAT rules.
$ firewall-cmd --direct --get-all-rulesCheck if rules are permanently set$ firewall-cmd --permanent --direct --get-all-rulesYou may check /etc/firewalld/direct.xml if rules are added permanently or not.
-
Restart docker if required on each peer in the cluster.
$ systemctl restart docker
Verification
firewall-cmd Commands
The following are useful firewall-cmd commands.
$ firewall-cmd --direct --get-all-rules$ firewall-cmd --permanent --direct --get-all-rules$ cat /etc/firewalld/direct.xml$ mysqldata -e "select * from local.nat_config_info" +----+---------------+---------------+---------------------+ | id | physical_ip | nat_ip | created_at | +----+---------------+---------------+---------------------+ | 1 | 10.168.180.21 | 10.133.72.26 | 2020-06-25 05:05:49 | | 2 | 10.168.180.22 | 10.133.72.27 | 2020-06-25 05:05:50 |+----+---------------+---------------+---------------------+Manual Peer Connectivity Checks
Prior to adding a new peer to the NMS cluster, manual connectivity checks must be performed to ensure that the new peer has connectivity to/from all other peers using the IP address which will be used to add the peer to the NMS cluster.
-
Confirm that each existing peer in the cluster is reachable using ssh and mysql from the new peer using the peer IP address which is contained in the NMS peers table.
$ssh<existing peering address>$ mysql -h <existing peering address>MySQL connections will be rejected until the new peer has been added to the NMS cluster. Confirm that the IP address in a connection message is the peering address of the peer attempting to make the connection - it can be either the NAT IP address or the physical IP address which is used for adding a new peer.
-
Confirm that the new peer is reachable using ssh from each existing peer using the peering address of the new peer.
$ssh<new peering address>$ mysql -h <new peering address>MySQL connections will be rejected until the new peer has been added to the NMS cluster. Confirm that the IP address in a connection message is the peering address of the peer attempting the connection.
NMS Cluster Connectivity Checks
After the NMS cluster has been built, the standard NMS cluster health check scripts can be used to verify that the required connectivity is working between all peers and to troubleshoot any issues observed during the clustering activity.
-
Execute the following command to perform a full checkout of the cluster.
$ SevOne-act check checkout –full-clusterIndividual check scripts can be executed if any errors are detected.
-
To detect issues with connectivity and port access, execute the following command.
$ SevOne-act check peers --full-cluster -v$ SevOne-act check mysql-full-mesh-connectivity --full-cluster -v
firewalld Service Checks
-
Execute the following command to check if firewalld service is enabled and active.
$ firewalld.service - firewalld - dynamic firewall daemonLoaded: loaded (/usr/lib/systemd/system/firewalld.service; enabled; vendor preset: enabled)Active: active (running) since Tue 2020-06-23 10:00:54 UTC; 1 day 20h agoDocs:man:firewalld(1)Main PID: 22923 (firewalld)Tasks: 2Memory: 29.0MCGroup:/system.slice/firewalld.service└─22923/usr/bin/python2-Es/usr/sbin/firewalld--nofork --nopid
Firewall Enabled?
Since NAT rules are added permanently, no new steps are required during the NMS upgrade. For NAT to work,
-
Firewall must be enabled on each peer in the cluster.
-
From SevOne NMS > Administration > Cluster Manager > Cluster Settings tab > Firewall subtab > select Enable Cluster Firewall check box to enable it.
-
From SevOne NMS > Administration > Cluster Manager > [specific appliance] > Peer Settings tab > Firewall subtab > Override Cluster Settings check box must be unchecked.
-
-
Ensure that firewalld is running after the upgrade. If not, execute the following command.
$ systemctl restart firewalld
FAQs
What happens if the IP address of NAT'd server is changed?
If the IP address is changed using SevOne-change-ip or if the IP address of the NAT'd appliance is changed, firewalld rules must be regenerated.
What is the procedure to apply the NAT rules if an appliance has to be rebuilt that already has a NAT configuration?
firewalld rules must be regenerated.
What if I add a new peer to the cluster?
If you add a new peer to the cluster, firewalld NAT configuration rules must be applied before the peer is added to the NMS cluster.
What if I need to remove a peer using NAT?
For the peer that has been removed, NAT rules must be flushed out manually. Once removed, you must execute the flush rules script, as mentioned in Generate firewalld NAT Rules, on it. On the remaining peers, NAT rules will have to be applied again with the updated config.
What if I want to change the current Cluster Leader peer where NAT may be configured?
If there is no change in the IP address of NAT’d servers (i.e., current Cluster Leader peer), the NAT rules do not need to be reapplied. However, if there is a change of IP address in any of the peers, the config will have to be flushed and reconfigured by using the NAT utility commands such as SevOne-act firewall flush-nat and SevOne-act firewall apply-nat. Also, described in section Generate firewalld NAT Rules.
What happens if the hostname is changed?
No changes are required.
If NAT is configured, does it require firewalld service to be running?
Yes, firewalld service must always be up and running if NAT is configured.
How about bonding in CentOS when you have active-backup setup?
NAT configuration is not supported over Virtual IP. If bonding is configured to use Virtual IP, it will not be supported.
What steps do I need to follow if I am using a custom port and do not have firewalld enabled?
Please refer to the following sections in SevOne NMS System Administration Guide to add the port rule as required.
-
Administration > Cluster Manager > Cluster Settings tab > Firewall subtab.
-
Administration > Cluster Manager > [specific appliance] > Peer Settings tab > Firewall subtab.
Interface Bonding for Active-Backup Failover
Overview
Bonding joins multiple network interfaces together. There are various modes of bonding supported by the Linux Ethernet Bonding Driver (https://www.kernel.org/doc/Documentation/networking/bonding.txt). However, this document will only discuss the most common and applicable mode of bonding, active-backup. This mode provides network fault tolerance within a single appliance. For example, if an appliance has two interfaces which are bonded in active-backup and connected to two different switches, if the switch of the primary interface fails, the secondary interface will take over. For in-depth details, please refer to Linux Ethernet Bonding Driver (https://www.kernel.org/doc/Documentation/networking/bonding.txt) and the Networking Guide for Red Hat Enterprise Linux (https://access.redhat.com/documentation/en-us/red_hat_enterprise_linux/7/html/networking_guide/).
Configure Bonding
Use Network Manager Command Line Tool, NMCLI, to configure bonding. This tool provides a convenient way of making changes to the network configurations without the need for directly editing text files. You will require the relevant networking details to be configured in the bonded interface. In the example below, IPv4 networking details are used.
-
IP Address - 10.168.116.5
-
Subnet Mask - 255.255.252.0 (CIDR of /22)
-
Gateway - 10.168.116.1
Editing a network interface while connected through that same interface is NOT recommended. These changes should be performed while connected to the console either through iDRAC (for physical appliance) or the Hypervisor (for virtual appliance).
-
Using ssh, log into SevOne NMS appliance as root.
$sshroot@<NMS appliance> -
Determine the names of the available network connections that you would like to bond. In the example below, bonding between ens160 and ens33 is performed.
$ nmcli conn showNAME UUID TYPE DEVICEens160 e2f7df86-55c8-4227-a00d-0f048e030b1a ethernet ens160ens33 f2b05eaa-e9fa-3f03-a503-623de3bae7c5 ethernet ens33 -
Create the bonded interface using the networking details provided by the user. For example,
-
Connection Name - bond0
-
IPv4 - 10.168.116.5 with a subnet mask in CIRD notation of /22 (255.255.252.0)
-
Mode - Active Backup
-
Link Monitoring - MII
-
Monitoring Frequency - 100ms
-
Link Up Delay - 400ms (suggested 4x the monitoring frequency)
-
Link Down Delay - 400ms (suggested 4x the monitoring frequency)
Example$ nmcli con addtypebond con-name bond0 ifname bond0 \ip4 10.168.116.5/22gw4 10.168.116.1 ipv4.method manual \ipv6.method ignore \bond.options"mode=active-backup,miimon=100,downdelay=400,updelay=400"Connection'bond0'(e8048f88-80e5-43c1-a981-3bcb9b8ccc69) successfully added.
-
-
Add the first interface to the bond0 you just created.
$ nmcli con addtypebond-slave ifname ens160 master bond0Connection'bond-slave-ens160'(fe926d34-0e12-46e3-a07c-fa78e5e0c8a3) successfully added. -
Bring up the first follower interface.
$ nmcli conn up bond-slave-ens160Connection successfully activated (D-Bus active path:/org/freedesktop/NetworkManager/ActiveConnection/51). -
Set the first follower interface to the primary interface for bond0.
$ nmcli dev mod bond0 +bond.options"primary=ens160"Connection successfully reapplied to device'bond0'. -
For each additional interface, add it as a follower and then, bring it up.
$ nmcli con addtypebond-slave ifname ens33 master bond0Connection'bond-slave-ens33'(073517f9-723a-4abe-a97e-fc10077f0ef3) successfully added.$ nmcli conn up bond-slave-ens33Connection successfully activated (D-Bus active path:/org/freedesktop/NetworkManager/ActiveConnection/51). -
Verify configurations.
$cat/etc/sysconfig/network-scripts/ifcfg-bond0BONDING_OPTS="downdelay=400 miimon=100 mode=active-backup updelay=400"TYPE=BondBONDING_MASTER=yesPROXY_METHOD=noneBROWSER_ONLY=noBOOTPROTO=noneIPADDR=10.168.116.5PREFIX=22GATEWAY=10.168.116.1DEFROUTE=yesIPV4_FAILURE_FATAL=noIPV6INIT=noNAME=bond0UUID=f3fa06e0-66b7-47d6-aff3-3a3db27ba596DEVICE=bond0ONBOOT=yes$cat/proc/net/bonding/bond0Ethernet Channel Bonding Driver: v3.7.1 (January 27, 2020)Bonding Mode: fault-tolerance (active-backup)Primary Slave: ens160 (primary_reselect always)Currently Active Slave: ens160MII Status: upMII Polling Interval (ms): 100Up Delay (ms): 400Down Delay (ms): 400Slave Interface: ens160MII Status: upSpeed: 10000 MbpsDuplex: fullLink Failure Count: 0Permanent HW addr: 00:50:56:8c:11:13Slave queue ID: 0Slave Interface: ens33MII Status: upSpeed: 1000 MbpsDuplex: fullLink Failure Count: 0Permanent HW addr: 00:50:56:8c:2c:d0Slave queue ID: 0 -
From another appliance, verify that you can ping bond0 IP and receive a response.
SevOne-test$ping10.168.116.5PING 10.168.116.5 (10.168.116.5): 56 data bytes64 bytes from 10.168.116.5: icmp_seq=0 ttl=63time=0.293 ms64 bytes from 10.168.116.5: icmp_seq=1 ttl=63time=0.331 ms64 bytes from 10.168.116.5: icmp_seq=2 ttl=63time=0.249 ms64 bytes from 10.168.116.5: icmp_seq=3 ttl=63time=0.285 ms -
If you do not receive a response, reload all connection files from disk and restart the network service on the appliance you are bonding with.
IMPORTANTPlease execute the entire command below as-is to avoid any disconnect or box unreachable issue.
$/usr/bin/nmclic reload;/usr/bin/nmclinetworking off;/usr/bin/nmclinetworking on -
You now have the bonding set up and working. You may try to bring down the primary interface to ensure that the follower takes over.
$ nmcli conn down bond-slave-ens160Connection'bond-slave-ens160'successfully deactivated (D-Bus active path:/org/freedesktop/NetworkManager/ActiveConnection/55)$cat/proc/net/bonding/bond0Ethernet Channel Bonding Driver: v3.7.1 (January 27, 2020)Bonding Mode: fault-tolerance (active-backup)Primary Slave: NoneCurrently Active Slave: ens33MII Status: upMII Polling Interval (ms): 100Up Delay (ms): 400Down Delay (ms): 400Slave Interface: ens33MII Status: upSpeed: 1000 MbpsDuplex: fullLink Failure Count: 0Permanent HW addr: 00:50:56:8c:2c:d0Slave queue ID: 0$ nmcli conn up bond-slave-ens160$cat/proc/net/bonding/bond0Ethernet Channel Bonding Driver: v3.7.1 (January 27, 2020)Bonding Mode: fault-tolerance (active-backup)Primary Slave: ens160 (primary_reselect always)Currently Active Slave: ens160MII Status: upMII Polling Interval (ms): 100Up Delay (ms): 400Down Delay (ms): 400Slave Interface: ens33MII Status: upSpeed: 1000 MbpsDuplex: fullLink Failure Count: 0Permanent HW addr: 00:50:56:8c:2c:d0Slave queue ID: 0Slave Interface: ens160MII Status: upSpeed: 10000 MbpsDuplex: fullLink Failure Count: 0Permanent HW addr: 00:50:56:8c:11:13Slave queue ID: 0
To configure bonding, instead of using Network Manager Command Line Tool, NMCLI, as mentioned above, you may choose to use Network Manager Text User Interface, NMTUI. For details on nmtui, please refer to https://access.redhat.com/documentation/en-us/red_hat_enterprise_linux/7/html/networking_guide/sec-configure_bonding_using_the_text_user_interface_nmtui.
References / Related Documents
|
Document |
URL |
|
IP Subnet Calculator |
|
|
Linux Ethernet Bonding Driver |
https://www.kernel.org/doc/Documentation/networking/bonding.txt |
|
Networking Guide for Red Hat Enterprise Linux |
https://access.redhat.com/documentation/en-us/red_hat_enterprise_linux/7/html/networking_guide/ |
|
Using the Network Manager Command Line Tool, nmcli |
|
|
CentOS / RHEL 7 : How to create an Network Bonding (NIC teaming) using nmcli |
|
|
Using Network Manager Text User Interface, nmtui |