Table of Contents (Start)
- Topics
- Introducing SevOne
- Login
- Startup Wizard
- Dashboard
- Global Search - Advanced Search
- Report Manager
- Report Attachment Wizard
- Report Properties
- Report Interactions
- Instant Graphs
- TopN Reports
- Alerts
- Alert Archives
- Alert Summary
- Instant Status
- Status Map Manager
- Edit Maps
- View Maps
- FlowFalcon Reports
- NBAR Reports
- Logged Traps
- Unknown Traps
- Trap Event Editor
- Trap Destinations
- Trap Destination Associations
- Policy Browser
- Create and Edit Policies
- Webhook Definition Manager
- Threshold Browser
- Create and Edit Thresholds
- Probe Manager
- Discovery Manager
- Device Manager
- New Device
- Edit Device
- Object Manager
- High Frequency Poller
- Device Summary
- Device Mover
- Device Groups
- Object Groups
- Object Summary
- Object Rules
- VMware Browser
- AWS Plugin
- Azure Plugin (Public Preview)
- Calculation Plugin
- Database Manager
- Deferred Data Plugin
- DNS Plugin
- HTTP Plugin
- ICMP Plugin
- IP SLA Plugin
- JMX Plugin
- NAM
- NBAR Plugin
- Portshaker Plugin
- Process Plugin
- Proxy Ping Plugin
- SDWAN Plugin
- SNMP Plugin
- VMware Plugin
- Web Status Plugin
- WMI Plugin
- xStats Plugin
- Indicator Type Maps
- Device Types
- Object Types
- Object Subtype Manager
- Calculation Editor
- xStats Source Manager
- User Role Manager
- User Manager
- Session Manager
- Authentication Settings
- Preferences
- Cluster Manager
- Maintenance Windows
- Processes and Logs
- Metadata Schema
- Baseline Manager
- FlowFalcon View Editor
- Map Flow Objects
- FlowFalcon Views
- Flow Rules
- Flow Interface Manager
- MPLS Flow Mapping
- Network Segment Manager
- Flow Protocols and Services
- xStats Log Viewer
- SNMP Walk
- SNMP OID Browser
- MIB Manager
- Work Hours
- Administrative Messages
- Enable Flow Technologies
- Enable JMX
- Enable NBAR
- Enable SNMP
- Enable Web Status
- Enable WMI
- IP SLA
- SNMP
- SevOne Data Publisher
- Quality of Service
- Perl Regular Expressions
- Trap Revisions
- Integrate SevOne NMS With Other Applications
- Email Tips and Tricks
- SevOne NMS PHP Statistics
- SevOne NMS Usage Statistics
- Glossary and Concepts
- Map Flow Devices
- Trap v3 Receiver
- Guides
- Quick Start Guides
- AWS Quick Start Guide
- Azure Quick Start Guide (Public Preview)
- Data Miner Quick Start Guide
- Flow Quick Start Guide
- Group Aggregated Indicators Quick Start Guide
- IP SLA Quick Start Guide
- JMX Quick Start Guide
- Metadata Quick Start Guide
- RESTful API Quick Start Guide
- Self-monitoring Quick Start Guide
- SevOne NMS Admin Notifications Quick Start Guide
- SNMP Quick Start Guide
- Synthetic Indicator Types Quick Start Guide
- Topology Quick Start Guide
- VMware Quick Start Guide
- Web Status Quick Start Guide
- WMI Quick Start Guide
- xStats Quick Start Guide
- xStats Adapter - Accedian Vision EMS (TM) Quick Start Guide
- Deployment Guides
- Automated Build / Rebuild (Customer) Instructions
- Generate a Self-Signed Certificate or a Certificate Signing Request
- SevOne Best Practices Guide - Cluster, Peer, and HSA
- SevOne Data Platform Security Guide
- SevOne NMS Implementation Guide
- SevOne NMS Installation Guide - Virtual Appliance
- SevOne NMS Advanced Network Configuration Guide
- SevOne NMS Installation Guide
- SevOne NMS Port Number Requirements Guide
- SevOne NMS Upgrade Process Guide
- SevOne Physical Appliance Pre-Build BIOS and RAID Configuration Guide
- SevOne SAML Single Sign-On Setup Guide
- Cloud Platforms
- Other Guides
- Quick Start Guides
SNMP Plugin
The SNMP plugin is automatically enabled when you add a new device to SevOne NMS. Simple Network Management Protocol (SNMP) is a key technology to manage networks of any size. You should enable the SNMP plugin for all devices. SNMP enables the collection of basic performance metrics and QoS data. SNMP metadata is vital for the proper operation of flow technology monitoring and other plugins such as IP SLA, NBAR, Process, and Proxy Ping. Please see section SNMP in SevOne NMS System Administration Guide .
Devices for which you enable the SNMP plugin can display the following common SNMP indicators on the Device Summary, when available.
-
CPU Total - Displays the following CPU total data.
-
Name
-
Idle CPU Time
-
Kernel CPU Time
-
Nice CPU Time
-
System CPU Time
-
User CPU Time
-
Waiting CPU Time
-
-
CPU - Displays the following information for each CPU.
-
Name
-
CPU Load
-
-
Memory - Displays the following memory information.
-
Name
-
Description
-
Available Real Memory
-
Available Swap Memory
-
Total Free Memory
-
Total Used Memory
-
-
Disks - Displays the following disk information.
-
Name
-
Description
-
Available Disk Space
-
Used Disk Space
-
Storage Used
-
Used Storage Indicators
-
Hard Drive Storage Used
-
-
Interfaces - Displays the following information for each interface on the device.
-
Interface Name
-
Utilization (In Out)
-
The Cluster Manager > Cluster Settings tab > SNMP subtab enables you to define cluster wide SNMP settings. After you enable the device to send SNMP data to SevOne NMS, perform the following steps to enable the SNMP plugin for each device from which you want to poll SNMP metrics. Please refer to section Enable SNMP in SevOne NMS System Administration Guide .
-
From the navigation bar, click the Devices menu and select Device Manager.
-
Either add a device with the SNMP plugin or edit a device to define the SNMP plugin.
When you add a new device to SevOne NMS, the SNMP plugin is automatically enabled.
-
Click Add Device to display the New Device page.
-
Click
 to display the Edit Device page.
-
-
 - Click the plugin drop-down. By default, it is set to SNMP.
-
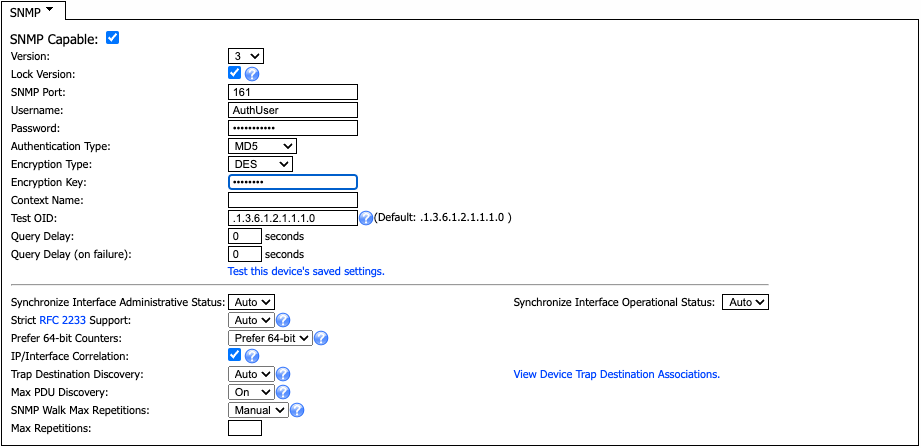
Select the SNMP Capable check box to enable discovery of SNMP object types and to poll SNMP data on the device. To disable SNMP for this device, clear the check box.
-
Click the Version drop-down and select an SNMP version. SNMPv2c is common and includes 64-bit counters and newer MIBs. If you select a version that is not compatible with the device, SevOne NMS tries a lower SNMP version (unless you select the Lock Version check box).
-
Select the Lock Version check box to use the SNMP version you select in field Version. This prevents SevOne NMS from trying to determine the proper version if the version you select fails.
-
In the SNMP Port field, enter the port number on the device for SevOne NMS to poll SNMP data. The default port number is 161.
-
If you have selected version 1 or 2c, perform the following steps.
-
In the Read Community String field, enter the read community string SevOne NMS needs to authenticate onto the device if the string is different from what you have entered in Cluster Manager > Cluster Settings tab > SNMP subtab. Leave blank to use the Cluster Manager entry.
-
In the Write Community String field, enter the read-write community string SevOne NMS needs to authenticate onto the device if the string is different from what you have entered in Cluster Manager > Cluster Settings tab > SNMP subtab. Leave blank to use the Cluster Manager entry.
If you plan to use the Proxy Ping Plugin or the IP SLA Plugin, you will need to add the read/write community string. SevOne NMS sends SNMP SET commands to the device with these plugins.
-
-
If you have selected version 3, perform the following steps.
-
In the Username field, enter the user name SevOne NMS needs to authenticate onto the device.
-
In the Password field, enter the password SevOne NMS needs to authenticate onto the device.
-
Click the Authentication Type drop-down.
-
NONE (usmNoAuthProtocol) - to not use an authentication method to send or receive messages.
-
MD5 (usmHMACMD5AuthProtocol) - to use MD5 authentication protocol for messages.
-
SHA (usmHMACSHAAuthProtocol) - to use SHA authentication protocol for messages.
-
SHA-224 (usmHMAC128SHA224AuthProtocol) - to use SHA-224 authentication protocol for messages and truncate the output to 128 bits.
-
SHA-256 (usmHMAC192SHA256AuthProtocol) - to use SHA-256 authentication protocol for messages and truncate the output to 192 bits.
-
SHA-384 (usmHMAC256SHA384AuthProtocol) - to use SHA-384 authentication protocol for messages and truncate the output to 256 bits.
-
SHA-512 (usmHMAC384SHA512AuthProtocol) - to use SHA-512 authentication protocol for messages and truncate the output to 512 bits.
-
-
If you have selected MD5 or a SHA-type, click the Encryption Type drop-down.
-
NONE - to not use encryption to send or receive messages.
-
AES - to use the Advanced Encryption Standard encryption method.
-
AES192 - to use 192-bit Advanced Encryption Standard encryption method; uses AES key length of 192 bits.
-
AES192C - to use 192-bit Advanced Encryption Standard encryption method for Cisco devices; uses AES key length of 192 bits.
-
AES256 - to use 256-bit Advanced Encryption Standard encryption method; uses AES key length of 256 bits.
-
AES256C - to use 256-bit Advanced Encryption Standard encryption method for Cisco devices; uses AES key length of 256 bits.
-
3DES - to use encryption cipher; derived from the original Data Encryption Standard (DES) encryption method.
-
DES - to use the Data Encryption Standard encryption method.
IMPORTANTIf you are upgrading from SevOne NMS 5.7.2.x to SevOne NMS 6.3 or above, no action is required for the existing devices. However, if any new Cisco device(s) are added as AES192 or AES256, you will need to add them as AES192C or AES256C respectively.
-
-
If you have selected an AES or a DES Encryption Type, for the Encryption Key field, enter the localized key the authentication protocol on the device requires to authenticate messages.
-
In the Context Name field, enter the SNMP context name which defines a collection of management information that is accessible to an SNMP entity. Context can be a physical or logical system, a collection of multiple systems, or even a subset of a system. Only one context is allowed per device.
-
-
In the Test OID field, enter the OID to use to verify the SNMP settings. The default OID is .1.3.6.1.2.1.1.1.0, which is the value for sysDescr.0.
-
In the Query Delay field, enter the number of seconds to wait after each SNMP command or query during discovery and polling.
The SNMP plugin issues a series of SNMP queries to discover and poll objects on the device. There are some devices that cannot handle the frequency at which SevOne NMS issues these queries. This enables you to adjust the query frequency and supports fractional second entry when your scenario requires faster queries. You should consider this setting based on the number of SNMP objects on the device. The default value is 0 seconds which means that there is no wait between queries.
If you set this to 20 seconds for a device with few objects, discovery could take a short time, but if you set this to 20 seconds for a device with hundreds of objects, discovery could take weeks.
-
In the Query Delay (on Failure) field, enter the number of seconds to wait after a failure of an SNMP command or query. When an SNMP query fails (an expected behavior during SNMP discovery), this is the number of second to wait before the SNMP plugin issues the next query. The default value is 0 seconds which means that there is no wait between queries.
-
Click the Test this device's saved settings link to display the SNMP Walk page where you can perform an SNMP Walk. Please refer to SevOne NMS System Administration Guide > section SNMP Walk for details.
-
Click the Synchronize Interface Administrative Status drop-down.
-
Auto - to use the setting from the Cluster Manager.
-
On - to disable and hide the administratively down interfaces and to enable and show the administratively up interfaces.
-
Off - to poll all interfaces by default.
-
-
Click the Synchronize Interface Operational Status drop-down.
-
Auto - to use the setting from the Cluster Manager.
-
On - to disable and hide the operational down interfaces and to enable and show the operational up interfaces.
-
Off - to poll all interfaces by default.
-
-
Click the Strict RFC 2233 Support drop-down.
-
Auto - to use the setting from the Cluster Manager.
-
No - to not use strict RFC 2233 Support.
-
Yes - to have interfaces under 20Mbps not support 64-bit counters when 32-bit counters are also available. Interfaces found to be over 20Mbps do not support 32-bit counters when 64-bit counters are also available. Exercise caution because certain sequences of Strict RFC 2233 Support and Prefer 64-bit Counter can result in data loss.
-
-
Click the Prefer 64-bit Counters drop-down.
-
Auto - to use the setting from the Cluster Manager.
-
Allow both - to use both 64-bit and 32-bit counters.
-
Prefer 64-bit - to set interfaces found to be under 20Mbps to not support 64-bit counters when 32-bit counters are also available. Interfaces found to be over 20Mbps do not support 32-bit counters when 64-bit counters are also available.
-
Prefer 32-bit - to use 32-bit counters
Certain combinations of Strict RFC 2233 Support and Prefer 64-bit Counters can result in data loss.
-
-
Select the IP/Interface Correlation check box to walk the ipAdEntAddr-like entries for IP address information. Some SNMP agents do not support this and may have issues with it. Some devices have vast numbers of IP addresses which increases discovery time. This information helps monitor flow technologies, but is not required.
-
Trap Destination Discovery field discovers the trap destinations for the selected device. Some SNMP Trap Destination Discovery agents do not support this and may have issues with it. Some devices have a vast number of destinations which increases the discovery time. The default value is Auto which uses the settings in Cluster Manager > Cluster Settings tab > Devices subtab.
-
Auto - to use the setting from the Cluster Manager .
-
Off - to disable the discovery of trap destinations for the device .
-
On - to enable the discovery of trap destinations for the device .
The following OIDs are walked to discover the trap destinations. These OIDs are in snmpTargetMIB. This MIB module defines MIB objects which provide mechanisms to remotely configure the parameters used by an SNMP entity for the generation of SNMP messages.
SNMP target address table (snmpTargetAddrTable) OIDs.
-
.1.3.6.1.6.3.12.1.2.1.3 (= snmpTargetAddrTAddress)
-
.1.3.6.1.6.3.12.1.2.1.7 (= snmpTargetAddrParams)
SNMP target parameters table (snmpTargetParamsTable) OIDs.
-
.1.3.6.1.6.3.12.1.3.1.3 (= snmpTargetParamsSecurityModel)
-
.1.3.6.1.6.3.12.1.3.1.4 (= snmpTargetParamsSecurityName)
-
-
-
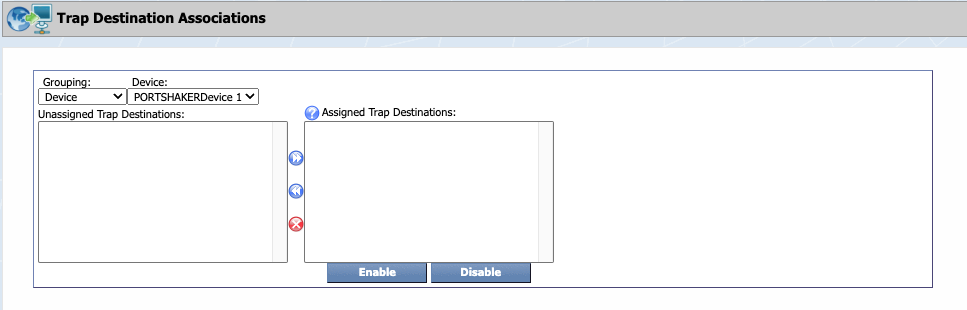
After the device has been discovered you can click the View Device Trap Destination Associations link to view the trap destinations that are available for the device.
-
Click the Max PDU Discovery drop-down.
-
Auto - to use the setting from the Cluster Manager.
-
Off - to not attempt to find the maximum number of PDUs on the device and to enter the maximum number of PDUs to discover in the Max PDU field.
Max PDU setting may cause polling to fail as net-snmp 5.8 library takes maximum send buffer size into account. Normally, during device configuration, this setting is not modified however, there are exceptions.
-
On - to attempt to discover the maximum number of PDUs allowed for the device.
-
-
Click the SNMP Walk Max Repetitions drop-down. Can choose from options Default or Manual.
-
Default
-
Manual - Max Repetitions field becomes available which allows you to specify the maximum number of iterations over the repeating variables. Max Repetitions must be a positive integer between 1 and 30.
-
-
Click Edit Indicator Types to Monitor to display the Indicator Type Map page where you select to enable or disable the SNMP indicator types to poll on the device.