Table of Contents (Start)
- Topics
- Introducing SevOne
- Login
- Startup Wizard
- Dashboard
- Global Search - Advanced Search
- Report Manager
- Report Attachment Wizard
- Report Properties
- Report Interactions
- Instant Graphs
- TopN Reports
- Alerts
- Alert Archives
- Alert Summary
- Instant Status
- Status Map Manager
- Edit Maps
- View Maps
- FlowFalcon Reports
- NBAR Reports
- Logged Traps
- Unknown Traps
- Trap Event Editor
- Trap Destinations
- Trap Destination Associations
- Policy Browser
- Create and Edit Policies
- Webhook Definition Manager
- Threshold Browser
- Create and Edit Thresholds
- Probe Manager
- Discovery Manager
- Device Manager
- New Device
- Edit Device
- Object Manager
- High Frequency Poller
- Device Summary
- Device Mover
- Device Groups
- Object Groups
- Object Summary
- Object Rules
- VMware Browser
- AWS Plugin
- Azure Plugin (Public Preview)
- Calculation Plugin
- Database Manager
- Deferred Data Plugin
- DNS Plugin
- HTTP Plugin
- ICMP Plugin
- IP SLA Plugin
- JMX Plugin
- NAM
- NBAR Plugin
- Portshaker Plugin
- Process Plugin
- Proxy Ping Plugin
- SDWAN Plugin
- SNMP Plugin
- VMware Plugin
- Web Status Plugin
- WMI Plugin
- xStats Plugin
- Indicator Type Maps
- Device Types
- Object Types
- Object Subtype Manager
- Calculation Editor
- xStats Source Manager
- User Role Manager
- User Manager
- Session Manager
- Authentication Settings
- Preferences
- Cluster Manager
- Maintenance Windows
- Processes and Logs
- Metadata Schema
- Baseline Manager
- FlowFalcon View Editor
- Map Flow Objects
- FlowFalcon Views
- Flow Rules
- Flow Interface Manager
- MPLS Flow Mapping
- Network Segment Manager
- Flow Protocols and Services
- xStats Log Viewer
- SNMP Walk
- SNMP OID Browser
- MIB Manager
- Work Hours
- Administrative Messages
- Enable Flow Technologies
- Enable JMX
- Enable NBAR
- Enable SNMP
- Enable Web Status
- Enable WMI
- IP SLA
- SNMP
- SevOne Data Publisher
- Quality of Service
- Perl Regular Expressions
- Trap Revisions
- Integrate SevOne NMS With Other Applications
- Email Tips and Tricks
- SevOne NMS PHP Statistics
- SevOne NMS Usage Statistics
- Glossary and Concepts
- Map Flow Devices
- Trap v3 Receiver
- Guides
- Quick Start Guides
- AWS Quick Start Guide
- Azure Quick Start Guide (Public Preview)
- Data Miner Quick Start Guide
- Flow Quick Start Guide
- Group Aggregated Indicators Quick Start Guide
- IP SLA Quick Start Guide
- JMX Quick Start Guide
- Metadata Quick Start Guide
- RESTful API Quick Start Guide
- Self-monitoring Quick Start Guide
- SevOne NMS Admin Notifications Quick Start Guide
- SNMP Quick Start Guide
- Synthetic Indicator Types Quick Start Guide
- Topology Quick Start Guide
- VMware Quick Start Guide
- Web Status Quick Start Guide
- WMI Quick Start Guide
- xStats Quick Start Guide
- xStats Adapter - Accedian Vision EMS (TM) Quick Start Guide
- Deployment Guides
- Automated Build / Rebuild (Customer) Instructions
- Generate a Self-Signed Certificate or a Certificate Signing Request
- SevOne Best Practices Guide - Cluster, Peer, and HSA
- SevOne Data Platform Security Guide
- SevOne NMS Implementation Guide
- SevOne NMS Installation Guide - Virtual Appliance
- SevOne NMS Advanced Network Configuration Guide
- SevOne NMS Installation Guide
- SevOne NMS Port Number Requirements Guide
- SevOne NMS Upgrade Process Guide
- SevOne Physical Appliance Pre-Build BIOS and RAID Configuration Guide
- SevOne SAML Single Sign-On Setup Guide
- Cloud Platforms
- Other Guides
- Quick Start Guides
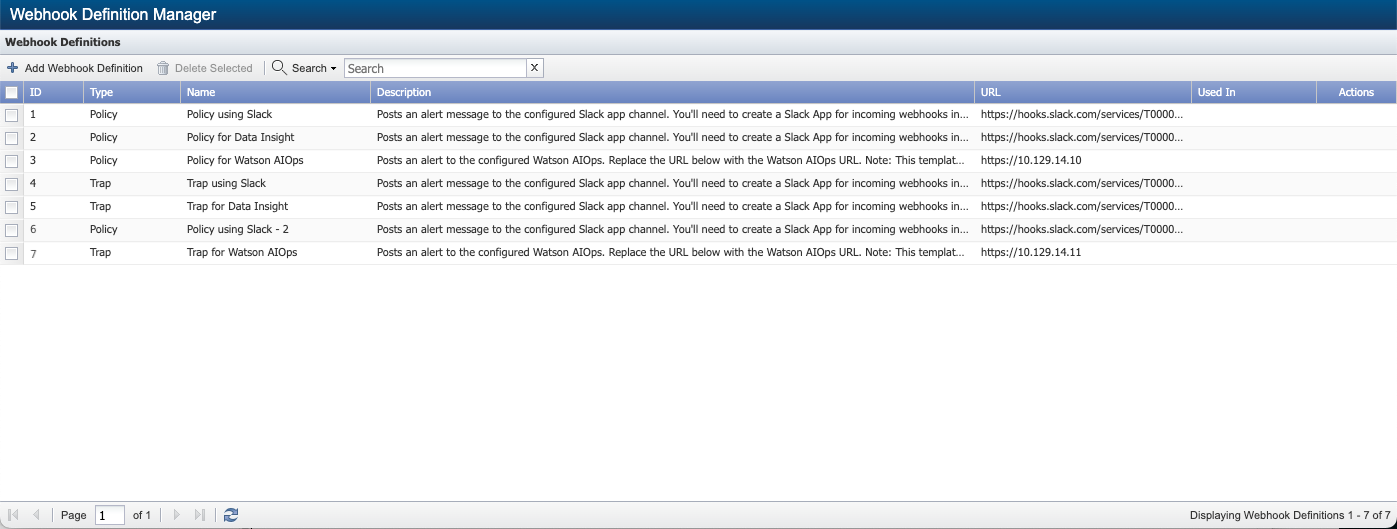
Webhook Definition Manager
The Webhook Definition Manager enables you to add webhook definitions .
Webhook Definition Manager can be accessed from the navigation bar using one of the following three ways. This allows you to view/edit existing webhook definition(s) or create a new one.
-
Click the Events menu, select Configuration, and then select Policy Browser to display the Policy Browser. On the Policy Browser, click Webhook Definitions under Policies section.
-
Click the Events menu, select Configuration, and then select Trap Event Editor to display the Trap Event Editor. On the Trap Event Editor, click Webhook Definitions under Events section. Please refer to SevOne NMS User Guide, section Trap Event Editor for details.
-
Click the Events menu, select Configuration, and then select Webhook Definition Manager.
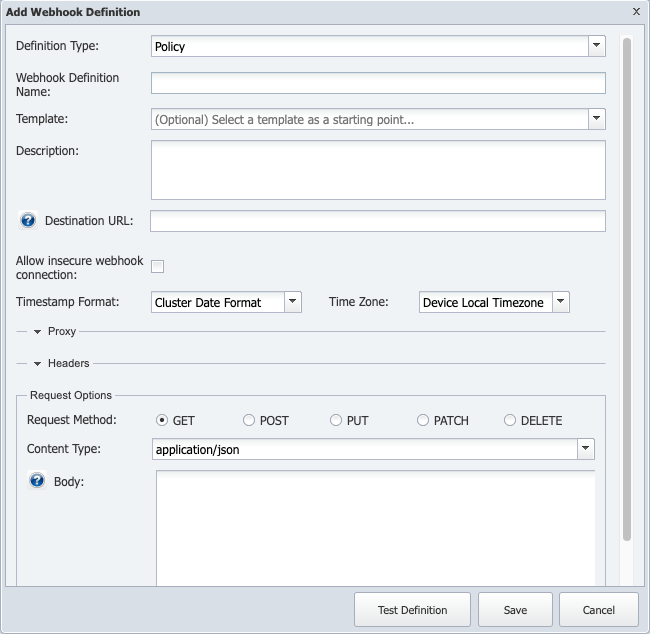
Add Webhook Definition
To add a new webhook definition, click  to create.
-
Definition Type - select the webhook definition type based on the usage of the webhook definition for policies or traps. Definition Type can be Policy or Trap. The default value is set to Policy.
-
Webhook Definition Name - enter the webhook definition name.
-
(optional) Template - select a preconfigured webhook template to populate default data. Click the drop-down list to choose one of the following.
-
Post to Slack
-
Post to Slack w/ DI URL
-
Post to Watson AIOps
Destination URL field gets automatically populated with a sample URL format. Also, it provides the default body in field Body.
-
-
(optional) Description - enter the description of the webhook definition.
-
Destination URL - based on the option chosen in field Template, Destination URL field is automatically populated with a sample URL format . You are required to update the sample URL format with the exact URL of your Slack Destination. For example, https://hooks.slack.com/services/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. However, if you choose to not use the template, you must add the URL of your Slack Destination directly in this field. To activate incoming webhooks to post messages from SevOne NMS into Slack, Slack channel must be configured first to obtain the URL. Please refer to section Configure Slack Channel.
Click for the list of acceptable URL variables for policy / trap webhooks.
for Definition Type = Policy,General Variables-
$clusterName - The cluster name of the triggered alert.
-
$alertId - The id of the triggered alert.
-
$alertMessage - The message of the alert.
-
$alertType - The origin of the alert. For example, system / flow / trap.
-
$alertState - The severity of the policy. For example, Emergency or Debug.
-
$occurrences - How many times this alert is triggered.
-
$assignedTo - To which user this alert is assigned to.
-
$deviceId - The device id of the triggered alert.
-
$deviceIp - The IP address of the device of the triggered alert.
-
$deviceName - The device name of the triggered alert.
-
$deviceAltName - The alternate name of the device that triggered the policy.
-
$groupName - The device group/device type that contains the device that triggered the policy.
-
$policyId - The id of the policy.
-
$policyName - The name of the policy which was triggered.
-
$thresholdId - The id of the threshold.
-
$thresholdName - The name of the threshold.
Metric Policy Variables
The following variables are only supported for metric policy alerts. They are not supported for flow policy-based alerts.
-
$objectId - The object id of the triggered alert.
-
$objectName - The object name of the triggered alert.
-
$objectAltName - The object alternate name of the triggered alert.
-
$objectDescription - The description of the object of the triggered alert.
-
$pluginName - The short name for the plugin. For example, SNMP.
-
$pluginDescription - The description of the plugin. For example, SNMP Poller.
for Definition Type = Trap,General Variables-
$clusterName - The cluster name of the triggered alert.
-
$alertId - The id of the triggered alert.
-
$alertMessage - The message of the alert.
-
$alertType - The origin of the alert. For example, system / flow / trap.
-
$alertState - The severity of the policy. For example, Emergency or Debug.
-
$occurrences - How many times this alert is triggered.
-
$deviceId - The device id of the triggered alert.
-
$deviceIp - The IP address of the device of the triggered alert.
-
$deviceName - The device name of the triggered alert.
-
$deviceAltName - The alternate name of the device that triggered the policy.
-
$trapEventId - The id of the trap event.
-
$trapIPAddress - The IP address of the trap sender.
-
$trapOIDText - The OID of the trap that triggered/clear the alert (OID in textual format).
-
$trapOIDNum - The OID of the trap that triggered/clear the alert (OID in numerical format).
The following variables are not applicable for clear webhooks when the trap alert is acknowledged manually from Events > Alerts.
-
$trapIPAddress
-
$trapOIDText
-
$trapOIDNum
IPv6 addressesIPv6 addresses contain colons. Due to this, they cannot be directly used in URLs because the colons conflict with both the protocol declaration (http:// or https://) and port numbers. Therefore, when a literal IPv6 address is used , encase it in a bracket. For example, http://[2001:db8::1]:80
Known Issue related to TLS CertificateGolang uses the standard net/http package to test the API endpoint while making the webhook request.
TLS certificates that rely on the legacy Common Name field are not supported by webhook tests. Instead, SANs (Subject Alternative Name) must be used.
-
-
Allow insecure webhook connection - select the check box to allow an insecure connection to the webhook URL. Leave clear to allow SSL verification check for the webhook URL.
-
Timestamp Format - choose the timestamp from the options provided in the drop-down list.
-
Time Zone - choose the time zone from the options provided in the drop-down list.
-
Under Proxy section, enter the values for the following fields.
-
Proxy - enter the proxy URL with protocol, IP, and port number (if applicable). For example, http://myproxy:portnumber/.
-
User Name - enter username for basic authentication of the proxy.
-
Password - enter password for basic authentication of the proxy.
-
-
Under Headers section, enter the values for the following fields.
Headers data is encrypted at rest; i.e., it can be used for Bearer and AWS4-HMAC-SHA256 based login.
For Bearer, add corresponding key-value pair in field Custom Headers.
-
(optional) Use Basic Auth - select the check box to use the basic authorization. Enter the user name and password if the check box is selected.
-
User Name - enter the username for basic authorization.
-
Password - enter the password for basic authorization.
Use Basic Auth, User Name, and Password fields apply to basic authorization only.
-
-
(optional) X-Auth-Token - enter the x-auth-token for authentication. For example, eyJhbGciOiJIUzUxMHqAuE8YY3zfCGTNVc...
-
(optional) Custom Headers - enter list of key-value pairs in JSON format for setting the custom headers. For example, {"cust_key1":"cust_val1","cust_key2":"cust_val2"} or {"Authorization":"Bearer 678h","X-Laundry-Service":"dryclean"}.
-
(optional) Cookies - enter list of key-value pairs in JSON format for setting the cookies. For example, {"cook1":"val1","cook2":"val1"} or {"Name":"admin","User-token":"abc"}.
-
-
Under Request Options section, configure the following.
-
Request Method - select the request method from options GET, POST, PUT, PATCH, and DELETE.
-
Content Type - click the drop-down list to choose the content type from the following options available.
-
application/json
-
application/x-www-form-urlencoded
-
application/xml
-
text/html
-
text/plain
-
text/xml
ExamplesBased on Content Type, the variables can be encoded individually. In examples below, $deviceName and $deviceId are encoded based on the content type.
Example: for Content Type application/x-www-form-urlencodeddeviceName=$deviceName&deviceId=$deviceIdExample: for Content Type application/xml<device>$deviceName</device><deviceId>$deviceId</deviceId>
-
-
Body - click
for the list of acceptable message variables for policy / trap webhooks.
If an unsupported variable is used, it is replaced with n/a. For example, $pluginName is only supported for metric policy alerts. However, if $pluginName is added in flow policy webhook, it will be replaced with n/a.
for Definition Type = Policy,General Variables-
$clusterName - The cluster name of the triggered alert.
-
$alertId - The id of the triggered alert.
-
$alertMessage - The message of the alert.
-
$alertType - The origin of the alert. For example, system / flow / trap.
-
$alertState - The severity of the policy. For example, Emergency or Debug.
-
$occurrences - How many times this alert is triggered.
-
$firstSeen - The first time this alert is triggered.
-
$lastSeen - The last time this alert is triggered.
-
$assignedTo - To which user this alert is assigned to.
-
$deviceId - The device id of the triggered alert.
-
$deviceIp - The IP address of the device of the triggered alert.
-
$deviceName - The device name of the triggered alert.
-
$deviceAltName - The alternate name of the device that triggered the policy.
-
$groupName - The device group/device type that contains the device that triggered the policy.
-
$policyId - The id of the policy.
-
$policyName - The name of the policy which was triggered.
-
$thresholdId - The id of the threshold.
-
$thresholdName - The name of the threshold.
Metric Policy Variables
The following variables are only supported for metric policy alerts. They are not supported for flow policy-based alerts.
-
$objectId - The object id of the triggered alert.
-
$objectName - The object name of the triggered alert.
-
$objectAltName - The object alternate name of the triggered alert.
-
$objectDescription - The description of the object of the triggered alert.
-
$pluginName - The short name for the plugin (ex: SNMP).
-
$pluginDescription - The description of the plugin (ex: SNMP Poller).
-
$DIDataResources - The part of SevOne Data Insight report URL for violating resources of the alert. Start the Data Insight report URL with the Data Insight host and report name in URL-encoded format, and append variable $DIDataResources at the end. For example, http://localhost/redirect/v1/reports?reportName=My%20Report&$DIDataResources, where localhost is SevOne Data Insight host and My Report is the Data Insight report name. The URL created, supports Webhooks and emails sent for Alerts.
Variable $DIDataResources can be used in trigger messages, clear messages, and webhook messages for metric policies.
To utilize variable $DIDataResources as expected, you must have flag FF_UI_REDIRECT set to true in SevOne Data Insight's /opt/SevOne/chartconfs/di_custom.yaml file. Also, please refer to section SevOne NMS to SevOne Data Insight Drillback URL Configuration Tutorial for details.
CAUTIONAt present, FF_UI_REDIRECT is an early-access feature flag and is available for limited-use only. Please contact SevOne Support or your Technical Account Manager before you use this flag.
If /opt/SevOne/chartconfs/di_custom.yaml file does not exist, create it.
$sshsevone@<SevOne Data Insight IP address orhostname>Create /opt/SevOne/chartconfs/di_custom.yaml file$touch/opt/SevOne/chartconfs/di_custom.yamlUsing a text editor of your choice, edit /opt/SevOne/chartconfs/di_custom.yaml file to set the following environment variable and then, save it.
ui:env:FF_UI_REDIRECT:trueApply the changes made to /opt/SevOne/chartconfs/di_custom.yaml file.
$ sevone-cli playbook up --tags appsExample: Generic URLhttp://<SevOne Data Insight IP address or hostname>/redirect/v1/reports?<enter parameter>&$DIDataResources
Example# 1: Create URLLet's assume the following.
-
SevOne Data Insight IP address or hostname = localhost
-
reportName = Alert Details Report
Your URL will be,
http://localhost/redirect/v1/reports?reportName=Alert%Details%Report&$DIDataResources
Example# 2: Create URLLet's assume the following.
-
SevOne Data Insight IP address or hostname = 10.128.10.24
-
reportName = Alert Summary Report
Your URL will be,
http://10.128.10.24/redirect/v1/reports?reportName=Alert%Summary%Report&$DIDataResources
-
SevOne Data Insight's datasource name must match SevOne NMS cluster name.
-
When you create a SevOne Data Insight report with variables, it can be used for loading any violating indicator's data.
-
SevOne NMS sends the start time for SevOne Data Insight's report and the report's configured timezone is used for the Epoch start timestamp.
-
When alerts are manually acknowledged from SevOne NMS' user interface, this functionality is not supported as the alerts are cleared manually and not cleared based on condition.
-
Flow Policy Variables-
$flowDeviceId - The Netflow device id of the triggered alert.
-
$flowDeviceName - The Netflow device name of the triggered alert.
-
$flowDeviceIp - The IP address of the Netflow device of the triggered alert.
-
$interface - The index of the netflow interface.
-
$interfaceId - The id of the Netflow interface.
-
$interfaceName - The name of the Netflow interface.
-
$interfaceSystemName - The system name of the Netflow interface.
-
$interfaceDescription - The description for the Netflow interface.
-
$directionId - The id of the Netflow direction.
-
$directionName - The name of the Netflow direction.
-
$filterId - The id of the Netflow filter.
-
$filterName - The name of the Netflow filter.
-
$viewId - The id of the Netflow view.
-
$viewName - The name of the Netflow view.
-
$flowServiceProfileList - The list of Netflow service profile ids.
Trigger Policy (metric and flow) VariablesThe following variables are only supported for metric and flow p olicy alerts.
-
$numTriggeringConditions - The number of triggering conditions.
-
$triggeringConditions - The information and calculated values of the triggering conditions formatted according to the chosen Content-type.
-
$plainTextTriggeringConditions - The information and calculated values of the triggering conditions.
-
$numConditions - The number of all conditions.
-
$allConditions - The information and calculated values of all conditions formatted according to the chosen Content-type.
-
$plainTextAllConditions - The information and calculated values of all conditions.
Clear Policy (metric and flow) Variables-
$closureMessage - The closure message for the cleared alert. For example, Acknowledged by for a user acknowledged alert or Alert cleared by clear condition for a system cleared alert.
for Definition Type = Trap,General Variables-
$clusterName - The cluster name of the triggered alert.
-
$alertId - The id of the triggered alert.
-
$alertMessage - The message of the alert.
-
$alertType - The origin of the alert. For example, system / flow / trap.
-
$alertState - The severity of the policy. For example, Emergency or Debug.
-
$occurrences - How many times this alert is triggered.
-
$firstSeen - The first time this alert is triggered.
-
$lastSeen - The last time this alert is triggered.
-
$deviceId - The device id of the triggered alert.
-
$deviceIp - The IP address of the device of the triggered alert.
-
$deviceName - The device name of the triggered alert.
-
$deviceAltName - The alternate name of the device that triggered the policy.
-
$trapEventId - The id of the trap event.
-
$trapIPAddress - The IP address of the trap sender.
-
$trapOIDText - The OID of the trap that triggered/clear the alert (OID in textual format).
-
$trapOIDNum - The OID of the trap that triggered/clear the alert (OID in numerical format).
-
$trapVarText - The varbinds and respective values (OID in textual format).
-
$trapVarNum - The varbinds and respective values (OID in numerical format).
The following variables are not applicable for clear webhooks when the trap alert is acknowledged manually from Events > Alerts.
-
$trapIPAddress
-
$trapOIDText
-
$trapOIDNum
-
$trapVarText
-
$trapVarNum
Clear Trap Variables-
$closureMessage - The closure message for the cleared alert. For example, Acknowledged by for a user acknowledged alert or Alert cleared by clear trap for a system cleared alert.
-
-
-
To test the definition, click Test Definition button. This populates the result for the user, including the status code, response header, and body.
-
Click Save to save and add the new definition.
Example: Webhook Defnition added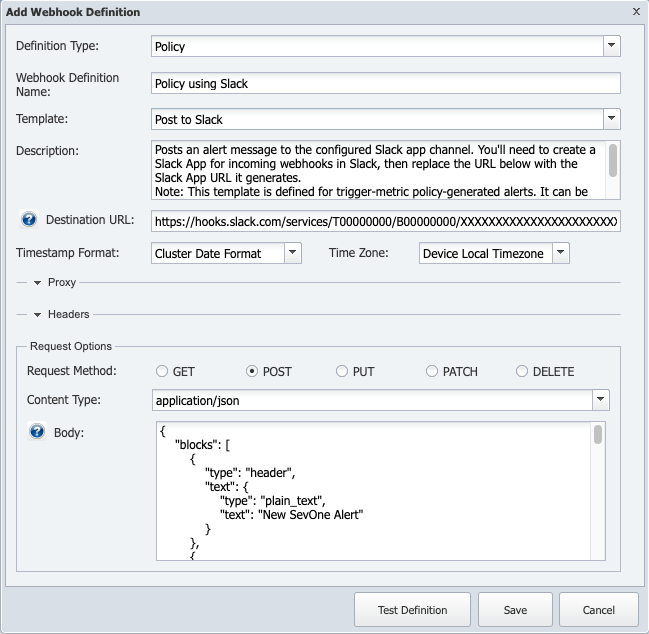
Edit Webhook Definition
To edit an existing webhook definition, click  on the webhook definition row you want to modify under column Actions. After updating the webhook definition, click Save to save the definition.
Delete Webhook Definition
Scenario# 1 - Webhook Definition ID not yet assigned to Policies or Trap Events
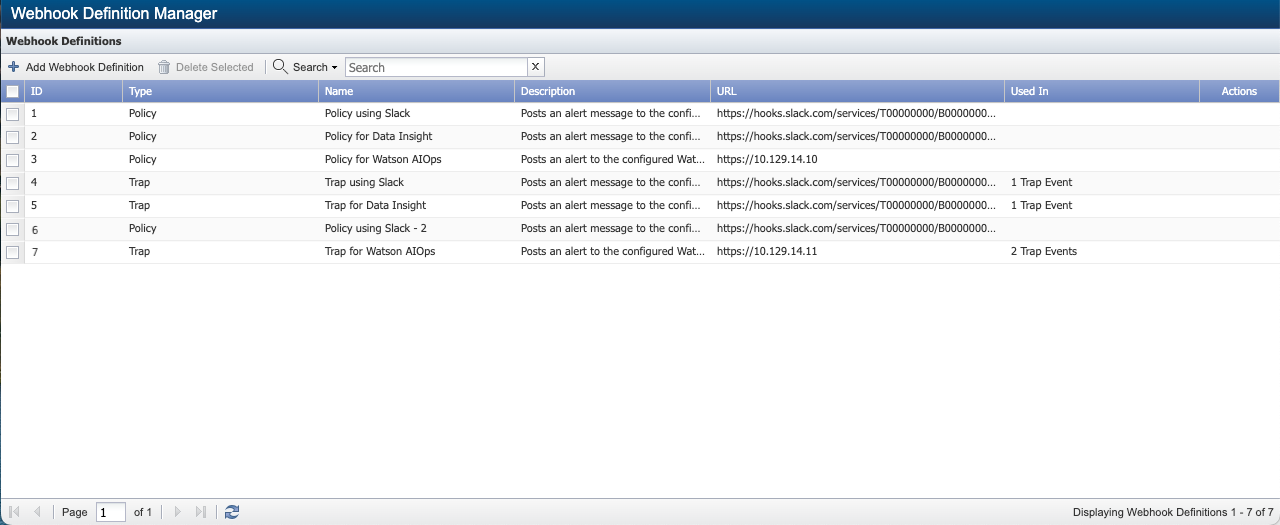
Assume you have 7 webhook definition ids - 1, 2, 3, 4, 5, 6, and 7. These ids are not assigned to any policy ID or trap event. You will see that Used In column has no policy or trap event.
Select Webhook Definition ID = 2 and click  to delete the selected webhook definition. Or, you may click
  on the webhook definition row you want to delete under column Actions.

You will get the following warning message.
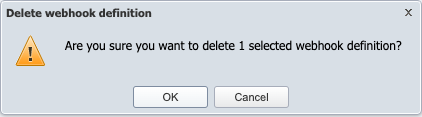
Click OK to delete the selected webhook definition or Cancel to exit.
You may select one or more webhook definition(s) and click
to delete the selected webhook definition(s).
Scenario# 2 - Webhook Definition ID assigned to Policies
Assume that,
-
Policy ID 5 has Webhook Definition IDs 1, 2, and 3 assigned to it.
-
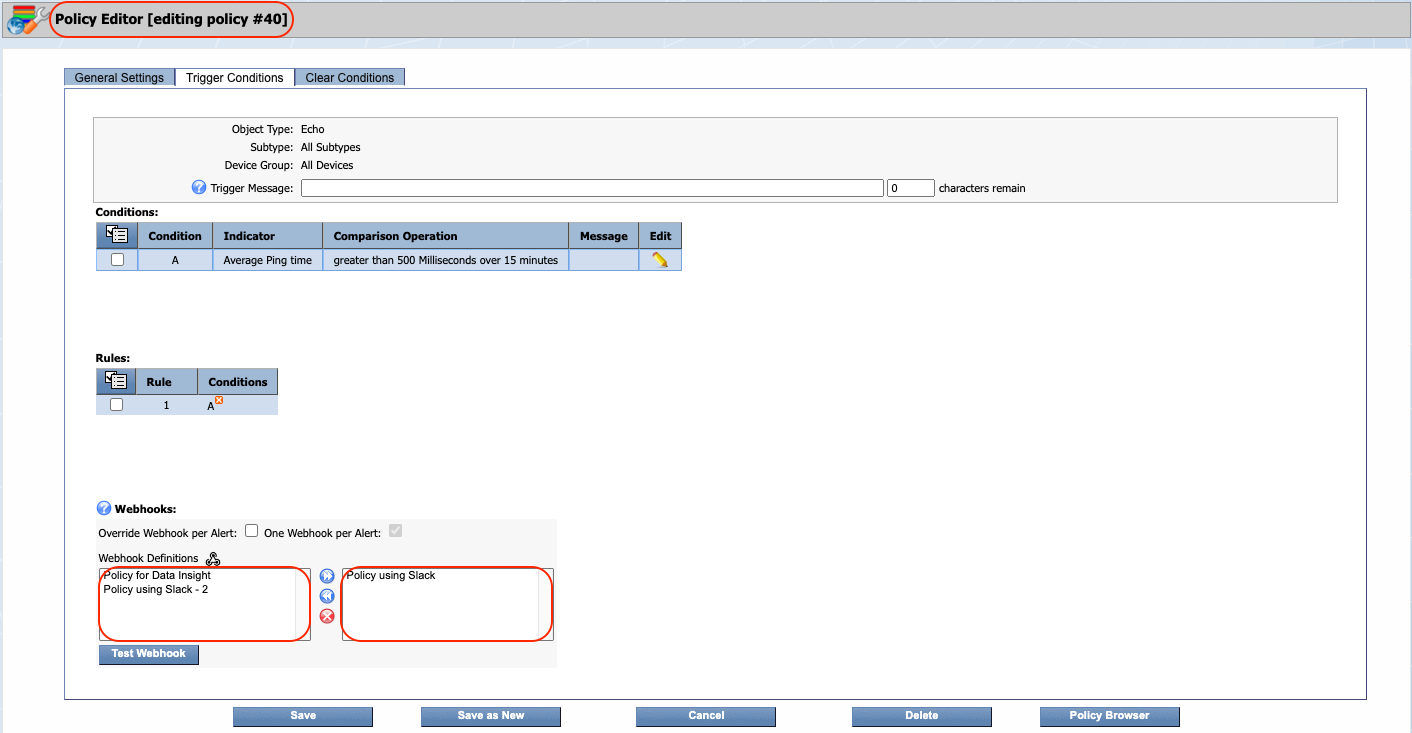
Policy ID 40 has Webhook Definition IDs 1 and 3 assigned to it.
Based on this, Webhook Definition Manager will appear as the following.
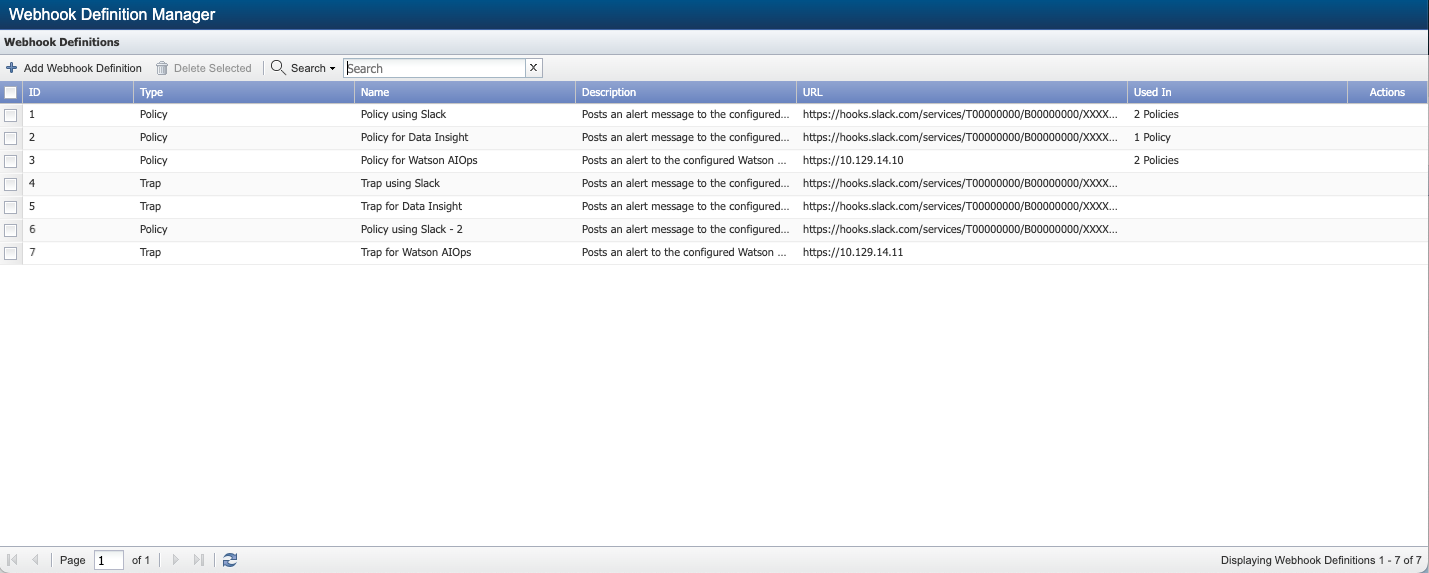
where,
-
Webhook Definition ID 1 has 2 Policies in column Used In. This is because 2 policies, 5 and 40, have been assigned to this ID.
-
Webhook Definition ID 2 has 1 Policies in column Used In. This is because only one policy, 5, has been assigned to this ID.
-
Webhook Definition ID 3 has 2 Policies in column Used In. This is because 2 policies, 5 and 40, have been assigned to this ID.
Now, select one or more webhook definitions ids and click
or select a row and click
under Actions column.
Let's say you want to delete webhook definition id 3. Select the ID and click
or
under Actions column.
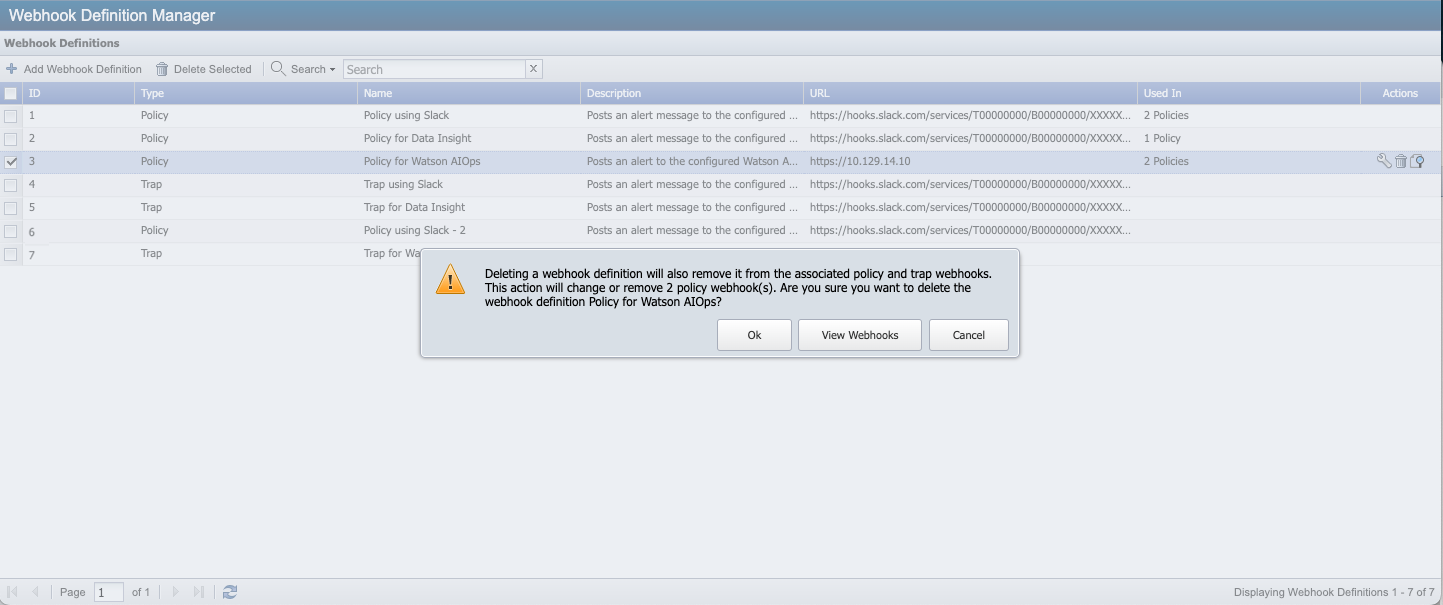
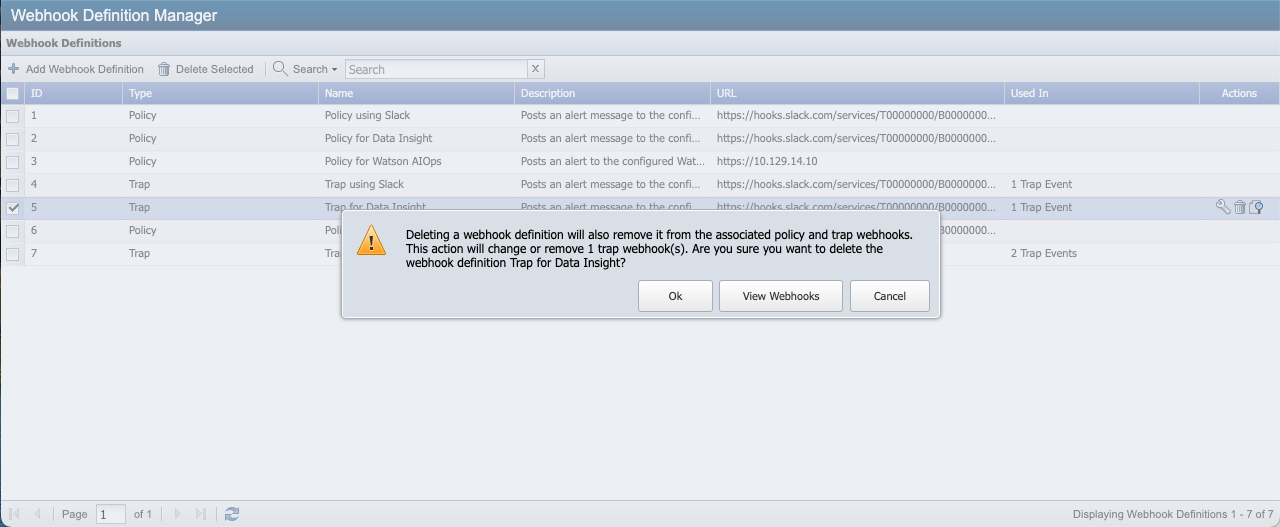
You will get a warning message to confirm if you want to proceed with the deletion.
-
Click Ok to delete webhook definition id 3.
-
Click View Webhooks to see which policy IDs are assigned webhook definition id 3. In our example, Webhook Definition ID 3 is assigned to policy ids 5 and 40.
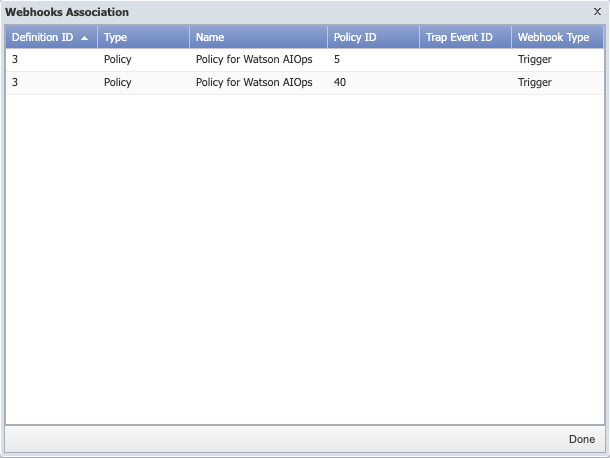
Click Done after reviewing the details. If you want to continue with the deletion, click Ok to delete or Cancel to exit. Let's assume you have clicked Ok button to delete webhook definition id 3. You now have webhook definition ids 1, 2, 4, 5, 6, and 7.
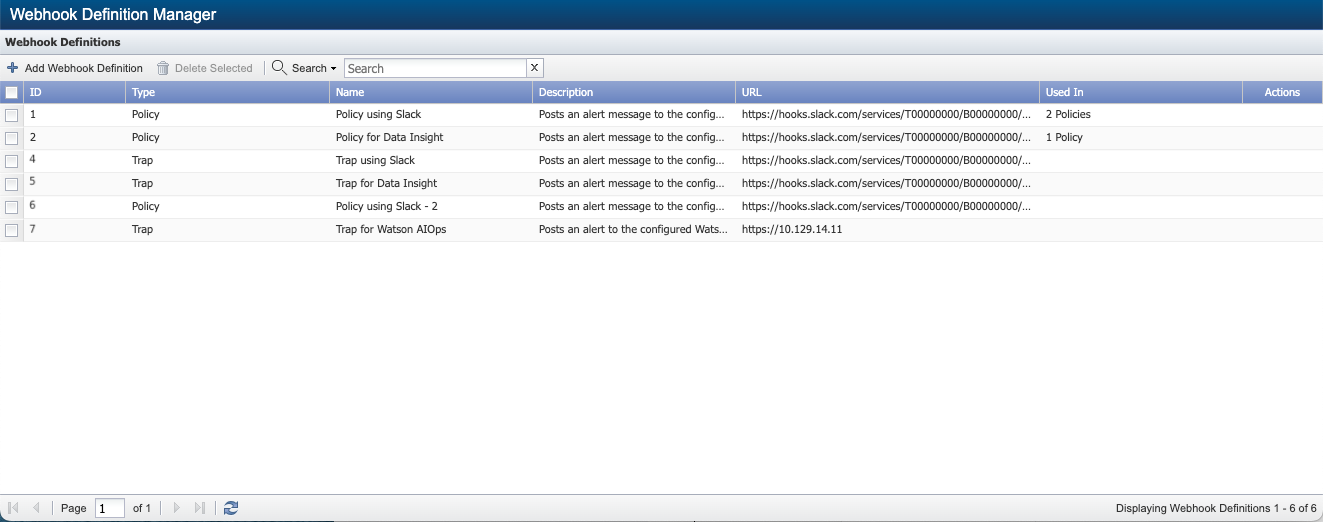
Webhook Definition ID 3 was associated with Policy IDs 5 and 40. By deleting webhook definition id 3, it will also remove the policy webhooks present from the associated policies. i.e., Policy IDs 5 and 40. To confirm, go to Events > Configuration > Policy Browser.
Select Policy ID 5 and click
under Actions column. Click tab Trigger Conditions. You will see that policy id 5 which was associated with webhook definition ids 1, 2, and 3 is now, only associated with webhook definition ids 1 and 2 after deletion of webhook definition id 3. 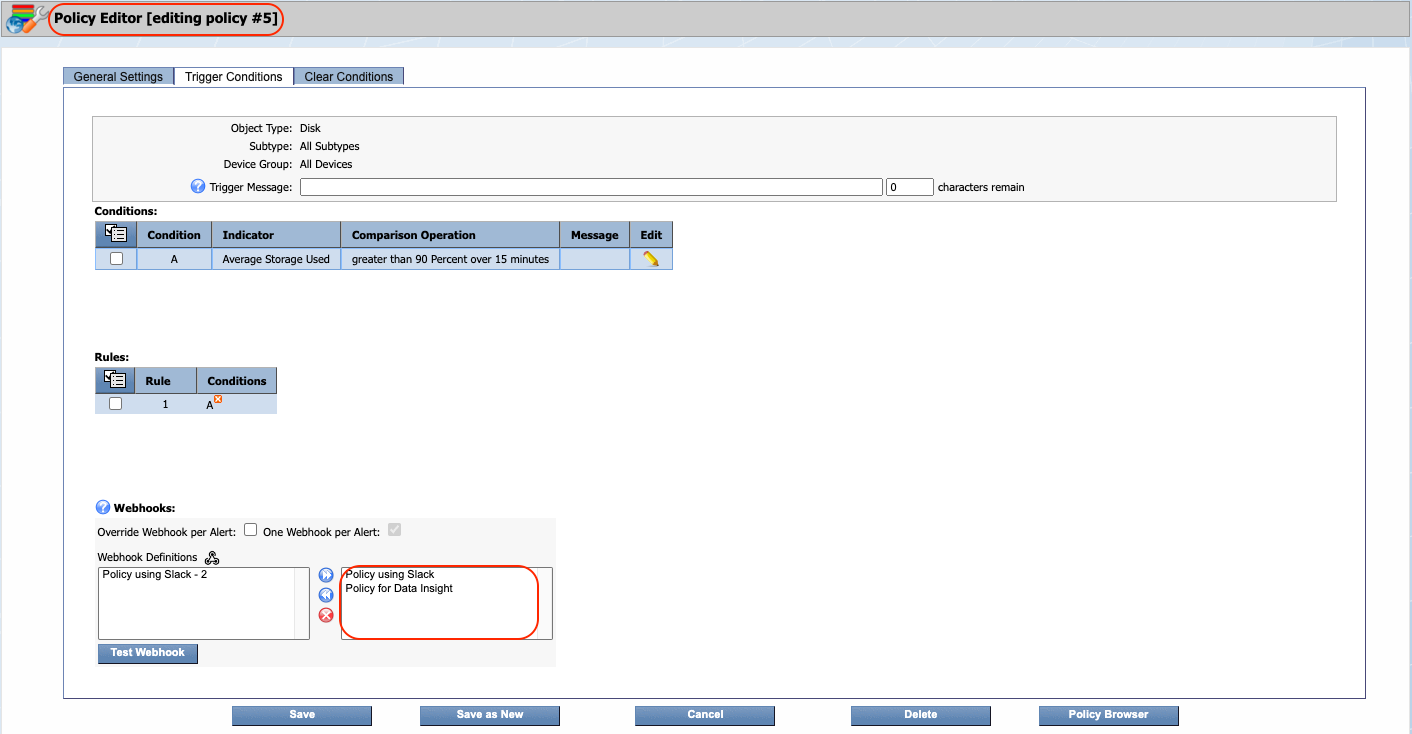
Webhook Definition ID 6 was never assigned to Policy ID 5.
And, policy id 40 which was associated with webhook definition ids 1 and 3 is now, only associated with webhook definition id 1 after deletion of webhook definition id 3.
Webhook Definition IDs 2 and 6 were never assigned to Policy ID 40.
Scenario# 3 - Webhook Definition ID assigned to Trap Events
Assume that,
-
Trap Event ID 25 has Webhook Definition IDs 4 and 7 assigned to it.
-
Trap Event ID 63 has Webhook Definition IDs 5 and 7 assigned to it.
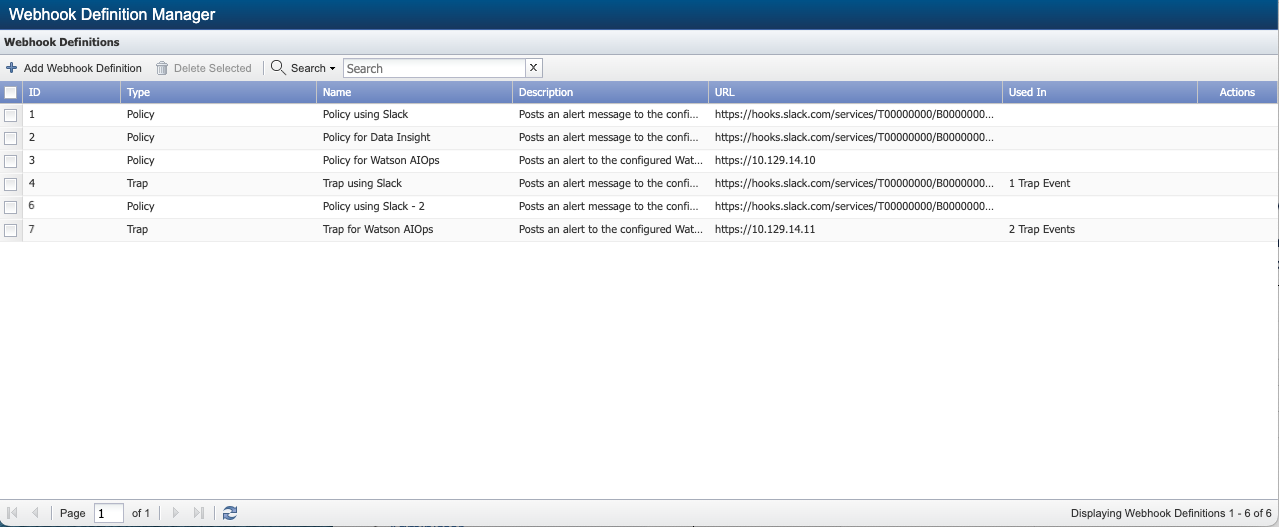
Based on this, Webhook Definition Manager will appear as the following.
where,
-
Webhook Definition ID 4 has 1 Trap Event in column Used In. This is because only one trap event, 25, has been assigned to this ID.
-
Webhook Definition ID 5 has 1 Trap Event in column Used In. This is because only one trap event, 63, has been assigned to this ID.
-
Webhook Definition ID 7 has 2 Trap Events in column Used In. This is because 2 trap events, 25 and 63, have been assigned to this ID.
Now, select one or more webhook definitions ids and click
or select a row and click
under Actions column.
Let's say you want to delete webhook definition id 5. Select the ID and click
or
under Actions column.
You will get a warning message to confirm if you want to proceed with the deletion.
-
Click Ok to delete webhook definition id 5.
-
Click View Webhooks to see which policy IDs are assigned webhook definition id 5. In our example, Webhook Definition ID 5 is assigned to trap event id 63.
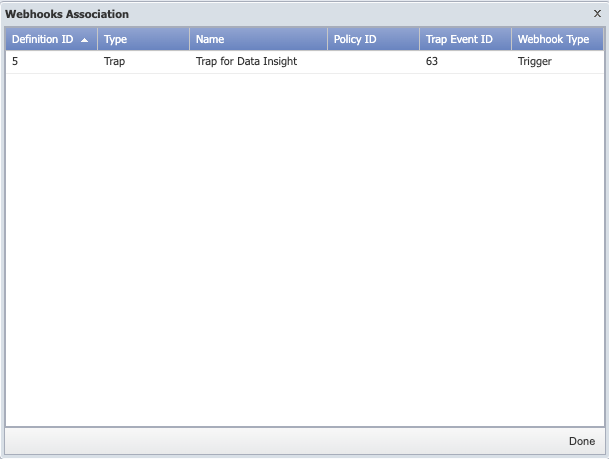
Click Done after reviewing the details. If you want to continue with the deletion, click Ok to delete or Cancel to exit. Let's assume you have clicked Ok button to delete webhook definition id 5. You now have webhook definition ids 1, 2, 3, 4, 6, and 7.
Webhook Definition ID 5 was associated with Trap Event ID 63. By deleting webhook definition id 5, it will also remove the trap webhooks present from the associated trap events. i.e., Trap Event ID 63. To confirm, go to Events > Configuration > Trap Event Editor.
Select Trap Event ID 63 and click
under Actions column. Click tab Trigger. You will see that trap event id 63 which was associated with webhook definition ids 5 and 7 is now, only associated with webhook definition ids 7 after deletion of webhook definition id 5. 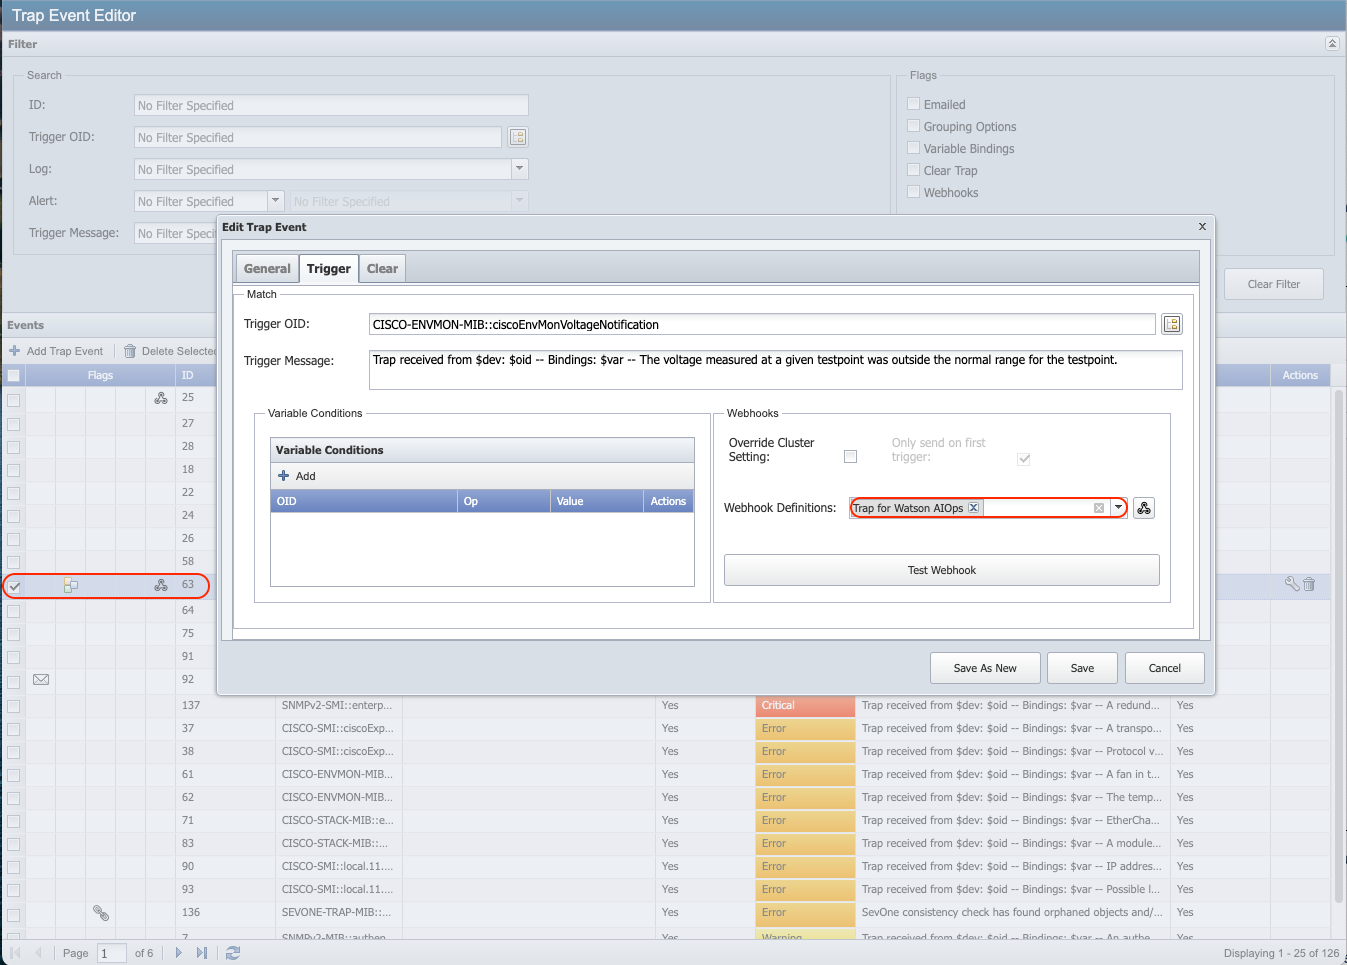
Test Webhook Definition
To test an existing webhook definition, click  on the webhook definition row you want to test under column Actions. You will get a pop-up with the result for the user, including the following details.
-
Webhook Definition ID - returns the webhook definition id.
-
Webhook Definition Name - returns the webhook definition name.
-
Ping Result - r eturns the value of ping test fail or success. If success, it proceeds further.
-
Status Code - s tatus code of the webhook request.
-
Response - when a webhook request is executed, it returns a response body.
-
Response Error - if webhook request fails to execute, it returns a response error.
-
Response Header - c ontains all response header values when webhook request has completed.
-
Curl Request - c url request has a curl command for every successful request.
Click Close to exit.
Configure Slack Channel
To activate incoming webhooks to post messages from SevOne NMS into Slack, Slack channel must be configured first.
-
From a web browser of your choice, enter URL api.slack.com/messaging/webhooks.
-
From the left navigation bar, Managing messages > select Using Webhooks.
-
Scroll-down and click
 .
. -
From Create an app pop-up, click
 under From scratch.
 -
In the Name app & choose workspace pop-up,
-
App Name field - enter webhook, for example.
-
Pick a workspace to develop your app in field - choose a Slack Workspace from the drop-down list that you are a member of. For example, SevOne.
-
Click
 .
. 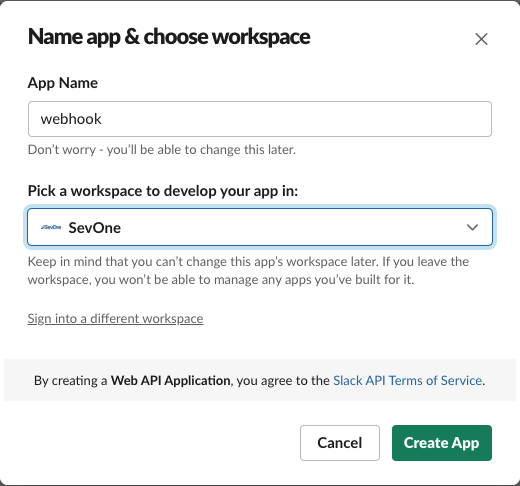
Your Slack application is now ready.
-
-
From the left navigation bar, Features > click Incoming Webhooks.
-
Move Activate Incoming Webhooks slider from Off to On.
-
Select
 button.
 -
From the drop-down list, choose a channel. For example, # random. Click Allow.
-
Click Copy to copy the Webhook URL generated for the channel selected in the step above. For example, https://hooks.slack.com/services/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. The request method is POST and the content type is application/json.

Go to the Slack channel you set to receive notifications. For example, SevOne > # random . You will see that you have been notified on Slack.
-
Based on the request method, content type, and webhook URL r eturned from Configure Slack Channel section above, enter the fields from SevOne NMS along with the Body to request the result on.
Variables $triggeringConditions and $allConditions cannot be used in the Slack message as these do not conform to the Slack format. These variables are translated from NMS to a JSON array of objects.
Go to the Slack channel you set in step Incoming Webhooks above. For example, SevOne > # random. You will see that you have been notified on Slack.
SevOne NMS to SevOne Data Insight Drillback URL Configuration Tutorial
The drillback URL configuration tutorial can also be found in SevOne Data Insight Administration Guide.
NMS cluster must be on SevOne NMS 6.3.1 or higher .
This section explains the SevOne Data Insight URL structure, how to create the structure from SevOne NMS > Events > Configuration > Webhook Definition Manager, the origin of each of its constituent URL components, and the prerequisites required in SevOne Data Insight and SevOne NMS for this integration to work.
SevOne Data Insight Setup
Prerequisites
As of SevOne Data Insight 3.14, flag FF_UI_REDIRECT has been added to provide the capability to redirect the user interface using the redirect option in the URL.
The URL redirector is a URL-based API for translating simple resource information into complex Data Insight user interface data types for webhooks and other linking purposes.
The default redirector route is at /redirect/v1/reports . At present, reports are supported for redirection and URL translation. If you are not logged in, you will be prompted to log in and then, redirection will continue.
With the new URL redirector API (i.e., flag FF_UI_REDIRECT), you can easily create, view, and understand webhook drillback URLs. By default, this flag is set to false. In order to use the FF_UI_REDIRECT flag, you must set it to true.
-
SSH into your SevOne Data Insight machine and log in as sevone and at the Password prompt, enter sevone.
$sshsevone@<virtual machine IP address orhostname>
-
Using a text editor of your choice, edit /opt/SevOne/chartconfs/di_custom.yaml file to set flag, FF_UI_REDIRECT, and then, save it.
If /opt/SevOne/chartconfs/di_custom.yaml file does not exist, please create one.
Create /opt/SevOne/chartconfs/di_custom.yaml file$touch/opt/SevOne/chartconfs/di_custom.yaml
ui:env:FF_UI_REDIRECT:true
-
Apply the change made to /opt/SevOne/chartconfs/di_custom.yaml file.
$ sevone-cli playbook up --tags apps
Before configuring a webhook containing drillback URL, a SevOne Data Insight report must exist; this will be the destination for the drillback and ideally, this report will be shared with all the users. This will ensure that all users who will click the link in the webhook, will be able to access the desired report.
The webhook URL sends the resources to the report. These resources are intended to provide context from the generating alert to the report to place a user, in context, within the report. It is highly recommended that the chosen report has variables configured for the report to accept these resources. From SevOne Data Insight, a report can be prepared for the resources that will be passed from the webhook URL.
Using a web browser of your choice, enter your SevOne Data Insight IP address or hostname of the machine to which you want to add the report variables. Please refer to SevOne Data Insight User Guide > section Create > Report Options > Variables for details.

The dynamic URL creation process references the selected resource types that are used in SevOne Data Insight OOTB (out-of-the-box) reports.
SevOne NMS Setup
Prerequisites
Any SevOne NMS sending out webhooks containing drillback URLs must already be configured as a datasource on an instance of SevOne Data Insight. Administrators creating Webhook Definitions must already know the IP address / hostname or the URL of SevOne Data Insight instance and the names of any SevOne Data Insight reports which will be referenced in the drillback URL.
This feature is designed such that SevOne NMS clusters must have the same name as their SevOne Data Insight datasource name in multi-datasource use-cases.
To create a webhook definition, p
lease refer to section Add Webhook Definition above for details. In addition to this, you will also find details on how to configure Slack channel above.
Sections Edit Webhook Definition and Delete Webhook Definition above provides details on how to edit or delete an existing webhook.
SevOne Data Insight drillback URLs are configured inside Webhook Definitions as part of the message body. Administrators can build their own definitions or reference the starter template for Slack message.
SevOne Data Insight Drillback URL Structure
To create a SevOne Data Insight drillback URL inside Webhook Definition, the following is required.
-
address of SevOne Data Insight instance which the URL will reference
-
name of SevOne Data Insight report the user will be navigated to
-
resources that will be referenced from the alert dynamically as variable $DIDataResources. This variable contains alert-specific information about the threshold violating the following.
-
Datasource / Cluster Name
-
Plugin Name
-
Object Types
-
Device Name
-
Object Name(s)
-
Indicator Type(s)
-
Relative Timespan
-
http://<SevOne Data Insight IP address or hostname>/redirect/v1/reports?<enter parameter>&$DIDataResources
Let's assume the following.
-
SevOne Data Insight address or hostname: localhost
-
SevOne Data Insight report name: Alert Details Report
-
Resources: this is automated by passing variable $DIDataResources in the URL
Your URL will be,
http://localhost/redirect/v1/reports?reportName=Alert%Details%Report&$DIDataResources
where, the parameter is reportName.
Let's assume the following.
-
SevOne Data Insight address or hostname: 10.128.10.24
-
SevOne Data Insight report name: Alert Details Report
-
Resources: this is automated by passing variable $DIDataResources in the URL
Your URL will be,
http://10.128.10.24/redirect/v1/reports?reportName=Alert%Details%Report&$DIDataResources
where, the parameter is reportName.
For the list of available parameters, please refer to section Parameters.
Once you have created a valid SevOne Data Insight drillback URL, it will send the webhook's parameters to the Data Insight instance running at localhost. When this instance of Data Insight receives the URL, it will open Alert Details Report and automatically fill out the variables with the values provided by the webhook.
Single Datasource
This feature is designed to work with single NMS cluster as a datasource, with no additional configuration necessary.
Multi Datasource
To navigate users to the correct report resources in environments where there are multiple NMS clusters set up as Data Insight datasources, the Cluster Name of each NMS cluster sending webhook alerts must match the Data Insight datasource. $DIDataResources automatically appends the value of the Cluster Name as parameter, datasourceName, to the URL. In the event of a mismatch, the administrator can change to the desired datasource inside SevOne Data Insight. This design approach is chosen to require consistent naming and navigation to the correct resources.
https://localhost/redirect/v1/reports?reportName=Alert%20Details%20Report &datasourceName=MyClusterName &indicators=SNMP%26%26Interface%26%26SNMPDevice%201%26%26Fa0%2F11%26%26ifInErrors%7C%7CSNMP%26%26Interface%26%26SNMPDevice%201%26%26Fa0%2F11%26%26ifOutErrors%7C%7CSNMP%26%26Interface%26%26SNMPDevice%201%26%26Fa0%2F11%26%26ifInDiscards%7C%7CSNMP%26%26Interface%26%26SNMPDevice%201%26%26Fa0%2F11%26%26ifOutDiscards &startTime=1667409663000
where,
Base URL is,
-
SevOne Data Insight address: https://localhost/redirect/
-
API version: v1
-
API function: reports
-
Report Name: Alert Details Report
Dynamic Alert Variables are,
-
Datasource / Cluster Name: MyClusterName
-
DIDataResources:
-
Plugin: SNMP
-
Object Type: Interface
-
Device Name: SNMPDevice 1
-
Object Name: Fa0/11
-
Indicator Type: ifInErrors
OR -
Plugin: SNMP
-
Object Type: Interface
-
Device Name: SNMPDevice 1
-
Object Name: Fa0/11
-
Indicator Type: ifOutErrors
OR -
Plugin: SNMP
-
Object Type: Interface
-
Device Name: SNMPDevice 1
-
Object Name: Fa0/11
-
Indicator Type: ifInDiscards
OR -
Plugin: SNMP
-
Object Type: Interface
-
Device Name: SNMPDevice 1
-
Object Name: Fa0/11
-
Indicator Type: ifOutDiscards
-
-
Relative Timespan: 1667409663000 (as Epoch timestamp)
The URL ASCII character encoding has been omitted from URL legend above for readability.
-
%20 = space
-
%26 = &
-
%2f = /
-
%7C = |
Parameters
Parameters are provided in query search format.
http://localhost:8080/redirect/v1/reports?reportName=Indicator Summary&datasourceName=CX NMSwhere,
-
reportName = Indicator Summary
-
datasourceName = CX NMS
URLs must be URL-encoded before being passed to the redirect route.
Combined Parameters
Some fields require information to be in a combined format and have optional support for multiple parameters of a type. In the case of a combined input, fields must be separated by &&. For example, (Device Name)&&(Object Name) for an object input.
Use || as a separator for fields with optional multiple parameters. For example, (Device Name 1)&&(Object Name 1)||(Device Name 2)&&(Object Name 2).
reportId
Is the report ID parameter. It takes the report ID and sets it as the redirect target. This will override any ID passed in reportName parameter.
reportName
Is the report name parameter. It translates a report name into the report ID and sets it as the target of the redirect when using the reports redirect route.
datasourceId
Is the datasource ID parameter. It takes a given datasource ID and sets it as the target datasource. It overrides any provided datasourceName parameter.
datasourceName
Is the datasource name parameter. It translates a datasource name into an ID and sets it as the target datasource.
startTime / endTime
Are the specific time parameters where startTime and endTime are UNIX timestamps. It takes a UNIX timestamp startTime and optional endTime and sets it as the timespan for the report. If no endTime is provided, it defaults to the current UNIX timestamp. This will always override both timespan and customTimespan parameters.
timespan
Is the SevOne timespan parameter. It takes a SevOne timespan for example, PAST_24HOURS, and sets it as the timespan for the report.
customTime
Is the custom time string parameter. It takes a custom time string for example, PAST 24 Hours, and sets it as the timespan for the report.
timezone
Is the timezone string parameter. It takes a timezone string and applies it to the timespan parameter. For example, America/Anchorage.
deviceGroups
Is the [Device Group Path] parameter separated by /. It takes a set of device group paths and translates them into device groups useable by report variables.
devices
Is the [Device Name] parameter. It takes a set of device names and translates them into devices useable by report variables.
objects
Is the [Plugin Name + Device Name + Object Name] parameter. It takes a set of plugin, device and object names and translates them into objects useable by report variables. At present, the object report variable only uses the first object.
indicators
Is the [Plugin Name + Object Type Path (separated by /) + Devcie Name + Object Name + Indicator Type Name] parameter. It takes a set of plugin, object type, device, object and indicator type names and translates them into indicators useable by report variables.