Table of Contents (Start)
- Topics
- Introducing SevOne
- Login
- Startup Wizard
- Dashboard
- Global Search - Advanced Search
- Report Manager
- Report Attachment Wizard
- Report Properties
- Report Interactions
- Instant Graphs
- TopN Reports
- Alerts
- Alert Archives
- Alert Summary
- Instant Status
- Status Map Manager
- Edit Maps
- View Maps
- FlowFalcon Reports
- NBAR Reports
- Logged Traps
- Unknown Traps
- Trap Event Editor
- Trap Destinations
- Trap Destination Associations
- Policy Browser
- Create and Edit Policies
- Webhook Definition Manager
- Threshold Browser
- Create and Edit Thresholds
- Probe Manager
- Discovery Manager
- Device Manager
- New Device
- Edit Device
- Object Manager
- High Frequency Poller
- Device Summary
- Device Mover
- Device Groups
- Object Groups
- Object Summary
- Object Rules
- VMware Browser
- AWS Plugin
- Azure Plugin (Public Preview)
- Calculation Plugin
- Database Manager
- Deferred Data Plugin
- DNS Plugin
- HTTP Plugin
- ICMP Plugin
- IP SLA Plugin
- JMX Plugin
- NAM
- NBAR Plugin
- Portshaker Plugin
- Process Plugin
- Proxy Ping Plugin
- SDWAN Plugin
- SNMP Plugin
- VMware Plugin
- Web Status Plugin
- WMI Plugin
- xStats Plugin
- Indicator Type Maps
- Device Types
- Object Types
- Object Subtype Manager
- Calculation Editor
- xStats Source Manager
- User Role Manager
- User Manager
- Session Manager
- Authentication Settings
- Preferences
- Cluster Manager
- Maintenance Windows
- Processes and Logs
- Metadata Schema
- Baseline Manager
- FlowFalcon View Editor
- Map Flow Objects
- FlowFalcon Views
- Flow Rules
- Flow Interface Manager
- MPLS Flow Mapping
- Network Segment Manager
- Flow Protocols and Services
- xStats Log Viewer
- SNMP Walk
- SNMP OID Browser
- MIB Manager
- Work Hours
- Administrative Messages
- Enable Flow Technologies
- Enable JMX
- Enable NBAR
- Enable SNMP
- Enable Web Status
- Enable WMI
- IP SLA
- SNMP
- SevOne Data Publisher
- Quality of Service
- Perl Regular Expressions
- Trap Revisions
- Integrate SevOne NMS With Other Applications
- Email Tips and Tricks
- SevOne NMS PHP Statistics
- SevOne NMS Usage Statistics
- Glossary and Concepts
- Map Flow Devices
- Trap v3 Receiver
- Guides
- Quick Start Guides
- AWS Quick Start Guide
- Azure Quick Start Guide (Public Preview)
- Data Miner Quick Start Guide
- Flow Quick Start Guide
- Group Aggregated Indicators Quick Start Guide
- IP SLA Quick Start Guide
- JMX Quick Start Guide
- Metadata Quick Start Guide
- RESTful API Quick Start Guide
- Self-monitoring Quick Start Guide
- SevOne NMS Admin Notifications Quick Start Guide
- SNMP Quick Start Guide
- Synthetic Indicator Types Quick Start Guide
- Topology Quick Start Guide
- VMware Quick Start Guide
- Web Status Quick Start Guide
- WMI Quick Start Guide
- xStats Quick Start Guide
- xStats Adapter - Accedian Vision EMS (TM) Quick Start Guide
- Deployment Guides
- Automated Build / Rebuild (Customer) Instructions
- Generate a Self-Signed Certificate or a Certificate Signing Request
- SevOne Best Practices Guide - Cluster, Peer, and HSA
- SevOne Data Platform Security Guide
- SevOne NMS Implementation Guide
- SevOne NMS Installation Guide - Virtual Appliance
- SevOne NMS Advanced Network Configuration Guide
- SevOne NMS Installation Guide
- SevOne NMS Port Number Requirements Guide
- SevOne NMS Upgrade Process Guide
- SevOne Physical Appliance Pre-Build BIOS and RAID Configuration Guide
- SevOne SAML Single Sign-On Setup Guide
- Cloud Platforms
- Other Guides
- Quick Start Guides
Trap Event Editor
The Trap Event Editor enables you to configure how to handle traps. Traps that you associate to a trap event can appear on the Logged Traps page and traps without a trap event appear on the Unknown Traps page. SevOne NMS provides starter set trap events.
To access the Trap Event Editor from the navigation bar, click the Events menu, select Configuration, and then select Trap Event Editor.
Typical access to the Trap Event Editor is from the Unknown Traps page that provides a Configure Trap Event button. The SNMP OID Browser also provides access when you select an applicable OID and click Configure Trap Event.
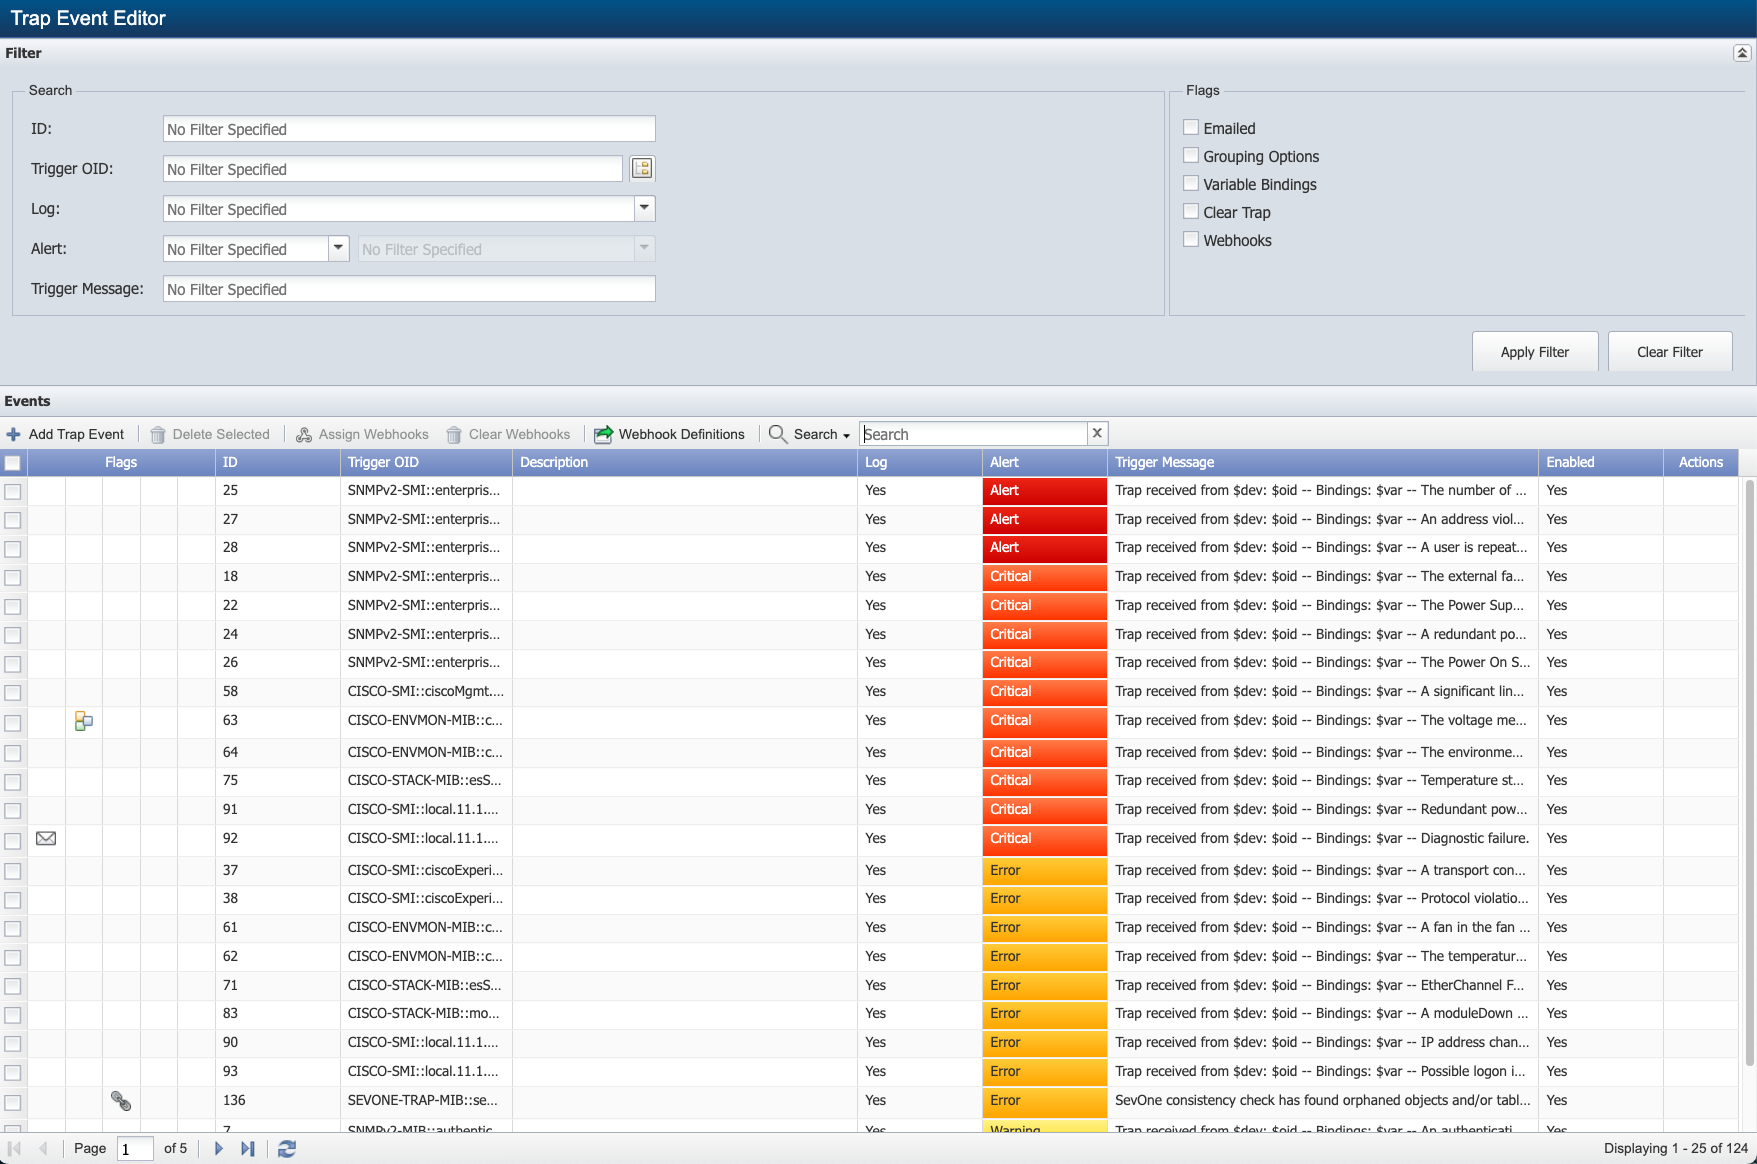
Filter
Filters enable you to limit the trap events that appear in the list. All filters are optional and cumulative.
Search
-
In the ID field, enter an internal trap event identifier to display a specific trap event.
-
Click the Trigger OID
 to display the SNMP OID Browser where you can select the target OID. You can enter the name of the target OID to display trap events for a specific OID.
 -
Click the Log drop-down.
-
Select No Filter Specified to display all trap events.
-
Select Yes to display trap events that display applicable traps on the Logged Traps page.
-
Select No to display trap events that do not display applicable traps on the Logged Traps page.
-
-
Click the Alert drop-down.
-
Select No Filter Specified to display all trap events.
-
Select Yes to display trap events that trigger an alert to appear on the Alerts page. If you select Yes, you can click the corresponding drop-down and select an alert severity to further filter the trap event list.
-
Select No to display trap events that do not trigger an alert to appear on the Alerts page.
-
-
In the Trigger Message field, enter a portion of the trap event message to display trap events that contain the string entered in the message.
Flags
Select each check box to display traps that are flagged to be emailed, grouped, contain variable bindings, clear trap, and/or Webhooks. The following check boxes are available.
-
Emailed
-
Grouping Options
-
Variable Bindings
-
Clear Trap
-
Webhooks
Buttons
-
Click Apply Filter button to apply the filter settings and display the trap events that meet the filter criteria.
-
Click Clear Filter button to remove all filters and to display all trap events in the list.
-
Click on

to collapse or

to uncollapse the Filter section.
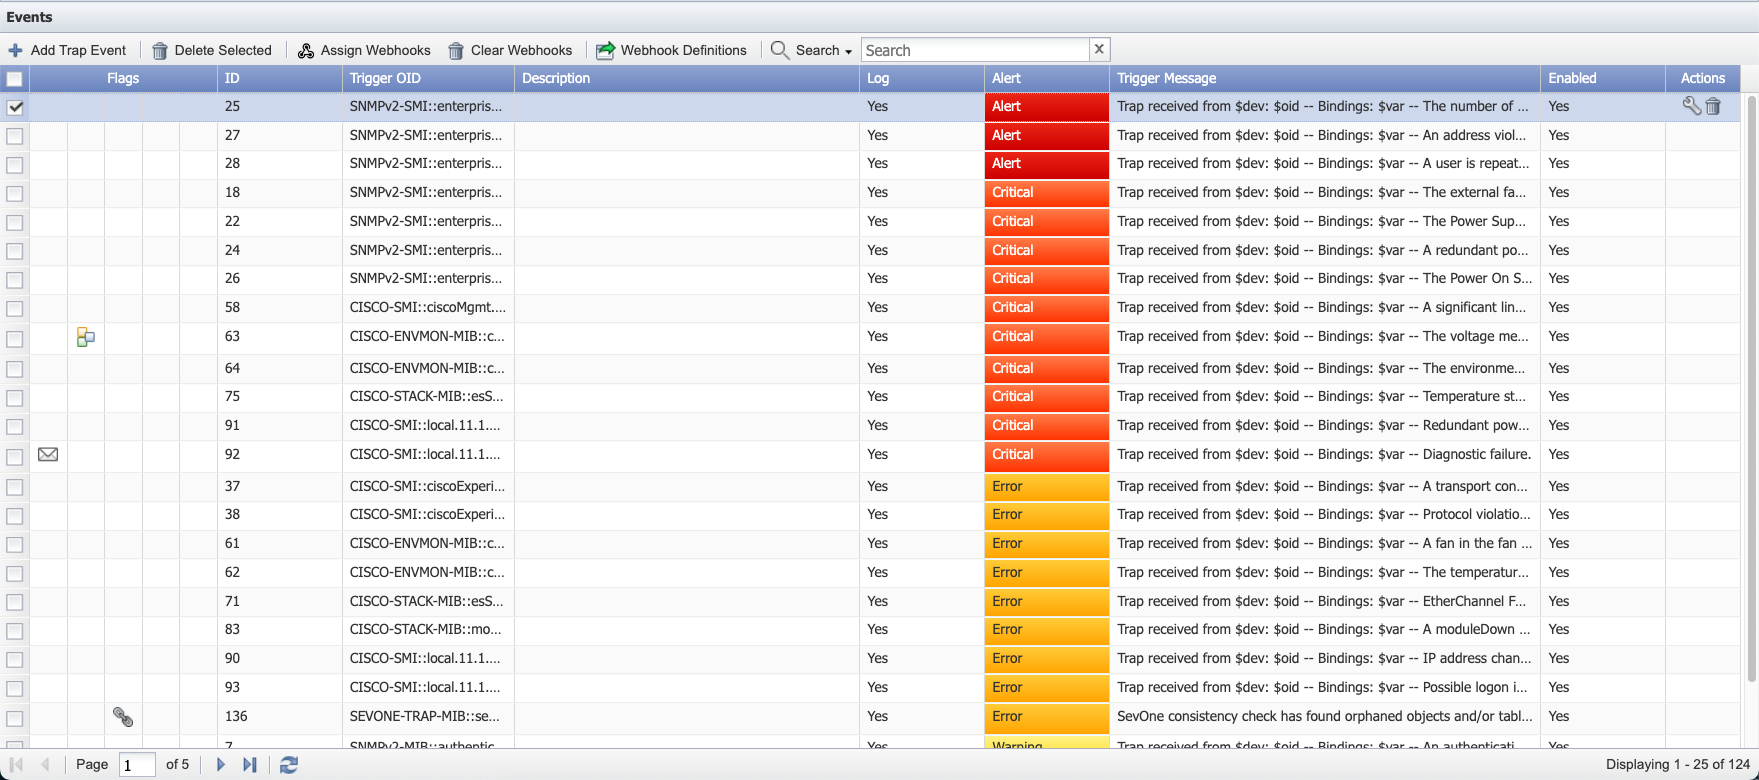
Events
Add / Edit Trap Event
Click  to create a new trap event. To modify an existing trap event, select a trap event and click
  under Actions column. Or, from Events > Archives > Unknown Traps, select an unknown trap and click Configure Trap Event to display the Add/Edit Trap Event pop-up.
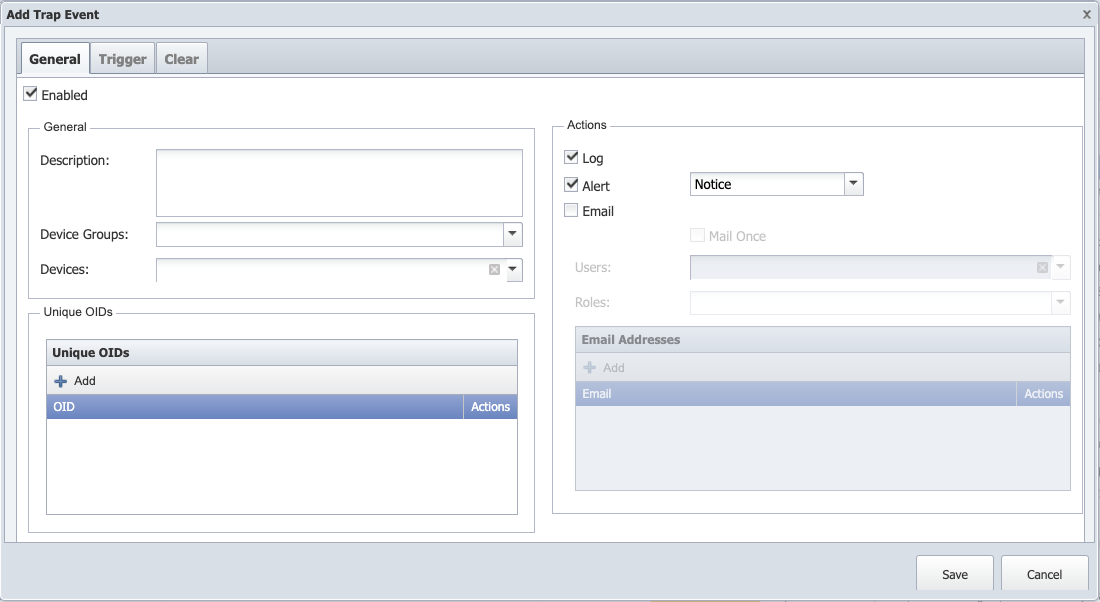
Tab 'General'
The General tab enables you to define the basic trap event settings.
-
Select the Enabled check box to enable the trap event. Leave clear to not apply the trap event and to display applicable traps on the Unknown Traps page.
-
Under section General, you can apply the trap event to device groups/device types, or devices.
-
In field Description, enter description for the trap event.
-
Click the Device Groups drop-down and select the check box for each device group/device type to trigger the trap event.
-
Click the Devices drop-down and select the devices to trigger the trap event.
-
-
Under section Unique OIDs, you can designate unique OIDs to associate to the trap event.
-
Click
 to add a row to the table and to add an OID.
 -
Click the OID
to display the SNMP OID Browser where you select the OID. -
Click Update to save the OID with the trap event.
-
-
-
Under section Actions,
-
Select the Log check box to display traps on the Logged Traps page. Leave clear to have traps not appear on the Logged Traps page. For an enabled trap event, when you leave this check box clear, traps that meet the trap event criteria do not appear on either the Unknown Traps page or the Logged Traps page.
Examples-
For devices that send traps when traffic is denied through a firewall rule, a logged trap enables you to trace the events to a firewall to determine the cause of missed traffic.
-
Frequent but irrelevant traps such as when devices send traps each time a new IP address is leased via DHCP may not be useful.
-
-
Select the Alert check box to have the trap trigger an alert.
-
Click the drop-down and select the alert severity to display for the alert. For example, Emergency, Alert, Critical, Error, Warning, Notice, Info, or Debug.
-
-
Select the Email check box to enable the following fields.
-
Select the Mail Once check box to send one email when the trap triggers the first occurrence of the trap event. All subsequent occurrences are not emailed.
-
Click the Users drop-down and select the users to receive an email when the trap event triggers.
-
Click the Roles drop-down and select the user roles to receive an email when the trap event triggers.
-
In the Email Addresses field, click
to enter the email addresses where an email is to be sent when the trap event triggers.
-
-
Click Save As New or Save to save. Click Cancel to cancel the add / edit of the trap event.
-
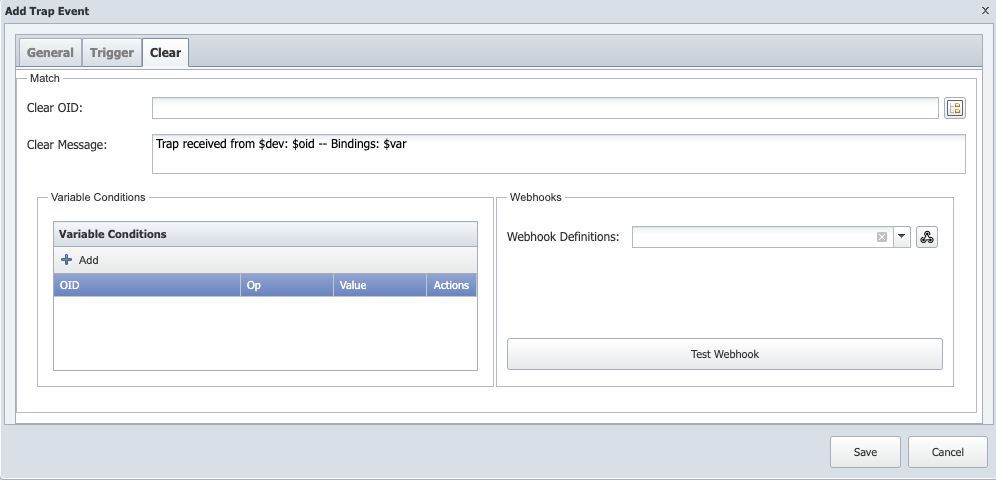
Tabs 'Trigger' & 'Clear'
The Trigger / Clear tabs enable you to define the conditions to trigger / clear the trap event and to define the trigger / clear messages respectively.
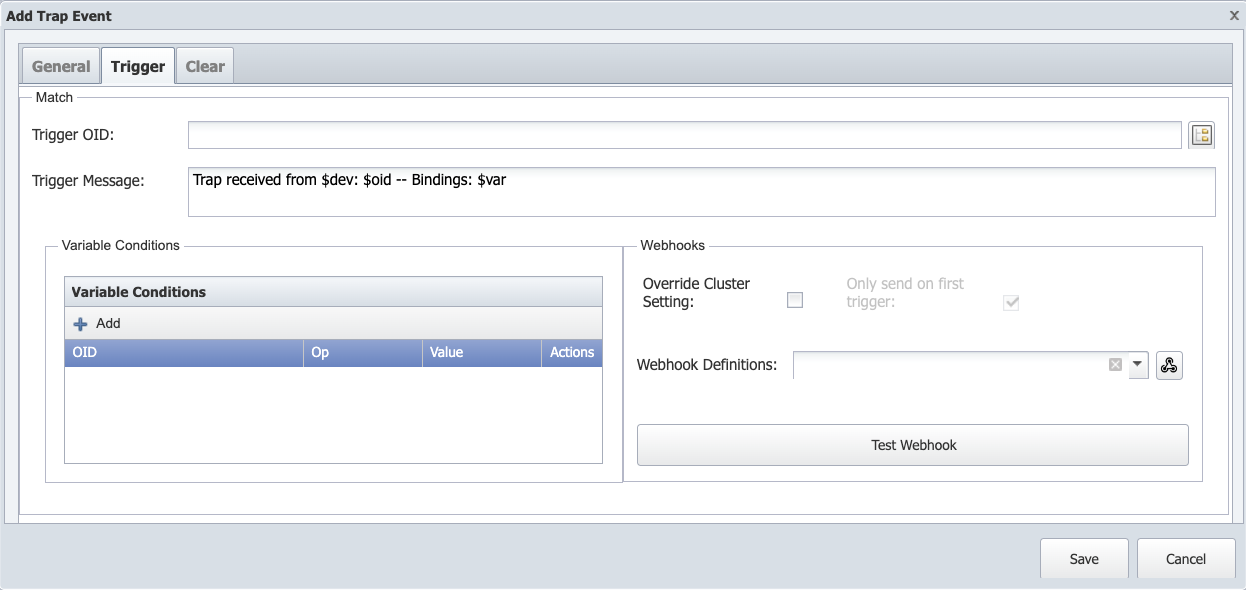
Under section Match, you can apply the trap event to a specific OID. A match is a logical AND option. The trap primary OID must come from the device group/device type or the device you specify to trigger the trap event. To make the trap event applicable for all device groups/device types and devices do not define Match options.
-
The Trigger OID / Clear OID
provides access to the SNMP OID Browser where you select the target OID for the trap event. When you edit a trap event or you access the Trap Event Editor from the Unknown Traps page, this field displays the name of the OID you select. You can enter the OID name in this field if you know the OID name. -
The Trigger Message / Clear Message field allows you to enter the message to display when this trap event is triggered. For example, Trap received from $dev: $oid -- Bindings: $var -- The number of broadcast packets received in a second from a port is higher than the broadcast threshold.
-
$dev - to display the source device of the trap (in textual format).
-
$oid - to display the trigger OID (in textual format).
-
$oidnum - to display the trigger OID (in numerical format).
-
$var - to display the Varbinds and respective values (in textual format).
-
$varnum - to display the Varbinds and respective values (in numerical format).
When specifying variable OIDs (varbinds), it is helpful to review Unknown Traps. From there you can search for and identify any previous traps that have been received and the variables (varbinds) that were received with the trap.
-
-
Under section Variable Conditions, you can define the conditions for which a trap event is applicable.
-
Click
to add a row to the table and to define a new variable condition. -
Click the OID
to display the SNMP OID Browser where you select the trap target OID. -
Click the Op drop-down and select a comparison operator.
-
In the Value field, enter the value that must be met to trigger the trap event.
-
Click Update to save the variable condition.
Repeat to add additional variable conditions. All variable conditions for a trap event are AND'd together.
-
-
-
Under section Webhooks,
Applies to tab 'Trigger' onlySelect Override Cluster Setting check box to override the setting in Administration > Cluster Manager > tab Cluster Settings > Alerts subtab > field One Webhook per Alert.
-
Only send on first trigger check box is available only when Override Cluster Setting check box is selected. This allows you to override the setting configured cluster-wide. New setting is applied to the selected trap event only. When this check box is selected, it will send webhook only on the first trigger of an alert. However, when unchecked, it will send a webhook for every occurrence of an alert even if an alert already exists for that triggered trap event.
For traps, you may set field Update Interval from Administration > Cluster Manager > tab Cluster Settings > Trap Collector subtab. By default, Update Interval is set to 300 seconds (i.e., 5 minutes).
In SevOne-trapd, trap triggering list is loaded every 5 minutes based on the default value set in field Update Interval. When an alert is acknowledged from Events > Alerts, it does not pass through SevOne-trapd; it is now in trap triggering list's cache. If the same alert triggers again within 5 minutes after being manually acknowledged and, Only send on first trigger is enabled, trapd assumes that it is an incremented occurrence and ignores sending the webhook.
The lower the setting of Administration > Cluster Manager > tab Cluster Settings > Trap Collector subtab > field Update Interval, the lower the likelihood of webhook failing / missed. The setting of field Update Interval can affect trap webhooks.
-
Click Webhook Definitions drop-down and choose one or more webhook definition ids from the list. If no webhook definition ids are available or you want to create additional webhook definition ids, click
 icon.
icon. -
Test Webhook button provides the testing ability for the webhook definition(s) applied to the trap event. You will get a pop-up with the result for the user, including the following details. The notifications can be sent to SevOne NMS application itself.
-
Webhook Definition ID - returns the webhook definition id.
-
Webhook Definition Name - returns the webhook definition name.
-
Ping Result - r eturns the value of ping test fail or success. If success, it proceeds further.
-
Status Code - s tatus code of the webhook request.
-
Response - when a webhook request is executed, it returns a response body.
-
Response Error - if webhook request fails to execute, it returns a response error.
-
Response Header - c ontains all response header values when webhook request has completed.
-
Curl Request - c url request has a curl command for every successful request.
Click Close to exit.
-
-
Delete Selected
Select one or more trap events in the list and click  to delete the trap events selected.
Assign Webhooks
Before assigning webhook definitions to the trap events, you must first have webhook definitions configured. Please refer to section Webhook Definitions .
To understand Assign Webhooks feature, let's assume you have 7 webhook definition ids (1, 2, 3, 4, 5, 6, and 7) created. Of these 7 webhook definition ids, only 3 webhook definition ids, 4, 5, and 7 are for Type = Trap.
In Used In column, you will see 0 Trap Event(s) for all 3 webhook definitions where Type = Trap. This means that these webhook definitions have not been assigned to any trap event yet.
Click  to assign webhook definitions to the trap event(s) selected. Below you will find a few scenarios.
Scenario# 1
-
Select trap event id 25 and click
to assign webhook definition ids 4 and 7 to it. Webhook Definition ID 5 is not assigned to trap event id 25.
-
You will get the following pop-up with a list of 3 webhook definitions available.
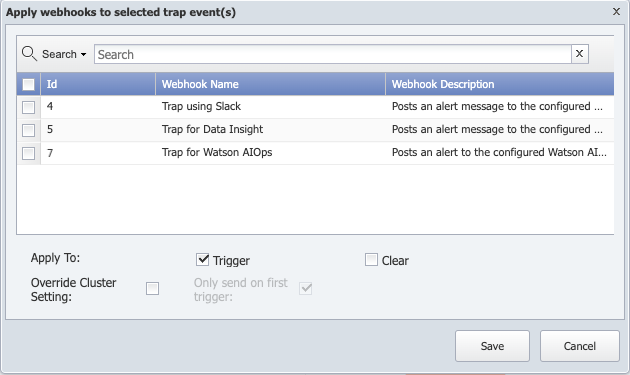
-
The Search field allows you to search from the list of webhook definitions available in the table below.
-
Field Apply To - select Trigger or Clear check box to apply the webhook definition to Trigger or Clear conditions respectively.
-
Select Override Cluster Setting check box to override the setting in Administration > Cluster Manager > tab Cluster Settings > Alerts subtab > field One Webhook per Alert.
-
Only send on first trigger check box is available only when Override Cluster Setting check box is selected. This allows you to override the setting configured cluster-wide. New setting is applied to the selected trap events only. When this check box is selected, it will send webhook only on the first trigger of an alert. However, when unchecked, it will send a webhook for every occurrence of an alert even if an alert already exists for that triggered trap event.
-
-
-
Select webhook definition ids 4 and 7 to assign to trap event id 25.
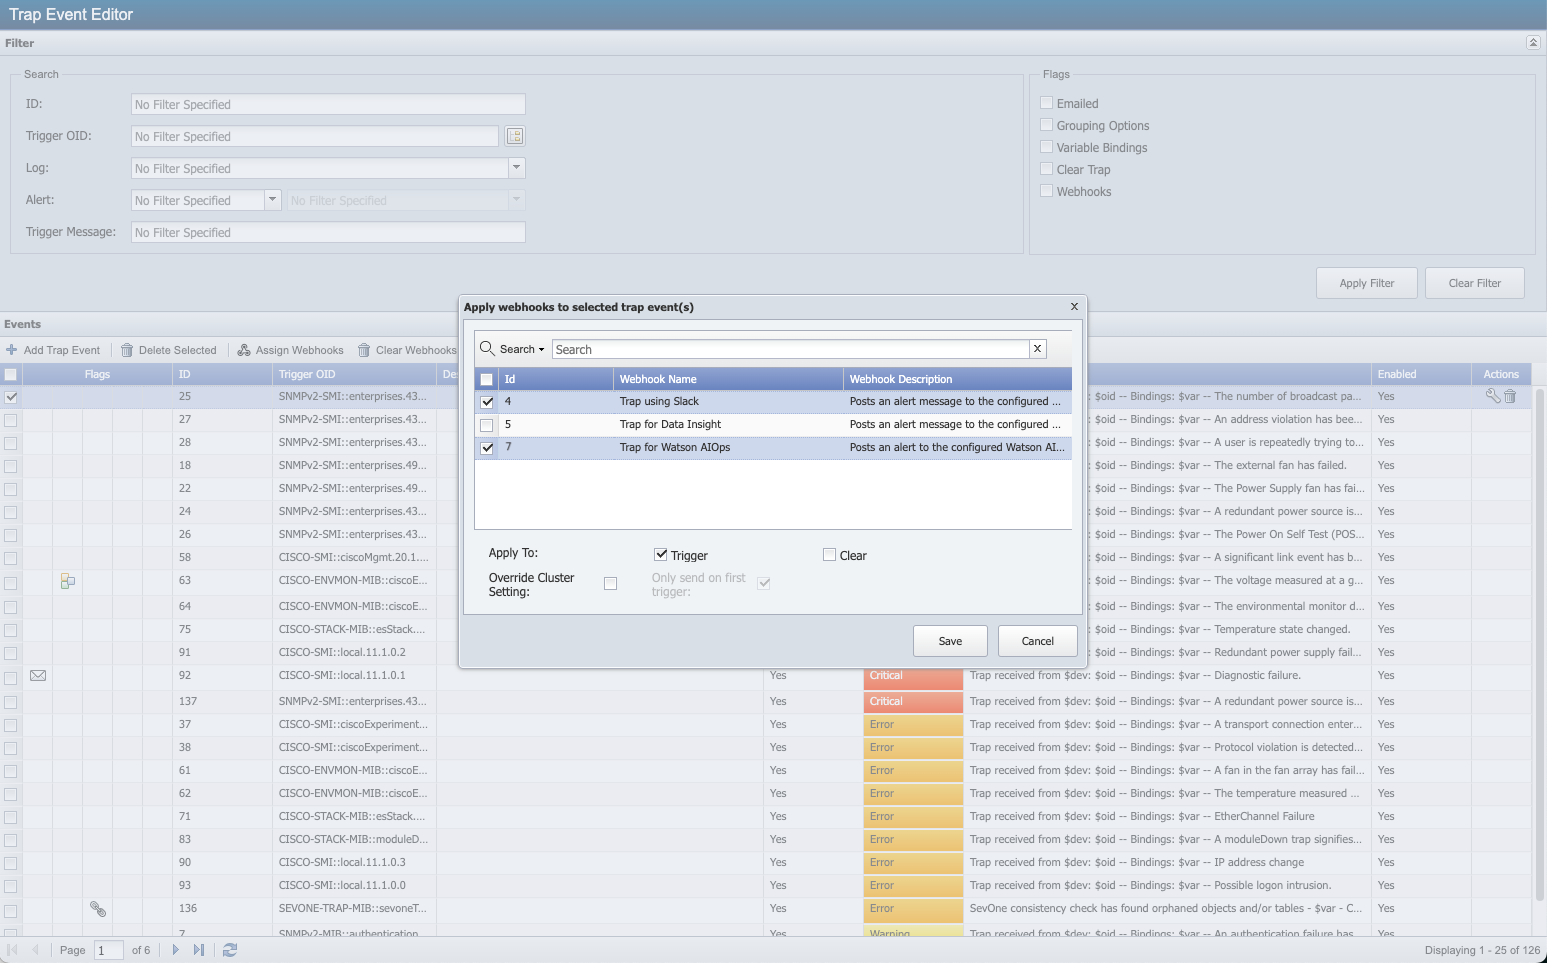
-
Click Save and you will get a pop-up.
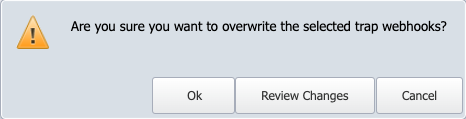
-
Click Ok to overwrite the webhook definitions currently assigned to trap event id 25 with webhook definition ids 4 and 7.
-
Click Review Changes to review the trap webhooks association before overwriting trap event id 25. A pop-up appears.
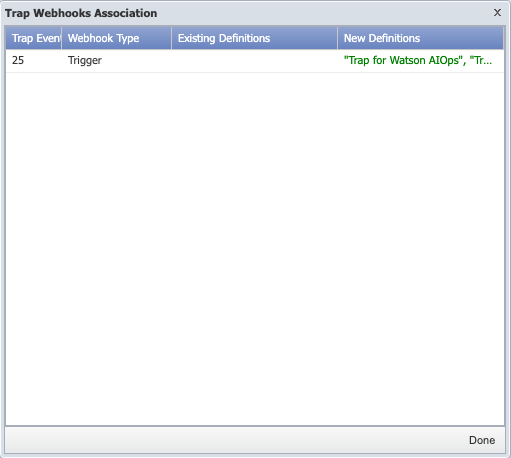
Since this is the first time webhook definition(s) are being assigned to trap event id 25, there are no Existing Definitions for it.
Click Done after reviewing the details. If you want to continue with the assignment of the webhook definitions to the trap event(s) selected, click Ok to save or Cancel to exit.
If you clicked the Ok button, you will see that trap event id 25 has
icon in column 5 under Flags. This indicates that trap event id 25 now has webhook definition ids 4 and 7 assigned to it.
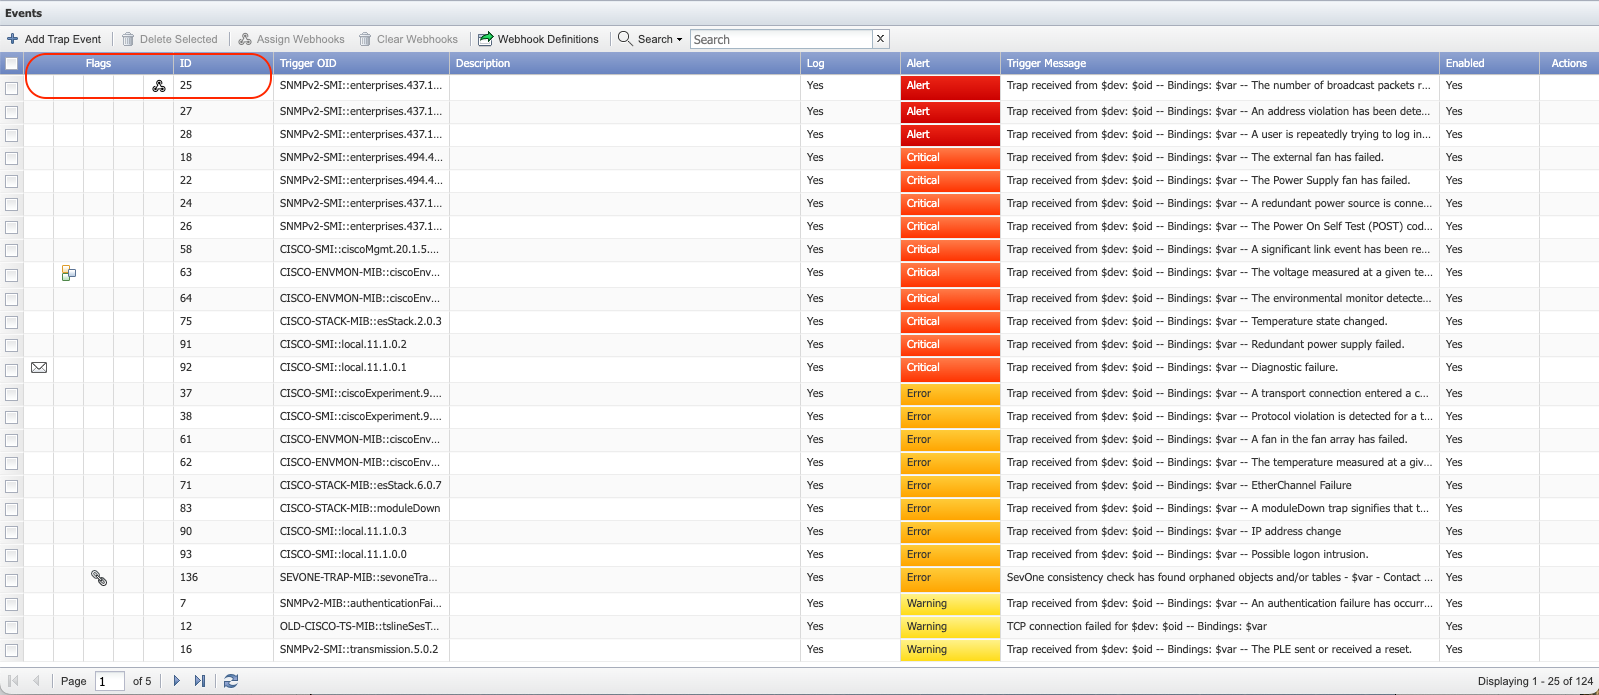
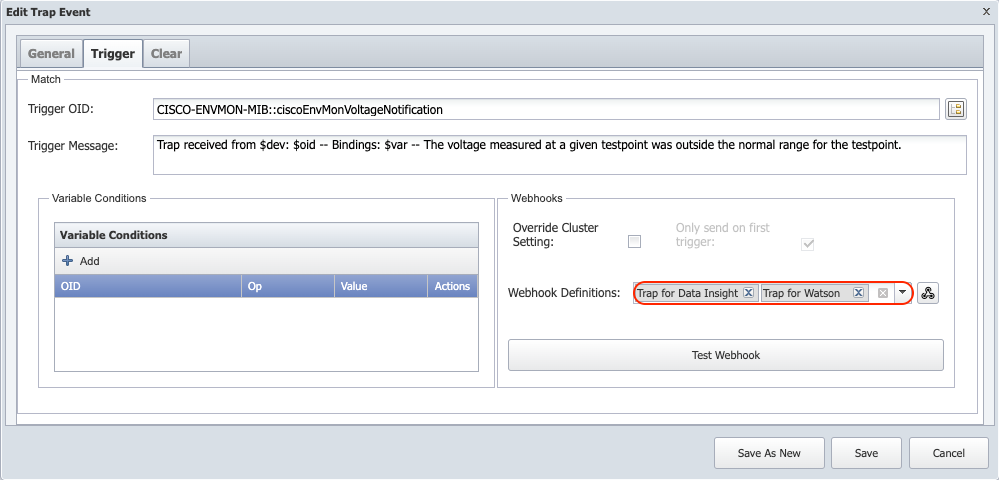
To confirm this, click row with trap event id 25 > in Actions column click
.
Choose tab Trigger. You will see that webhook definition ids 4 and 7 (Trap using Slack - 4 and Trap for Watson AIOps - 7 respectively) are assigned to trap event id 25.
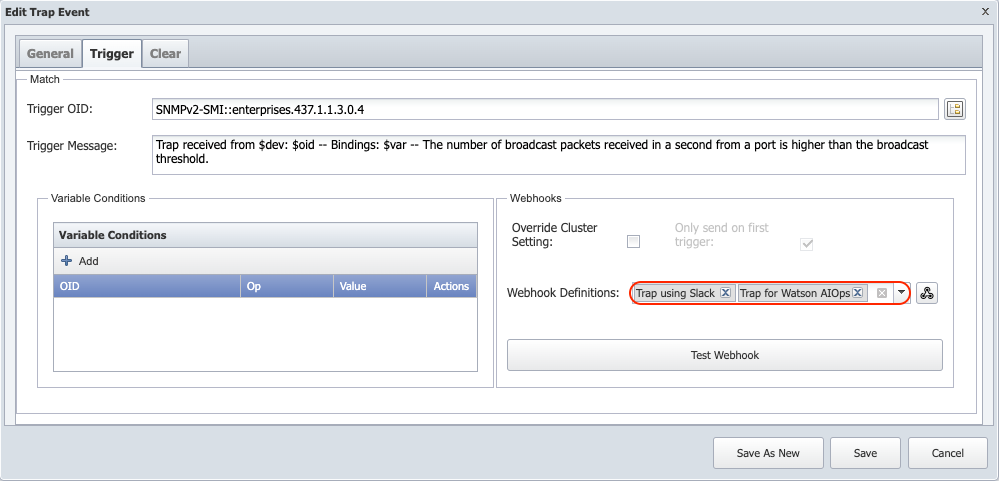
You will see that Trap Event ID 25 has Webhook Definition IDs 4 and 7 assigned to it.
Webhook Definition ID 5 is available but not used.
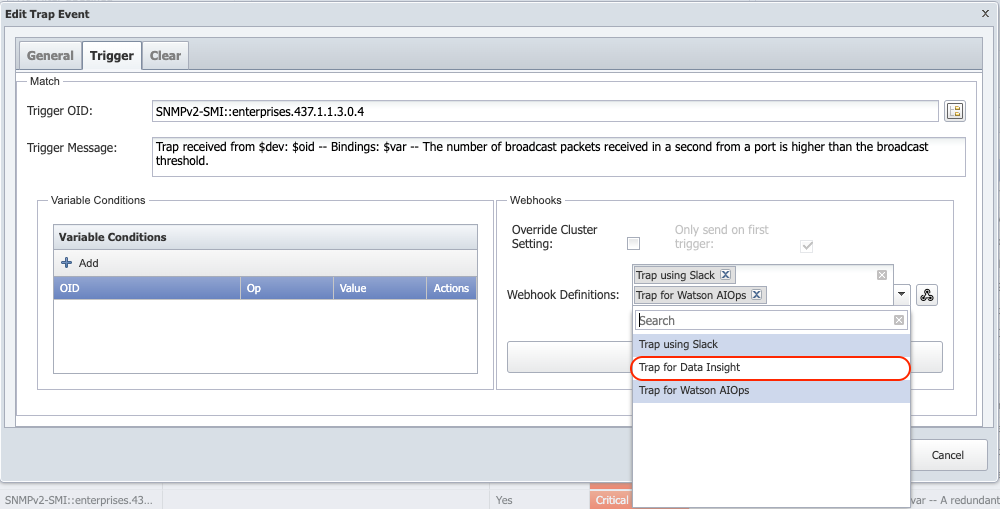
If you choose to assign Webhook Definition ID 5 to Trap Event ID 25, select Trap for Data Insight from the drop-down list and click the Save button.
-
Scenario# 2
-
Select trap event id 63 and click
to assign webhook definition ids 5 and 7 to it. Webhook Definition ID 4 is not assigned to trap event id 63.
-
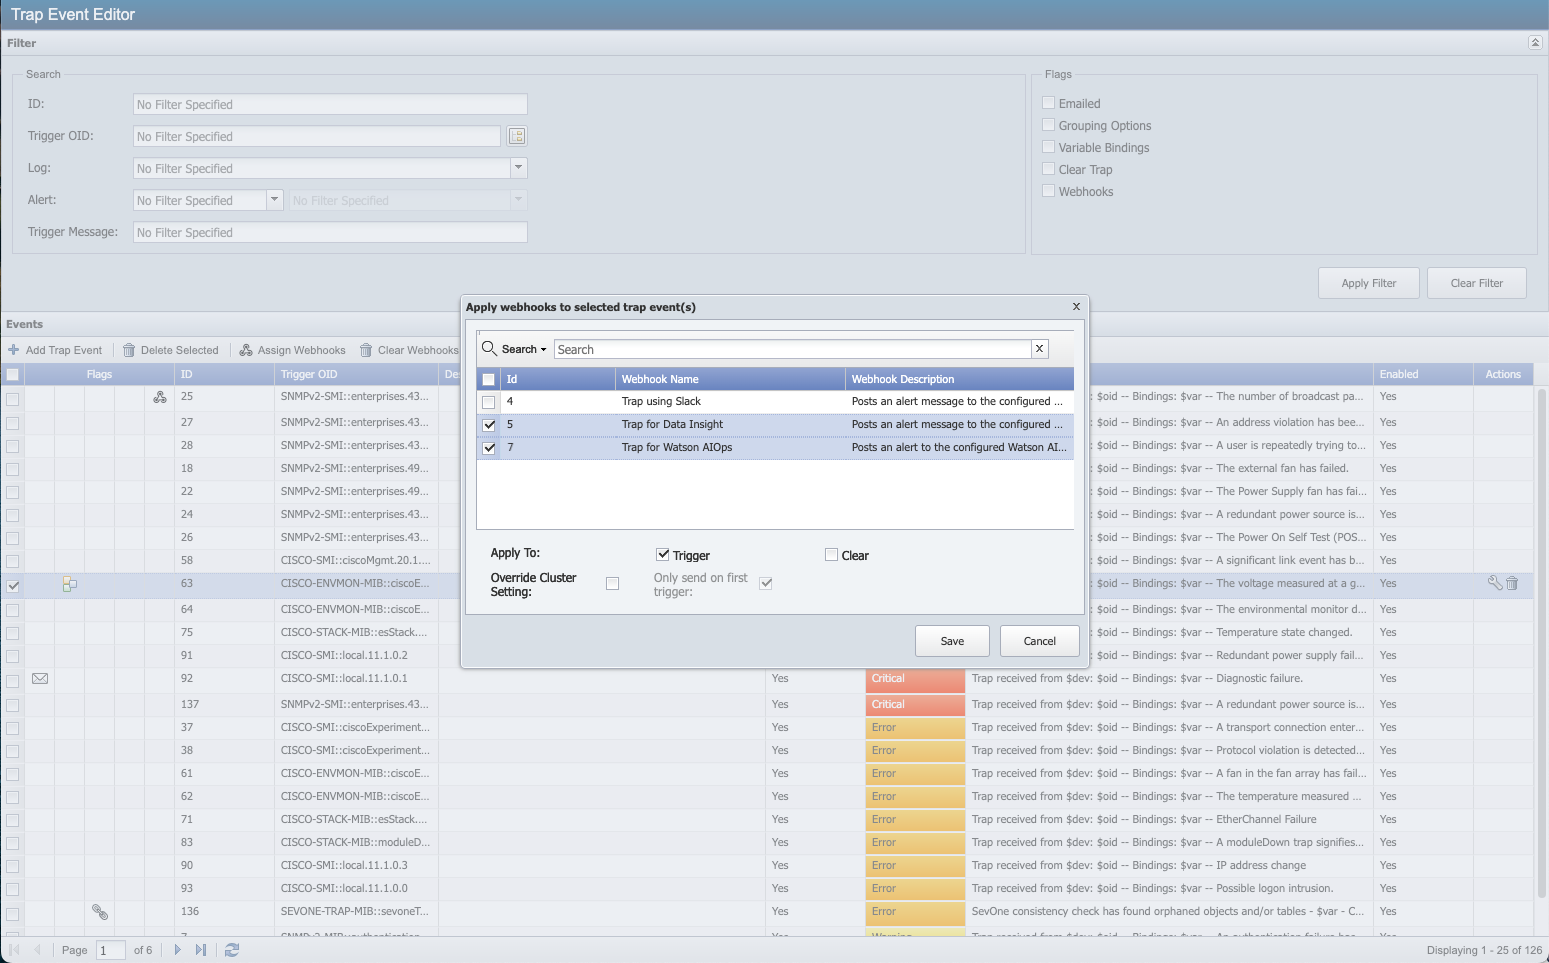
You will get the following pop-up with a list of 3 webhook definitions available.
-
The Search field allows you to search from the list of webhook definitions available in the table below.
-
Field Apply To - select Trigger or Clear check box to apply the webhook definition to Trigger or Clear conditions respectively.
-
Select Override Cluster Setting check box to override the setting in Administration > Cluster Manager > tab Cluster Settings > Alerts subtab > field One Webhook per Alert.
-
Only send on first trigger check box is available only when Override Cluster Setting check box is selected. This allows you to override the setting configured cluster-wide. New setting is applied to the selected policies only. When this check box is selected, it will send webhook only on the first trigger of an alert. However, when unchecked, it will send a webhook for every occurrence of an alert even if an alert already exists for that triggered threshold.
-
-
-
Select webhook definition ids 5 and 7 to assign to trap event id 63.
-
Click Save and you will get a pop-up.
-
Click Ok to overwrite the webhook definitions currently assigned to trap event id 63 with webhook definition ids 5 and 7.
-
Click Review Changes to review the policy webhooks association before overwriting trap event id 63. A pop-up appears.
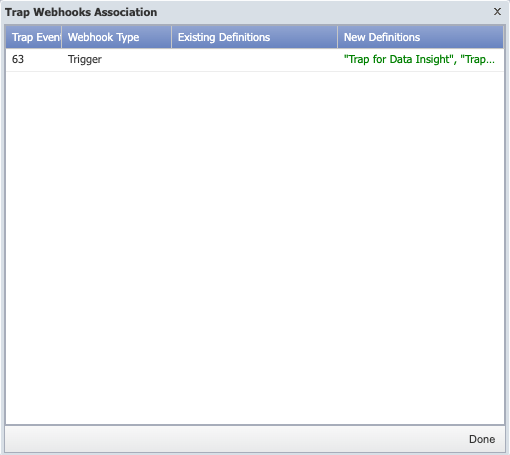
Since this is the first time webhook definition(s) are being assigned to trap event id 63, there are no Existing Definitions for it.
Click Done after reviewing the details. If you want to continue with the assignment of the webhook definitions to the trap event(s) selected, click Ok to save or Cancel to exit.
Trap event id 63 already has
 icon in column 2 under Flags for Grouping Options.
If you clicked the Ok button, in addition to
icon, you will also see that trap event id 63 has
icon (for webhook definition) in column 5 under Flags. This indicates that trap event id 63 now has webhook definition ids 5 and 7 assigned to it.
To confirm this, click row with trap event id 63 > in Actions column click
.
Choose tab Trigger. You will see that webhook definition ids 5 and 7 (Trap with Data Insight and Trap for Watson AIOps respectively) are assigned to trap event id 63.
You will see that Trap Event ID 63 has Webhook Definition IDs 5 and 7 assigned to it.
Webhook Definition ID 4 is available but not used.
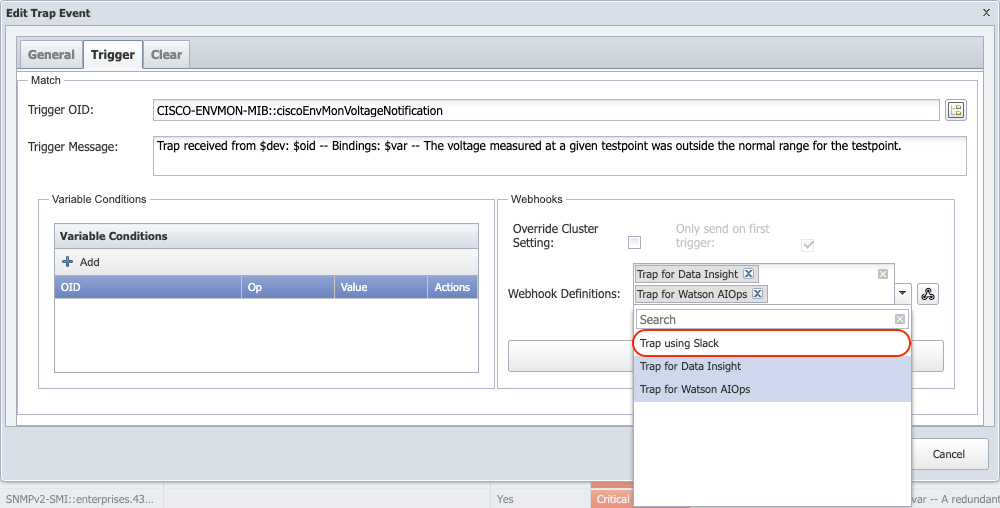
If you choose to assign Webhook Definition ID 4 to Trap Event ID 63, select Trap using Slack from the drop-down list and click the Save button.
-
Assume that,
-
Trap Event ID 25 has Webhook Definition IDs 4 and 7 assigned to it.
-
Trap Event ID 63 has Webhook Definition IDs 5 and 7 assigned to it.
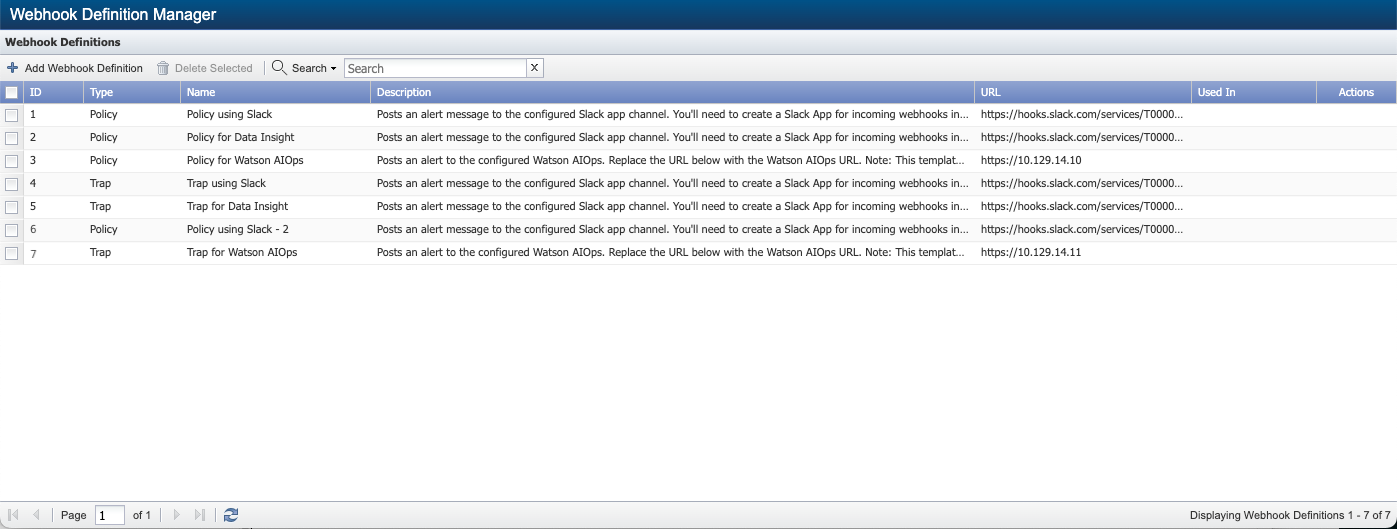
Based on this, Events > Configure > Webhook Definition Manager will appear as the following.
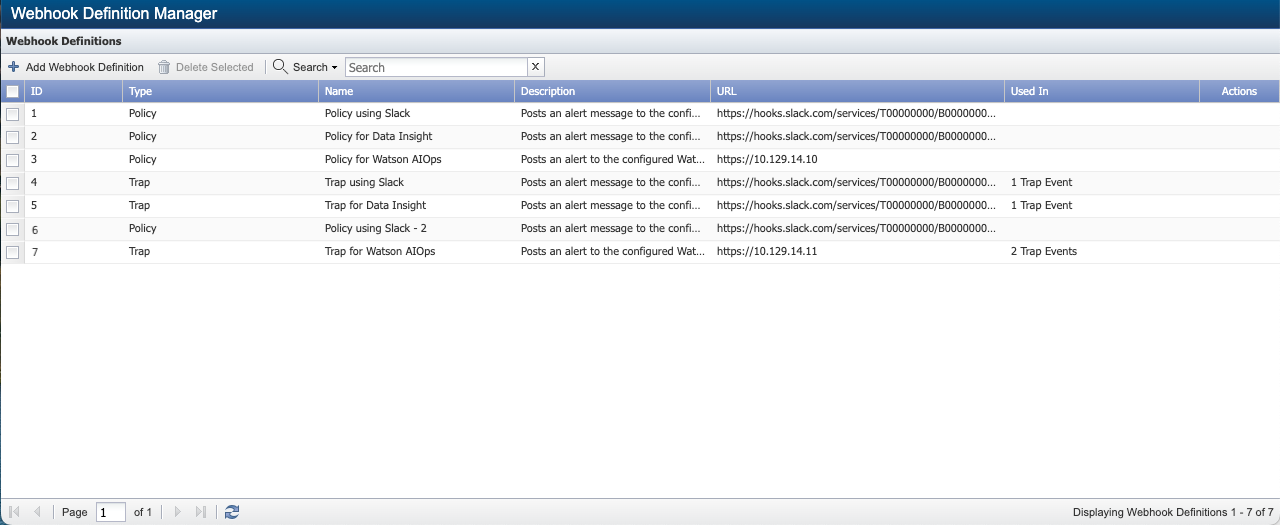
where,
-
Webhook Definition ID 4 has 1 Trap Event in column Used In. This is because only one trap event, 25, has been assigned to this ID.
-
Webhook Definition ID 5 has 1 Trap Event in column Used In. This is because only one trap event, 63, has been assigned to this ID.
-
Webhook Definition ID 7 has 2 Trap Events in column Used In. This is because 2 trap events, 25 and 63, have been assigned to this ID.
Clear Webhooks
-
Select one or more trap event ids where webhook(s) are assigned.
-
Click
 to remove the webhook(s) assigned to the selected trap event id(s).
Example-
Select trap event id 25 as webhook definition ids 4 and 7 are assigned to it.
-
Click
.
-
You will get the following pop-up to confirm the deletion.

-
Click Yes to clear the webhooks. Otherwise, click No.
If both trap event ids 25 and 63 were selected and you clicked
, webhook definition ids assigned to both trap event ids 25 and 63 will get deleted.
-
Webhook Definitions
Click  to create / configure, modify, or delete webhook definitions.
For details, please refer to
Webhook Definition Manager
.
to create / configure, modify, or delete webhook definitions.
For details, please refer to
Webhook Definition Manager
.
Search
The search capability allows user to search the table for the word enter in the field.
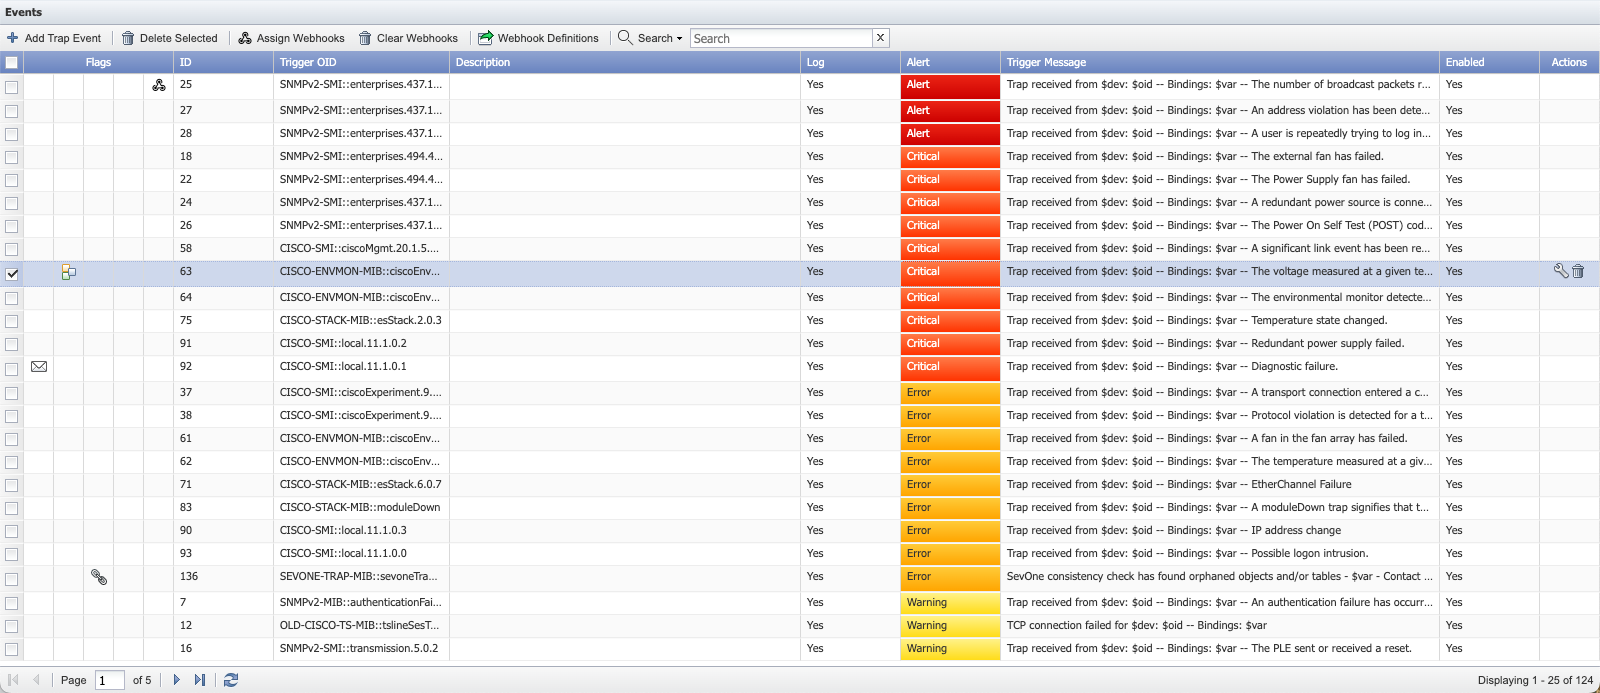
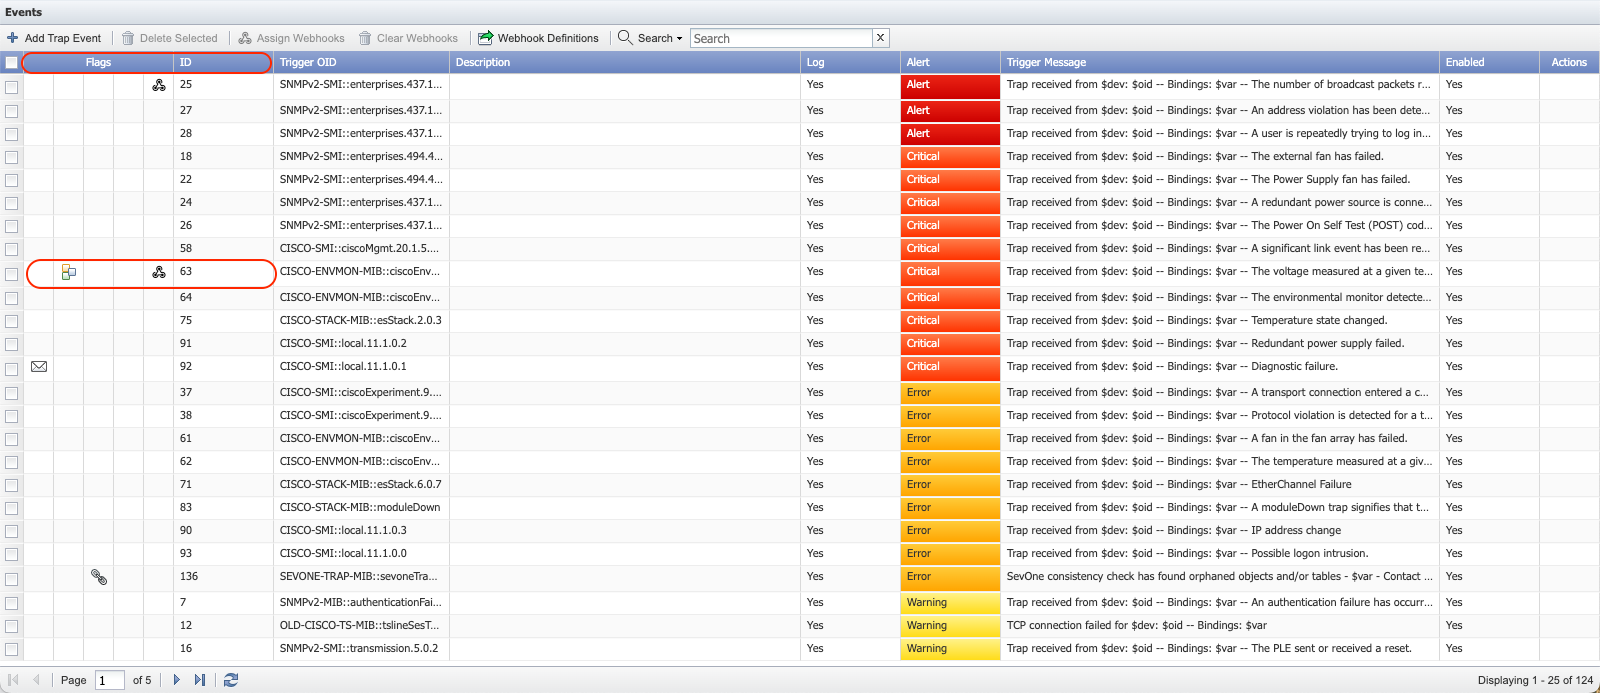
List of Trap Events
Each trap has a primary OID that designates the trap type. Each trap event has a target OID. When the trap primary OID matches the trap event target OID and any trap event variable conditions you define, the trap triggers the trap event. The list of trap events displays the following information.
-
Flags - can display the following flags. There are 5 columns under Flags.
-
column 1 - displays
 when trap event triggers an email.
 -
column 2 - displays
when trap event applies to specific Device Groups / Device Types. -
column 3 - displays
 when trap has variable conditions.
 -
column 4 - displays
 when trap has clear condition(s) assigned to it.
 -
column 5 - displays
when trap has webhook definition id(s) assigned to it.
-
-
ID – displays the internal identifier for the trap event which is helpful for API workflows.
-
Trigger OID - displays the resolved name of the trap event target OID.
-
Description - displays the general description for the selected trap event id.
-
Log - displays Yes when you define the trap event to display the trap on the Logged Traps page or displays No when the trap does not appear on the Logged Traps page.
-
Alert - displays the severity level for the alerts the trap triggers when you define the trap event to trigger an alert or displays No when you define the trap event to not trigger an alert.
-
Trigger Message - displays the message you define for the trap to display.
-
Enabled - displays Yes when the trap event is enabled or displays No when the trap event is disabled.