Table of Contents (Start)
- Topics
- Introducing SevOne
- Login
- Startup Wizard
- Dashboard
- Global Search - Advanced Search
- Report Manager
- Report Attachment Wizard
- Report Properties
- Report Interactions
- Instant Graphs
- TopN Reports
- Alerts
- Alert Archives
- Alert Summary
- Instant Status
- Status Map Manager
- Edit Maps
- View Maps
- FlowFalcon Reports
- NBAR Reports
- Logged Traps
- Unknown Traps
- Trap Event Editor
- Trap Destinations
- Trap Destination Associations
- Policy Browser
- Create and Edit Policies
- Webhook Definition Manager
- Threshold Browser
- Create and Edit Thresholds
- Probe Manager
- Discovery Manager
- Device Manager
- New Device
- Edit Device
- Object Manager
- High Frequency Poller
- Device Summary
- Device Mover
- Device Groups
- Object Groups
- Object Summary
- Object Rules
- VMware Browser
- AWS Plugin
- Azure Plugin (Public Preview)
- Calculation Plugin
- Database Manager
- Deferred Data Plugin
- DNS Plugin
- HTTP Plugin
- ICMP Plugin
- IP SLA Plugin
- JMX Plugin
- NAM
- NBAR Plugin
- Portshaker Plugin
- Process Plugin
- Proxy Ping Plugin
- SDWAN Plugin
- SNMP Plugin
- VMware Plugin
- Web Status Plugin
- WMI Plugin
- xStats Plugin
- Indicator Type Maps
- Device Types
- Object Types
- Object Subtype Manager
- Calculation Editor
- xStats Source Manager
- User Role Manager
- User Manager
- Session Manager
- Authentication Settings
- Preferences
- Cluster Manager
- Maintenance Windows
- Processes and Logs
- Metadata Schema
- Baseline Manager
- FlowFalcon View Editor
- Map Flow Objects
- FlowFalcon Views
- Flow Rules
- Flow Interface Manager
- MPLS Flow Mapping
- Network Segment Manager
- Flow Protocols and Services
- xStats Log Viewer
- SNMP Walk
- SNMP OID Browser
- MIB Manager
- Work Hours
- Administrative Messages
- Enable Flow Technologies
- Enable JMX
- Enable NBAR
- Enable SNMP
- Enable Web Status
- Enable WMI
- IP SLA
- SNMP
- SevOne Data Publisher
- Quality of Service
- Perl Regular Expressions
- Trap Revisions
- Integrate SevOne NMS With Other Applications
- Email Tips and Tricks
- SevOne NMS PHP Statistics
- SevOne NMS Usage Statistics
- Glossary and Concepts
- Map Flow Devices
- Trap v3 Receiver
- Guides
- Quick Start Guides
- AWS Quick Start Guide
- Azure Quick Start Guide (Public Preview)
- Data Miner Quick Start Guide
- Flow Quick Start Guide
- Group Aggregated Indicators Quick Start Guide
- IP SLA Quick Start Guide
- JMX Quick Start Guide
- Metadata Quick Start Guide
- RESTful API Quick Start Guide
- Self-monitoring Quick Start Guide
- SevOne NMS Admin Notifications Quick Start Guide
- SNMP Quick Start Guide
- Synthetic Indicator Types Quick Start Guide
- Topology Quick Start Guide
- VMware Quick Start Guide
- Web Status Quick Start Guide
- WMI Quick Start Guide
- xStats Quick Start Guide
- xStats Adapter - Accedian Vision EMS (TM) Quick Start Guide
- Deployment Guides
- Automated Build / Rebuild (Customer) Instructions
- Generate a Self-Signed Certificate or a Certificate Signing Request
- SevOne Best Practices Guide - Cluster, Peer, and HSA
- SevOne Data Platform Security Guide
- SevOne NMS Implementation Guide
- SevOne NMS Installation Guide - Virtual Appliance
- SevOne NMS Advanced Network Configuration Guide
- SevOne NMS Installation Guide
- SevOne NMS Port Number Requirements Guide
- SevOne NMS Upgrade Process Guide
- SevOne Physical Appliance Pre-Build BIOS and RAID Configuration Guide
- SevOne SAML Single Sign-On Setup Guide
- Cloud Platforms
- Other Guides
- Quick Start Guides
Device Types
The Device Types page enables you to use discovery to classify and organize devices. Starter set device types use topology metadata driven rules to automatically add devices that topology sources discover to applicable device types. Device types enable you to associate a collection of SNMP object types to multiple devices. Each device can belong to multiple device types. Device types enable you to organize devices for SNMP polling purposes which expedites policy definition and enables you to run manufacturer independent reports for similar but not identical objects. You can associate an icon to each device type for topology reports. Device types appear in all Device Group lists and provide an additional method to secure, sort, and filter devices. For details, please refer to section Device Group in SevOne NMS User Guide.
To access the Device Types page from the navigation bar, click the Administration menu, select Monitoring Configuration, and then select Device Types.
Device Type Hierarchy
The device type hierarchy appears on the left. First level device types display in alphabetical order under the parent All Device Types.
-
Select the device type under which to add a new device type.
-
Click Add Device Types to display a pop-up.
-
In the Device Type Name field, enter the device type name.
-
Click Save on the pop-up.
-
-
 - Click to edit the values for the metadata attributes you want to associate with the device types. See the Manage Metadata Values section below.
 -
 - Click to edit a device type name.
 -
Drag and drop device types to different places in the custom device type hierarchy.
-
 - Click to delete the device group. When you delete a device group that has associated policies, a message appears to inform you that associated policies will be deleted.
 -
On the message, click View Policies to display the Policy Association pop-up that lists the policies associated to the device group.
-
Click Done to move the policies.
-
-
Click
above the right side of the page to display the Upload Device Type Icon pop-up that enables you to associate an icon to the device type for display in Topology reports - please see section Report Interactions in SevOne NMS User Guide. Please refer to section Device Type Icons below for the list of starter set icons.
-
Click the Select File
 to display the File Upload pop-up.
 -
Navigate your file hierarchy and select the image file to upload.
-
Click Open to return to the Upload Device Type Icon pop-up.
-
Click Save to associate the image with the device type or click Remove Icon to remove the icon associated with the device type.
-
Manage Metadata Values
The
in the device type hierarchy Actions column provides access to the Edit Metadata pop-up that enables you to manage the values for the metadata attributes you want to associate with the device type. The Metadata Schema page enables you to manage metadata attributes.
-
Click
 in the Actions column to display the Edit Metadata pop-up.
 -
Click
 to make the Values field editable.
 -
In the Values field, enter the value for the attribute with the applicable attribute type specific format.
-
Date/Time: Must have a valid date and time format and can use natural language processing such as; 3 Thursdays ago at 5pm.
-
Integer: Type: Value must be numeric.
-
IP Address: Must use one of the following formats:
-
IPv4: for example, 10.1.1.100 or 172.16.254.1
-
IPv6: supports Zero Suppression format. For example, 2001:db8::1234::567:8:1 or 2601::0800:200c:417a
-
-
Latitude and Longitude: Must have valid coordinates that are decimal values: -90.00 to 90.00 values for Latitude and -180.00 to 180.00 for Longitude
-
MAC Address: Must use the following format: 0A:00:27:00:00:00
-
Text (Validated): Supports up to 1024 UTF-16 characters including PCRE regex that uses preg-match (perform a regular expression match) to validate the regular expression you enter against the attribute definition from the Metadata Schema page.
-
Text: Supports up to 65K UTF-16 varchar characters.
-
URL: Complete the following fields:
-
Link Display Text: Enter the text to display in reports as the link caption.
-
URL: Enter the URL. Must have FQDN validation, supports username prefix, ports, protocol AND ?/& for HTTP GET variables, and optional additional PCRE regex for validation, and must be fewer than 255 characters.
-
-
-
Click Update to save the value.
Device Type Membership Rules
The Device Type Membership Rules section enables you to define rules to automatically add devices to a device type from across multiple manufacturers/products that implement the same MIBs. Starter set rules automatically add devices to applicable device types for Topology reports - for details, please see section Report Interactions in SevOne NMS User Guide. Device type rules run during discovery to add the devices from which the SNMP plugin can poll the metrics you specify to the device types you create. You can manually pin devices to device types and the Device Manager also enables you to pin devices to device types. Rules are case sensitive and you can use Perl regular expressions to create rules.
-
Click on a device type in the hierarchy to display the device type membership rules in the upper section on the right.
-
Click Add Rule or click
to display the Add/Edit Device Type Membership Rule pop-up. Each rule requires only one field. If you populate several fields per rule, the criteria you enter in that rule are cumulative. Example: Enter Remote in the Name field and enter ^192\.168 in the Management IP Address field in the same rule criteria row. The device must have both Remote in the name AND an IP address that starts with 192.168 to be added to the device type.
-
Device Name - The device name (wildcards are implied).
-
Device Description - The device description.
-
Management IP Address - The IP address of the device (^192\.168 adds all devices whose IP address starts with 192.168).
-
sysDescr - The text you get when you SNMP walk the sysDescr OID.
-
sysContact - The text you get when you SNMP walk the sysContact OID.
-
sysLocation - The text you get when you SNMP walk the sysLocation OID.
-
sysName - The text you get when you walk the sysName OID.
-
sysObjectID - The text you get when you SNMP walk the sysObjectID OID.
-
Walkable OID - Enter the number of the OID to walk. Make sure that the OID can actually be walked. You may be able to get an OID and get a response. However, if you walk an OID and the result from the snmpgetnext falls outside of the OID tree, discovery won't add the device to the device type.
Examplegetnext .1.3.6.1.2.1.1.1.0 – get .1.3.6.1.2.1.1.2.0 - does not match the pattern .1.3.6.1.2.1.1.1.0.X
getnext .1.3.6.1.2.1.1.1 – get .1.3.6.1.2.1.1.1.1 - matches the pattern .1.3.6.1.2.1.1.1.X
-
-
Click Save to save the rule criteria.
-
Repeat these steps to add additional rules to use the OR Boolean.
Example: Enter Remote in the Name field in the first row in the rule table then click Create Rule. Enter ^192\.168 in the second row in the rule table. The device can have either Remote in the name OR an IP address that starts with 192.168 to be added to the device type.
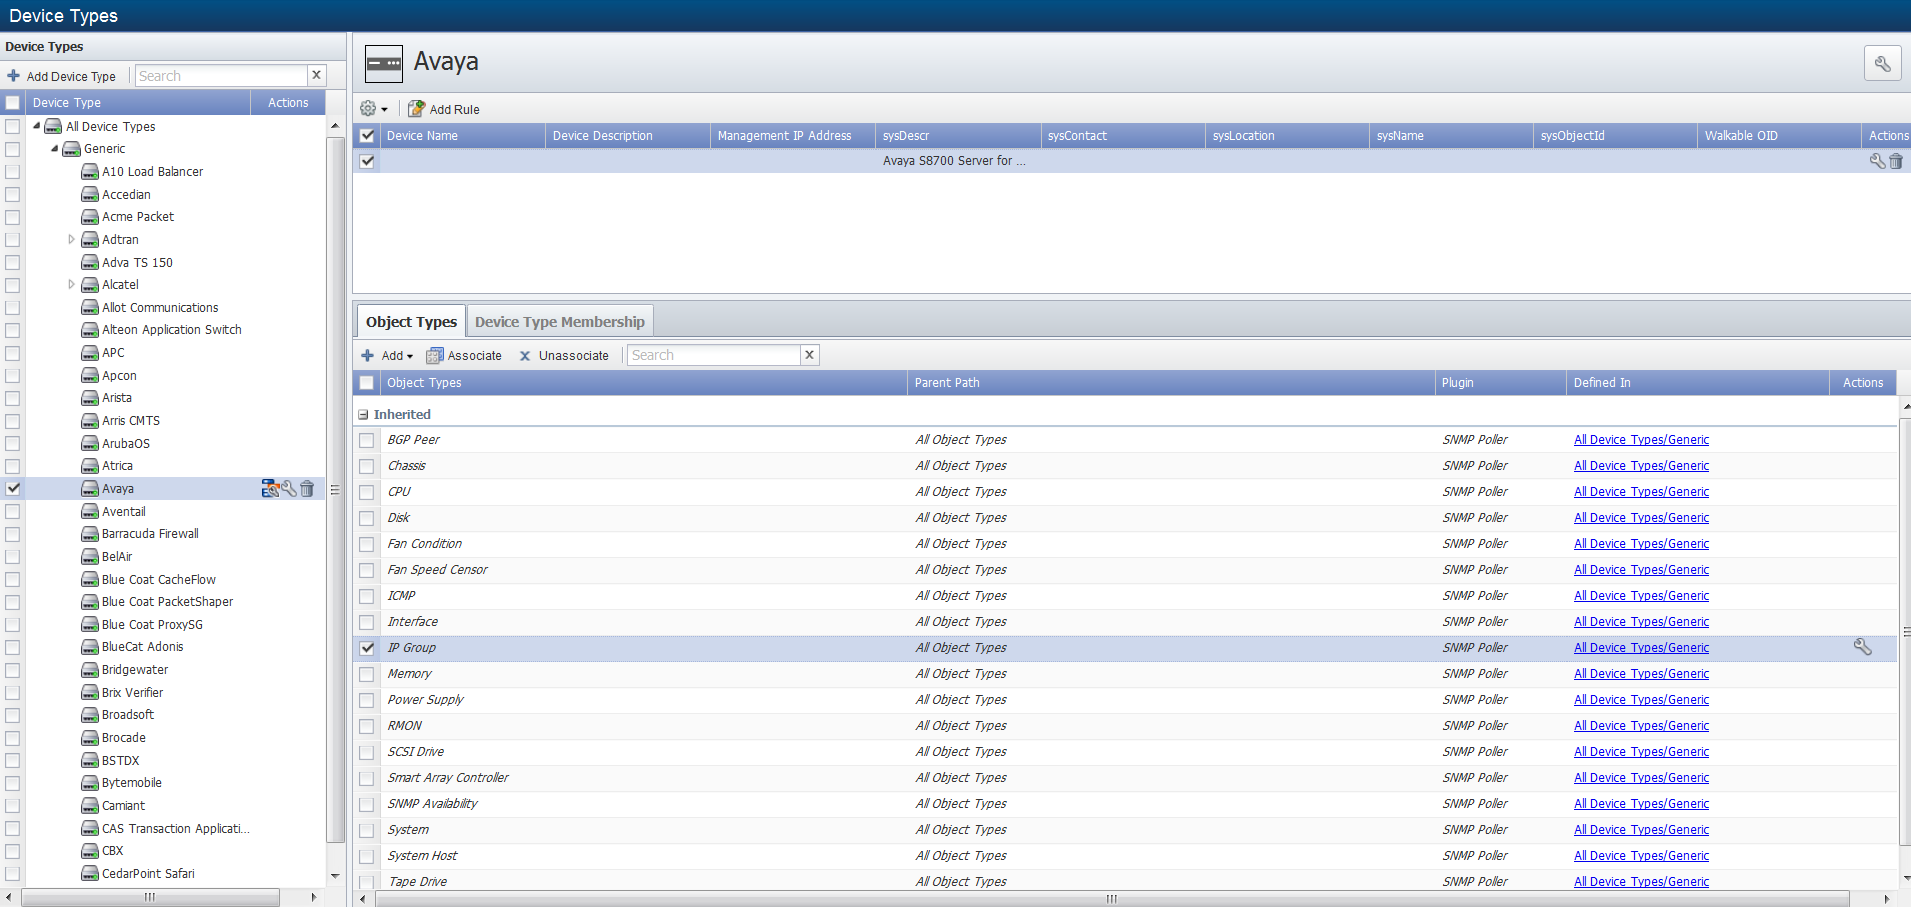
Object Types
The Object Types tab in the lower right section contains two groups of object types Inherited and Local. The Object Types tab displays the following information.
-
Object Types - Displays the list of object types that are associated to the device type.
-
Parent Path - Displays where the object type resides within the object type hierarchy.
-
Plugin - Displays the name of the plugin that polls the object type.
-
Defined In - Displays Local for object types that are defined at this level in the Device Type hierarchy or displays a link that navigates you to the level in the Device Types hierarchy from where the object type inherits its definition.
The Object Types tab enables you to associate the SNMP object types you want the SNMP plugin to attempt to poll on the devices that are members of the device type.
-
On the Object Types tab, click Associate to display the Associate pop-up.
-
Select the check box for each object type to poll on the devices that are members of the device type.
-
Click Associate on the pop-up to associate the object types to the device type.
Manage SNMP Object Types
The Object Types tab duplicates the functionality of Object Types page to enable you to add and edit SNMP object types. For additional details see the SNMP topic. For interfaces and most SNMP objects, there is an OID that is dedicated to provide the index number.
RFC1213-MIB::ifIndex.1 = INTEGER: 1
RFC1213-MIB::ifIndex.2 = INTEGER: 2
RFC1213-MIB::ifIndex.8 = INTEGER: 8
Each field on the Add/Edit SNMP Object Type pop-up has a corresponding check box on the right side to enable you to make changes at this level of the hierarchy and below. The changes you make when you select the right-hand check box override and do not affect the parent object type definition.
-
Click Add then SNMP or click
to display the Add/Edit SNMP Object Type pop-up. -
In the Name field, enter the object type name.
-
Click the Indexed By
 to display the SNMP OID Browser where you select the index OID.
 -
Select the Reverse Engineer check box to have instances of this object type be uniquely identified by evaluating the OID of the SNMP object specified in the Indexed By field, as opposed to its value. How the values encoded within the OID are evaluated is based on the configuration of the Index Keys field. You should leave this check box selected for the vast majority of object types.
-
The Index Keys fields enable you to select the index keys to use to determine how to treat the remaining octets after the index. In the Possible Values field, select index keys to assign to the object type (use Ctrl or Shift keys to multi-select) then move the index keys to the Index Keys field. Index keys in the Index Keys field are assigned to the object type and they display in the sequence in which they appear listed. Possible values include the following:
-
Integer - A single number that indicates there is a constant amount of numbers following each OID.
-
String - A string prefixed with the string length. This typically appears with double quotes.
-
String (Implied) - A string with no length information. This must only occur as the last index value.
-
Variable - A variable amount of numbers prefixed with the amount of items. This is typically used for IPv4 versus IPv6 indexes.
-
Variable (Implied) - A Variable amount of numbers, but with no length information. This must occur as the last index value. This can be used to eat up the remainder of the index.
-
-
Click the Name Expression
to display the SNMP OID Browser where you select the OID that results in a unique name for all object types on a device. -
Click the Description Expression
to display the SNMP OID Browser where you select the OID to add additional information about the object type. -
Click the Subtype
to display the SNMP OID Browser where you select the OID to define a subtype for the object type (used for thresholds and reports). This can generate the following variables:
-
- [TYPE]: The numerical value of the subtype.
-
- [TYPE]: The name of the subtype.
-
- [TYPE]: The description of the subtype.
-
-
Click the Assert
to display the SNMP OID Browser where you select the OID to use in the assert expression that generates a list of individual object indexes. This is skipped if the object does not pass the assert expression. No variables are generated. -
Click the Last-change OID
to display the SNMP OID Browser where you select the OID to use to determine if a change was made to the object type since it was last polled. If the object type changed, the SNMP plugin invalidates the current data. -
Click the Admin-status
to display the SNMP OID Browser where you select the OID to use to determine the administrative status of the object. -
Click the Oper-status
to display the SNMP OID Browser where you select the OID to use to determine the operational status of the object. -
In the Variable field, enter the variables, expressions, and operators you want to use to evaluate first for use with the other fields.
-
Click Edit Subtypes to display the Object Subtype Manager where you manage the object subtypes.
-
Click Save.
Device Type Membership
The Device Type Membership tab displays the devices that are members of the device type. When you pin a device to a device type, rules do not affect the device's membership and you must manually unpin the device to remove its membership. When a rule adds a device to a device type, if you change the rule, the devices that were added by the rule can automatically be removed from the device type.
-
 - Indicates the device is a member that was pinned to the device type at this level.
 -
 - Indicates the device is a member that was added by a device type membership rule at this level.
Membership Management
The following tools enable you to manage the devices that are members of the device type you select in the hierarchy.
-
Click Pin Devices to display a pop-up that displays all devices in SevOne NMS.
-
Select the check box for each device to pin to the device type.
-
Click Pin to Type on the pop-up to pin the devices you select to the device type.
-
-
Select the check box for each device to unpin from the device type and click Unpin Devices. If you pin a device that was added by a rule, when you unpin the device it is removed from the membership list. If you do not change the rule, the device appears in the list again upon the next discovery.
-
Click
in the Actions column to display the Edit Metadata pop-up. See the Manage Metadata Values section above.
Device Type Icons
Topology related device types use the following icons by default. You can change the icon from the
as described above.
|
|
|
|
|
|
|
|
|
|
|
|
|
|
|
|
|
|
|
|
|
|
|
|
|
 - Bridge
  - Cloud
  - Cloud No Access
  - Computer
  - Computers
  - Controller
  - Device
  - Firewall
  - Host
  - PBX
- PBX  - Printer
  - Rack
  - Switch
  - UPS
- UPS  - User
  - Users
  - VM
- VM  - Wireless