Table of Contents (Start)
- Topics
- Introducing SevOne
- Login
- Startup Wizard
- Dashboard
- Global Search - Advanced Search
- Report Manager
- Report Attachment Wizard
- Report Properties
- Report Interactions
- Instant Graphs
- TopN Reports
- Alerts
- Alert Archives
- Alert Summary
- Instant Status
- Status Map Manager
- Edit Maps
- View Maps
- FlowFalcon Reports
- NBAR Reports
- Logged Traps
- Unknown Traps
- Trap Event Editor
- Trap Destinations
- Trap Destination Associations
- Policy Browser
- Create and Edit Policies
- Webhook Definition Manager
- Threshold Browser
- Create and Edit Thresholds
- Probe Manager
- Discovery Manager
- Device Manager
- New Device
- Edit Device
- Object Manager
- High Frequency Poller
- Device Summary
- Device Mover
- Device Groups
- Object Groups
- Object Summary
- Object Rules
- VMware Browser
- AWS Plugin
- Azure Plugin (Public Preview)
- Calculation Plugin
- Database Manager
- Deferred Data Plugin
- DNS Plugin
- HTTP Plugin
- ICMP Plugin
- IP SLA Plugin
- JMX Plugin
- NAM
- NBAR Plugin
- Portshaker Plugin
- Process Plugin
- Proxy Ping Plugin
- SDWAN Plugin
- SNMP Plugin
- VMware Plugin
- Web Status Plugin
- WMI Plugin
- xStats Plugin
- Indicator Type Maps
- Device Types
- Object Types
- Object Subtype Manager
- Calculation Editor
- xStats Source Manager
- User Role Manager
- User Manager
- Session Manager
- Authentication Settings
- Preferences
- Cluster Manager
- Maintenance Windows
- Processes and Logs
- Metadata Schema
- Baseline Manager
- FlowFalcon View Editor
- Map Flow Objects
- FlowFalcon Views
- Flow Rules
- Flow Interface Manager
- MPLS Flow Mapping
- Network Segment Manager
- Flow Protocols and Services
- xStats Log Viewer
- SNMP Walk
- SNMP OID Browser
- MIB Manager
- Work Hours
- Administrative Messages
- Enable Flow Technologies
- Enable JMX
- Enable NBAR
- Enable SNMP
- Enable Web Status
- Enable WMI
- IP SLA
- SNMP
- SevOne Data Publisher
- Quality of Service
- Perl Regular Expressions
- Trap Revisions
- Integrate SevOne NMS With Other Applications
- Email Tips and Tricks
- SevOne NMS PHP Statistics
- SevOne NMS Usage Statistics
- Glossary and Concepts
- Map Flow Devices
- Trap v3 Receiver
- Guides
- Quick Start Guides
- AWS Quick Start Guide
- Azure Quick Start Guide (Public Preview)
- Data Miner Quick Start Guide
- Flow Quick Start Guide
- Group Aggregated Indicators Quick Start Guide
- IP SLA Quick Start Guide
- JMX Quick Start Guide
- Metadata Quick Start Guide
- RESTful API Quick Start Guide
- Self-monitoring Quick Start Guide
- SevOne NMS Admin Notifications Quick Start Guide
- SNMP Quick Start Guide
- Synthetic Indicator Types Quick Start Guide
- Topology Quick Start Guide
- VMware Quick Start Guide
- Web Status Quick Start Guide
- WMI Quick Start Guide
- xStats Quick Start Guide
- xStats Adapter - Accedian Vision EMS (TM) Quick Start Guide
- Deployment Guides
- Automated Build / Rebuild (Customer) Instructions
- Generate a Self-Signed Certificate or a Certificate Signing Request
- SevOne Best Practices Guide - Cluster, Peer, and HSA
- SevOne Data Platform Security Guide
- SevOne NMS Implementation Guide
- SevOne NMS Installation Guide - Virtual Appliance
- SevOne NMS Advanced Network Configuration Guide
- SevOne NMS Installation Guide
- SevOne NMS Port Number Requirements Guide
- SevOne NMS Upgrade Process Guide
- SevOne Physical Appliance Pre-Build BIOS and RAID Configuration Guide
- SevOne SAML Single Sign-On Setup Guide
- Cloud Platforms
- Other Guides
- Quick Start Guides
Enable JMX
Java Management Extensions (JMX) is a Java specification technology (defined in JSR-160) that provides a standard means for Java applications to publish indicators to JMX compliant management and monitoring systems.
This topic describes how to enable JMX devices to send JMX data to SevOne NMS. This workflow is outside of the SevOne NMS application and may not present all of the steps your network requires to enable devices to send JMX data. If the following instructions are not applicable for your network please reference the device manufacturer's documentation.
Related SevOne NMS workflows include the following.
-
The Device Manager provides access to the New Device page and the Edit Device page where you enable the JMX plugin for a device.
-
The Object Types page enables you to enable or disable the JMX object types and indicator types you want the JMX plugin to poll in your network.
-
The Indicator Type Map page enables you to enable or disable the device specific indicators you want the JMX plugin to poll.
Send JMX Data to SevOne NMS
Enter the following command on the JMX device.
Hostname –i
The result should not equal 127.0.0.1
Tomcat
Enter the following commands for the Tomcat Startup script.
JAVA_OPTS="$JAVA_OPTS -Dcom.sun.management.jmxremote"
JAVA_OPTS="$JAVA_OPTS -Dcom.sun.management.jmxremote.port=8007"
JAVA_OPTS="$JAVA_OPTS -Dcom.sun.management.jmxremote.authenticate=false"
JAVA_OPTS="$JAVA_OPTS -Dcom.sun.management.jmxremote.ssl=false"
JAVA_OPTS="$JAVA_OPTS -Djava.rmi.server.hostname=192.168.50.213"
WebLogic
Enter the following commands for the WebLogic Startup script.
/opt/Oracle/Middleware/wlserver_10.3/samples/domains/wl_server/bin/startWebLogic.sh
JAVA_OPTIONS="$JAVA_OPTIONS -Dcom.sun.management.jmxremote"
JAVA_OPTIONS="$JAVA_OPTIONS -Dcom.sun.management.jmxremote.port=8007"
JAVA_OPTIONS="$JAVA_OPTIONS -Dcom.sun.management.jmxremote.authenticate=false"
JAVA_OPTIONS="$JAVA_OPTIONS -Dcom.sun.management.jmxremote.ssl=false"
JAVA_OPTIONS="$JAVA_OPTIONS -Djava.rmi.server.hostname=192.168.30.251"
JAVA_OPTIONS="$JAVA_OPTIONS -Djavax.management.builder.initial=weblogic.management.jmx.mbeanserver.WLSMBeanServerBuilder"
You must also enable this on the Administrative page.
domain -> Configuration -> general (Advanced) , usePlatformMBean , exportPlatformMBean
JBoss
Enter the following commands to enable JBoss to send JMX data. Change the hostname and IP to /etc/hosts to connect. The servername cannot be listed under 127.0.0.1
In /opt/jboss/bin/run.sh add #Setup jmx remoting
JAVA_OPTS="$JAVA_OPTS -Dcom.sun.management.jmxremote.authenticate=false"
JAVA_OPTS="$JAVA_OPTS -Dcom.sun.management.jmxremote.ssl=false"
JAVA_OPTS="$JAVA_OPTS -Dcom.sun.management.jmxremote.port=8007"
Use the JBoss MBeanServerBuilder.
JAVA_OPTS="$JAVA_OPTS -Djboss.platform.mbeanserver"
JAVA_OPTS="$JAVA_OPTS -Djavax.management.builder.initial=org.jboss.system.server.jmx.MBeanServerBuilderImpl"
Use the jboss logmanager.
JAVA_OPTS="$JAVA_OPTS -Djava.util.logging.manager=org.jboss.logmanager.LogManager"
JAVA_OPTS="$JAVA_OPTS -Dorg.jboss.logging.Logger.pluginClass=org.jboss.logging.logmanager.LoggerPluginImpl"
JBOSS_CLASSPATH="../lib/jboss-logmanager.jar"
GlassFish
Increase the monitoring to HIGH on the Web Admin page and enter the following commands to enable GlassFish v 3.1 to send JMX data.
In the domain configuration file /glassfish/domains/domain1/config/domain.xml find <java-config> and add:
-Dcom.sun.management.jmxremote.ssl=false
-Dcom.sun.management.jmxremote.authenticate=false
Then find <admin-service> and add/modify:
<jmx-connector accept-all="true" port="8007" address="0.0.0.0" security-enabled="false" name="system" auth-realm-name="admin-realm" />
WebSphere 6.1
Enter the following commands for WebSphere 6.1.
Install the server { yum install compat-libstdc++-* libXp libXmu }
Run the server { /etc/init.d/webspherejmxserverNode01_was.init start }
Log in via the admin console and make sure the JMX RMI connection is established.
Use the Python script ListPorts to get the admin port. { ./wsadmin.sh -conntype none -lang jython -profileName AppSrv01 -f /opt/ListPorts.py }
Log into the server { admin:admin }
Back to the CLI, disable security.
{
./wsadmin.sh -conntype NONE
wsadmin>securityoff
wsadmin>$AdminConfig save
}
Connect with the following script.
#!/bin/bash
HOST=
PORT=
WAS_HOME=/home/dkozlowski/IBM/WebSphere/AppServer
CLIENTSAS="-Dcom.ibm.CORBA.ConfigURL=file:`pwd`/sas.client.props"
PROVIDER="-Djava.naming.provider.url=corbaname:iiop:$HOST:$PORT"
PROPS=
#PROPS="$PROPS $CLIENTSAS"
#PROPS="$PROPS $PROVIDER"
CLASSPATH=
CLASSPATH="$CLASSPATH:$WAS_HOME/java/lib/tools.jar"
CLASSPATH="$CLASSPATH:$WAS_HOME/runtimes/com.ibm.ws.admin.client_7.0.0.jar"
CLASSPATH="$CLASSPATH:$WAS_HOME/runtimes/com.ibm.ws.ejb.thinclient_7.0.0.jar"
CLASSPATH="$CLASSPATH:$WAS_HOME/runtimes/com.ibm.ws.orb_7.0.0.jar"
CLASSPATH="$CLASSPATH:$WAS_HOME/java/lib/jconsole.jar"
URL=service:jmx:iiop://$HOST:$PORT/jndi/JMXConnector
java -classpath $CLASSPATH $PROPS sun.tools.jconsole.JConsole $URL
WebSphere 8.5
WebSphere JMX Configuration
-
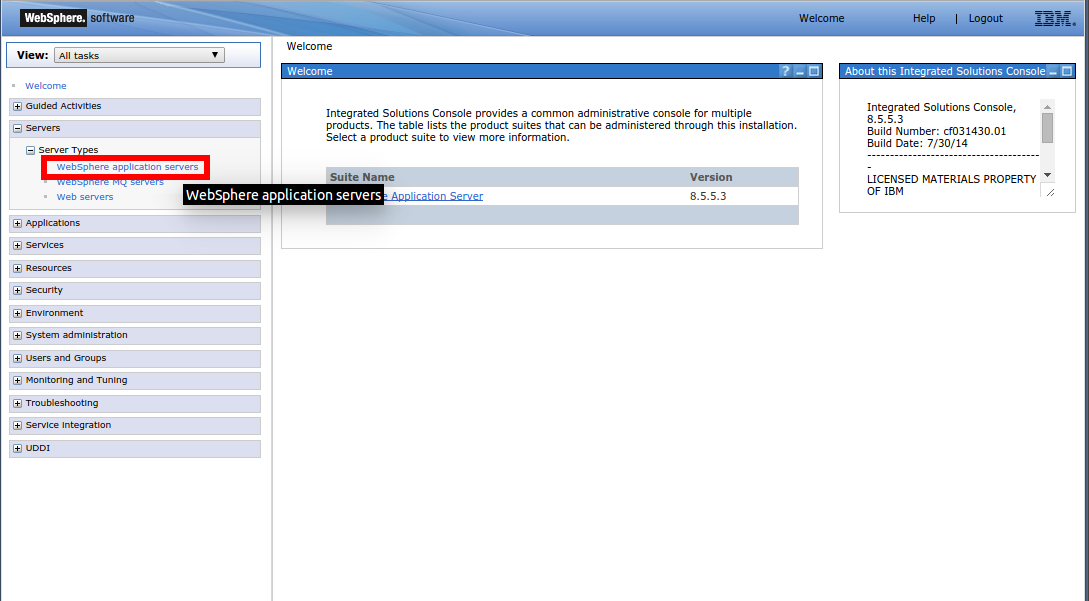
Log on to the WebSphere Admin Console.
-
Click Servers on the left to expand the Servers options.
-
Click Server Types to display the Server Types options.
-
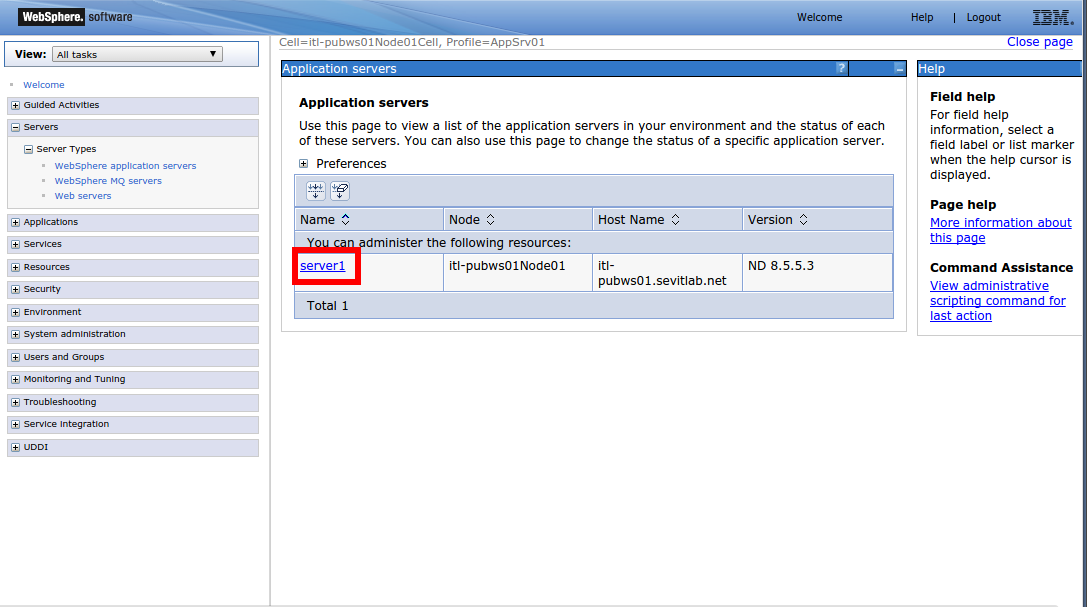
Click the WebSphere Application Servers link to display the application servers on the right.
-
Click on the server to administer.
-
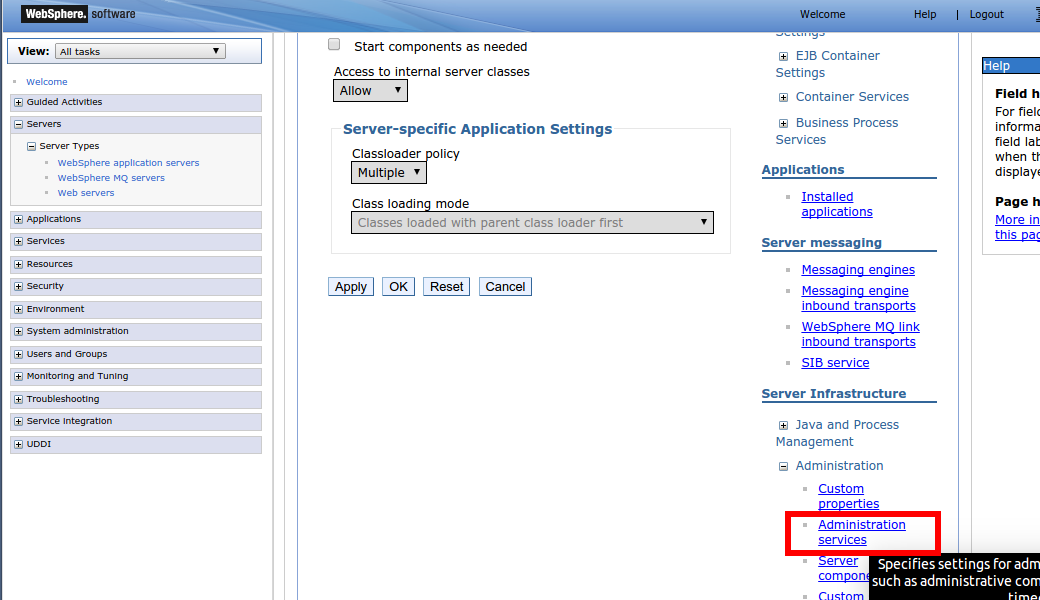
On the right in the Server Infrastructure section, click Administration Services to display the Administration Services options.
-
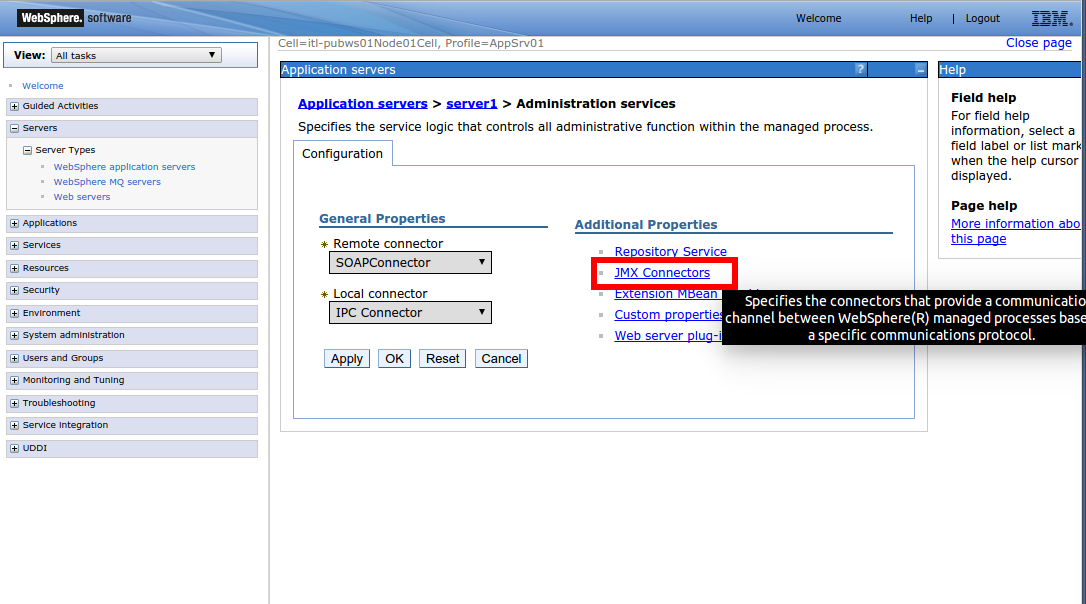
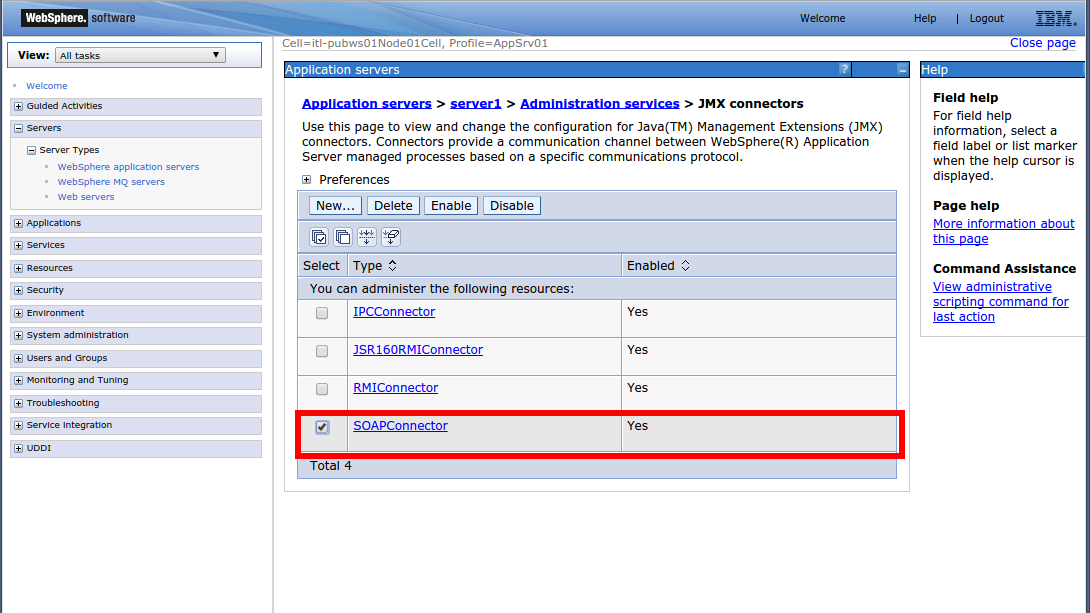
In the Additional Properties section, click JMX Connectors.
-
Select the SOAPConnector check box, if needed.
-
Return to the previous page.
-
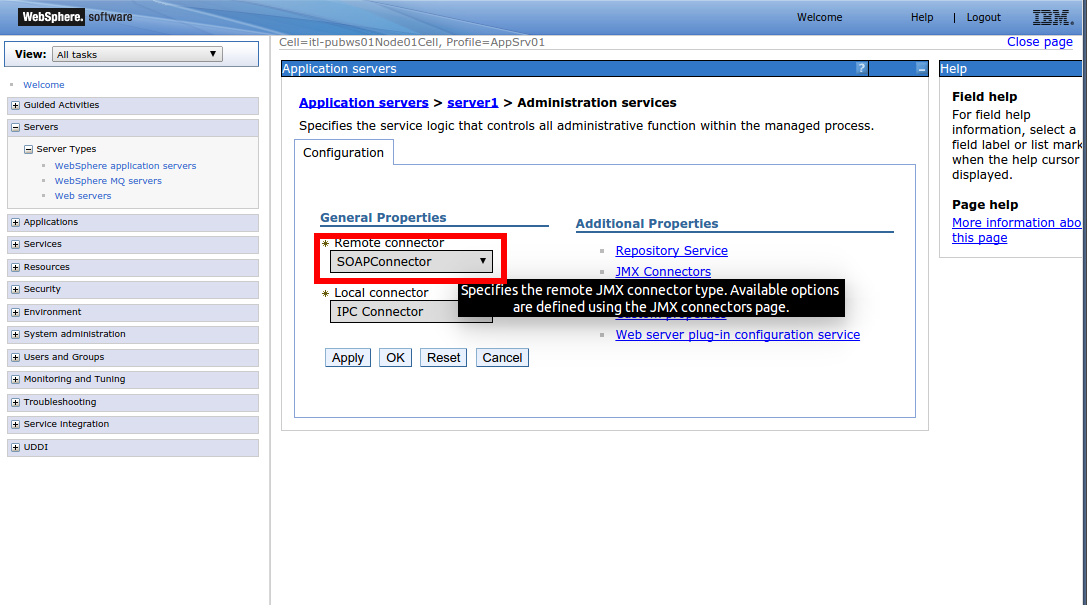
In the General Properties section, click the Remote Connector drop-down and select SOAPConnector.
-
Click Apply.
-
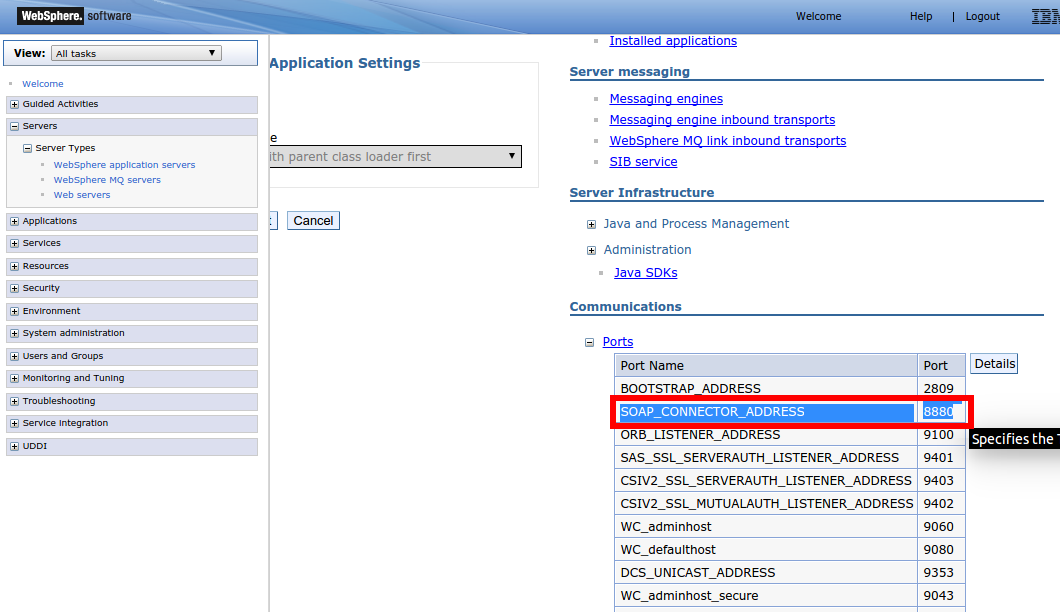
Return to the Servers page to find the port for SevOne NMS to use to monitor the device.
-
In the Communications section, click Ports to expand the Ports list.
-
Make a note of the SOAP_CONNECTOR_ADDRESS port number. This port number is used for the device on the Edit Device page.