Table of Contents (Start)
- Topics
- Introducing SevOne
- Login
- Startup Wizard
- Dashboard
- Global Search - Advanced Search
- Report Manager
- Report Attachment Wizard
- Report Properties
- Report Interactions
- Instant Graphs
- TopN Reports
- Alerts
- Alert Archives
- Alert Summary
- Instant Status
- Status Map Manager
- Edit Maps
- View Maps
- FlowFalcon Reports
- NBAR Reports
- Logged Traps
- Unknown Traps
- Trap Event Editor
- Trap Destinations
- Trap Destination Associations
- Policy Browser
- Create and Edit Policies
- Webhook Definition Manager
- Threshold Browser
- Create and Edit Thresholds
- Probe Manager
- Discovery Manager
- Device Manager
- New Device
- Edit Device
- Object Manager
- High Frequency Poller
- Device Summary
- Device Mover
- Device Groups
- Object Groups
- Object Summary
- Object Rules
- VMware Browser
- AWS Plugin
- Azure Plugin (Public Preview)
- Calculation Plugin
- Database Manager
- Deferred Data Plugin
- DNS Plugin
- HTTP Plugin
- ICMP Plugin
- IP SLA Plugin
- JMX Plugin
- NAM
- NBAR Plugin
- Portshaker Plugin
- Process Plugin
- Proxy Ping Plugin
- SDWAN Plugin
- SNMP Plugin
- VMware Plugin
- Web Status Plugin
- WMI Plugin
- xStats Plugin
- Indicator Type Maps
- Device Types
- Object Types
- Object Subtype Manager
- Calculation Editor
- xStats Source Manager
- User Role Manager
- User Manager
- Session Manager
- Authentication Settings
- Preferences
- Cluster Manager
- Maintenance Windows
- Processes and Logs
- Metadata Schema
- Baseline Manager
- FlowFalcon View Editor
- Map Flow Objects
- FlowFalcon Views
- Flow Rules
- Flow Interface Manager
- MPLS Flow Mapping
- Network Segment Manager
- Flow Protocols and Services
- xStats Log Viewer
- SNMP Walk
- SNMP OID Browser
- MIB Manager
- Work Hours
- Administrative Messages
- Enable Flow Technologies
- Enable JMX
- Enable NBAR
- Enable SNMP
- Enable Web Status
- Enable WMI
- IP SLA
- SNMP
- SevOne Data Publisher
- Quality of Service
- Perl Regular Expressions
- Trap Revisions
- Integrate SevOne NMS With Other Applications
- Email Tips and Tricks
- SevOne NMS PHP Statistics
- SevOne NMS Usage Statistics
- Glossary and Concepts
- Map Flow Devices
- Trap v3 Receiver
- Guides
- Quick Start Guides
- AWS Quick Start Guide
- Azure Quick Start Guide (Public Preview)
- Data Miner Quick Start Guide
- Flow Quick Start Guide
- Group Aggregated Indicators Quick Start Guide
- IP SLA Quick Start Guide
- JMX Quick Start Guide
- Metadata Quick Start Guide
- RESTful API Quick Start Guide
- Self-monitoring Quick Start Guide
- SevOne NMS Admin Notifications Quick Start Guide
- SNMP Quick Start Guide
- Synthetic Indicator Types Quick Start Guide
- Topology Quick Start Guide
- VMware Quick Start Guide
- Web Status Quick Start Guide
- WMI Quick Start Guide
- xStats Quick Start Guide
- xStats Adapter - Accedian Vision EMS (TM) Quick Start Guide
- Deployment Guides
- Automated Build / Rebuild (Customer) Instructions
- Generate a Self-Signed Certificate or a Certificate Signing Request
- SevOne Best Practices Guide - Cluster, Peer, and HSA
- SevOne Data Platform Security Guide
- SevOne NMS Implementation Guide
- SevOne NMS Installation Guide - Virtual Appliance
- SevOne NMS Advanced Network Configuration Guide
- SevOne NMS Installation Guide
- SevOne NMS Port Number Requirements Guide
- SevOne NMS Upgrade Process Guide
- SevOne Physical Appliance Pre-Build BIOS and RAID Configuration Guide
- SevOne SAML Single Sign-On Setup Guide
- Cloud Platforms
- Other Guides
- Quick Start Guides
User Role Manager
The User Role Manager enables you to define the permissions, device/device group/device type access, and user/user role access that enables you to restrict what users can do and see in the application. User roles are hierarchical. Each lower level (child) user role can have either the same permissions as its parent user role or a subset of the permissions of its parent user role. You can assign users to multiple roles.
To access the User Role Manager from the navigation bar, click the Administration menu, select Access Configuration, and then select User Role Manager.
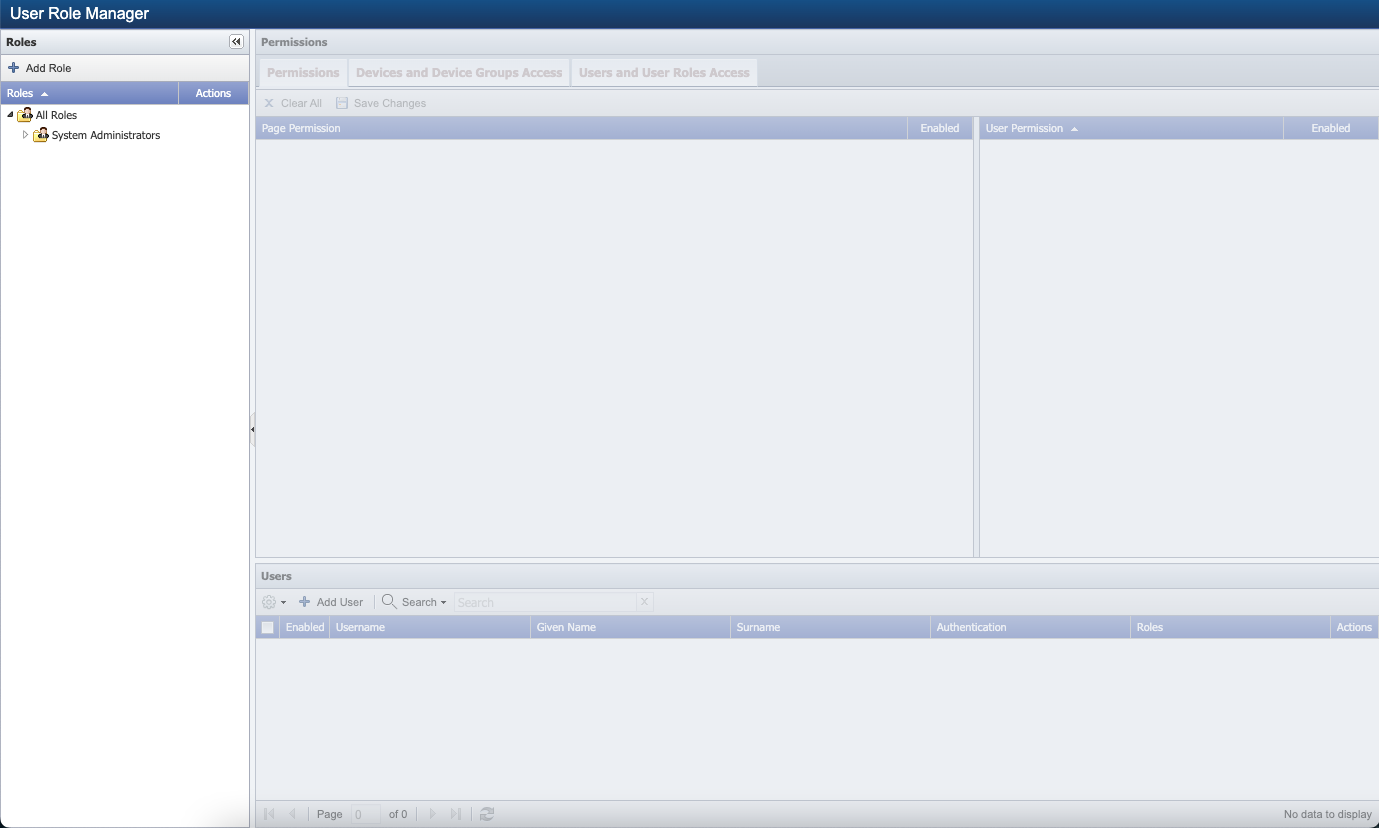
Roles
The user roles to which you are granted Role View permission appear in the role hierarchy on the left side. The Users and User Roles Access tab enables you to define roles that have access to view roles but not edit roles that are above their role in the hierarchy.
-
Click Add Role or
 to display the Add/Edit Role pop-up.
 To edit an existing user role, select the role from the role hierarchy and click
to display the Edit Role pop-up. You can edit the user role name and description. While editing a role, parent cannot be changed. Example: Add / Edit User Role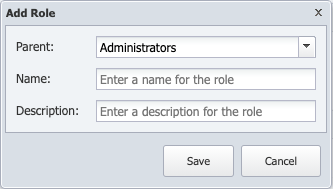

-
For a new role, click the Parent drop-down and select the role under which to add the role in the role hierarchy. You cannot edit this field after you click Save.
-
In the Name field, enter the name of the role.
-
In the Description field, enter a description for the role.
-
Click Save.
LDAP groups are associated with SevOne User Roles nested in the LDAP folder. The LDAP sync process will automatically perform the following actions:
-
Create or delete User Roles within the LDAP folder hierarchy for any LDAP groups present during the sync.
-
Create new user accounts for any users present in the LDAP groups.
-
Add or remove User Roles to individual user accounts based on their LDAP group assignment.
LDAP roles created by the sync will have no permissions by default and must be maintained manually. If LDAP group assignment is changed for a user, the next LDAP sync will modify the user's roles in the NMS accordingly.
User roles not nested within the LDAP roles folder can be assigned to LDAP users but require manual management by an administrator.
Permissions
The Permissions section provides three tabs (Permissions, Devices and Device Groups Access, and Users and User Roles Access) to enable you to define the permissions for each role. All permissions are cumulative and each tab provides a subset of the permissions a user needs to perform tasks.
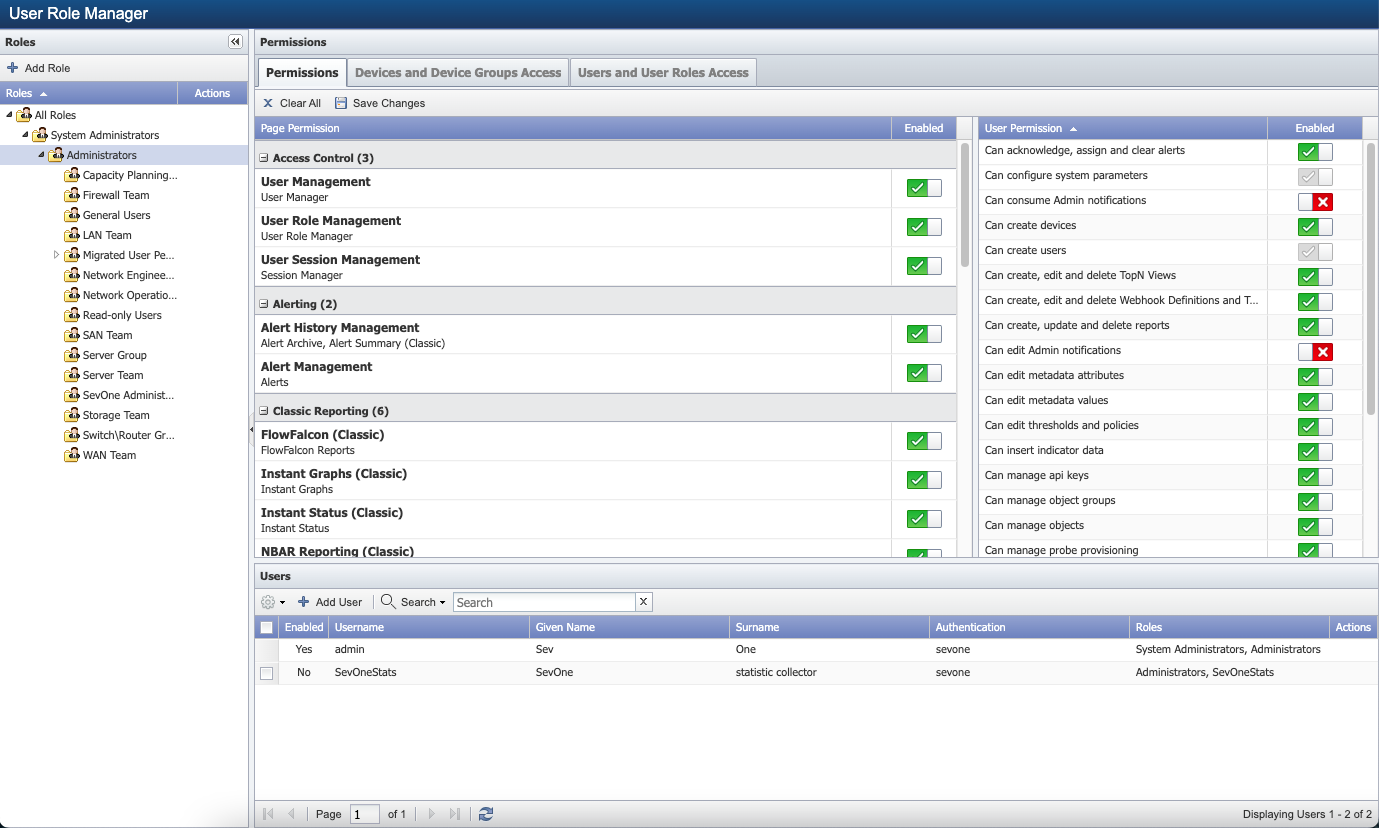
To enable users to acknowledge, assign, and clear alerts, the user role must have:
-
Permissions
-
Page Permission - alert management.
-
User Permission - can Acknowledge, Assign, and Clear Alerts, and Can View Alerts.
-
-
Devices and Device Groups Access - enable access to device groups/device types that contain the devices from which the user is to be able to manage alerts.
If a Device Group is moved from one parent to another, the permissions for that device group are changed to inherit the permissions from the new parent.
-
Users and User Roles Access - enable access to user roles that contain the users to which the user is to assign alerts.
As you enable permissions for higher level user roles, the same permission becomes available for the subordinate user roles. Conversely, when you disable permissions, the corresponding permissions are no longer available for the subordinate user roles.
If user belongs to multiple user roles and one role has user permissions whereas the other role does not, then the role which has the user permissions will take the precedence.
The following buttons appear below the Permissions tabs.
-
Click Clear All to reset the permissions on all tabs to their last saved settings.
-
Click Save Changes to save the changes made to all permissions on all tabs.
Page Permission and User Permission
The Permissions tab enables you to define which pages in SevOne NMS users assigned to the role can access and what the user can do on those pages. Additional Devices and Device Groups permissions and/or Users and User Roles permissions are required to actually see device data on the page. In other words, access to pages does not necessarily enable users to see or do anything on that page.
Page Permission
The Page Permission section enables you to grant users access to view applicable pages. As you enable page permissions, the corresponding minimum user permissions are enabled. You can enable additional user permissions when you feel they are applicable but you cannot disable the minimal user permission the page requires.
You can grant a role the user permission Can Acknowledge, Assign, and Clear Alerts but if you do not enable the page permission to the Alerts page, the users in the role cannot see the workflows in the application that provide the ability to acknowledge, assign, or clear alerts.
Perform the following steps to manage the page permissions for a role.
-
In the Roles hierarchy, select a role to populate the Permissions tabs with the permissions for the role you select.
-
Select the Permissions tab, if needed.
-
In the Page Permission column, enable each permission to grant the users access to the pages listed.
When you disable all page permissions, an enabled user has permission to access the following pages.
-
My Preferences (Please refer to section Preferences in SevOne NMS User Guide for details).
Access Control
-
Enable User Management to grant access to: User Manager.
-
Corresponding User Permissions: Can create users
-
-
Enable User Role Management to grant access to: User Role Manager.
-
Corresponding User Permissions: Can create users
-
-
Enable User Session Management to grant access to: Session Manager.
-
Corresponding User Permissions: None
-
Alerting
-
Enable Alert History Management to grant access to: Alert Archives and Alert Summary.
-
Corresponding User Permissions: Can view alert history, Can view alerts, Can view reports
-
-
Enable Alert Management to grant access to: Alerts.
-
Corresponding User Permissions: Can view alerts, Can view reports
-
Classic Reporting
-
Enable FlowFalcon (classic) to grant access to FlowFalcon Reports.
-
Corresponding User Permissions: Can view flow data, Can view reports
-
-
Enable Instant Graphs (classic) to grant access to: Instant Graphs.
-
Corresponding User Permissions: Can view reports
-
-
Enable Instant Status (classic) to grant access to: Instant Status.
-
Corresponding User Permissions: Can view alerts, Can view reports
-
-
Enable NBAR Reporting (classic) to grant access to: NBAR Reports.
-
Corresponding User Permissions: Can view reports
-
-
Enable Status Maps (classic) to grant access to: Status Map Manager.
-
Corresponding User Permissions: Can view alerts, Can view reports
-
-
Enable TopN (classic) to grant access to: TopN Reports.
-
Corresponding User Permissions: Can view reports
-
Device Management
-
Enable Device Manager to grant access to: Device Manager and SNMP Walk.
-
Corresponding User Permissions: None. You can enable the Can create devices user permission to grant users the ability to manage devices. The Devices and Device Groups Access tab enables you to limit which devices users can see.
-
-
Enable Discovery Management to grant access to: Discovery Manager.
-
Corresponding User Permissions: None. You can enable the Can create devices user permission to grant users permission to manage devices. The Devices and Device Groups Access tab enables you to limit which devices users can see.
-
-
Enable Probe Provisioning to grant access to: Probe Manager and the Proxy Ping configuration on the Edit Device page.
-
Corresponding User Permissions: None
-
-
Enable VMware Browser to grant access to: VMware Browser.
-
Corresponding User Permissions: None - Limits set from Devices and Device Groups Access tab
-
Metadata
-
Enable Metadata Attributes to grant access to: Metadata Schema.
-
Corresponding User Permissions: Requires Can edit metadata attributes to edit the metadata attributes this page permission enables you to view.
-
-
Enable Metadata Values to grant access to the Edit Metadata workflow from the following pages: Device Types, Device Groups, Device Manager, Edit Device, Object Types, and Object Manager.
-
Corresponding User Permissions: Requires Can edit metadata values to edit the values this page permission enables you to view.
-
Other
-
Enable Device Group Manager to grant access to: Device Groups.
-
Corresponding User Permissions: None - Limits set from Devices and Device Groups Access tab
-
-
Enable Object Manager to grant access to: Object Manager.
-
Corresponding User Permissions: None - Limits set from Devices and Device Groups Access tab
-
-
Enable Report Manager to grant access to: Report Attachment Wizard and Report Manager.
-
Corresponding User Permissions: Can view reports
-
System Administration
-
Enable Cluster Configuration to grant access to: Authentication Settings, Baseline Manager, Cluster Manager, Device Mover, and Work Hours.
-
Corresponding User Permissions: Can configure system parameters
-
-
Enable Flow Monitoring Configuration to grant access to: Flow Interface Manager, Flow Rules, FlowFalcon View Editor, MPLS Flow Mapping, Network Segment Manager, Object Mapping, and Protocols and Services.
-
Corresponding User Permissions: Can configure system parameters
-
-
Enable Maintenance Window Configuration to grant access to: Maintenance Window Manager.
-
Corresponding User Permissions: Can configure system parameters
-
-
Enable Object Group Manager to grant access to: Object Groups.
-
Corresponding User Permissions: Can configure system parameters
-
-
Enable Polling Configuration to grant access to: Calculation Editor, Device Types, MIB Manager, Object Rules, Object Subtype Manager, Object Types, and SNMP OID Browser.
-
Corresponding User Permissions: Can configure system parameters
-
-
Enable Threshold Configuration to grant access to: Policy Browser and Threshold Browser.
-
Corresponding User Permissions: Can edit thresholds and policies , Can view thresholds and policies
-
-
Enable Trap Configuration to grant access to: Logged Traps, Trap Destinations, Trap Destination Associations, Trap Event Editor, Unknown Traps, Trap v3 Receiver.
-
Corresponding User Permissions: configure system parameters
-
-
Enable Webhook Configuration to grant access to: Webhook Destination Manager.
-
Corresponding User Permissions: Can create, edit and delete Webhook Definitions and Templates
-
-
Enable xStats Configuration to grant access to: xStats Log Viewer, and xStats Source Manager.
-
Corresponding User Permissions: configure system parameters
-
User Permissions
The User Permission section enables you to grant additional permissions to users in the role. User permissions are governed by the Page Permission settings and the user is further limited by their Devices and Device Groups Access and their Users and User Roles Access.
-
Enable Can acknowledge, assign, and clear alerts to grant permission to acknowledge, assign, and clear alerts when you also enable appropriate Devices and Device Groups permissions and you enable page permission for Alert Management.
-
Enable Can configure system parameters to grant permission to perform system administration tasks when you also enable appropriate Devices and Device Groups permissions and you enable appropriate page permissions.
-
Enable Can consume Admin notifications to grant permission to a user to receive prometheus alertmanager email notifications.
-
Enable Can create devices to grant permission to create, edit and delete device data when you also enable appropriate Devices and Device Groups permissions and you enable page permission for Device Manager.
-
Enable Can create users to grant permission to create, edit, and delete user data when you also enable appropriate Users and User Roles permissions and you enable page permission for User Management and/or User Role Management.
-
Enable Can create, edit and delete TopN Views to grant permission to create, edit and delete TopN Views based on role-based access control.
-
Enable Can create, edit and delete Webhook Definitions and Templates to grant permission to create, edit and delete Webhook Definitions based on role-based access control.
-
Enable Can create, update and delete reports to grant permission to create and save report data when you also enable appropriate Devices and Device Groups permissions and you enable page permission for Instant Graphs, Device Manager, NBAR Reports, Report Manager, and/or Status Map Manager. Users can create disposable reports from these pages and can detach individual reports to a comprehensive report that they can save to the Report Manager.
If user is not an owner of the report but has create, update, and delete report user permission, then the user can only do a S ave As to create a new report. It will not allow user to overwrite the report that the user is not the owner of.
-
Enable Can edit Admin notifications to grant permission to a user to enable/disable the delivery of prometheus alertmanager admin email notifications.
-
Enable Can edit metadata attributes to grant permission to edit the metadata attributes on the Metadata Schema page.
-
Enable Can edit metadata values to grant permission to edit the values for the metadata attributes that are specific to a device type, device group, device, object group, or object.
-
Enable Can edit thresholds and policies to grant permission to edit the values for thresholds and policies.
-
Enable Can insert indicator data to grant permission to insert indicator data. This is used in conjunction with the API.
-
Enable Can manage api keys to grant permission to manage API keys. This is used in conjunction with the API.
-
Enable Can manage object groups to grant permission to manage object groups.
-
Enable Can manage objects to grant permission to manage objects.
-
Enable Can manage probe provisioning to grant permission to provision probes via the Probe Manager when you enable appropriate Devices and Device Groups and you enable the Probe Provisioning page permission.
-
Enable Can perform discovery related tasks without permission checks to grant permission to perform discovery tasks without the need for permission checks. This is used in conjunction with the API.
-
Enable Can receive alert notifications to grant permission to receive email notifications from applicable traps, policies, and thresholds. This permission does not grant access to any workflows in SevOne NMS.
-
Enable Can view alert history to grant permission to view archived alerts when you also enable appropriate Devices and Device Groups permissions and you enable page permission for Alert History Management.
-
Enable Can view alerts to grant permission to view alerts when you also enable appropriate Devices and Device Groups permission and you enable the page permission for Alert Management.
-
Enable Can view flow data to grant permission to view flow data in FlowFalcon reports when you also enable the appropriate Devices and Device Groups permission and you enable the page permission for FlowFalcon Reports.
-
Enable Can view reports to grant permission to view report data when you also enable appropriate Devices and Device Groups permissions and you enable page permission for Instant Graphs, Device Manager, NBAR Reports, Report Manager, and/or Status Map Manager. Users assigned to the role can create disposable reports from these pages and can detach individual reports to a comprehensive report but they cannot save reports to the Report Manager.
-
Enable Can view thresholds and policies to grant permission to view the values for thresholds and policies.
-
Enable Can view unmapped flow devices to allow users to access flow devices that are not mapped to any other plugin device. In order to give the user access to a flow device that is mapped to another plugin device, user must have access to the plugin device.
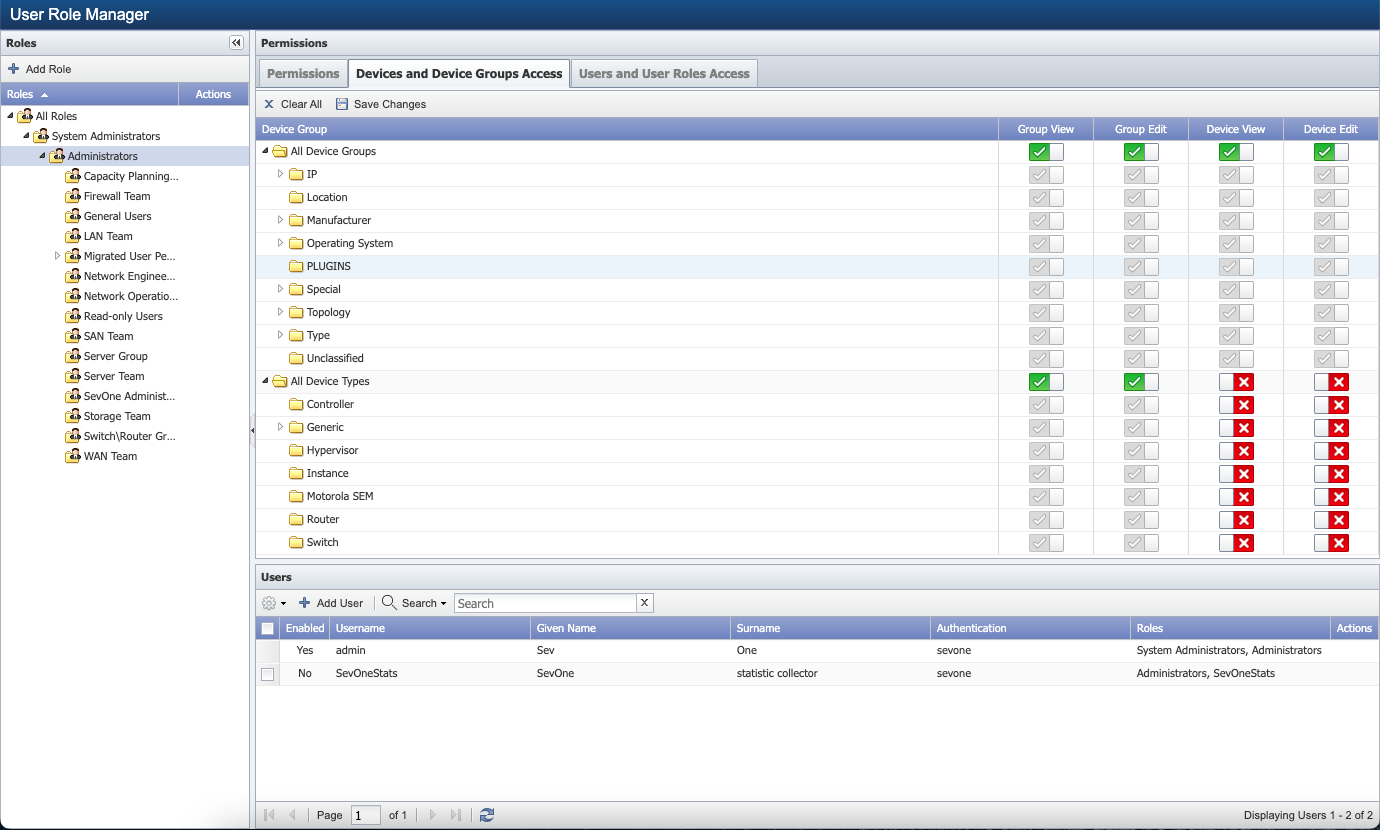
Devices and Device Groups Access
The Devices and Device Groups Access tab enables you to grant permissions to view and/or edit specific device groups/device types and/or to view and/or edit specific devices.
-
Select the Devices and Device Groups Access tab.
-
Enable the following to grant permission to view and/or edit device groups/device types and the devices within device groups/device types.
As you enable the Devices and Device Groups permissions for higher level user roles, the same Devices and Device Groups permissions becomes available for the subordinate user roles. Conversely, when you disable the Devices and Device Groups permissions, the corresponding Devices and Device Groups permissions are no longer available for the subordinate user roles.
-
Enable Group View to grant permission to view the name of the device group/device type. Users cannot see the devices that are members of the device group/device type or any corresponding device data until you enable Device View permission.
-
Enable Group Edit to grant permission to edit the device group/device type name. Enable Device View permissions to grant permission to edit the list of devices that are members of the device group/device type.
-
Enable Device View to grant permission to see the devices that are members of the device group/device type and applicable corresponding device data. If you disable the Group View permission, users can see the devices that are members of the device group/device type but cannot see the device group/device type name. When a device is mapped to a flow a device, this option allows users to see the flow device. Users have permissions to all device properties such as collected data, triggered alerts, etc. when they have access to the device. Permissions can be extended to flow devices as well via object mappings.
-
Enable Device Edit to grant permission to edit the configuration of the devices that are members of the device group/device type.
-
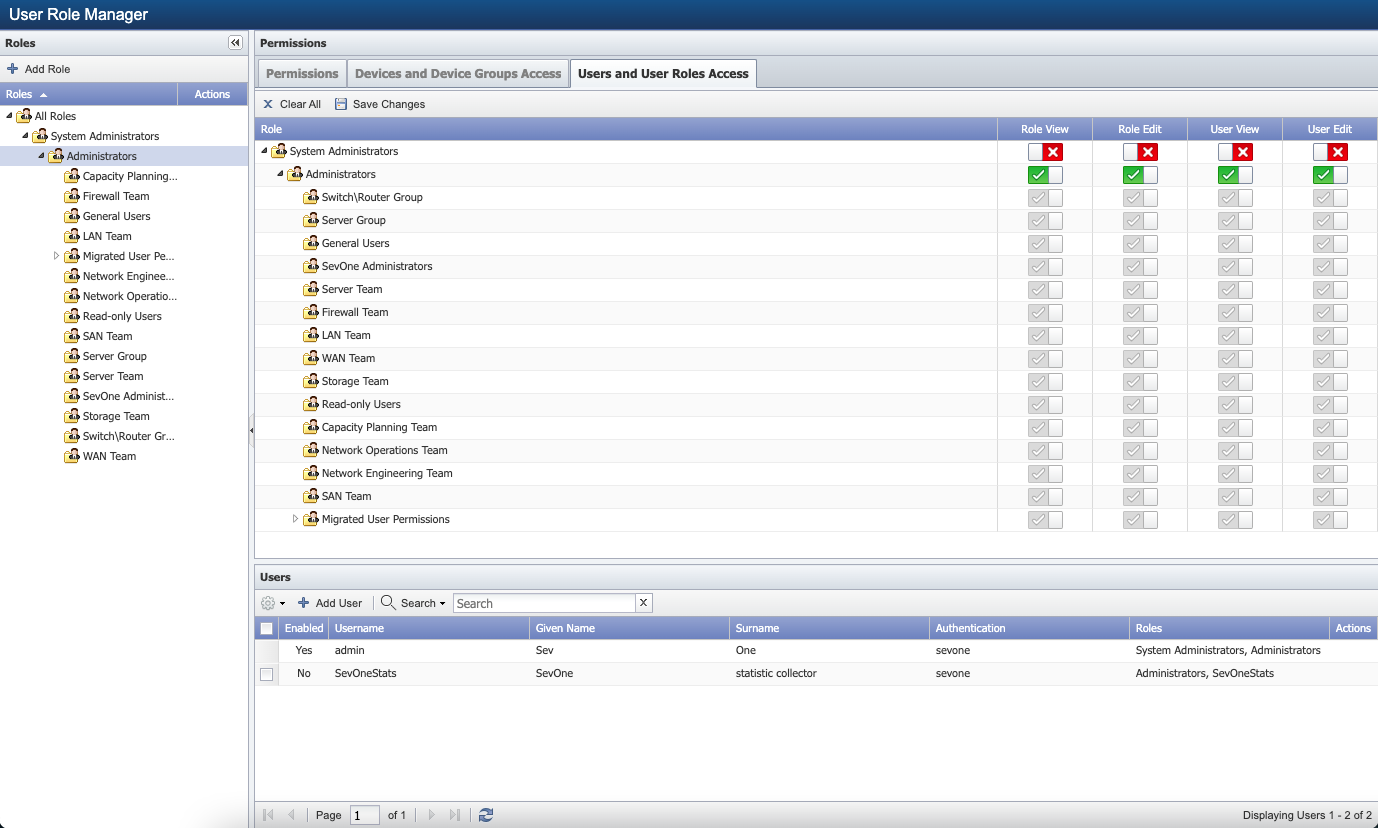
Users and User Roles Access
The Users and User Roles Access tab enables you to define which user roles users can see and/or edit and which users the users can see and/or edit.
-
Select the Users and User Roles Access tab.
-
Enable the following permissions to grant permission to view and/or edit user roles and the users assigned to the user roles.
As you enable the Users and User Roles permissions for higher level user roles, the same Users and User Roles permissions become available for the subordinate user roles. Conversely, when you disable the Users and User Roles permissions, the corresponding Users and User Roles permissions are no longer available for the subordinate user roles.
-
Enable Role View to grant permission to view the name of the user role. Users cannot see users assigned to the user role until you enable applicable User View permissions.
-
Enable Role Edit to grant permission to edit the user role name. Enable applicable User View permissions to grant permission to manage the user assignments for the role.
-
Enable User View to grant permission to view the users in the role.
-
Enable User Edit to grant permission to edit the user information, credentials, and role assignments for the users in the role.
-
Users
The Users section on the lower-half of the page enables you to manage users and user role assignments. Users can update their given name, surname, email address, and password from the Preferences page.
-
Select the check box for each user to manage, click
 , and select Enable, Disable, or Delete to enable, disable, or delete the users you select.
 -
Click Add User or
to display the Add/Edit User pop-up that enables you to manage the user information, credentials, and role assignments. Example: Add / Edit User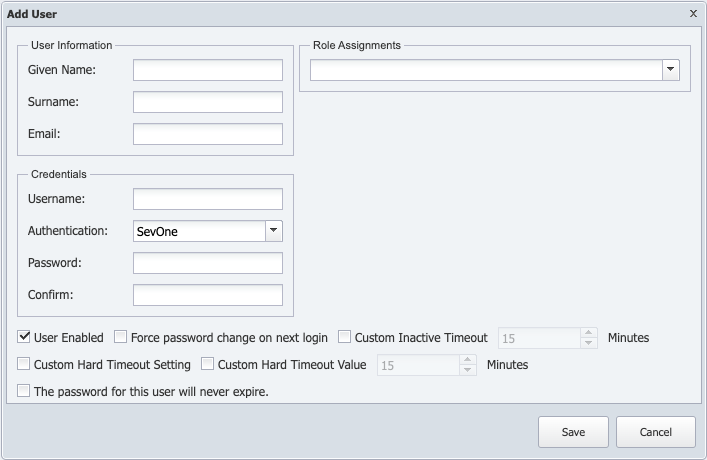
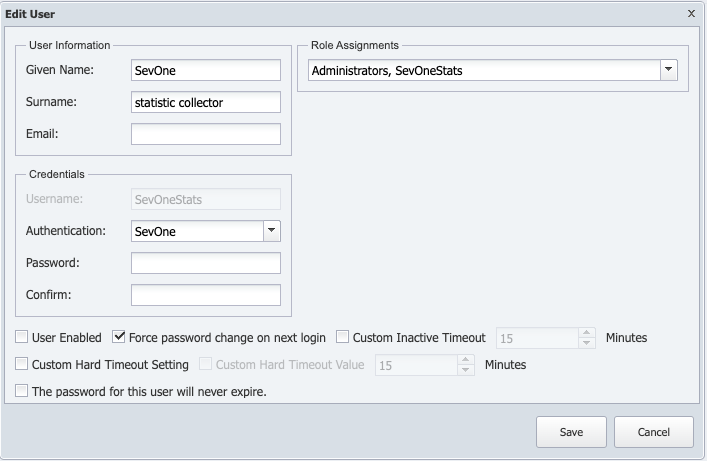
To edit an existing user, select the user and click
to display the Edit User pop-up. While editing a user, username cannot be changed. -
User Information
-
Given Name - enter the given name to appear wherever a user name appears.
-
Surname - enter the surname to appear wherever a user name appears.
-
Email - enter the email address where you want SevOne NMS to send emails to the user.
-
-
Credentials
-
Username - enter the name for the user to enter into the Username field on the Login page. You cannot edit this field after you click Save.
-
Authentication - click drop-down and select the method for the user to use when they log on. Select the SevOne authentication unless your company uses LDAP, RADIUS, or TACACS protocol to authenticate users.
-
Password - enter the user password. This field and the Confirm field are not applicable for users who use TACACS, LDAP, or RADIUS because password management for these protocols is done through the corresponding authentication servers.
-
Confirm - re-enter the user password.
-
-
Role Assignments - click the drop-down and select the user roles to which to assign the user. You can assign users to multiple roles and role permissions are cumulative.
-
Select the User Enabled check box to enable the user to log on and use SevOne NMS. Clear this check box to block access to the user without having to delete their account.
-
Select the Force password change on next login check box to force the user to change the password when they log on for the first time.
-
Select the Custom Inactive Timeout check box to enable the user to stay logged on during periods of inactivity for the amount of minutes you enter in the Custom Inactive Timeout field. This setting overrides the Inactivity Timeout setting you enter on the Cluster Manager > Cluster Settings tab > Security subtab. Leave clear to have the user log off after the amount of time you enter on the Cluster Manager. The user must log out and then log back on for this setting to take effect.
-
Select the Custom Hard Timeout Setting check box to enable and use customized Hard Timeout setting (for the user you are adding or editing) you define on the Cluster Manager > Cluster Settings tab > Security subtab.
-
To customize the hard timeout value for a user, select the Custom Hard Timeout Value check box to enable editing the hard timeout value for the user that you are either adding or editing. Enable the checkbox to allow you to enter the number of minutes in value field the user can remain alive before SevOne NMS automatically logs them out of the application. The default value is 15 minutes. Value field can range between 5 minute to 86400 minutes (60 days). When Custom Hard Timeout Value is enabled, the timeout set in its value field is used for the user in add or edit mode instead of the Hard Timeout value set on the Cluster Manager > Cluster Settings tab > Security subtab.
-
Select the The password for this user will never expire check box to override the Maximum Password Age setting you define on the Cluster Manager > Cluster Settings tab > Security subtab. This check box does not appear when you do not enable the Maximum Password Age setting on the Cluster Manager.
-
Click Save.
Your new user will also appear on Administration > Access Configuration > User Manager page.
Troubleshooting
I disabled a page permission but users assigned to the user role still have the user permissions associated with it.
A bit earlier, we mentioned that you will need to manually disable corresponding user permissions for a page permission when you disable that page permission. Otherwise, the corresponding user permissions remain enabled even after you have disabled the page permission.
Terms
|
Lightweight Directory Access Protocol (LDAP) |
An application protocol to query and modify directory services that run over TCP/IP to enable maintenance of centralized user directories that distributed applications authenticate to. |
|
Remote Authentication Dial-In User Service (RADIUS) |
A network protocol that provides centralized access, authorization, and accounting management for people or computers to connect and use a network service. |
|
Terminal Access Controller Access Control System (TACACS) |
A remote authentication protocol that communicates with an authentication server commonly used in UNIX networks. |