Table of Contents (Start)
- Topics
- Introducing SevOne
- Login
- Startup Wizard
- Dashboard
- Global Search - Advanced Search
- Report Manager
- Report Attachment Wizard
- Report Properties
- Report Interactions
- Instant Graphs
- TopN Reports
- Alerts
- Alert Archives
- Alert Summary
- Instant Status
- Status Map Manager
- Edit Maps
- View Maps
- FlowFalcon Reports
- NBAR Reports
- Logged Traps
- Unknown Traps
- Trap Event Editor
- Trap Destinations
- Trap Destination Associations
- Policy Browser
- Create and Edit Policies
- Webhook Definition Manager
- Threshold Browser
- Create and Edit Thresholds
- Probe Manager
- Discovery Manager
- Device Manager
- New Device
- Edit Device
- Object Manager
- High Frequency Poller
- Device Summary
- Device Mover
- Device Groups
- Object Groups
- Object Summary
- Object Rules
- VMware Browser
- AWS Plugin
- Azure Plugin (Public Preview)
- Calculation Plugin
- Database Manager
- Deferred Data Plugin
- DNS Plugin
- HTTP Plugin
- ICMP Plugin
- IP SLA Plugin
- JMX Plugin
- NAM
- NBAR Plugin
- Portshaker Plugin
- Process Plugin
- Proxy Ping Plugin
- SDWAN Plugin
- SNMP Plugin
- VMware Plugin
- Web Status Plugin
- WMI Plugin
- xStats Plugin
- Indicator Type Maps
- Device Types
- Object Types
- Object Subtype Manager
- Calculation Editor
- xStats Source Manager
- User Role Manager
- User Manager
- Session Manager
- Authentication Settings
- Preferences
- Cluster Manager
- Maintenance Windows
- Processes and Logs
- Metadata Schema
- Baseline Manager
- FlowFalcon View Editor
- Map Flow Objects
- FlowFalcon Views
- Flow Rules
- Flow Interface Manager
- MPLS Flow Mapping
- Network Segment Manager
- Flow Protocols and Services
- xStats Log Viewer
- SNMP Walk
- SNMP OID Browser
- MIB Manager
- Work Hours
- Administrative Messages
- Enable Flow Technologies
- Enable JMX
- Enable NBAR
- Enable SNMP
- Enable Web Status
- Enable WMI
- IP SLA
- SNMP
- SevOne Data Publisher
- Quality of Service
- Perl Regular Expressions
- Trap Revisions
- Integrate SevOne NMS With Other Applications
- Email Tips and Tricks
- SevOne NMS PHP Statistics
- SevOne NMS Usage Statistics
- Glossary and Concepts
- Map Flow Devices
- Trap v3 Receiver
- Guides
- Quick Start Guides
- AWS Quick Start Guide
- Azure Quick Start Guide (Public Preview)
- Data Miner Quick Start Guide
- Flow Quick Start Guide
- Group Aggregated Indicators Quick Start Guide
- IP SLA Quick Start Guide
- JMX Quick Start Guide
- Metadata Quick Start Guide
- RESTful API Quick Start Guide
- Self-monitoring Quick Start Guide
- SevOne NMS Admin Notifications Quick Start Guide
- SNMP Quick Start Guide
- Synthetic Indicator Types Quick Start Guide
- Topology Quick Start Guide
- VMware Quick Start Guide
- Web Status Quick Start Guide
- WMI Quick Start Guide
- xStats Quick Start Guide
- xStats Adapter - Accedian Vision EMS (TM) Quick Start Guide
- Deployment Guides
- Automated Build / Rebuild (Customer) Instructions
- Generate a Self-Signed Certificate or a Certificate Signing Request
- SevOne Best Practices Guide - Cluster, Peer, and HSA
- SevOne Data Platform Security Guide
- SevOne NMS Implementation Guide
- SevOne NMS Installation Guide - Virtual Appliance
- SevOne NMS Advanced Network Configuration Guide
- SevOne NMS Installation Guide
- SevOne NMS Port Number Requirements Guide
- SevOne NMS Upgrade Process Guide
- SevOne Physical Appliance Pre-Build BIOS and RAID Configuration Guide
- SevOne SAML Single Sign-On Setup Guide
- Cloud Platforms
- Other Guides
- Quick Start Guides
FlowFalcon View Editor
The FlowFalcon View Editor enables you to define which flow template fields that devices send to SevOne NMS are used in the FlowFalcon views you use to create FlowFalcon reports. The FlowFalcon Views tab enables you to add flow template fields to the FlowFalcon views that generate FlowFalcon reports. The Devices & Templates tab displays a list of the devices you enable to send flow data to SevOne NMS plus the source template fields and option template fields that the device sends.
To access the FlowFalcon View Editor from the navigation bar, click the Administration menu, select Flow Configuration, and then select FlowFalcon View Editor. The FlowFalcon Reports page also provides access to the FlowFalcon View Editor.
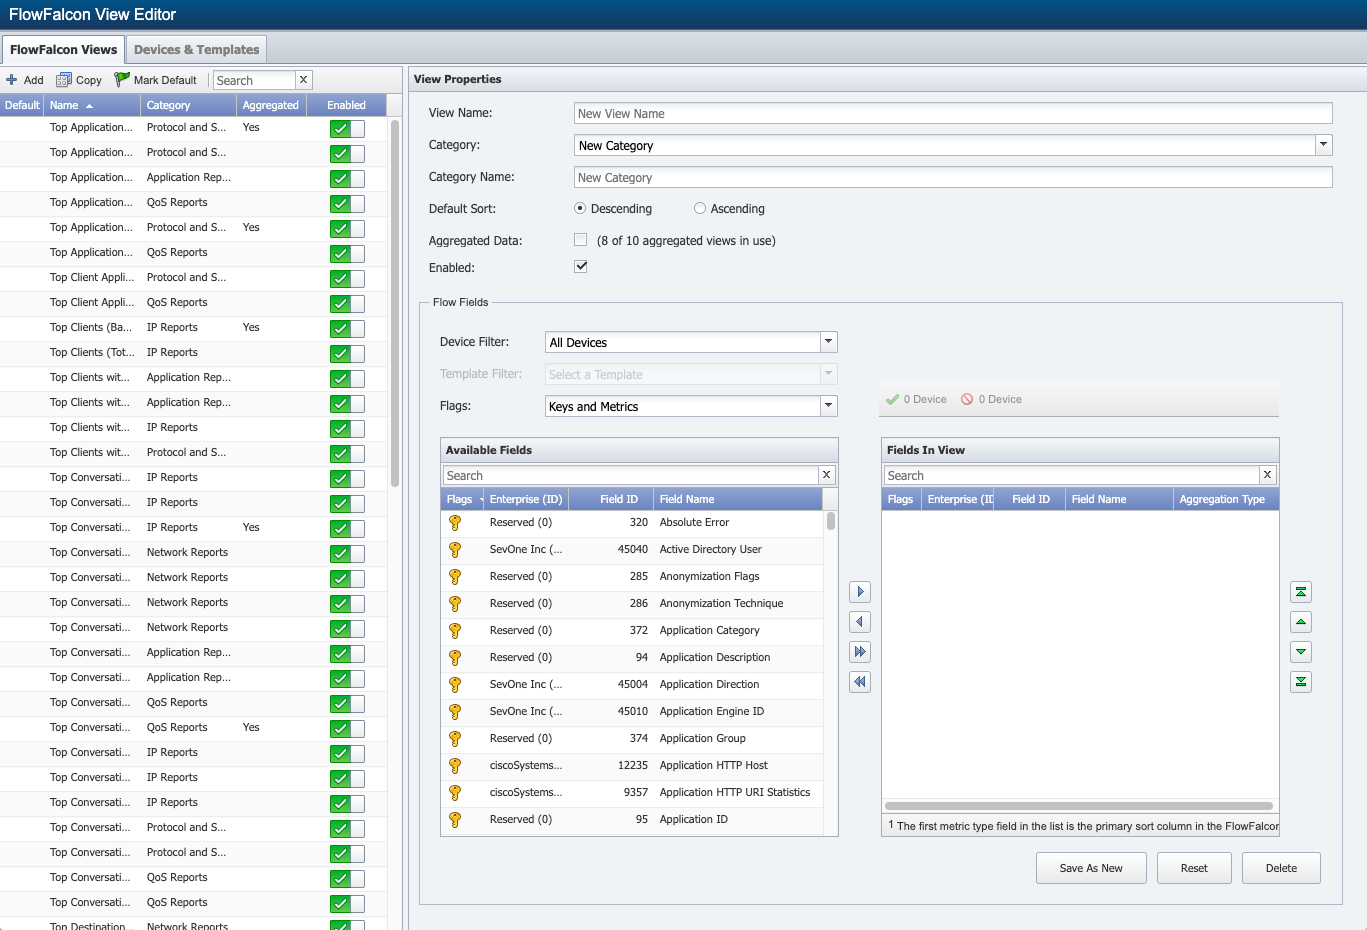
FlowFalcon Views
The FlowFalcon Views tab enables you to manage the FlowFalcon views you use to create FlowFalcon reports. FlowFalcon views use flow data fields from the flow templates to display reports of flow statistics.
There are two types of FlowFalcon views.
-
Aggregation Disabled views use the raw flow data to allow for more specificity in the result set at the trade off of longer report execution times and less historical data availability.
-
Aggregation Enabled views use aggregated flow data to present the most relevant flow data for faster report creation. Your SevOne appliance hardware determines the maximum number of aggregated views (between 5 and 20). Aggregation enabled views display an asterisk in the list.
View List
The view list displays the following information.
-
Default - Displays
 next to the view that is used by default for quick chain reports.
-
Name - Displays the view name.
-
Category - Displays the category name to which the view is a member.
-
Aggregated - Displays Yes for views that use aggregated flow data or displays nothing for views that use raw flow data.
-
Enabled - Displays
 for views that are enabled for use in reports or displays
  for views that do not appear in the list of views for which you can create a report.
Manage FlowFalcon Views
SevOne NMS provides a starter set of FlowFalcon views to enable you to create FlowFalcon reports right out of the box and to help create FlowFalcon views that are specific to your network.
Click on a view in the list to populate the View Properties section and the Flow Fields sections on the right with the flow template fields that are available to add to the view and the flow template fields that are in the view.
-
 # Devices - Displays the number of devices that send flow template data that could be used by the FlowFalcon view. Data from these devices could appear in a FlowFalcon report if you use this FlowFalcon view to generate the report.
-
 # Devices - Displays the number of devices that do not send flow template data that the view supports.
Click
or
to display the Supported Devices pop-up that lists the name and IP Address of the devices that send data that the view supports and the names of the devices that do not send flow template data that appears in the view.
If you select a view that has aggregation enabled, when you click Save, all aggregation data that exists for the view is deleted, even if you do not make any changes.
-
Either click Add above the view list or select a view in the list to manage FlowFalcon views.
-
In the View Name field, enter the view name.
-
Click the Category drop-down.
-
Select the category in which to include the view.
-
Select New Category and enter the category name in the Category Name field to add a category.
-
-
Select a Default Sort option.
-
Select Ascending to sort data from low value to high value.
-
Select Descending to sort data from high value to low value.
-
-
Select the Aggregated Data check box to create an aggregated view that uses aggregated flow data. At present, there is a limit of 10 aggregated views your appliance can support. Leave clear to create a view that uses raw flow data.
When you clear the check box in edit workflows, a message informs you that any aggregated data associated with the view will be deleted. Click OK on the message but be aware that when you click Save, all aggregated data that is associated with the view is deleted.
-
Select the Enabled check box to enable users to use the view in FlowFalcon reports.
-
The Flow Fields section enables you to select the flow template fields to include in the view. Filters enable you to limit the fields that appear in the Available Fields list.
-
Click the Device Filter drop-down and select the device from which to display fields.
-
Click the Template Filter drop-down to further filter the list to the fields in a specific template for the device you select in the previous filter.
-
Click the Flags drop-down and select to display only Keys, only Metrics, or both Keys and Metrics.
-
-
Move fields from the Available Fields list to the Fields In View list to include fields in the view. The fields display in the report in the sequence in which they appear in the Fields In View list and the first metric type field is the field on which the report sorts.
Under Fields in View, you can select multiple aggregation types. When you click on the Aggregation Type, you are presented with a drop-down list with Sum, Average, Average Non-zero, or Max options. You can choose one or more aggregation types from this drop-down list which is obtained when you click on the aggregation type of the metric already selected.
Under Available Fields, the following field names have the Flags column set to Metrics (
 ) instead of Key (
  ). However, if the FlowFalcon View is using the field as a Key then, it will not change the Flags column for that particular field name from Keys to Metrics.
-
TCP ACK Total
-
TCP FIN Total
-
TCP PSH Total
-
TCP RST Total
-
TCP SYN Total
-
TCP URG Total
-
-
Click one of the following.
-
When you edit a view, click Save to overwrite the original view with the changes you make. This deletes any existing aggregated data for an aggregated view.
-
Click Save as New to create a copy of the view. This preserves aggregated data for the original view when you edit an aggregated view. (The new aggregated view starts out with no aggregated data.)
-
When you edit a view, click Delete to delete the view and any associated aggregated data.
-
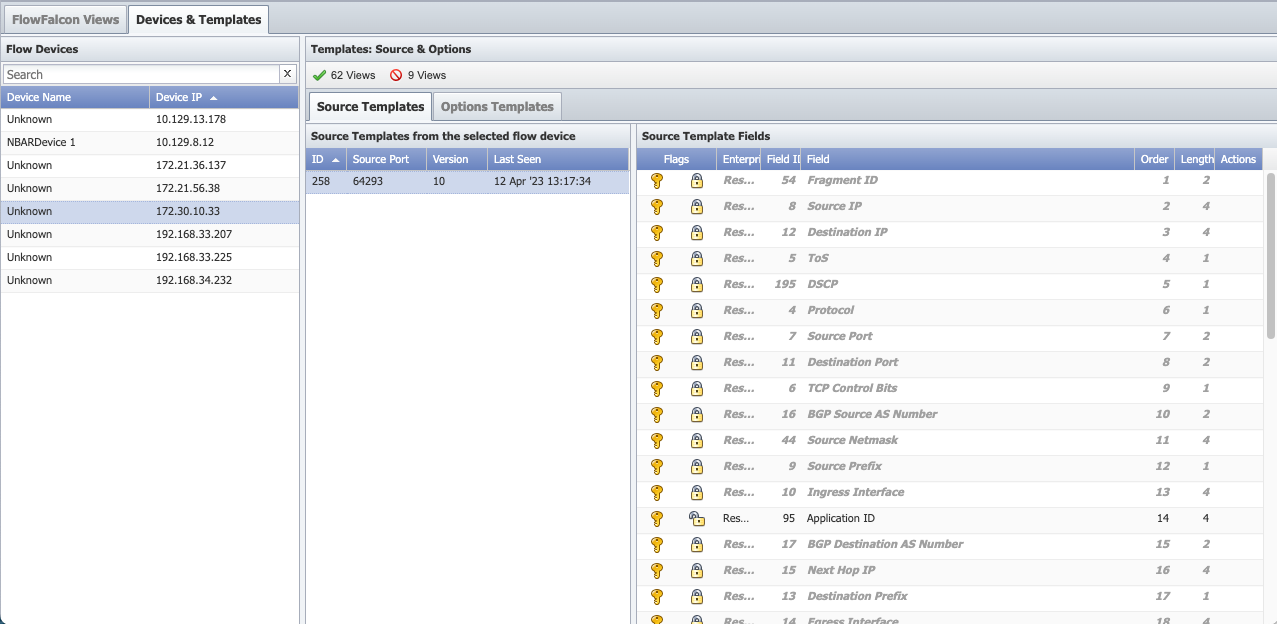
Devices & Templates
The Devices & Templates tab displays the devices you enable to send flow data to SevOne NMS. When you select a device in the list, the right side displays the templates (packages) the device sends.
-
Device Name - Displays the device name. Unknown devices are those for which you do not enable the SNMP plugin and therefore cannot have the name resolved.
-
Device IP - Displays the device IP address.
Select a device in the list to populate the Templates: Source & Options section with the source template data and the options template data the device sends. Each device can send multiple templates.
-
# Views - Displays the number of FlowFalcon views that support the display of data from the device. Data from this flow template could appear in a FlowFalcon report if you use any of these FlowFalcon views to generate the report.
-
# Views - Displays the number of FlowFalcon views that do not support the display of data from the device.
Click
or
to display the Views Support pop-up that lists the names of the FlowFalcon views that support the flow template data and the names of the views that do not support the flow template data.
Source Templates and Options Templates
Flow template data varies depending upon the device. Most flow devices send source templates that contain fields from which performance metrics can be directly polled. Flow v9 and v10 send additional options template fields that are more descriptive yet contain valuable metadata on which to report.
Select a device in the Flow Devices list to display the source templates the device sends on the Source Devices tab and the options templates the device send on the Options Templates tab. The following information appears in the Templates section on both tabs.
The Source Templates from the selected flow device list and the Options Templates from the selected flow device list appears on the left side of the tab.
-
ID – Displays the field identifier sent from the device with the flow template.
-
Source Port – Displays the port on the device from which the flow template was sent.
-
Version – Displays the flow version number.
-
Last Seen – Displays the last time the template was received from the flow device.
Select a template in the list to display the template fields that can be used in FlowFalcon views for FlowFalcon reports.
-
Flags:
-
 - Flow field is a key.
-
 - Flow field is a metric.
-
 - You can edit the field.
-
 - You cannot edit the field.
-
-
Enterprise ID - Displays the identification of the enterprise (typically the manufacturer) that creates the field identifier.
-
Field ID - Displays the flow template field identifier.
-
Field - Displays the field name.
-
Order - Displays the sequence location of the field within the flow template.
-
Length - Displays the size of the field in bytes.
From Devices & Templates tab, choose a Flow Device. Under Templates: Source & Options, choose Source Templates tab. Application ID field will be available and unlocked (  ) by default. Click
  to configure this field. From Flow Template Field - Configure as Key pop-up, click Add Code to add the codes for field Application ID.
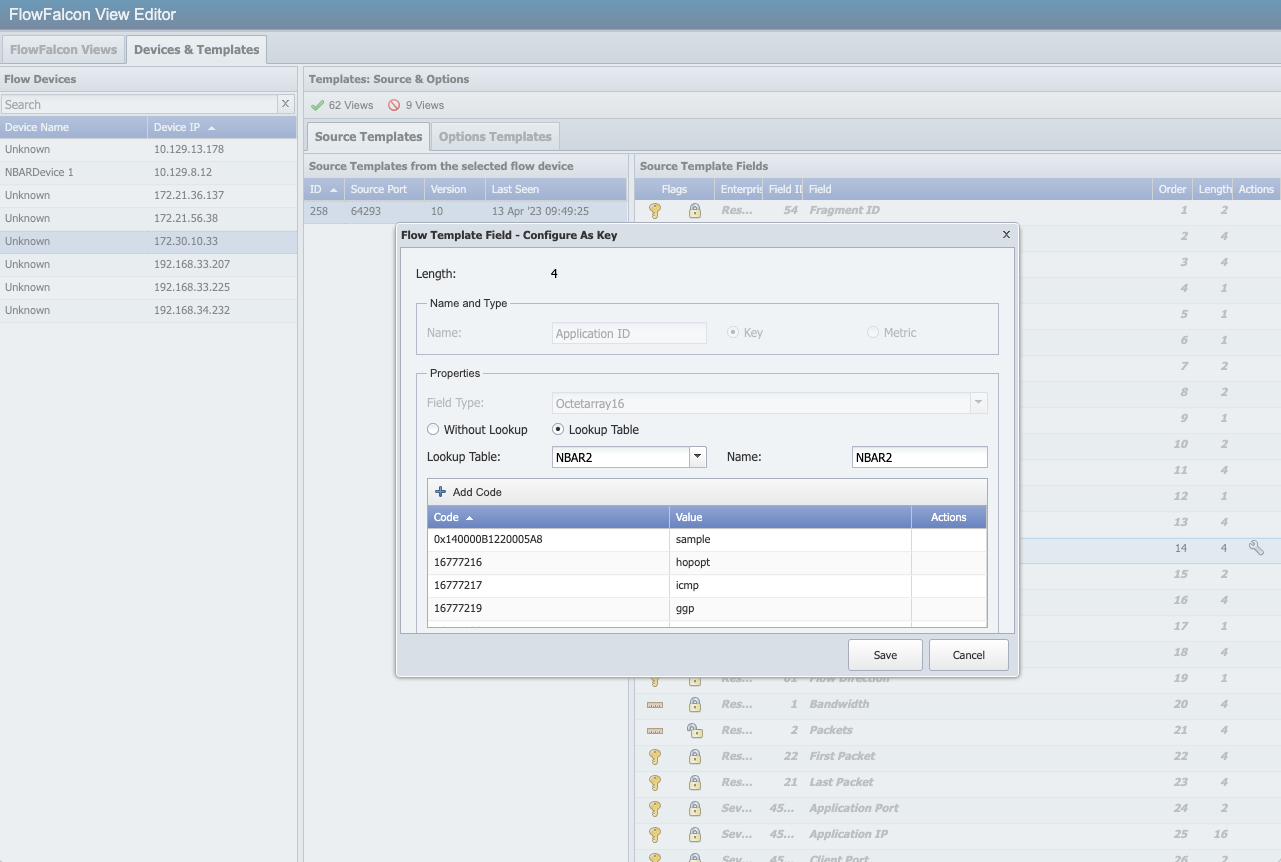
Edit Fields
When a field displays
in the Flags column, you can perform the following steps to edit the field. This workflow varies from field to field. Steps in the following workflow appear when applicable and are disabled when they cannot be edited.
All aggregated data for every FlowFalcon view that uses the field you edit will be deleted if you save edits.
-
Click
 in the Actions column to display the Flow Template Field – Configure As Key/Metric pop-up.
-
In the Name field, edit the field name.
-
Select one of the following:
-
Select Key to define the field as a key.
Example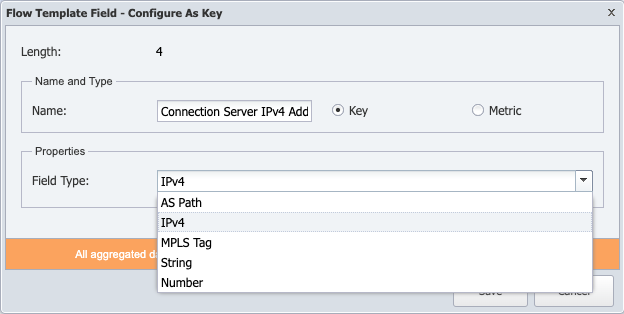
-
Click the Field Type drop-down. Select the appropriate field type from the drop-down. The drop-down options depend on the key length.
Key Length
Field Types
1
Direction, Protocol, String, Number
2
Port, Interface, String, Number
4
AS Path, IP, MPLS Tag, String, Number
6
MAC, String
8
String, Number
16
IP Hybrid, IPv6, String
32
String
128
AS Path, String
If field is a variable-length field, then String is the only option available. And, there is no drop-down available for this scenario.
256
String
-
Select one of the following if field type String or Number is chosen.
-
Select Without Lookup to not use a lookup table for the field.
-
Select Lookup Table to use a lookup table for the field. If you select this option perform the following steps.
-
Click the Lookup Table drop-down.
-
Select the lookup table for the field to use.
-
Select New Lookup Table and enter the lookup table name in the Name field to define a new lookup table.
-
-
Click Add Code or click
to add or edit a code in the lookup table.
-
In the Code field, enter the lookup table code.
-
In the Value field, enter the code value.
-
Click Update to save the code.
-
Repeat to add additional codes to the lookup table.
-
-
If an editable field has a length of 1, 2, 4, or 8, it can also be configured as a Metric.
-
-
Select Metric to define the field as a metric.
Example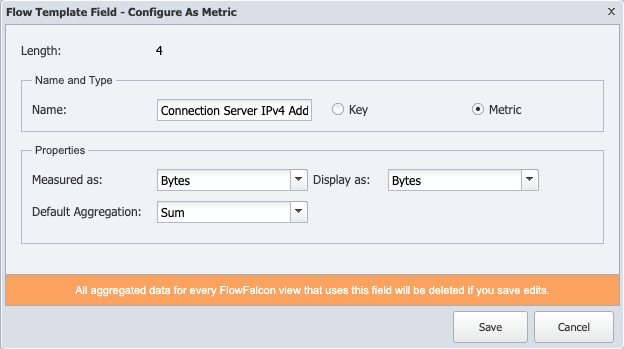
-
Click Measured as drop-down to choose how to measure the metrics.
-
Click Display as drop-down to choose how to display the metrics.
-
Click the Default Aggregation drop-down and select the aggregation to use by default.
-
-
-
Click Save.
All aggregated data for every FlowFalcon view that uses the field you edit is deleted.
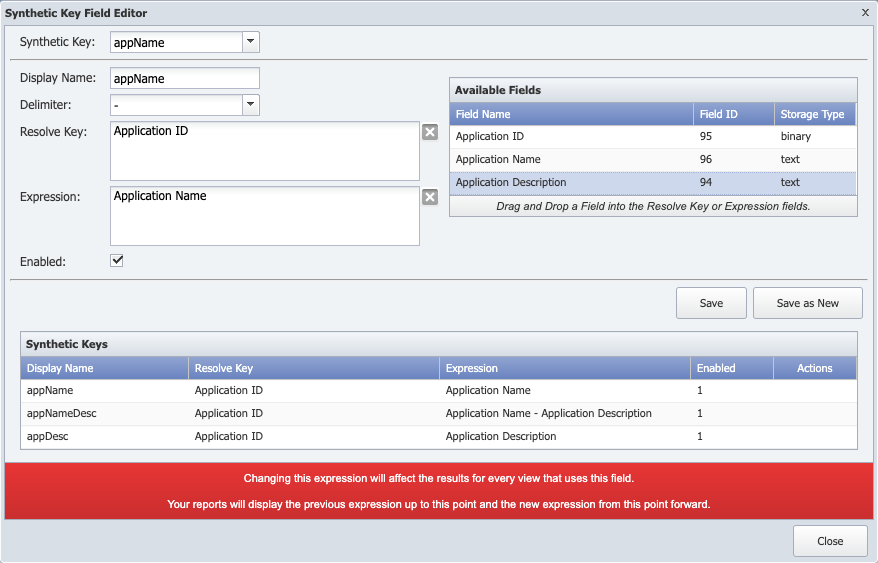
Synthetic Key Fields
You can combine options template fields into synthetic key fields. You create synthetic key fields on the Options Templates tab and they then appear in the list of Source Template fields on the Source Templates tab. Each options template can have multiple synthetic key field.
-
In the Flow Devices section, select a device to display its source templates in the Templates: Source & Options section.
-
Select the Options Templates tab.
-
In the Options Templates from the selected flow device section, select a template row to display the selected options template's fields in the Options Template Fields section.
All fields must be configured before you can proceed to the next step. See the Edit Fields section above to configure any fields that display Not Configured.
-
In the Options Templates from the selected flow device section Actions column, click
to display the Synthetic Key Field Editor pop-up.
-
Click the Synthetic Key drop-down and select an existing synthetic key from the list.
Synthetic Key field is available only when synthetic keys exist.
-
In the Display Name field, enter the name to display for the field in FlowFalcon reports.
-
Click the Delimiter drop-down and select the delimiter to display between the fields you will add to the synthetic field.
-
Multiple synthetic keys can be created when the same Resolve Key is added one at a time. Drag a field from the Available Fields section into the Resolve Key field. The Resolve Key must be a field that exists in the source template and becomes the synthetic field into which metadata is parsed. The Resolve Key field must be a String field type.
Or, you may drag one or more fields from the Available Fields section into the Resolve Key field. The Resolve Key must be a field that exists in the source template and becomes the synthetic field into which metadata is parsed. If more than one field is added, the fields are separated by a comma. The Resolve Key field must be a String field type.

This associates the Options Templates and the Source Templates data. -
Drag fields from the Available Fields section into the Expression field to combine the available fields into one synthetic field that displays in reports. The Expression accepts fields that have the Generic storage type and the String storage type.
Resolve Key and Expression fields must be different.
-
Select the Enabled check box to make the field available for inclusion in FlowFalcon views.
-
If you want to delete a row under Synthetic Keys, place your cursor on the row you want to delete and click
 under Actions column.
-
To modify an existing Synthetic Key, modify the field(s) and click Save. This will overwrite the existing key. To save a new key, click Save as New.
-
When done, click Close.
SevOne NMS Flow Fields
SevOne NMS calculates and/or manipulates flow data to create the following fields. For fields 45050-45056, you need to understand MPLS well enough to know which MPLS attributes correspond to your network's VPN 2nd Top Layer ID, PE Egress Address, Customer VRF, Source IP Address, and Ingress PE Address. In SevOne NMS, there are three requirements to map MPLS attributes to flow data for FlowFalcon Reports.
-
On the Cluster Manager > Cluster Settings tab, FlowFalcon subtab, select the Enable MPLS Attribute Mapping check box and enter the MPLS Attribute Mapping Refresh Interval.
-
On the MPLS Flow Mapping page, upload two MPLS mapping files.
-
On the FlowFalcon View Editor, create views that include at least one field 45040-45056.
SevOne NMS calculates and/or manipulated flow data to create the following fields.
|
Field # |
Field Name |
Field Description |
|
45000 |
Application Port |
The SRC or DEST port, whichever is lower. This is the port of the application. |
|
45001 |
Application IP |
IPv6 address associated with the application. |
|
45002 |
Client Port |
Higher of SRC and DEST ports. |
|
45003 |
Client IP |
IPv6 address associated with the client. |
|
45004 |
Application Direction |
The direction of the traffic. 0 means Application Port == Source Port, 1 means Application Port == Destination Port. |
|
45005 |
Next Hop IP |
NetFlow view field 15 Next Hop IP is IPv4 specific and field 62 Next Hop IPv6 Address is IPv6 specific. SevOne NMS provides field 45005 Next Hop IP that pulls IPv4 from field 15 and IPv6 from field 62. |
|
45006 |
Source IP Prefix |
Routing prefix of the source IP address. |
|
45007 |
Destination IP Prefix |
Routing prefix of the destination IP address. |
|
45010 |
Application Engine ID |
First byte of the NBAR application id (reserved field ID 95). |
|
45011 |
Application Selector ID |
3 low bytes of the NBAR application id (reserved field ID 95). |
|
45020 |
ToS 3-bit |
First three bits of the Type of Service byte. |
|
45021 |
ToS 4-bit |
First four bits of the Type of Service byte. |
|
45040 |
Active Directory User |
The result of a look up of the client IP address in the active_directory_ips table. |
|
45041 |
Peer AS |
The AS of the peer for the interface through which the flow transited. |
|
45042 |
Peer AS Path |
The BGP path ID is the identifier SevOne NMS assigns to a route as the collector receives path updates. |
|
45050 |
Customer Client IP |
Customer specific IP address of the connection origin in the context of MPLS. |
|
45051 |
Customer Client Subnet |
Customer specific IP subnet for the connection origin in the context of MPLS. |
|
45052 |
Customer VRF Name |
Name of the customer VRF looked up in the database that uses MPLS_lable_2 (element 71) and PE Egress address. |
|
45053 |
Customer Application IP |
Customer specific IP address for connection target in the context of MPLS |
|
45054 |
Customer Application Subnet |
Customer specific IP subnet for connection target in the context of MPLS |
|
45055 |
PE Ingress IP |
IP Address of Ingress Provider Edge Router. |
|
45056 |
PE Egress IP |
IP Address of Egress Provider Edge Router. |
|
45060 |
Service Profile |
Service Profile identifier from Protocols and Services, Service Mapping, and Service Profiles. |
|
45061 |
Service Category |
Service Category identifier from Protocols and Services, Service Mapping, and Service Profiles. |
|
45070 |
Source AS |
The autonomous system number of the Source IP. |
|
45071 |
Destination AS |
The autonomous system number of the Destination IP. |
|
45072 |
Source Country |
The country code that corresponds to the Source IP. |
|
45073 |
Destination Country |
The country code that corresponds to the Destination IP. |