Table of Contents (Start)
- Topics
- Introducing SevOne
- Login
- Startup Wizard
- Dashboard
- Global Search - Advanced Search
- Report Manager
- Report Attachment Wizard
- Report Properties
- Report Interactions
- Instant Graphs
- TopN Reports
- Alerts
- Alert Archives
- Alert Summary
- Instant Status
- Status Map Manager
- Edit Maps
- View Maps
- FlowFalcon Reports
- NBAR Reports
- Logged Traps
- Unknown Traps
- Trap Event Editor
- Trap Destinations
- Trap Destination Associations
- Policy Browser
- Create and Edit Policies
- Webhook Definition Manager
- Threshold Browser
- Create and Edit Thresholds
- Probe Manager
- Discovery Manager
- Device Manager
- New Device
- Edit Device
- Object Manager
- High Frequency Poller
- Device Summary
- Device Mover
- Device Groups
- Object Groups
- Object Summary
- Object Rules
- VMware Browser
- AWS Plugin
- Azure Plugin (Public Preview)
- Calculation Plugin
- Database Manager
- Deferred Data Plugin
- DNS Plugin
- HTTP Plugin
- ICMP Plugin
- IP SLA Plugin
- JMX Plugin
- NAM
- NBAR Plugin
- Portshaker Plugin
- Process Plugin
- Proxy Ping Plugin
- SDWAN Plugin
- SNMP Plugin
- VMware Plugin
- Web Status Plugin
- WMI Plugin
- xStats Plugin
- Indicator Type Maps
- Device Types
- Object Types
- Object Subtype Manager
- Calculation Editor
- xStats Source Manager
- User Role Manager
- User Manager
- Session Manager
- Authentication Settings
- Preferences
- Cluster Manager
- Maintenance Windows
- Processes and Logs
- Metadata Schema
- Baseline Manager
- FlowFalcon View Editor
- Map Flow Objects
- FlowFalcon Views
- Flow Rules
- Flow Interface Manager
- MPLS Flow Mapping
- Network Segment Manager
- Flow Protocols and Services
- xStats Log Viewer
- SNMP Walk
- SNMP OID Browser
- MIB Manager
- Work Hours
- Administrative Messages
- Enable Flow Technologies
- Enable JMX
- Enable NBAR
- Enable SNMP
- Enable Web Status
- Enable WMI
- IP SLA
- SNMP
- SevOne Data Publisher
- Quality of Service
- Perl Regular Expressions
- Trap Revisions
- Integrate SevOne NMS With Other Applications
- Email Tips and Tricks
- SevOne NMS PHP Statistics
- SevOne NMS Usage Statistics
- Glossary and Concepts
- Map Flow Devices
- Trap v3 Receiver
- Guides
- Quick Start Guides
- AWS Quick Start Guide
- Azure Quick Start Guide (Public Preview)
- Data Miner Quick Start Guide
- Flow Quick Start Guide
- Group Aggregated Indicators Quick Start Guide
- IP SLA Quick Start Guide
- JMX Quick Start Guide
- Metadata Quick Start Guide
- RESTful API Quick Start Guide
- Self-monitoring Quick Start Guide
- SevOne NMS Admin Notifications Quick Start Guide
- SNMP Quick Start Guide
- Synthetic Indicator Types Quick Start Guide
- Topology Quick Start Guide
- VMware Quick Start Guide
- Web Status Quick Start Guide
- WMI Quick Start Guide
- xStats Quick Start Guide
- xStats Adapter - Accedian Vision EMS (TM) Quick Start Guide
- Deployment Guides
- Automated Build / Rebuild (Customer) Instructions
- Generate a Self-Signed Certificate or a Certificate Signing Request
- SevOne Best Practices Guide - Cluster, Peer, and HSA
- SevOne Data Platform Security Guide
- SevOne NMS Implementation Guide
- SevOne NMS Installation Guide - Virtual Appliance
- SevOne NMS Advanced Network Configuration Guide
- SevOne NMS Installation Guide
- SevOne NMS Port Number Requirements Guide
- SevOne NMS Upgrade Process Guide
- SevOne Physical Appliance Pre-Build BIOS and RAID Configuration Guide
- SevOne SAML Single Sign-On Setup Guide
- Cloud Platforms
- Other Guides
- Quick Start Guides
VMware Quick Start Guide
SevOne Documentation
All documentation is available from the IBM SevOne Support customer portal.
© Copyright International Business Machines Corporation 2024 .
All right, title, and interest in and to the software and documentation are and shall remain the exclusive property of IBM and its respective licensors. No part of this document may be reproduced by any means nor modified, decompiled, disassembled, published or distributed, in whole or in part, or translated to any electronic medium or other means without the written consent of IBM.
IN NO EVENT SHALL IBM, ITS SUPPLIERS, NOR ITS LICENSORS BE LIABLE FOR ANY DAMAGES, WHETHER ARISING IN TORT, CONTRACT OR ANY OTHER LEGAL THEORY EVEN IF IBM HAS BEEN ADVISED OF THE POSSIBILITY OF SUCH DAMAGES, AND IBM DISCLAIMS ALL WARRANTIES, CONDITIONS OR OTHER TERMS, EXPRESS OR IMPLIED, STATUTORY OR OTHERWISE, ON SOFTWARE AND DOCUMENTATION FURNISHED HEREUNDER INCLUDING WITHOUT LIMITATION THE WARRANTIES OF DESIGN, MERCHANTABILITY OR FITNESS FOR A PARTICULAR PURPOSE, AND NONINFRINGEMENT.
IBM, the IBM logo, and SevOne are trademarks or registered trademarks of International Business Machines Corporation, in the United States and/or other countries. Other product and service names might be trademarks of IBM or other companies. A current list of IBM trademarks is available on ibm.com/trademark.
About
Virtualization
These days a lot of companies are enjoying the advantages of virtualization. While virtualization appears to be a very modern concept, it actually has its roots in the 1960s, back when mainframes were all the rage. Machines were expensive, and accommodating multiple users would require an extremely complex operating system. That is when IBM came up with the idea to use virtual machines. Their CP-67 program provided virtual memory space for each user, so that he or she had access to what was basically a single-user operating system. Roughly thirty years later, a little company named VMware followed IBM's cue and created virtualization technology for the x86 architecture. Today, VMware is one of the biggest names in virtualization.
Virtualization is a pretty neat trick that involves creating entire computers, hardware and all, in a software environment. This is done by installing virtualization software on a host machine. The host machine can then run one or multiple guest machines, known as virtual machines or VMs. A VM acts just like a physical computer, complete with its own CPU, RAM, NIC, and hard drive–all virtual, of course! One of the great things about virtualization is that you can run several VMs on a single piece of hardware. These VMs function independently of each other, giving you plenty of freedom and flexibility.
Why Virtualize?
You can do all kinds of things with VMs. If you need to work with a different operating system than the one installed on your computer, you can simply install the OS on a VM, rather than having to set up a dual-boot system. Or maybe want to run some legacy software that is not compatible with your OS version. You can set up a VM to run an earlier version of the OS and install the legacy software on that VM. This can be useful if your business requires you to use an older piece of software, but you are working with newer hardware. It is also great for old-school gaming!
The fun does not stop there. You can virtualize a server. In fact, you can virtualize tons of servers. There are several advantages to doing this in addition to the ones mentioned above. For starters, you can scale back on hardware. By using virtual servers, you need fewer physical servers and less rack space. This can also mean less networking equipment. To take it a step further, you require less overall space for housing your hardware, which means you save money on power as well as cooling or heating your data center. The reduced space requirements also make it easier to expand your resources because you can install additional servers with less consideration to physical space.
With virtualization, you can easily dedicate servers to specific purposes. For example, you can create an application server, a web server, a file server, and a print server all on a single hardware server. You can also set up a server solely for testing purposes. What is more, you can provision the necessary amount of CPU, memory, and storage for each server while preventing under-utilization of resources.
SevOne offers a plugin for monitoring VMware. With our VMware plugin, you can monitor your ESXi hosts and virtual machines through vSphere. SevOne NMS automatically discovers, then categorizes new VMs on a host. The VMware plugin lets you monitor several indicators, including the following:
-
CPU load
-
CPU time spent in an idle state
-
Time that the VM was ready but could not be scheduled on the physical CPU
-
ESXi memory consumed
-
ESXi memory mapped for the VM or host
-
Memory actively used by the VMkernel
-
Memory balloon
-
Disk I/O rate
-
In/out/total octets
Regular and reliable monitoring using SevOne's VMware plugin enables you to proactively address any issues with your VMs. You can also make sure that you are getting the most out of your VMs by identifying factors that might affect efficiency, such as under- or over-utilization, for example.
Prerequisites
Before getting started, make sure to have the following information handy:
-
vCenter IP address
-
vCenter user name and password
-
ESXi host user name and password
Also, you need to set up a vCenter user (on the vCenter) with the following considerations:
-
Set permissions for this user to Read-Only. This is a default user permissions class in vCenter.
-
Set permissions at the vCenter level and make sure they are configured to propagate to subsequent levels.
Configuration
In this section, please walk through the following processes.
-
Creating a vCenter
-
Enabling the VMware plugin for a vCenter
-
Enabling the VMware plugin for devices
-
Changing the VMware plugin configuration for devices
-
Setting up polling of virtual machines through hosts
Create a vCenter and Enable the VMware Plugin
In this subsection, start off by creating a new vCenter and it will conclude with enabling the VMware plugin for our new vCenter. If you have an existing vCenter and you just need to enable the VMware plugin for it, feel free to jump ahead to the section Enable VMware Plugin for the vCenter. The VMware plugin requires device-specific configuration. For this reason, it is disabled on new devices by default.
The VMware Browser lets you set up and create vCenter devices in SevOne NMS. You can monitor multiple vCenter devices.
Perform the following steps to create a vCenter and enable the VMware plugin for it.
Create a vCenter
-
From the navigation bar, click Devices and select VMware Browser.

-
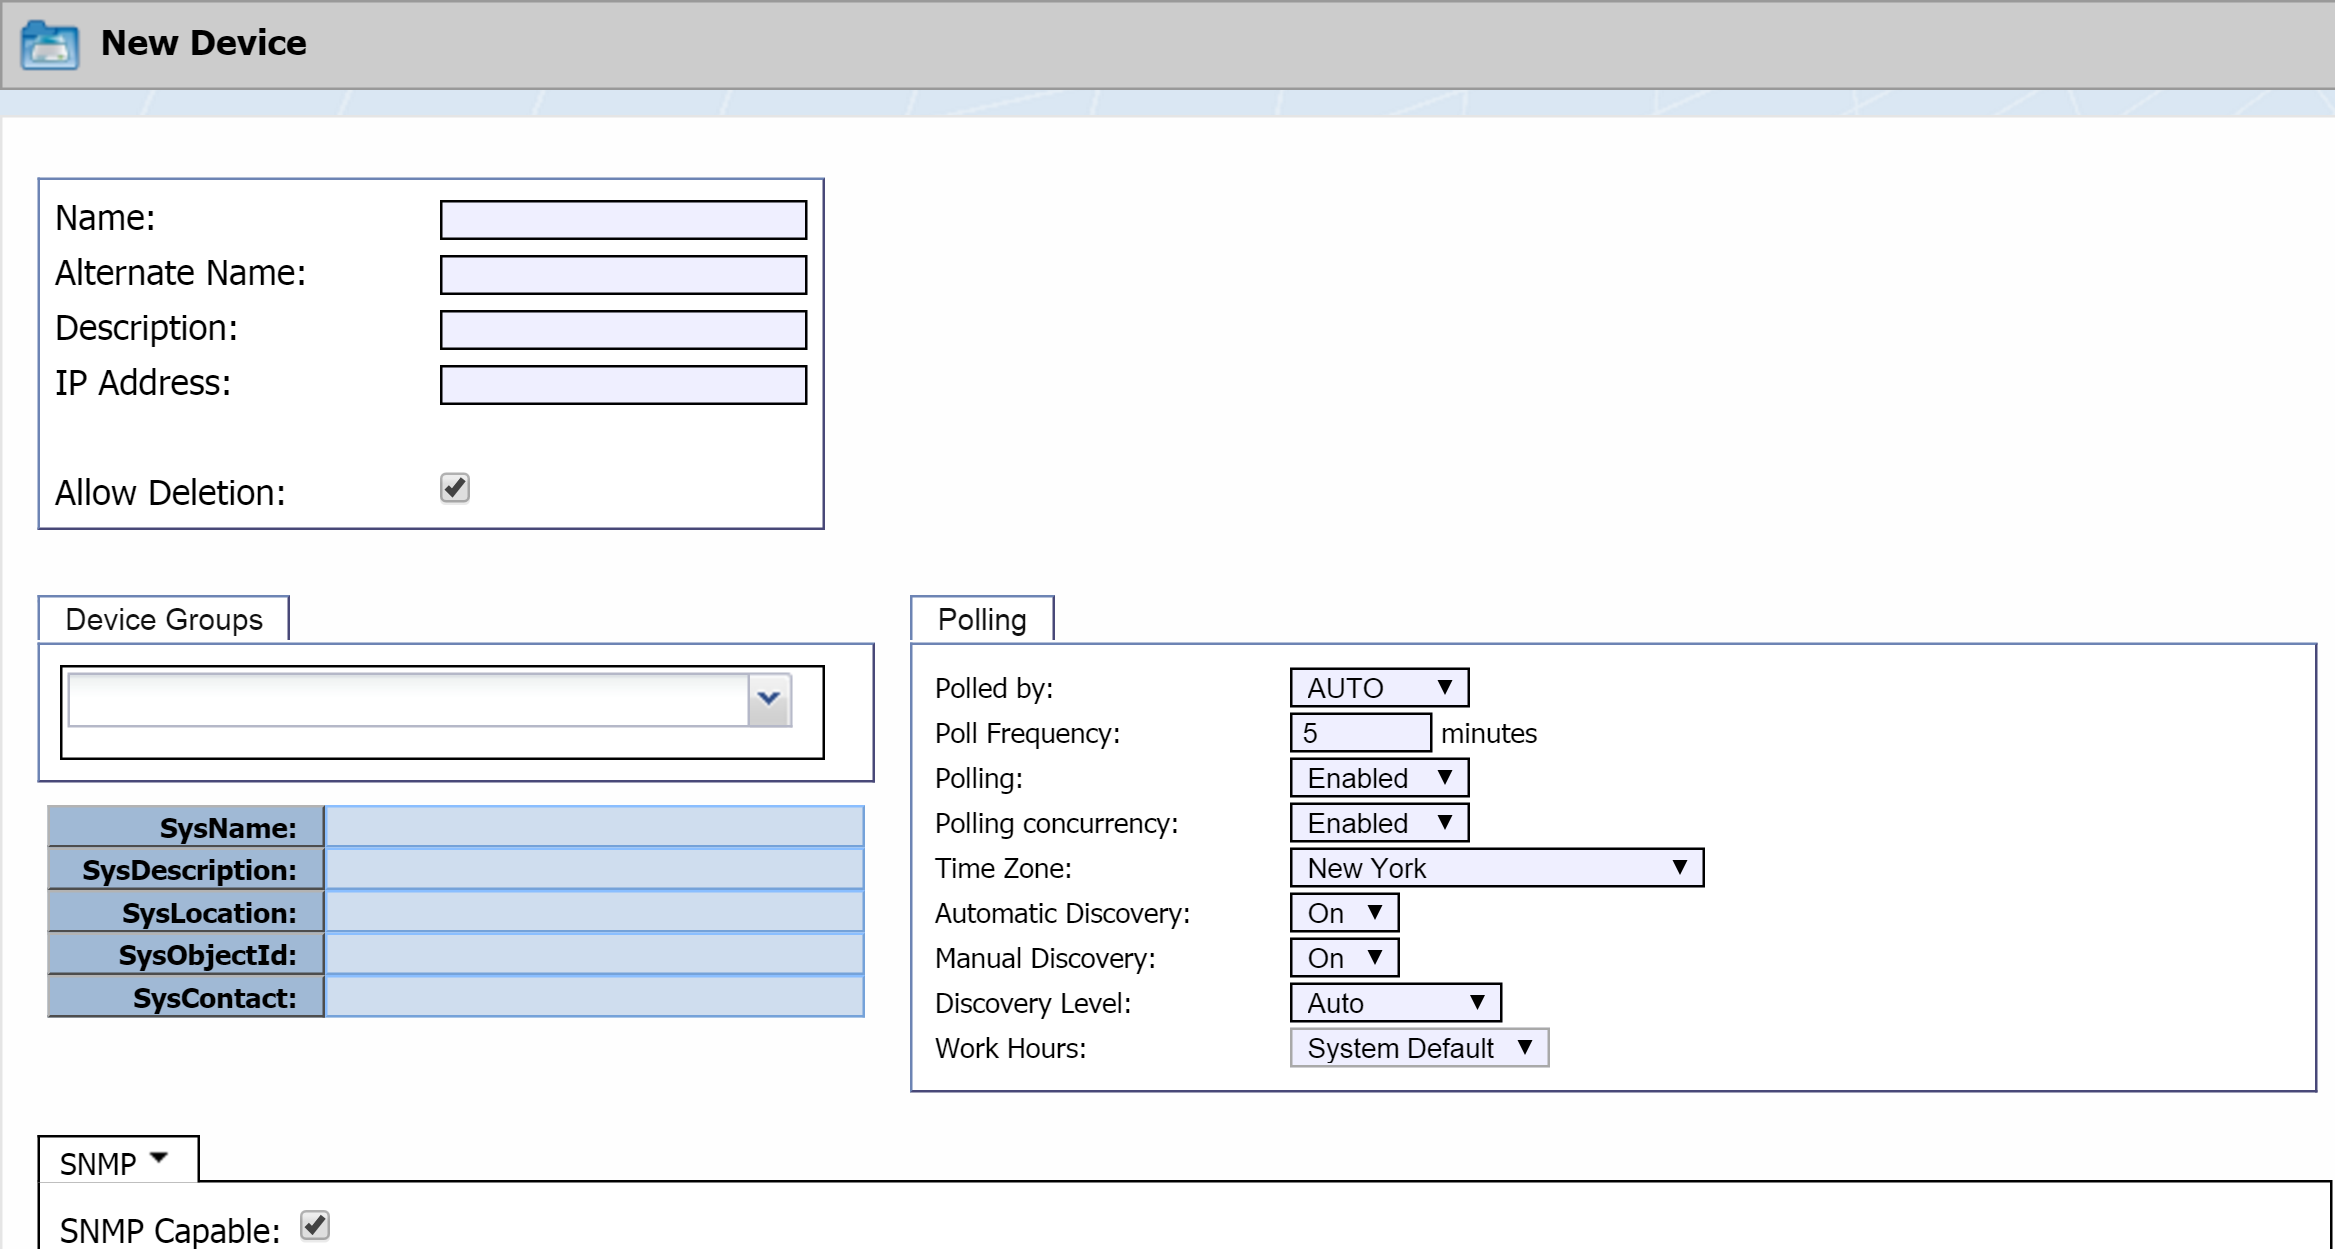
Click Create vCenter to display the New Device page, where you can create a new vCenter for SevOne NMS to discover.
-
Continue with the steps below to configure settings for the following sections.
-
Device Name and IP Address
-
Device Groups
-
Polling
-
Device Name and IP Address
-
In the Name field, enter the device name. This can be either a Fully Qualified Domain Name (FQDN) or any unique name.
If you use an FQDN that can be resolved via DNS, default Cluster Manager > Cluster Settings tab provide the option to have SevOne NMS update the IP address you enter for the device (below) to the correct IP address upon first discovery.
-
In the Alternate Name field, enter an alternate name for the device. Users can search for the device with this name.
-
In the Description field, enter a description of the device. You can use this to provide additional information about the device, such as function, location, etc.
-
In the IP Address field, enter the device IP address.
-
Select the Allow Deletion check box to enable users to delete the device. This check box appears to the admin user only and is selected by default. If you clear this check box, users cannot delete the device.
Device Groups
To manually pin devices to device groups/device types, click the Device Groups drop-down and select the check box for each device group/device type that you want to pin the device to.
The Device Groups section lets you pin the device to the device groups and device types you define. Device groups allow you to restrict user access to devices, and device types enable you to group devices for SNMP polling purposes. Using device groups and device types, you can filter the lists of devices for report and alert purposes. When you create device groups/device types before adding devices, you can define auto-grouping rules to automatically add devices to device groups/device types at first discovery. Device group rules and device type rules use the sysName, sysDescription, sysLocation, sysObjectID, and sysContact information that the SNMP plugin populates at the first discovery.
Polling
-
Click the Polled by drop-down and select the peer to poll the device. When you have multiple peers, this drop-down list displays all the peers in the cluster. The least used peer appears first in the list. Select AUTO to assign the device to the least used peer.
Once a peer has reached its license capacity, it does not discover the objects on a new device. The Device Manager displays Peer Full in the Objects column when a peer reaches its license capacity. You can view peer capacity from Cluster Manager > Peers tab.
-
In the Poll Frequency field, specify how often to poll the device. You can set poll frequency down to 1 minute. For a poll frequency of less than 1 minute, the Edit Device page provides access to the High Frequency Poller page.
-
Click the Polling drop-down and select Enabled to enable polling or Disabled to disable it.
-
Click the Polling concurrency drop-down and select one of the following options.
-
Enabled - to enable multiple threads to simultaneously poll the device. This is useful for devices with many objects. it is also useful when a device takes longer to poll than the poll frequency you specify. For most devices, you must set this to Enabled to get regular poll intervals at the frequency you set.
-
Disabled - to allow only one thread to poll the device.
-
-
Click the Time Zone drop-down and select the time zone where the device is located. For example, if the peer is in Pennsylvania, and the device is in California, select a Pacific time zone.
-
Click the Automatic Discovery drop-down and select On to discover the device each time the automatic discovery process runs. You schedule the automatic discovery process on the Cluster Manager Peer Settings tab. Select Off to not discover the device when the automatic discovery process runs.
-
Click the Manual Discovery drop-down and select On to enable manual discovery. Manual discovery occurs when you click Save on the Edit Device page and from all other manual discovery workflows. Select Off to not discover the device when you click Save on the Edit Device page and to block manual discovery of the device. Select Off when a device is in maintenance.
-
Click the Discovery Level drop-down and select the severity level of the device notes to create for the device. Select Auto to create device notes for the severity level you set on the Cluster Manager > Cluster Settings tab. After Auto, the severity levels are listed from highest severity to lowest severity.
SevOne NMS will create device notes for the severity level you select as well as all higher levels. For example, selecting Notice will create device notes for Notice and all higher severity levels but not for the levels below Notice, such as Info and Debug.
-
Click the Work Hours drop-down and select a work hours group. You define work hour groups on the Work Hours page.
Enable VMware Plugin for the vCenter
The plugin section appears in the lower half of the page. It is set to SNMP by default. As we mentioned a little earlier, the VMware plugin is disabled by default because it requires device-specific information. You must enable the VMware plugin for each device that you want to discover VMware objects from and poll VMware metrics from.
When you enable the VMware plugin for a vCenter device, SevOne NMS queries the vCenter and displays the vCenter's hosts and virtual machines on the VMware Browser. When you configure the VMware plugin for the vCenter device, you can choose to discover and monitor all hosts on the vCenter, or you can use the VMware Browser to monitor specific VMware devices.
The current steps are for enabling the VMware plugin for a vCenter. Please look at enabling the VMware plugin for other devices shortly.
Perform the following steps to enable the VMware plugin for the vCenter.
-
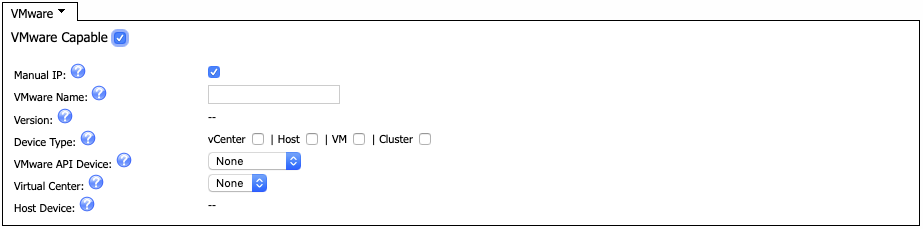
Click the plugin drop-down and select VMware.
-
The VMware Capable check box should be selected by default. If not, select it to enable discovery of VMware objects and to poll VMware data on the device.
-
The Manual IP check box, when selected, ensures that manual IP addresses for VMware are not overridden by the automatic discovery process.
-
In the VMware Name field, enter the name of the vCenter as it appears in vSphere.
-
For a new device, the Version field is empty. After discovery, this field displays the VMware API version number.
-
In the Device Type field, select the vCenter check box.
-
The VMware API Device field does not apply to vCenters, so just ignore that. (This setting does apply to VMware devices.)
-
The Virtual Center field does not apply to vCenters. Ignore that one, too. (This setting applies to VMware devices.)
-
In the Username field, enter the user name of the vCenter user you set up on the vCenter with Read-Only permissions. SevOne NMS needs this for authentication.

You may need to prefix the user name with the VMware domain, for example, using the format yourDomain\yourUsername.
-
In the Password field, enter the password for the user you set up on the vCenter.
-
If necessary, click Clear Cached Session to re-authenticate onto vSphere.
-
Select the Automatically Discover Devices check box to discover the vCenter hosts and virtual machines. The discovered hosts and virtual machines on the vCenter appear on the VMware Browser with Yes in the SevOne Monitored column. If you want to disable discovery of the vCenter hosts and virtual machines, clear this check box.
-
Click Save as New to save the VMware configuration for the vCenter.
Edit an Existing vCenter
If you already have a vCenter and you want to edit it, you can do so from the VMware Browser.
-
From the navigation bar, click Devices and select VMware Browser.

-
At the top of the page, click the vCenter drop-down and select the vCenter that you would like to edit.
-
Click
 to display the Edit Device page, which looks like the New Device page from above. Refer to the information above for editing settings on this page.
Enable the VMware Plug in for Other Devices
After you enable the VMware plugin for a vCenter, SevOne NMS discovers the vCenter and displays its hosts and virtual machines on the VMware Browser.
Your network can have multiple vCenters. A drop-down list at the top of the VMware Browser lets you select a vCenter to view its hosts and virtual machines. For example, in the screenshot below, vCenter named hyperactive is selected. Below, in the table, is a list of hyperactive's hosts. In this case, hyperactive has only one host, b30.sevone.com. The host, b30.sevone.com, has three virtual machines listed under it.
The VMware Browser lets you enable and disable the VMware plugin for multiple devices. Perform the steps below to enable the VMware plugin for devices and to change the default VMware configuration for devices.
You can manage the polling of VMware objects on devices from the Object Manager. To access the Object Manager from the navigation bar, click Devices, then select Object Manager.

Enable the VMware Plugin for Devices
-
Open the VMware Browser (Devices -> VMware Browser).
-
Click the vCenter drop-down and select a vCenter. In the table below, you should see a list of hosts for the selected vCenter.
-
Select a host and click
 to view its devices.
-
The SevOne Monitored column displays Yes for each device that you enable the VMware plugin for. The devices that display No do not have the VMware plugin enabled. To enable the VMware plugin for any of those devices, select the check box next to the device(s), click
 and select Discover Selected.
Change the Default VMware Plugin Configuration for Devices
-
In the table, select the device that you would like to enable the VMware plugin configuration for.
-
Click
 to display the Edit Device page.
-
At the bottom of the Edit Device page, you will see the plugin drop-down, which is set to SNMP by default. Click the drop-down and select VMware.
-
The VMware Capable check box appears selected when the VMware plugin is enabled.
-
The Manual IP check box, when selected, ensures that manual IP addresses for VMware are not overridden by the automatic discovery process.
-
The VMware Name field displays the VMware name for the device from vSphere. If you change the name in vSphere, make sure to enter the new name in this field. The VMware plugin cannot monitor the device through vSphere if the names do not match.
-
SevOne NMS populates the Version field upon discovery of the API device.
-
For Device Type, select each applicable check box. Following is information about the options. SevOne NMS prevents you from selecting conflicting check boxes.
-
vCenter - indicates that the device is a vCenter. If you select this check box, fields appear enabling you to enter the user name and password SevOne NMS needs to authenticate onto the vCenter, and a Clear Cached Session button enables you to re-authenticate onto vSphere, if needed.
-
Host - indicates that the device is an ESXi host. If you select this check box, fields appear enabling you to enter the user name and password SevOne NMS needs to authenticate onto the device, and a Clear Cached Session button enables you to re-authenticate onto vSphere, if needed.

-
VM - indicates that the device is a virtual machine. If you select this option, a field appears to display the name of the ESXi host device.

-
Cluster - indicates that the device is a virtual machine cluster.
-
-
Click the VMware API Device drop-down and perform one of the following actions.
-
Select None to not specify an API device. In the case of a physical vCenter or a cluster, it is not necessary to specify an API device.
-
Select This Device to poll the current device for performance data.
-
Select a vCenter to poll the device from a vCenter.
-
Select an ESXi host to poll the device from a host device. The host you select needs to contain this device as a virtual machine.
-
-
Click the Virtual Center drop-down and perform one of the following actions.
-
Select None to not associate the device to a vCenter.
-
Under Virtual Centers, select a vCenter to associate the device to a specific vCenter.
-
-
Click Save.
Set up Polling through Hosts
Perform the following steps to configure SevOne NMS to poll through each ESXi host itself instead of polling through the vCenter.
-
At the top of the VMware Browser, click the vCenter drop-down and select a vCenter.
-
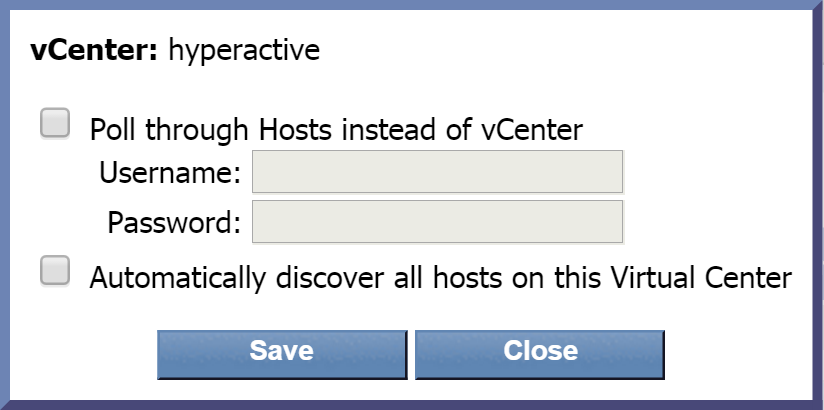
Click the Edit vCenter button to the edit vCenter pop-up.
-
Select the Poll through Hosts instead of vCenter check box to poll devices through the ESXi host.
-
In the Username field, enter the user name SevOne NMS needs to authenticate onto the vCenter.
-
In the Password field, enter the password SevOne NMS needs to authenticate onto the vCenter.
-
Select the Automatically discover all hosts on this Virtual Center check box to poll the vCenter's hosts and virtual machines on a daily basis. Any new hosts and virtual machines on the vCenter appear in the list with Yes in the SevOne Monitored column. Leave the check box clear to limit the amount of data from the vCenter's hosts and virtual machines.
-
Click Save.
vCenter Information
The VMware Browser provides the following information about clusters, hosts, and virtual machines for the vCenter that you select.
-
Name - The name of the cluster, host, or virtual machine.
-
IP Address - The IP address of the device.
-
Type - Whether the item listed is a cluster, a host, or a virtual machine. The column heading includes a total count of clusters, hosts, and virtual machines. The following information also appears in parentheses for items listed:
-
Cluster - The number of hosts and virtual machines in the cluster.
-
Host - The number of virtual machines on the host.
-
-
SevOne Monitored - Displays the following information:
-
Cluster - Yes indicates that the VMware plugin is enabled for the cluster device.
-
Host - Yes indicates that the VMware plugin is enabled for the host device.
-
Virtual machine - Yes indicates that the device is polled by the VMware plugin. No indicates that the VMware plugin is not enabled for the device.
-
-
Polling - The device that SevOne NMS is polling VMware data from. This can be the cluster, the host, or the device itself.
-
vSphere Status - The status of the device as indicated by one of the following colors:
-
Green - the status is okay.
-
Grey - the status is unknown.
-
Red - a problem exists.
-
Yellow - a problem may exist.
-
Troubleshooting
After you set up the new device and it is been polled a few times, you should start to see data. There are several ways to view the device data. The Device Summary enables you to see an overview of device data, and Performance Metrics/Instant Graphs let you view data down to the indicator level.
If you go to the Device Summary for an ESXi host and you do not see any statistics, check the user name and password configuration.
If you configure SevOne NMS to poll the host via the vCenter, make sure that you enter the credentials for the vCenter and not for the host.
Terms
|
Virtual Machine (VM) |
A self-contained software environment that acts as a physical computer, which runs an operating system and applications. |
|
VMkernel |
A high-performance operating system that runs on the virtualization layer and manages the virtual machine's access to physical hardware. |