Table of Contents (Start)
- Topics
- Introducing SevOne
- Login
- Startup Wizard
- Dashboard
- Global Search - Advanced Search
- Report Manager
- Report Attachment Wizard
- Report Properties
- Report Interactions
- Instant Graphs
- TopN Reports
- Alerts
- Alert Archives
- Alert Summary
- Instant Status
- Status Map Manager
- Edit Maps
- View Maps
- FlowFalcon Reports
- NBAR Reports
- Logged Traps
- Unknown Traps
- Trap Event Editor
- Trap Destinations
- Trap Destination Associations
- Policy Browser
- Create and Edit Policies
- Webhook Definition Manager
- Threshold Browser
- Create and Edit Thresholds
- Probe Manager
- Discovery Manager
- Device Manager
- New Device
- Edit Device
- Object Manager
- High Frequency Poller
- Device Summary
- Device Mover
- Device Groups
- Object Groups
- Object Summary
- Object Rules
- VMware Browser
- AWS Plugin
- Azure Plugin (Public Preview)
- Calculation Plugin
- Database Manager
- Deferred Data Plugin
- DNS Plugin
- HTTP Plugin
- ICMP Plugin
- IP SLA Plugin
- JMX Plugin
- NAM
- NBAR Plugin
- Portshaker Plugin
- Process Plugin
- Proxy Ping Plugin
- SDWAN Plugin
- SNMP Plugin
- VMware Plugin
- Web Status Plugin
- WMI Plugin
- xStats Plugin
- Indicator Type Maps
- Device Types
- Object Types
- Object Subtype Manager
- Calculation Editor
- xStats Source Manager
- User Role Manager
- User Manager
- Session Manager
- Authentication Settings
- Preferences
- Cluster Manager
- Maintenance Windows
- Processes and Logs
- Metadata Schema
- Baseline Manager
- FlowFalcon View Editor
- Map Flow Objects
- FlowFalcon Views
- Flow Rules
- Flow Interface Manager
- MPLS Flow Mapping
- Network Segment Manager
- Flow Protocols and Services
- xStats Log Viewer
- SNMP Walk
- SNMP OID Browser
- MIB Manager
- Work Hours
- Administrative Messages
- Enable Flow Technologies
- Enable JMX
- Enable NBAR
- Enable SNMP
- Enable Web Status
- Enable WMI
- IP SLA
- SNMP
- SevOne Data Publisher
- Quality of Service
- Perl Regular Expressions
- Trap Revisions
- Integrate SevOne NMS With Other Applications
- Email Tips and Tricks
- SevOne NMS PHP Statistics
- SevOne NMS Usage Statistics
- Glossary and Concepts
- Map Flow Devices
- Trap v3 Receiver
- Guides
- Quick Start Guides
- AWS Quick Start Guide
- Azure Quick Start Guide (Public Preview)
- Data Miner Quick Start Guide
- Flow Quick Start Guide
- Group Aggregated Indicators Quick Start Guide
- IP SLA Quick Start Guide
- JMX Quick Start Guide
- Metadata Quick Start Guide
- RESTful API Quick Start Guide
- Self-monitoring Quick Start Guide
- SevOne NMS Admin Notifications Quick Start Guide
- SNMP Quick Start Guide
- Synthetic Indicator Types Quick Start Guide
- Topology Quick Start Guide
- VMware Quick Start Guide
- Web Status Quick Start Guide
- WMI Quick Start Guide
- xStats Quick Start Guide
- xStats Adapter - Accedian Vision EMS (TM) Quick Start Guide
- Deployment Guides
- Automated Build / Rebuild (Customer) Instructions
- Generate a Self-Signed Certificate or a Certificate Signing Request
- SevOne Best Practices Guide - Cluster, Peer, and HSA
- SevOne Data Platform Security Guide
- SevOne NMS Implementation Guide
- SevOne NMS Installation Guide - Virtual Appliance
- SevOne NMS Advanced Network Configuration Guide
- SevOne NMS Installation Guide
- SevOne NMS Port Number Requirements Guide
- SevOne NMS Upgrade Process Guide
- SevOne Physical Appliance Pre-Build BIOS and RAID Configuration Guide
- SevOne SAML Single Sign-On Setup Guide
- Cloud Platforms
- Other Guides
- Quick Start Guides
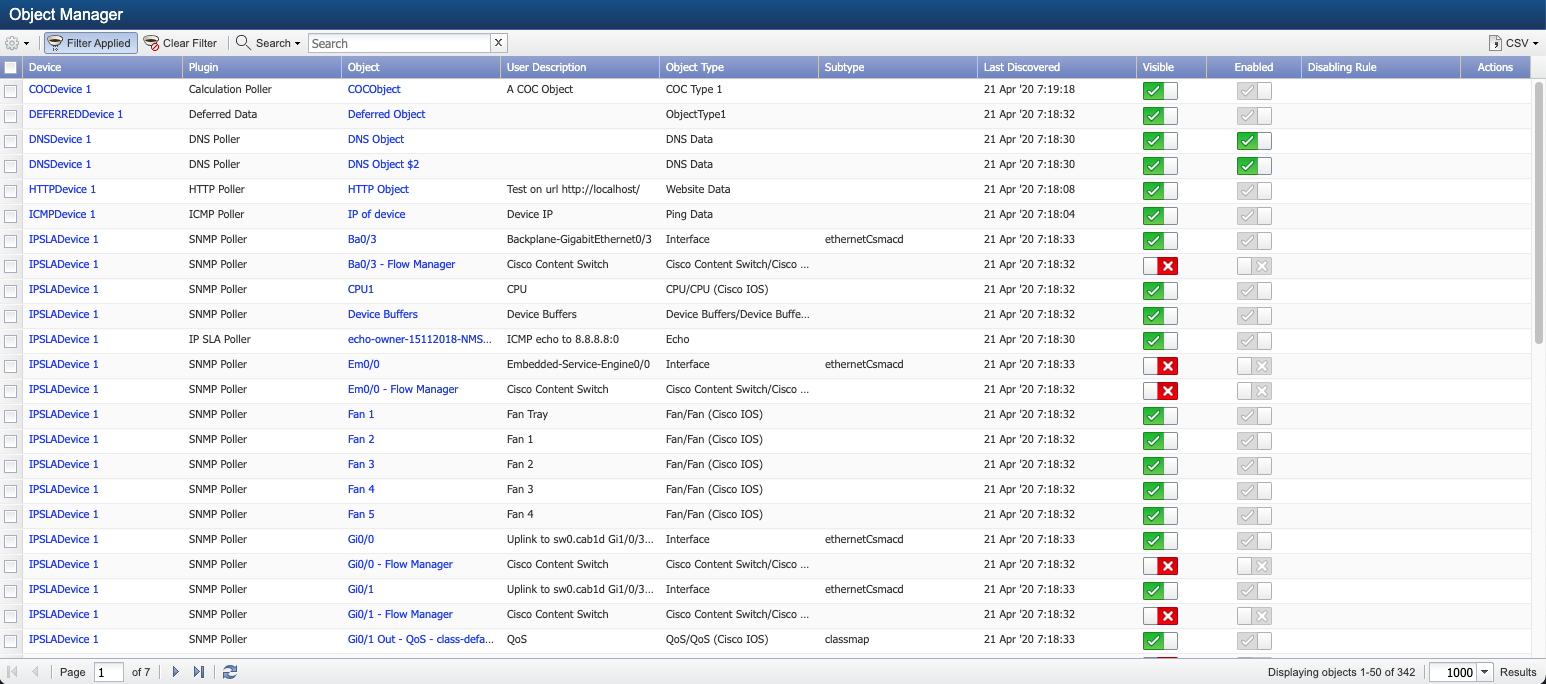
Object Manager
The Object Manager enables you to manage the objects that enabled plugins discover and poll on the devices you add to the Device Manager. Equipment is inherently dynamic. SevOne NMS maintains a list of the objects that were found in the previous discovery and creates a list of what is found during the current discovery. Each object found during the current discovery is crossed off the previous discovery list as the objects are detected. Objects that remain on the previous discovered list after discovery are declared to be missing. Cluster Manager settings enable you to define how long to wait before a missing object is disabled and how long to wait before a missing object is deleted. Each plugin uses a function called "findExistingObjectLike()" in the plugin discovery framework to help determine when a newly discovered object is actually an existing object with a new name. This function is described in section Object Types in SevOne NMS System Administration Guide.
To access the Object Manager from the navigation bar, click the Devices menu and select Object Manager.
You can click Object Manager from the Edit Device page to display objects for a specific device.
Object discovery varies from plugin to plugin. You must enable object types for the JMX plugin and the WMI plugin on the Object Types page to discover the objects for those plugins. You define objects for the Calculation plugin on the Calculation Editor. You define objects for the xStats Plugin on the xStats Source Manager. The Cluster Manager > Cluster Settings tab enables you to disable polling of objects the SNMP plugin discovers to be operationally down or administratively down.
If you see a rule id in column Disabling Rule, it means that an object rule is applied and it has disabled that object. When you click on a rule id in the Disabling Rule column, it will take you to the Object Rules page associated with the rule id. Disabling Rule column can be hidden from the table.
If the Enabled column denotes that an object is enabled, that object would have been enabled by a manual operation. The rule is still displayed as that will take effect when the device associated with the device is discovered. An object could be effective by multiple rules but the first rule in order on the object rule page takes precedence over any subsequent rules that would pertain to that object.
The Object Rules page enables you to define rules to manage polling of objects across multiple devices. For details, please refer to section Object Rules in SevOne NMS System Administration Guide.
Object List Filters
When you access the Object Manager from the navigation bar the Filter Options pop-up appears to enable you to define which objects appear in the list.
When you access the Object Manager from the Device Manager the list is filtered to display the visible, enabled, existing objects that the enabled plugins discover on the one device for which you access the Object Manager.
Filters enable you to display a specific set of objects. Click Set Filter of Filter Applied to display the Filter Options pop-up. Filters are optional and cumulative.
-
Click the *Peer drop-down and select the peers to display objects specific peers poll.
-
Click the Device Group drop-down and select the check box for each device group/device type whose objects are to display. If you select multiple device groups, select one of the following options.
-
Select Members of Any to display objects as an OR operator, (e.g., display objects for devices that are either in Group 1 OR in Group 2 OR in Group 3).
-
Select Members of All to display objects as an AND operator, (e.g., display objects for devices that are in all groups you select; in Group 1 AND in Group 2 AND in Group 3).
-
-
Click the Device drop-down and select the devices whose objects are to display.
-
Click the Plugin drop-down and select the plugins to display the objects polled by specific plugins.
-
Click the Object Group drop-down and select the object groups whose objects are to display.
-
Click the Object Type drop-down and select the check box for each object type to display objects for specific object types.
-
Click the *Object Visibility drop-down and select Show Only Visible, Show Only Hidden, or Show Both to display applicable hidden objects.
-
Click the Object Status drop-down and select Show Only Enabled, Show Only Disabled, or Show Both to display applicable active objects.
-
Click the *Object State drop-down and select Show Only Existing, Show Only Deleted, or Show Both to display objects that are marked for deletion.
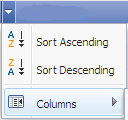 * Default settings do not display the Peer, Object Alternate Name, System Description, Visible, and Deleted columns in the list. To display these columns, hover the cursor over a column header to display a
  . Click
, select Columns, and then select the check box for each column to display in the list.
. Click
, select Columns, and then select the check box for each column to display in the list.
Manage Objects
When you enable or disable polling of an object on the Object Manager you override the settings for the object's object types and you override the object rules you define on the Object Rules page. In other words, when you manually enable an object, the only way to disable the object is to manually mark it to accept the auto settings or to manually mark it disabled.
When you enable an object for polling and the object's object type is disabled, SevOne NMS polls the object but does not discover the object, so the polls reflect only the data from the last discovery that occurred before you disabled the object type on the Object Types page.
Select the check box for each object to manage, click  , and select from the following options.
-
Select Set Visibility, and then select Visible or select Hidden.
Set Visibility option from the
drop-down is available only when Set Status is set to either Enabled or Disabled. The following appears when you include the Visible column in the list.
-
 - The object is visible. You can include poll data from visible objects in reports.
 -
 - The object is hidden. You need to apply a filter to display hidden objects. Poll data from hidden objects does not appear in reports. Polling continues for enabled hidden objects. Hidden objects can trigger alerts.
-
-
Select Set Status, and then select Auto, Enabled, or Disabled.
When Set Status is set to:
-
Auto - Enabled and Visible fields for the row selected cannot be modified.
-
Enabled - Enabled field for the row selected is enabled and Visible field can be modified.
-
Disabled - Enabled field for the row selected is disabled and Visible field can be modified.
The following appears in the Enabled column.
-
 (Auto-on) - The object is polled based on the Object Types page and the Object Rules page settings.
 -
- You used the Object Manager to enable the object to be polled.
-
 (Auto-off) - The object is not polled based on the Object Types page and the Object Rules page settings. You need to apply a filter to display disabled objects.
 -
- You used the Object Manager to disable polling of the object. You need to apply a filter to display disabled objects.
-
-
Select Deletion and then select Mark for Deletion or select Unmark for Deletion. When you select Mark for Deletion, the object and all associated data is deleted at the next discovery. No action is taken if the respective plugin discovery for the object to be deleted, fails. If you do not disable the object's object type on the Object Types page or you do not disable the object via an object rule, discovery finds the object and creates a new object with the same name and no poll data. This enables you to purge the data for objects. The following appears when you include the Deleted column.
-
- The object is marked for deletion. You need to apply a filter to display deleted objects. Polling continues for an object marked for deletion until the next discovery.
-
- The object is not marked for deletion.
-
-
Select Device Summary to display a link to the Device Summary and links to the report templates that are applicable for the device.
-
Select Object Summary to display a link to the Object Summary and links to the report templates that are applicable for the object.
-
Select Edit Metadata to display the Edit Metadata pop-up that enables you to manage values for the metadata attributes you want to associate with the object. See the Manage Metadata Values section below.
-
Select Edit Object to display the Object Editor pop-up that enables you to edit the object. See the Edit Objects section below.
-
Select Edit Indicators to display the Indicator Editor pop-up that enables you to edit the object's indicators. See the Edit Indicators section below.
Click on a device name in the Device column to display the Device Summary.
Click on an object name in the Object column to display the Object Summary.
Manage Metadata Values
The ![]() in the Actions column and the Edit Metadata option in the
in the Actions column and the Edit Metadata option in the ![]() menu provides access to the Edit Metadata pop-up that enables you to manage the value for the metadata attributes you want to associate with the object. The Metadata Schema page enables you to manage metadata attributes.
menu provides access to the Edit Metadata pop-up that enables you to manage the value for the metadata attributes you want to associate with the object. The Metadata Schema page enables you to manage metadata attributes.
-
Click
 in the Actions column to display the Edit Metadata pop-up.
 -
Click
 to make the Values field editable.
 -
In the Values field, enter the value for the attribute with the applicable attribute type specific format.
-
Date/Time: Must have a valid date and time format and can use natural language processing such as; 3 Thursdays ago at 5pm.
-
Integer: Type: Value must be numeric.
-
IP Address: Must use one of the following formats:
-
IPv4: for example, 10.1.1.100 or 172.16.254.1
-
IPv6: supports Zero Suppression format. For example, 2001:db8::1234::567:8:1 or 2601::0800:200c:417a
-
-
Latitude and Longitude: Must have valid coordinates that are decimal values: -90.00 to 90.00 values for Latitude and -180.00 to 180.00 for Longitude
-
MAC Address: Must use the following format: 0A:00:27:00:00:00
-
Text (Validated): Supports up to 1024 UTF-16 characters including PCRE regex that uses preg-match (perform a regular expression match) to validate the regular expression you enter against the attribute definition from the Metadata Schema page.
-
Text: Supports up to 65K UTF-16 varchar characters.
-
URL: Complete the following fields:
-
Link Display Text: Enter the text to display in reports as the link caption.
-
URL: Enter the URL. Must have FQDN validation, supports username prefix, ports, protocol AND ?/& for HTTP GET variables, and optional additional PCRE regex for validation, and must be fewer than 255 characters.
-
-
-
Click Update to save the value.
Edit Objects
The  in the Actions column and the Edit Object option in the
menu provides access to the Edit Object pop-up that enables you to edit an object.
in the Actions column and the Edit Object option in the
menu provides access to the Edit Object pop-up that enables you to edit an object.
-
Click
to display the Object Editor pop-up. -
The Object Name field displays the object name. You cannot edit the object name.
-
The Object Alternate Name field allows you to enter a user-friendly alternate name for the object.
-
The System Description displays the object system description. You cannot edit the system description.
Any apostrophes or backslashes in your device's interface description will be omitted in the System Description.
-
In the User Description field, enter the description you want to use for the object.
-
Select the Override Description check box to display the User Description in reports instead of the System Description.
-
The Object Type field displays the object type the plugin discovered on the device. You cannot edit the object type.
-
The Last Discovered field displays the last time the object was discovered. You cannot edit the last discovered.
-
Click the Enabled drop-down.
When Enabled is set to:
-
Auto - field Visible check box is read-only and cannot be modified.
-
Enabled - field Visible check box can be toggled.
-
Disabled - field Visible check box can be toggled.
-
Select Auto to use the poll settings from the Object Rules page and the Object Types page.
-
Select On to override rules and object type settings and poll the object.
-
Select Off to override rules and object type settings and not poll the object. If you do not have the filter set to display disabled objects, the object disappears from the list.
-
-
Select the Visible check box to make the object visible in reports.
-
Select the Deleted check box to mark the object for deletion. If you do not disable the object's object type, the object re-appears on the Object Manager for the device upon next discovery.
-
Click Save.
Edit Indicators
The Edit Indicators option in the
menu provides access to the Edit Indicator pop-up that enables you to edit the indicators for an object.
-
Select the check box for an object, click
, and then select Edit Indicators to display the Edit Indicator pop-up. -
The Indicator column displays the indicator name. You cannot edit the indicator name.
-
The Description column displays the indicator description. You cannot edit the description.
-
The System Maximum Value column displays the maximum value the plugin determines the indicator can present. You cannot edit the system maximum value.
-
In the Override column, click
to display
to use the value you enter in User Maximum Value column instead of the system maximum value.
- You cannot define a maximum value. -
Click in the User Maximum Value column to make the field editable. Enter the maximum value you want to use for the indicator.
-
The Measured Units column displays the unit of measure for the indicator values. You cannot edit the measured units.
-
The Enabled column displays Yes when the indicator's indicator type is enabled and metrics are polled from the indicator. Displays No when the indicator's indicator type is disabled and no metrics are polled from the indicator. The Object Types page enables you to manage indicator types.
When an indicator is discovered and you disable that Indicator Type from Administration > Monitoring Configuration > Object Types, the setting that determines when it will be removed from the report creation selection (for example, choosing indicators for an object in the Performance Metric Graph) is the Days until Deleted field under Administration > Cluster Manager > Cluster Settings tab > Discovery subtab > Missing Objects section.
Although the setting is for missing objects, the same applies for its indicators. If you add a new device and you have already disabled the Indicator Type from Administration > Monitoring Configuration > Object Types, the new device will not discover this indicator and it will not be available in the Instant Graph selection under your object.
-
Click Save.
Export Objects
You may export your objects as a CSV report. When selecting to export as CSV, you can choose from the following. The reports generated will respect any search filters and columns currently applied to the Object Manager. When you click the CSV export icon, the following options enable you to choose which objects you want to include in the report.
-
Selected Objects - Click to include only the objects for which you select the check box in the Objects list.
-
This Page - Click to include the object that currently display in the Object list.
-
All devices - Click to include all objects.
The Object Manager can export a maximum of 100,000 objects in a single report.