Table of Contents (Start)
- Topics
- Introducing SevOne
- Login
- Startup Wizard
- Dashboard
- Global Search - Advanced Search
- Report Manager
- Report Attachment Wizard
- Report Properties
- Report Interactions
- Instant Graphs
- TopN Reports
- Alerts
- Alert Archives
- Alert Summary
- Instant Status
- Status Map Manager
- Edit Maps
- View Maps
- FlowFalcon Reports
- NBAR Reports
- Logged Traps
- Unknown Traps
- Trap Event Editor
- Trap Destinations
- Trap Destination Associations
- Policy Browser
- Create and Edit Policies
- Webhook Definition Manager
- Threshold Browser
- Create and Edit Thresholds
- Probe Manager
- Discovery Manager
- Device Manager
- New Device
- Edit Device
- Object Manager
- High Frequency Poller
- Device Summary
- Device Mover
- Device Groups
- Object Groups
- Object Summary
- Object Rules
- VMware Browser
- AWS Plugin
- Azure Plugin (Public Preview)
- Calculation Plugin
- Database Manager
- Deferred Data Plugin
- DNS Plugin
- HTTP Plugin
- ICMP Plugin
- IP SLA Plugin
- JMX Plugin
- NAM
- NBAR Plugin
- Portshaker Plugin
- Process Plugin
- Proxy Ping Plugin
- SDWAN Plugin
- SNMP Plugin
- VMware Plugin
- Web Status Plugin
- WMI Plugin
- xStats Plugin
- Indicator Type Maps
- Device Types
- Object Types
- Object Subtype Manager
- Calculation Editor
- xStats Source Manager
- User Role Manager
- User Manager
- Session Manager
- Authentication Settings
- Preferences
- Cluster Manager
- Maintenance Windows
- Processes and Logs
- Metadata Schema
- Baseline Manager
- FlowFalcon View Editor
- Map Flow Objects
- FlowFalcon Views
- Flow Rules
- Flow Interface Manager
- MPLS Flow Mapping
- Network Segment Manager
- Flow Protocols and Services
- xStats Log Viewer
- SNMP Walk
- SNMP OID Browser
- MIB Manager
- Work Hours
- Administrative Messages
- Enable Flow Technologies
- Enable JMX
- Enable NBAR
- Enable SNMP
- Enable Web Status
- Enable WMI
- IP SLA
- SNMP
- SevOne Data Publisher
- Quality of Service
- Perl Regular Expressions
- Trap Revisions
- Integrate SevOne NMS With Other Applications
- Email Tips and Tricks
- SevOne NMS PHP Statistics
- SevOne NMS Usage Statistics
- Glossary and Concepts
- Map Flow Devices
- Trap v3 Receiver
- Guides
- Quick Start Guides
- AWS Quick Start Guide
- Azure Quick Start Guide (Public Preview)
- Data Miner Quick Start Guide
- Flow Quick Start Guide
- Group Aggregated Indicators Quick Start Guide
- IP SLA Quick Start Guide
- JMX Quick Start Guide
- Metadata Quick Start Guide
- RESTful API Quick Start Guide
- Self-monitoring Quick Start Guide
- SevOne NMS Admin Notifications Quick Start Guide
- SNMP Quick Start Guide
- Synthetic Indicator Types Quick Start Guide
- Topology Quick Start Guide
- VMware Quick Start Guide
- Web Status Quick Start Guide
- WMI Quick Start Guide
- xStats Quick Start Guide
- xStats Adapter - Accedian Vision EMS (TM) Quick Start Guide
- Deployment Guides
- Automated Build / Rebuild (Customer) Instructions
- Generate a Self-Signed Certificate or a Certificate Signing Request
- SevOne Best Practices Guide - Cluster, Peer, and HSA
- SevOne Data Platform Security Guide
- SevOne NMS Implementation Guide
- SevOne NMS Installation Guide - Virtual Appliance
- SevOne NMS Advanced Network Configuration Guide
- SevOne NMS Installation Guide
- SevOne NMS Port Number Requirements Guide
- SevOne NMS Upgrade Process Guide
- SevOne Physical Appliance Pre-Build BIOS and RAID Configuration Guide
- SevOne SAML Single Sign-On Setup Guide
- Cloud Platforms
- Other Guides
- Quick Start Guides
SevOne NMS Installation Guide - Virtual Appliance
SevOne Documentation
All documentation is available from the IBM SevOne Support customer portal.
© Copyright International Business Machines Corporation 2024.
All right, title, and interest in and to the software and documentation are and shall remain the exclusive property of IBM and its respective licensors. No part of this document may be reproduced by any means nor modified, decompiled, disassembled, published or distributed, in whole or in part, or translated to any electronic medium or other means without the written consent of IBM.
IN NO EVENT SHALL IBM, ITS SUPPLIERS, NOR ITS LICENSORS BE LIABLE FOR ANY DAMAGES, WHETHER ARISING IN TORT, CONTRACT OR ANY OTHER LEGAL THEORY EVEN IF IBM HAS BEEN ADVISED OF THE POSSIBILITY OF SUCH DAMAGES, AND IBM DISCLAIMS ALL WARRANTIES, CONDITIONS OR OTHER TERMS, EXPRESS OR IMPLIED, STATUTORY OR OTHERWISE, ON SOFTWARE AND DOCUMENTATION FURNISHED HEREUNDER INCLUDING WITHOUT LIMITATION THE WARRANTIES OF DESIGN, MERCHANTABILITY OR FITNESS FOR A PARTICULAR PURPOSE, AND NONINFRINGEMENT.
IBM, the IBM logo, and SevOne are trademarks or registered trademarks of International Business Machines Corporation, in the United States and/or other countries. Other product and service names might be trademarks of IBM or other companies. A current list of IBM trademarks is available on ibm.com/trademark.
About
This document describes the installation of a SevOne virtual appliance. A virtual appliance can be a SevOne Performance Appliance Solution (vPAS) or a SevOne Dedicated NetFlow Collector (vDNC), each of which runs the SevOne Network Management Solution (NMS) software.
In this guide if there is,
-
[any reference to master] OR
-
[[if a CLI command contains master] AND/OR
-
[its output contains master]],
it means leader.
And, if there is any reference to slave, it means follower.
Create Support Account
To create a user account to enable SevOne Support engineers to provide support services, go to https://www.ibm.com/mysupport/. Or, contact SevOne Support via phone.
-
In the address field on your web browser enter https://www.ibm.com/mysupport/ and press Enter.
-
Click Login to display the IBM SevOne Support Login page.
-
In the Create New Account section, enter the following information.
-
Your Full Name
-
Email Address
-
Phone Number
-
Company
-
-
Click Create Account.
-
Your account is created instantly and SevOne Support reviews the account validity within the next business day.
Multi Peer and Hot Standby Implementations
The SevOne NMS Cluster Manager provides an Integration tab to enable you to build your cluster and to add a new PAS appliance and/or a new vPAS as a peer into an existing cluster.
When your new virtual appliance is a Hot Standby Appliance, perform the steps in chapters 3 and 4 to install the SevOne software and to integrate the computer into your network then contact SevOne Support via phone or go to IBM SevOne Support customer portal to ensure that the Hot Standby Appliance is appropriately implemented into the cluster.
Prerequisites
There are three methods to download the image for a virtual SevOne appliance.
-
VMware - Standard method for all virtual SevOne software installations via a .ova file download from http://fileshare.sevone.com/ftp/login/.
-
KVM (Kernel-based Virtual Machine) - A virtualization infrastructure for the Linux kernel that turns it into a hypervisor. This method uses a .QCOW2 file.
-
Microsoft Azure - The method used to install is a Virtual Hard Disk (VHD) image.
All three methods have the following hardware requirements.
Hardware Requirements
In a cluster that contains mixed sized appliances, the largest hardware capacity appliance should be the Cluster Leader. There is RAM overhead exerted on the Cluster Leader based on its additional responsibilities. Due to this, SevOne strongly advises you to implement this recommendation.
The average Input / Output Operations Per Second (IOPS) is 19,000KBs.
|
Hardware |
vCPU Cores |
RAM (GB) |
Hard Drives |
Flow Limit (FPS) |
Max Indicators per Second (IPS) |
|
vPAS5k |
2 |
8 |
150GB |
- |
333 |
|
vPAS20k |
8 |
24 |
600GB |
- |
1,333 |
|
vPAS60k |
8 |
44 |
150GB/1.3TB |
- |
4,000 |
|
vPAS100k |
8 |
96
Higher demands (for example,
|
500GB/2TB |
- |
6,666 |
|
vPAS200k |
16 |
220 |
600GB/4TB |
- |
13,333 |
|
vDNC100 |
8 |
16 |
150GB/400GB |
30,000 |
- |
|
vDNC300 |
16 |
48 |
150GB/800GB |
80,000 |
- |
|
vDNC1000 |
24 |
96 |
150GB/1500GB |
80,000 |
- |
|
vDNC1500 |
24 |
128 |
150GB/3000GB |
80,000 |
- |
Used hard drive space vs. provisioned capacity - virtual machines are thin-provisioned and used space is based on polling the maximum number of licensed objects for 1 year at 5 minute intervals.
Any SAN with SSDs and supporting thin-provisioned LUNs is considered modern.
To properly size your SevOne PAS, the key aspects of SevOne PAS capacity are,
-
Devices
-
Objects
-
Indicators
-
Poll Frequency
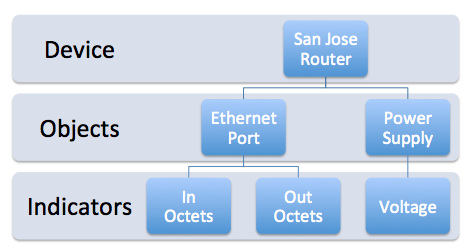
Let's assume you want to monitor...
-
a device, San Jose Router, with 2 objects. Object Ethernet Port with indicators In Octets and Out Octets and Object Power Supply with indicator Voltage.
A device can have one or more objects. And, each object can have one or more indicators.
IPS = (#Objects * #Indicators per Object) / (Poll Frequency in seconds)where,- Objects = 60,000- Indicators = 20- Poll Frequency = 300 secondsIPS = (60,000 * 20) / 300 = 4,000where,- Objects = 200,000- Indicators = 20- Poll Frequency = 300 secondsIPS = (200,000 * 20) / 300 = 13,333To change the poll frequency for an existing device, please refer to Edit Device. For a new device, please refer to New Device to change the default poll frequency.
Download Virtual Appliance Image File
For VMware, you need the .ova file. For KVM, .QCOW2 file is required. And, for Microsoft Azure, you will need the .vhd file.
The virtual appliance image file can be downloaded from IBM Passport Advantage (https://www.ibm.com/software/passportadvantage/pao_download_software.html) via Passport Advantage Online. However, if you are on a legacy / flexible SevOne contract and do not have access to IBM Passport Advantage but have an active Support contract, please contact SevOne Support Team for the image file. Download can take ~30 minutes.
VMware Considerations
A vPAS/vDNC installation using VMware has the following host system requirements
-
Intel-VT or AMD-V CPU extensions
-
VMware ESXi v5.0 (minimum requirement). Tested with ESXi 6.7 and later (VM version 14)
-
Installation using VMware is supported on any premise or VMware Cloud Infrastructure as long as it is compatible with the ESXi and VM versions listed above.
-
Does not run on VMware Workstation / VMware Player
The following are the VMware initial setup best practices.
-
The SevOne .ova image file contains a vmware-tools package to provide emulation for what vCenter and the ESX need to get from the VM. This package provides a set of utilities and drivers to help you improve the performance and management of virtual machines.
-
VMware Tools include the VMXNET3 network driver. The VMXNET3 adapter is a virtualized Network Interface Card that offers better performance and should be used for the vPAS100k.
-
Turn on Storage I/O Monitoring in vCenter for all data stores used by the appliance to diagnose performance issues.
-
Ensure that hyperthreading is enabled by default in the virtual data center. Hyperthreading is enabled or disabled in the BIOS when the system is booted.
-
Ensure adequate CPU and memory allocation as described earlier in this document. Do not inadvertently limit CPU or memory and ensure that the Unlimited check box is selected.
For a physical system, the concept of a CPU is easy term to understand. However, in the virtualized space it is difficult to determine how many cores a CPU has and whether hyperthreading is turned on. One way to normalize the values you should use to plan your virtual environment is to use the SPECint benchmark published by SPEC. SPEC breaks out CPU performance metrics for:
-
CPU Speed (cint)
-
CPU Throughput (rint)
The cint performance runs a single instance of the benchmark test to measure the speed of the system to perform a single task. rint runs the same number of instances of the benchmark test as there are threads in the machine to measure parallelization. Although a system may have a faster processor, other factors can reduce the number of parallel tasks, so rint is as important a measurement as cint. SevOne software provides good parallelization that benefits from more effective CPUs rather than from a smaller number of faster CPUs.
A machine with two CPUs and four cores per CPU, with one thread per core, may have a speed rating of 10 and a throughput rating of 40, rather than 80, which would be the expected value if all cores and threads were completely independent so this machine has 4 effective CPUs. To expand further, consider a PAS10K which runs on Dell R620 hardware. There are 2 physical CPUs with 8 cores and hyperthreading is enabled. This should result in 32 effective CPUs, but the cint and rint values of 54.7 and 585 determine an effective CPU rating of almost 11, not 32. Similar results exist for the PAS200K (R720xd) which should have 40 effective CPUs but actually rates about 14.
Virtualization can provide better efficiency of the underlying hardware through a fundamental model of over subscription. When set up properly, VMs can freely move about within the cluster of hypervisors to resolve temporary resource constraints without administrator intervention. It is important to note the following:
-
Since the system may attempt to resolve resource contention issues autonomously, performance related postmortem analysis can be difficult via the VM alone.
-
From the VM, it is difficult to determine if you actually have the resources you think you have without an attempt to continuously allocate them, which degrades performance.
-
Some things that constrain the performance of VMs are not things that trigger a VM to move within the cluster.
-
Data points that describe the level of resource contention and over subscription are intentionally not revealed to the VMs and access to vCenter in those scenarios is not universal.
SevOne NPM supports migration from one host to a compatible-versioned host using vMotion, provided they are on the same vSphere installation.
VMware Hybrid migration with vMotion has not been tested and is not a supported migration.
Using VMware Snapshot functions to move SevOne NPM between VMware Instances has not been tested and is not a supported migration.
Troubleshooting System Performance
-
Ensure that CPU utilization is in the range of 50-70%. For VMs above this range, vCPUs must be added to the SevOne VM. Note that adding more vCPUs than necessary may adversely affect performance.
-
Ensure adequate reserve of CPU and memory for the VM. Through testing and experience, analyzing esxtop data, the appropriate level of reservation can be determined. Reservations only take effect when there are insufficient resources to meet the needs of all the VMs on a particular ESX server.
VMware Implementation
The appliance-based installation is very similar to the installation based on deploying an .ova to your own Linux machine. The following is an overview of each approach as well as the upgrade process.
Deploy Appliance
For appliance-based installation, please follow the instructions in SevOne NMS Appliance Insert guide to deploy each NMS appliance.
Deploy OVA
The SevOne NMS .ova file can be downloaded from IBM Passport Advantage (https://www.ibm.com/software/passportadvantage/pao_download_software.html) via Passport Advantage Online . However, if you are on a legacy / flexible SevOne contract and do not have access to IBM Passport Advantage but have an active Support contract, please contact SevOne Support Team for the file. Save the .ova to a folder on your server.
To deploy SevOne NMS .ova, deploy it on each Linux machine you plan to install NMS on. For details, please refer to Deploy an OVF or OVA Template (docs.vmware.com) .
After successful deployment, change the default password, and then proceed to section Network Configuration Via the Config Shell for VMware, KVM, and Azure Implementations.
KVM Implementation
Each KVM implementation varies dependent upon your environment. The following workflow reflects an Openstack implementation. The typical implementation is to set up a private, internal network for the Openstack instances to use for communication. This private network is made available to the public network via NAT. You apply a floating IP address from the public network to the instance's main interface in the private network. Users connect to the floating IP address via their regular network. SevOne instances (each virtual appliance you peer into the cluster) is peered to one another via the private IP address. The private IP address must be reachable (i.e., in the same Neutron network, or otherwise routable). Otherwise, you should use floating IP addresses from the public network to establish peering. Metadata service is not supported.
The KVM image file has a QCOW2 file extension. QCOW2 is a file format for disk image files used by QEMU, a hosted virtual machine monitor. It stands for QEMU Copy On Write and uses a disk storage optimization strategy that delays allocation of storage until it is actually needed. You followed the steps earlier in this document to download the QCOW2 image.
Openstack Installation
Perform the following steps to incorporate the SevOne image via Openstack.
$ glance image-create --name "SevOne Image" --is-public true --disk-format qcow2 \ --container-format bare \ --file SevOne.qcow2
Log on to Openstack. If you do not have the Openstack GUI or you prefer to use command line Openstack, see the end of this section for command line instructions.
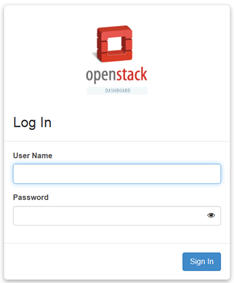
-
In the Username field, enter your Openstack user name.
-
In the Password field, enter your Openstack password.
-
Click Sign In.
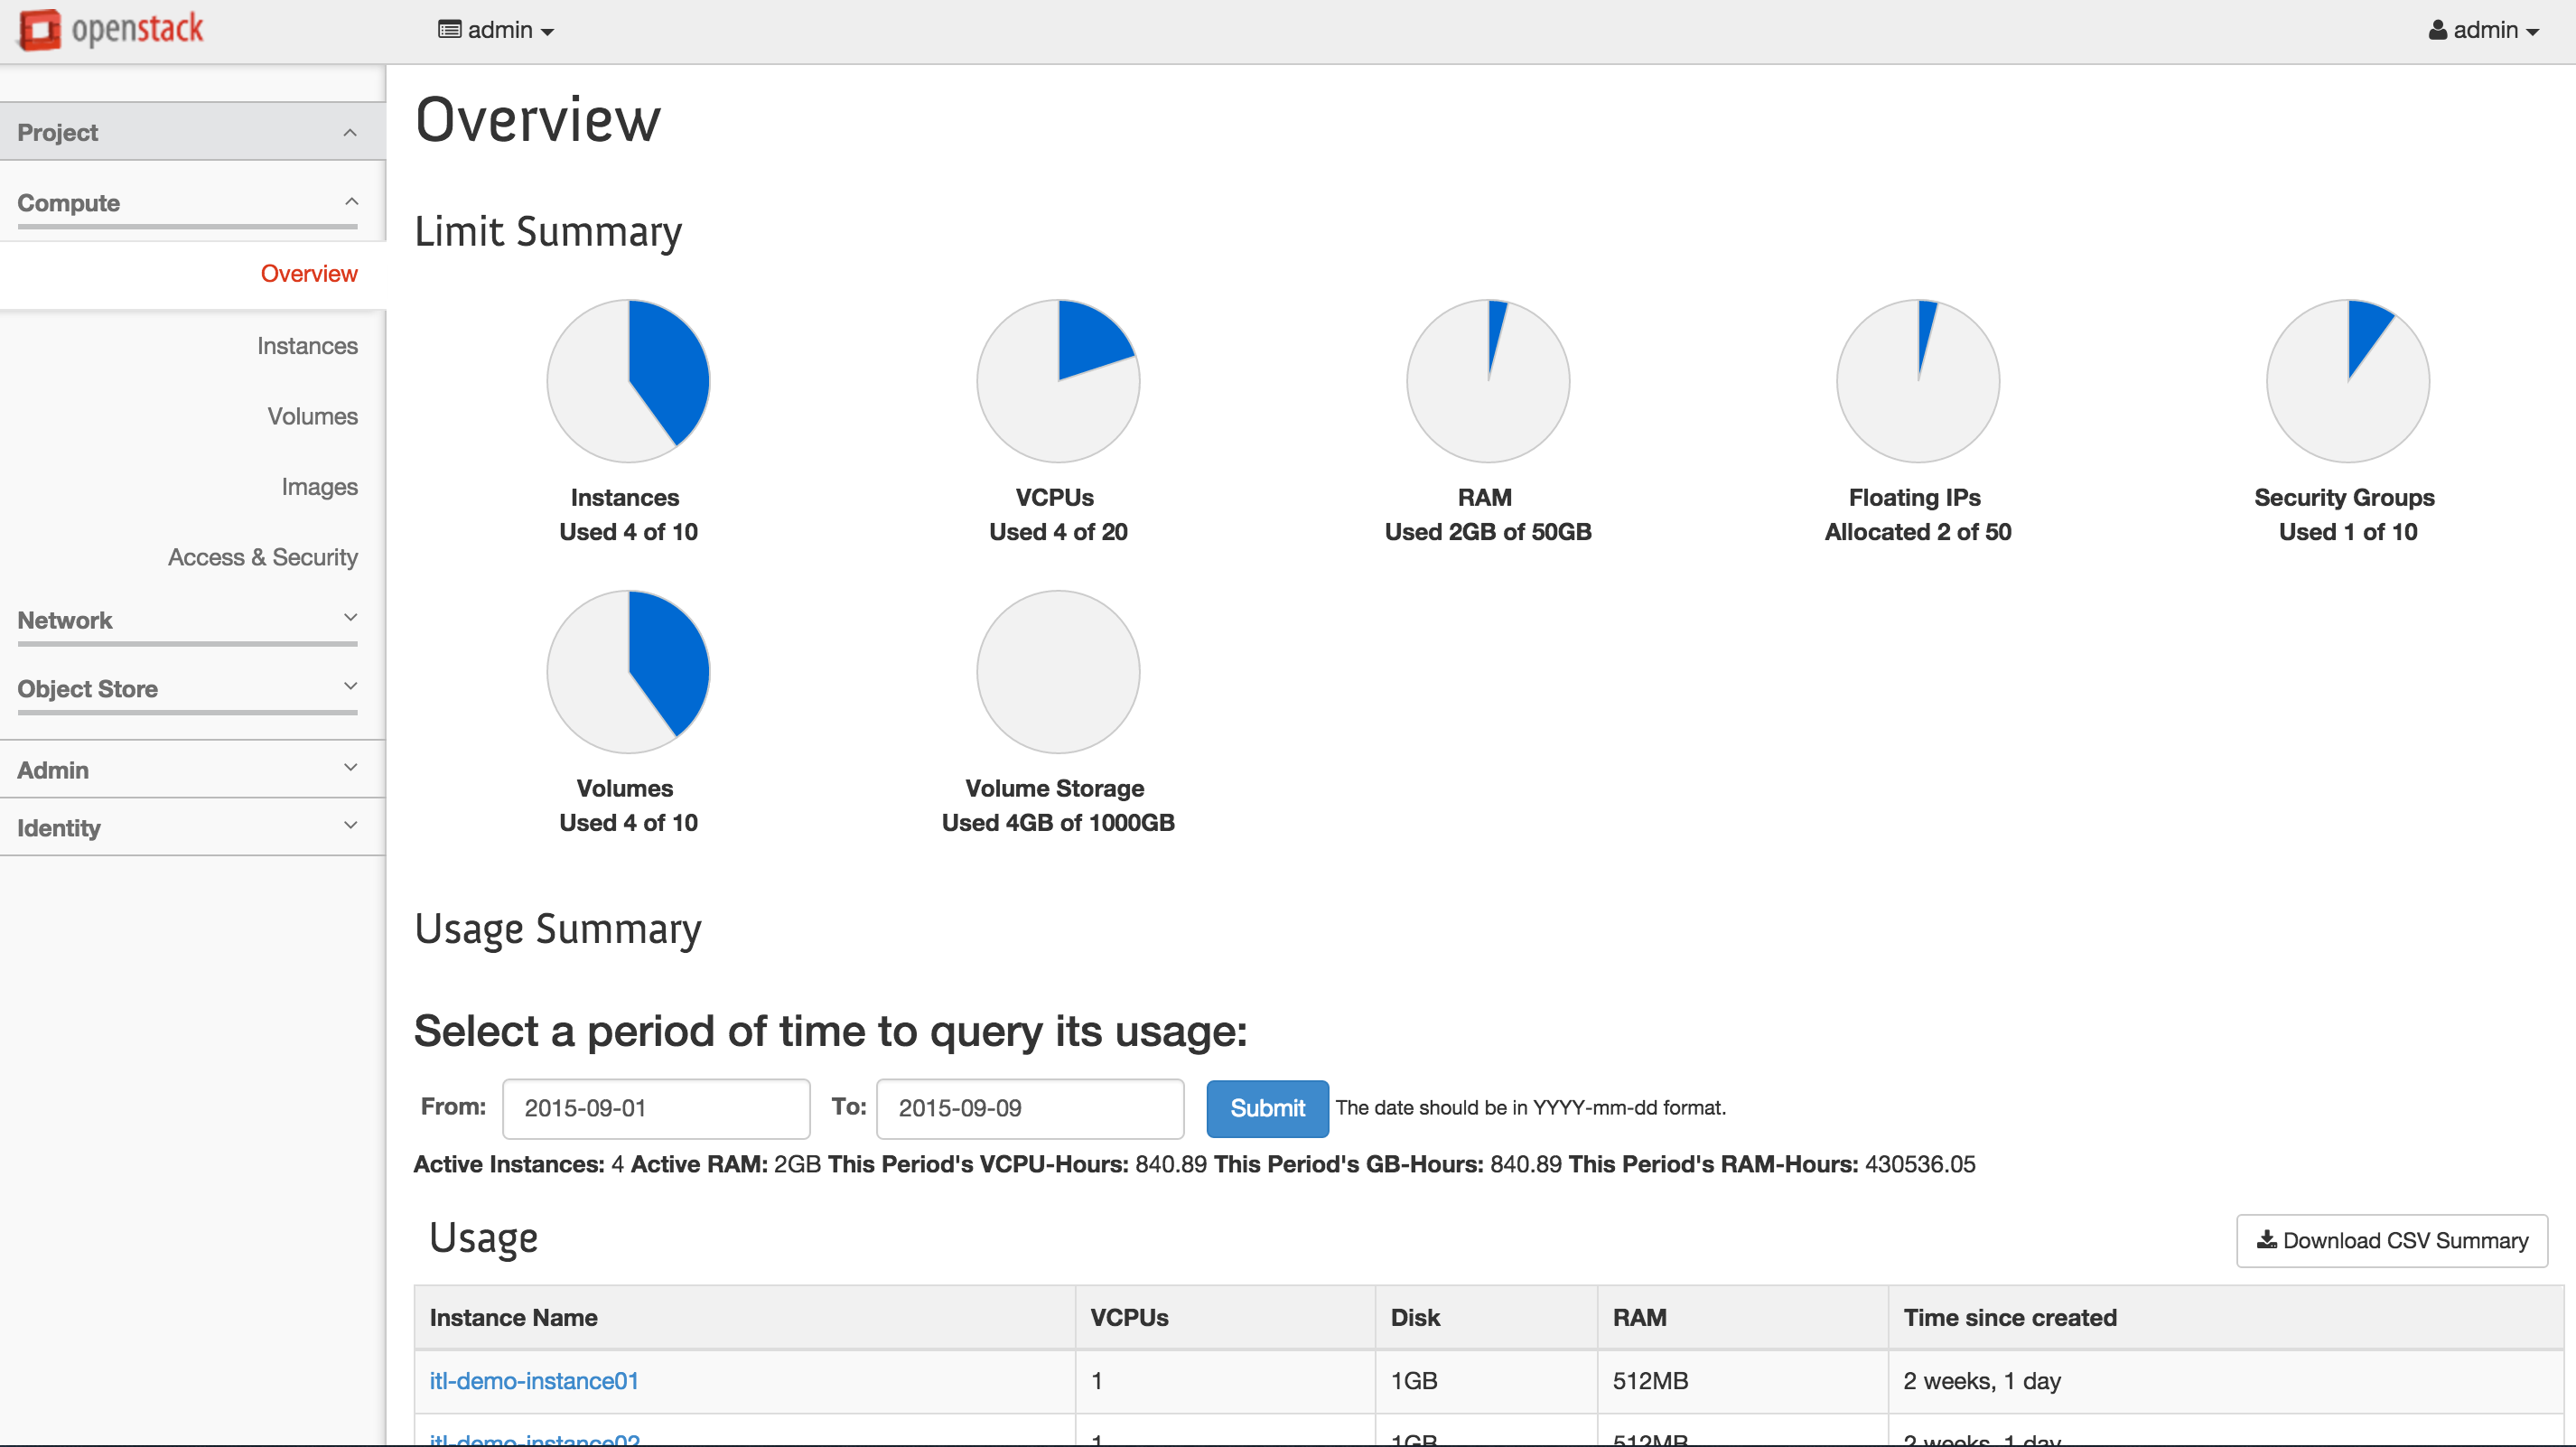
The Overview page appears with the System - Overview tab displayed.
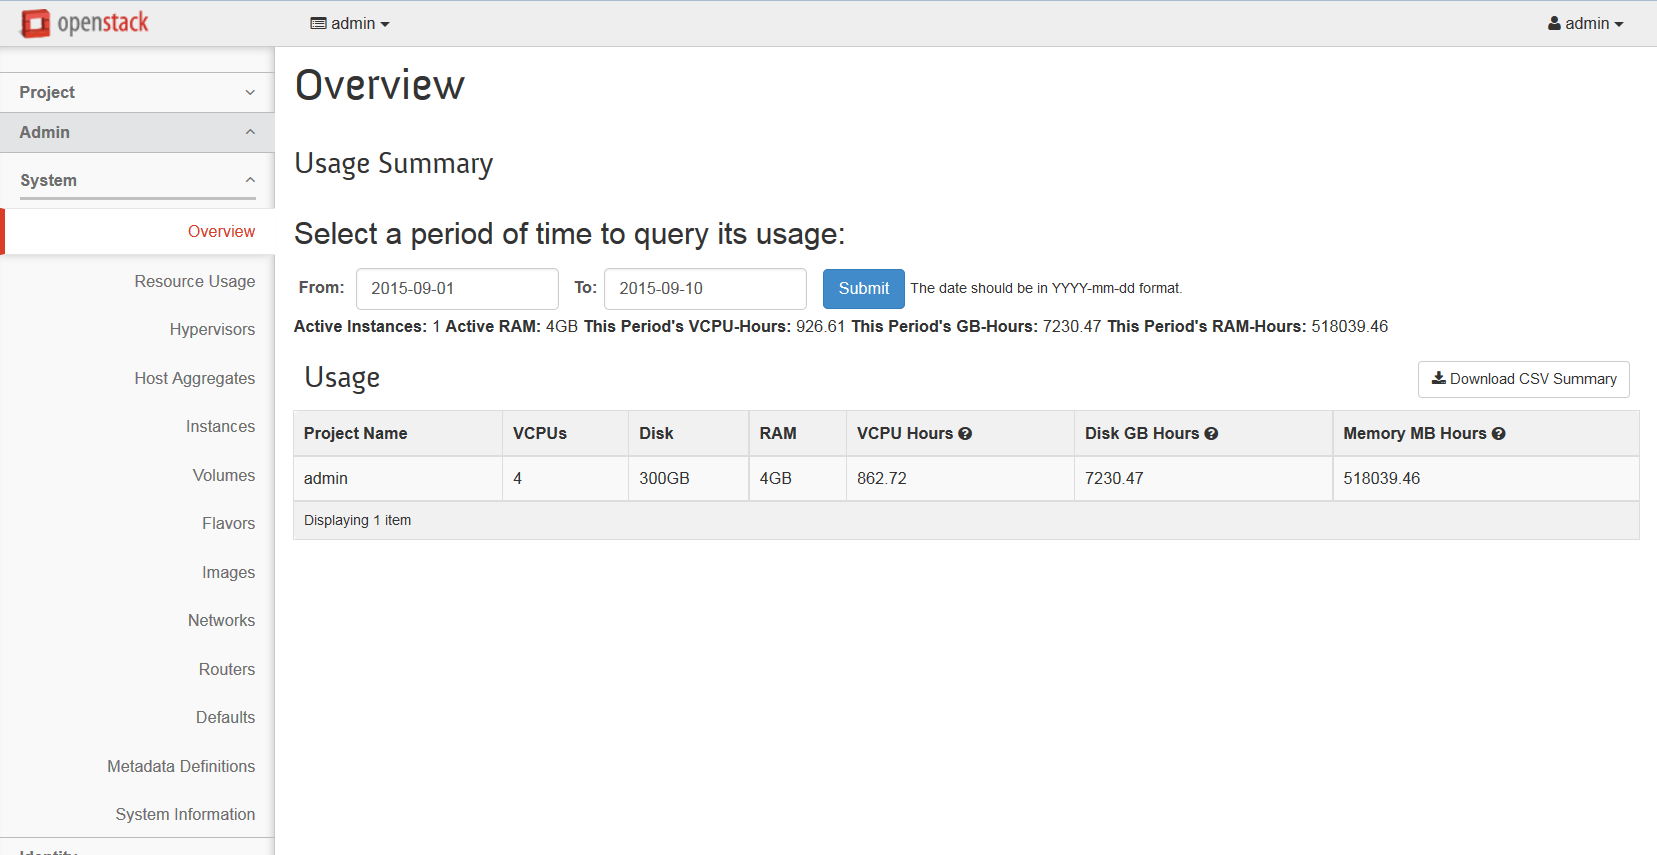
In the left menu, click Project, then select Compute, and then select Overview to display the statistics that enables you to determine if you have enough space for the virtual appliance. For details, please refer to section Hardware Requirements.
After you confirm that there are enough resources to install the virtual appliance, perform the following steps to create a flavor.
-
In the left menu select System then select Flavors.
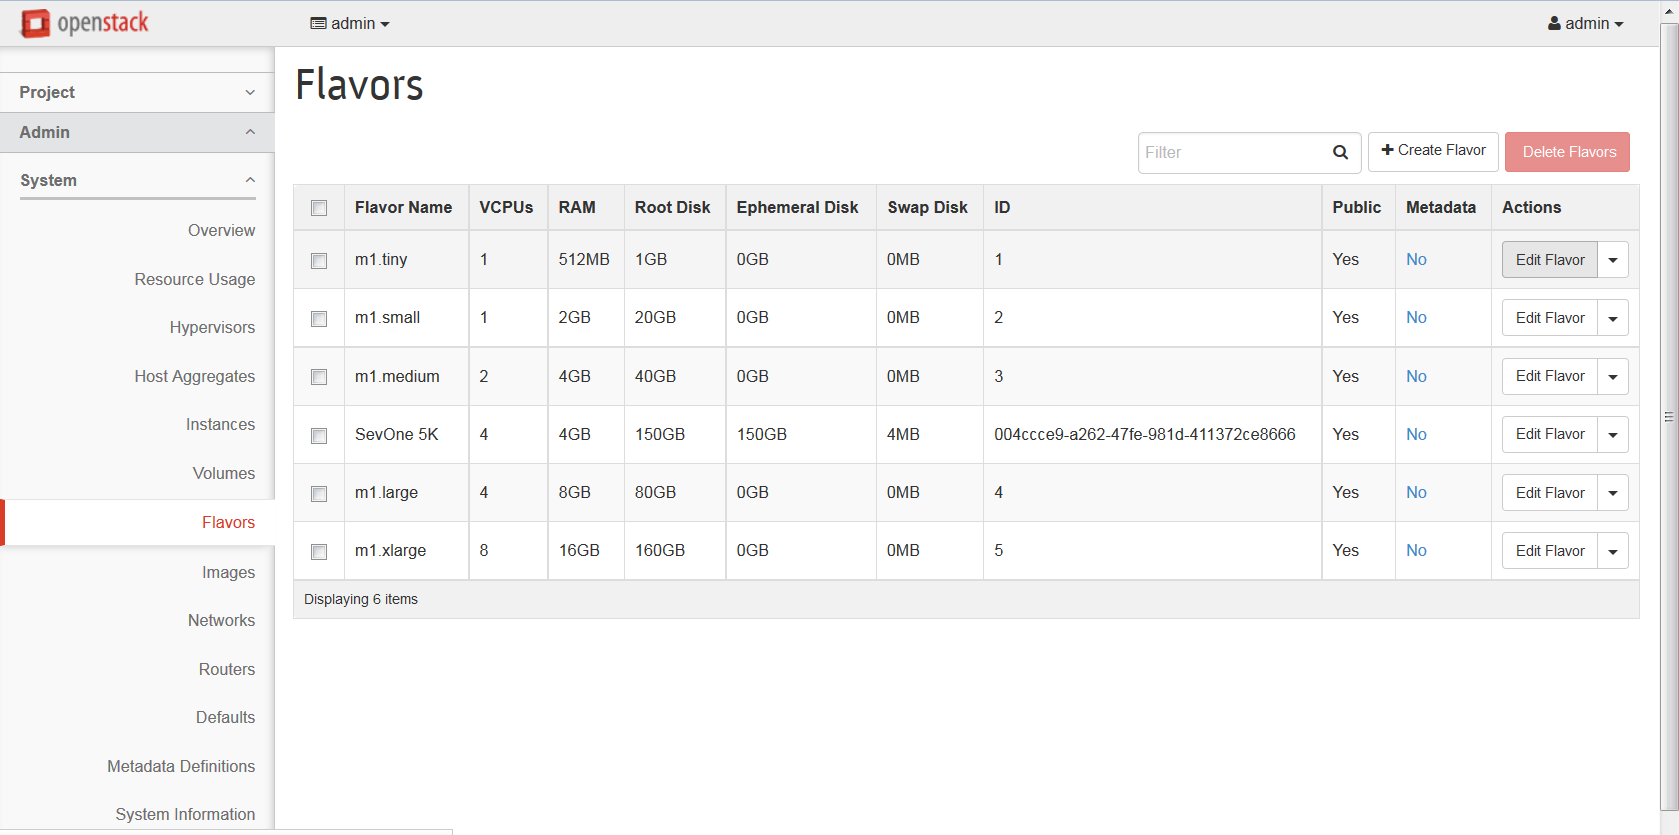
-
Click Create Flavor.
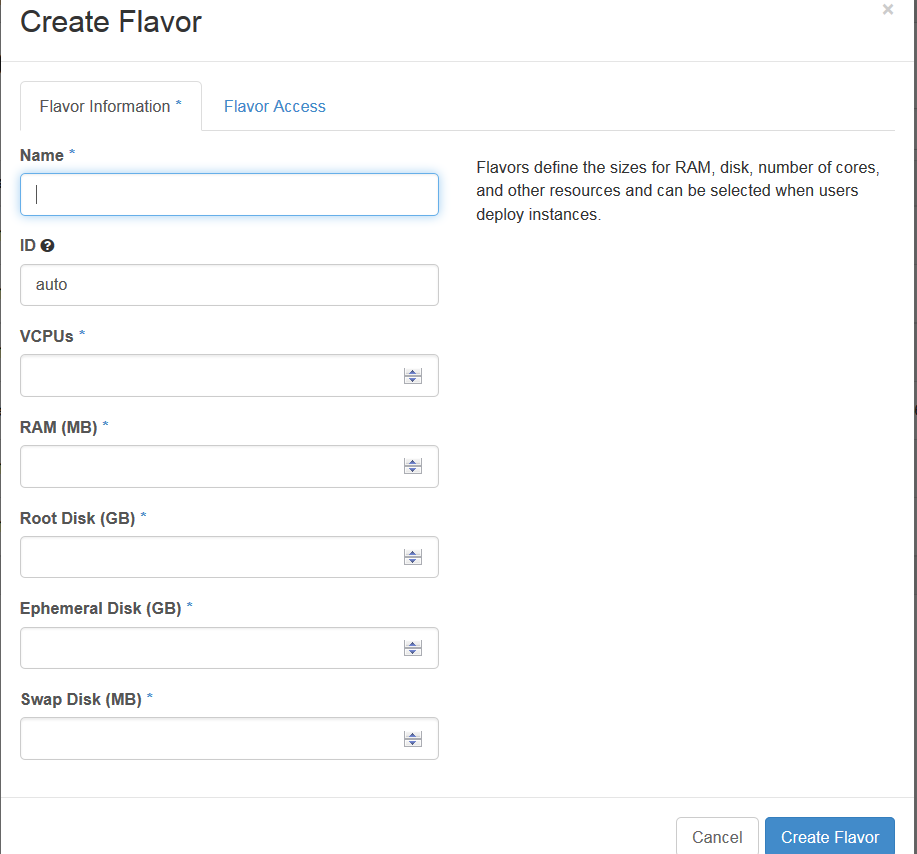
-
In the Name field, enter the name of the flavor.
-
In the ID field, enter the flavor identifier.
-
In the VCPUs field, enter the number of virtual CPUs. This is equal to the number of CPUs plus the number of cores listed in the requirements.
-
In the RAM field, enter the amount of RAM.
-
In the Root Disk field, enter the amount of space to allocate on the root disk.
-
In the Ephemeral Disk field, enter the amount of space to allocate on the ephemeral disk.
-
In the Swap Disk field, enter the amount of space to allocate on the swap disk.
-
Click Create Flavor to return to the Flavors page with the new flavor displayed in the list.
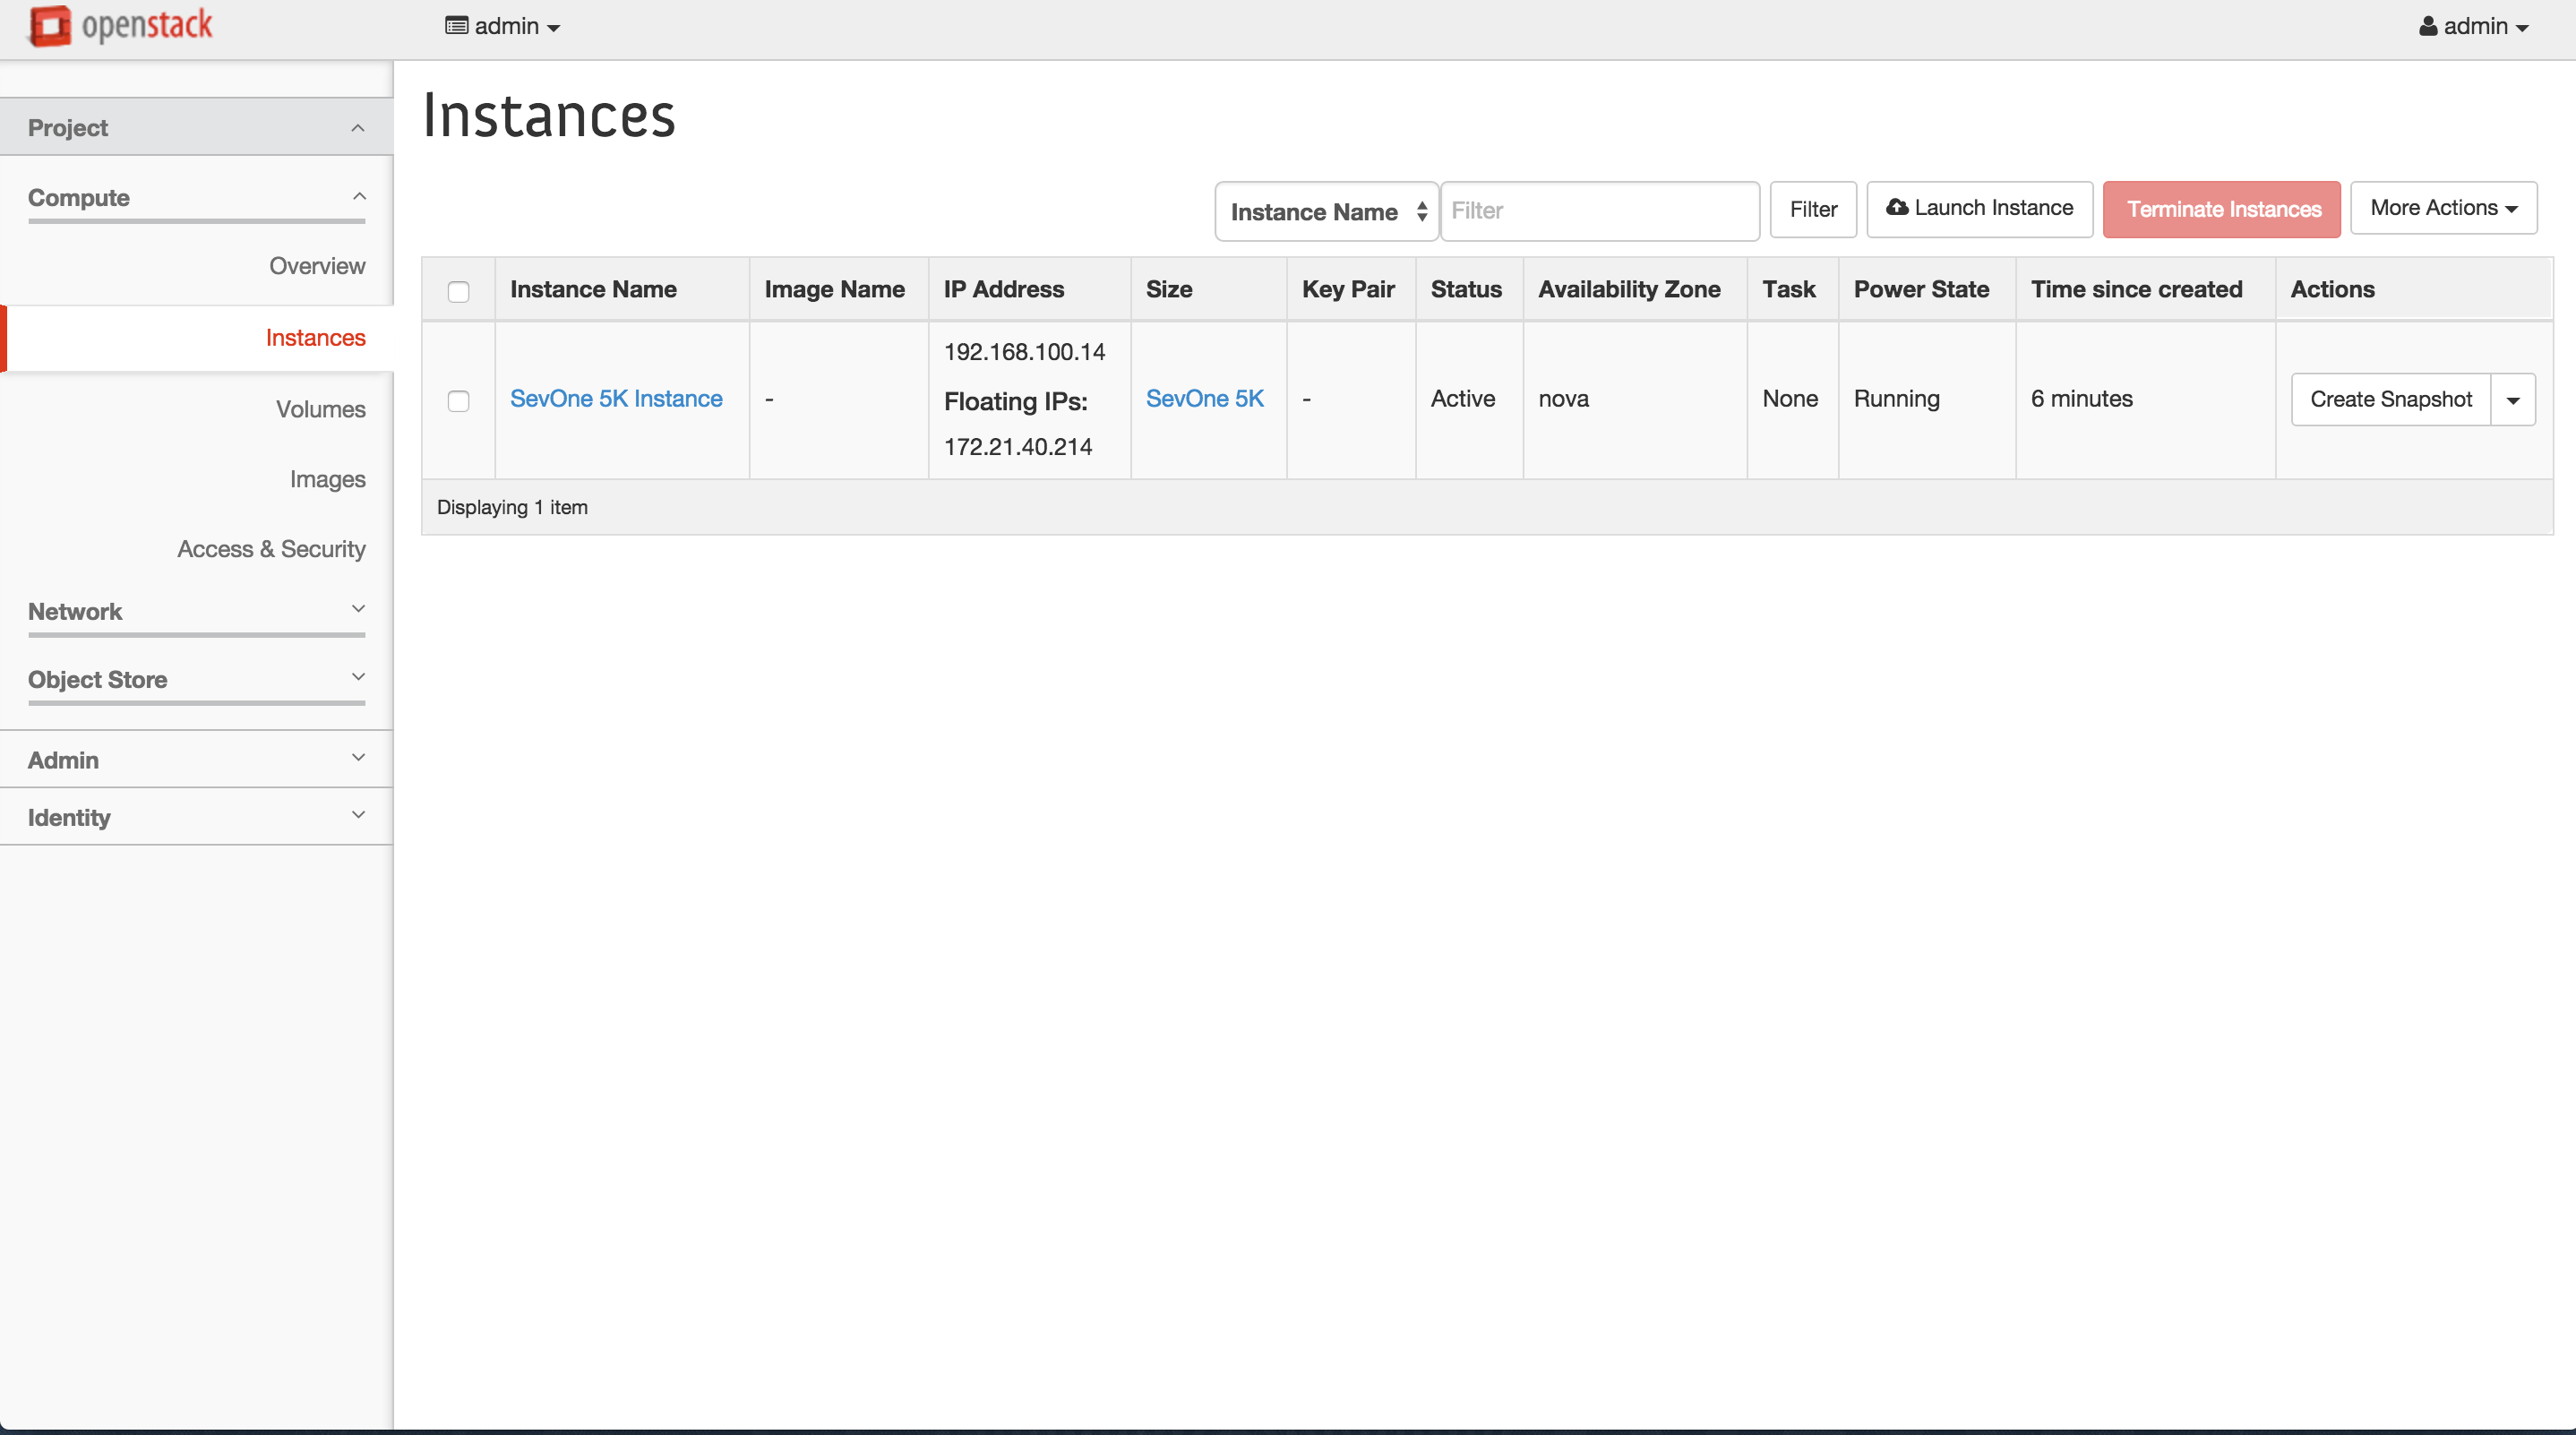
Perform the following steps to launch the instance for the virtual appliance.
-
In the left menu, select Compute then select Instances to display the Instances page that displays the status of your instances.
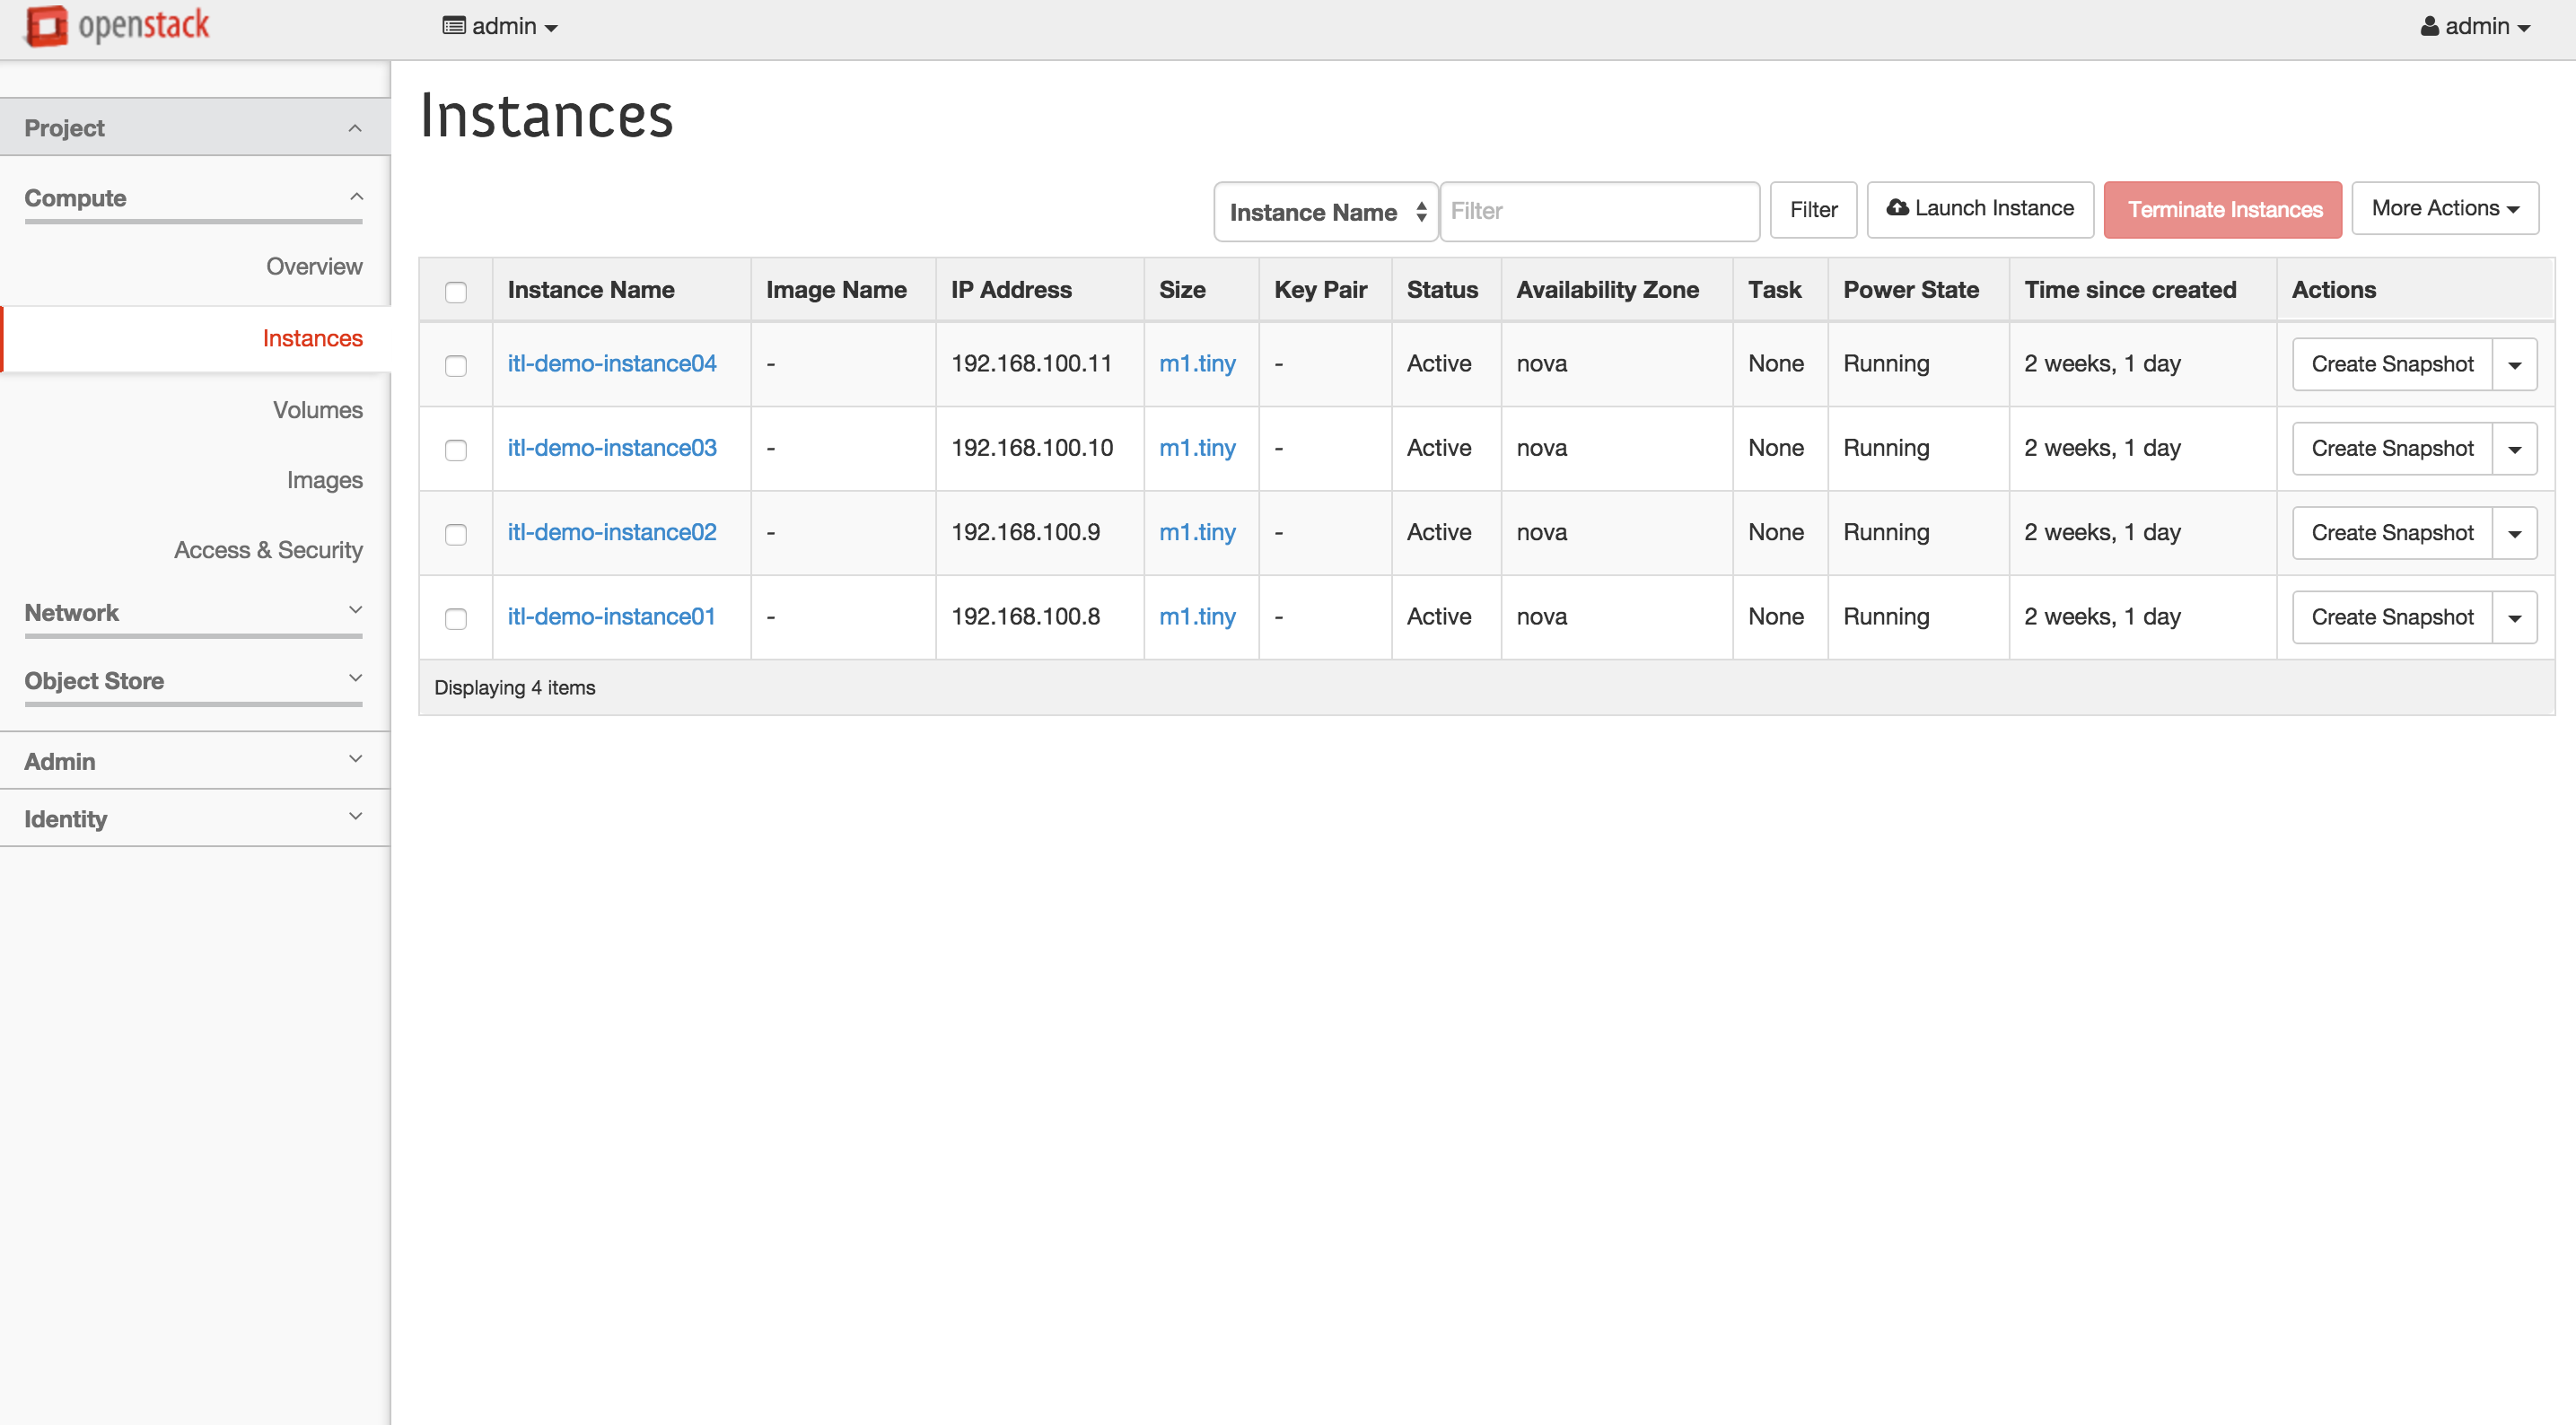
-
Click Launch Instance to display the Launch Instance page, Details tab, Advanced Options that enable you to define the details to launch an instance.
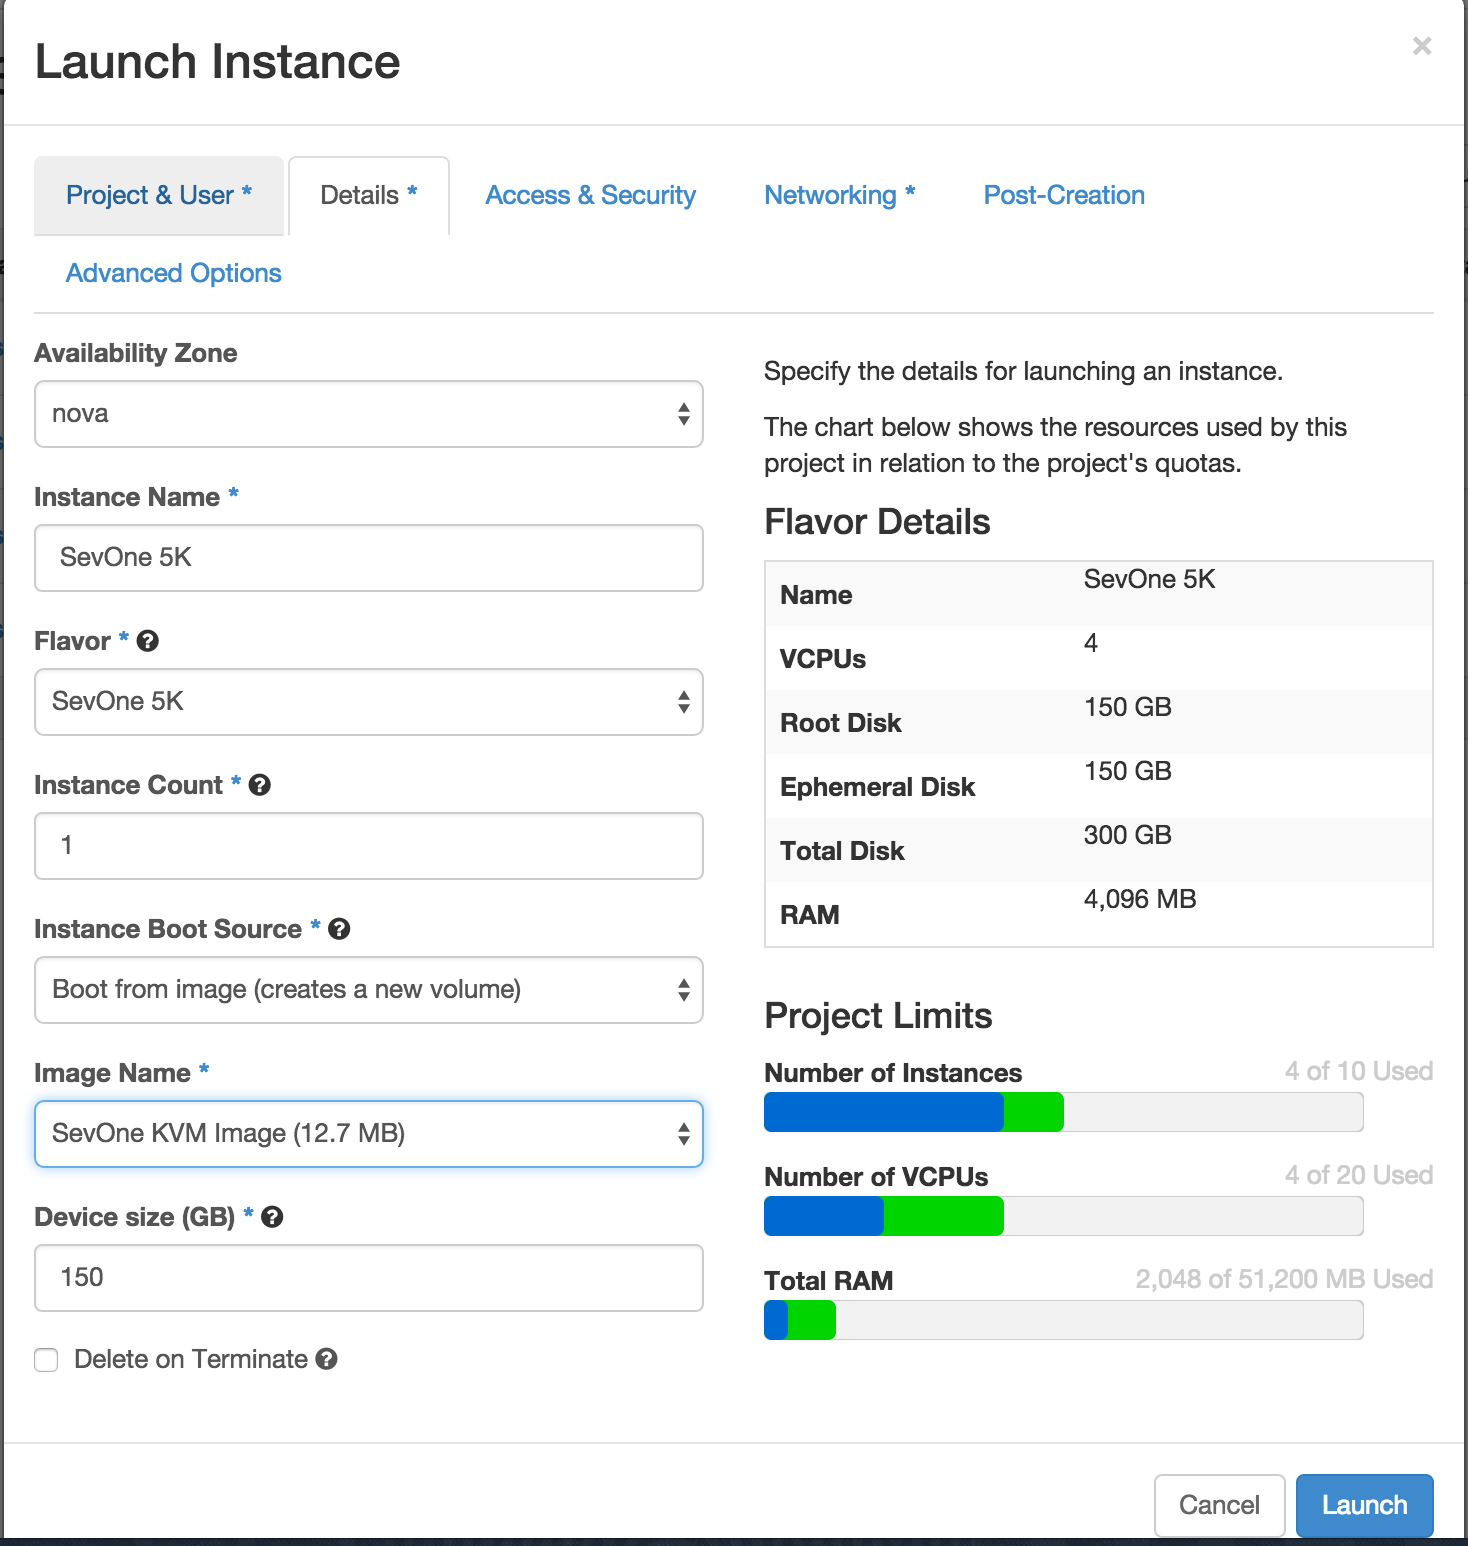
-
Click the Availability Zone drop-down and select an availability zone.
-
In the Instance Name field, enter the instance name.
-
Click the Flavor drop-down and select the flavor you created in the previous section.
-
In the Instance Count field, enter the instance count.
-
Click the Instance Boot Source drop-down and select Boot From Image (Creates New Volume).
-
Click the Image Name drop-down and select the image name.
-
In the Device Size field, enter the size of the device.
-
Click Launch to display the Launch Instance page Networking tab.
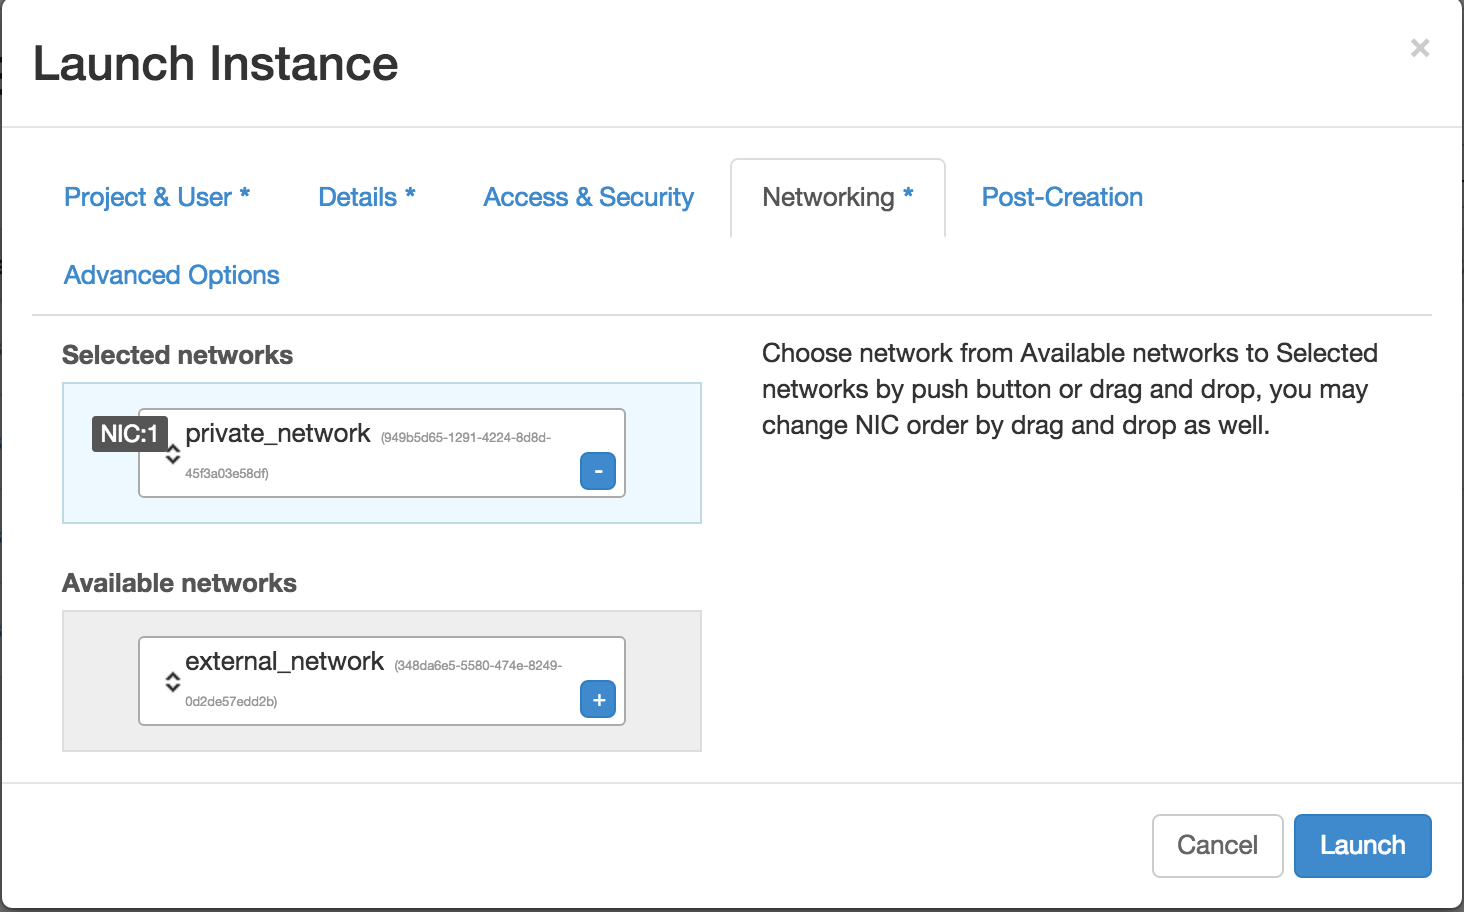
-
In the Available Networks section, click the + next to Private Network to move the Private Network to the Selected Networks field.
-
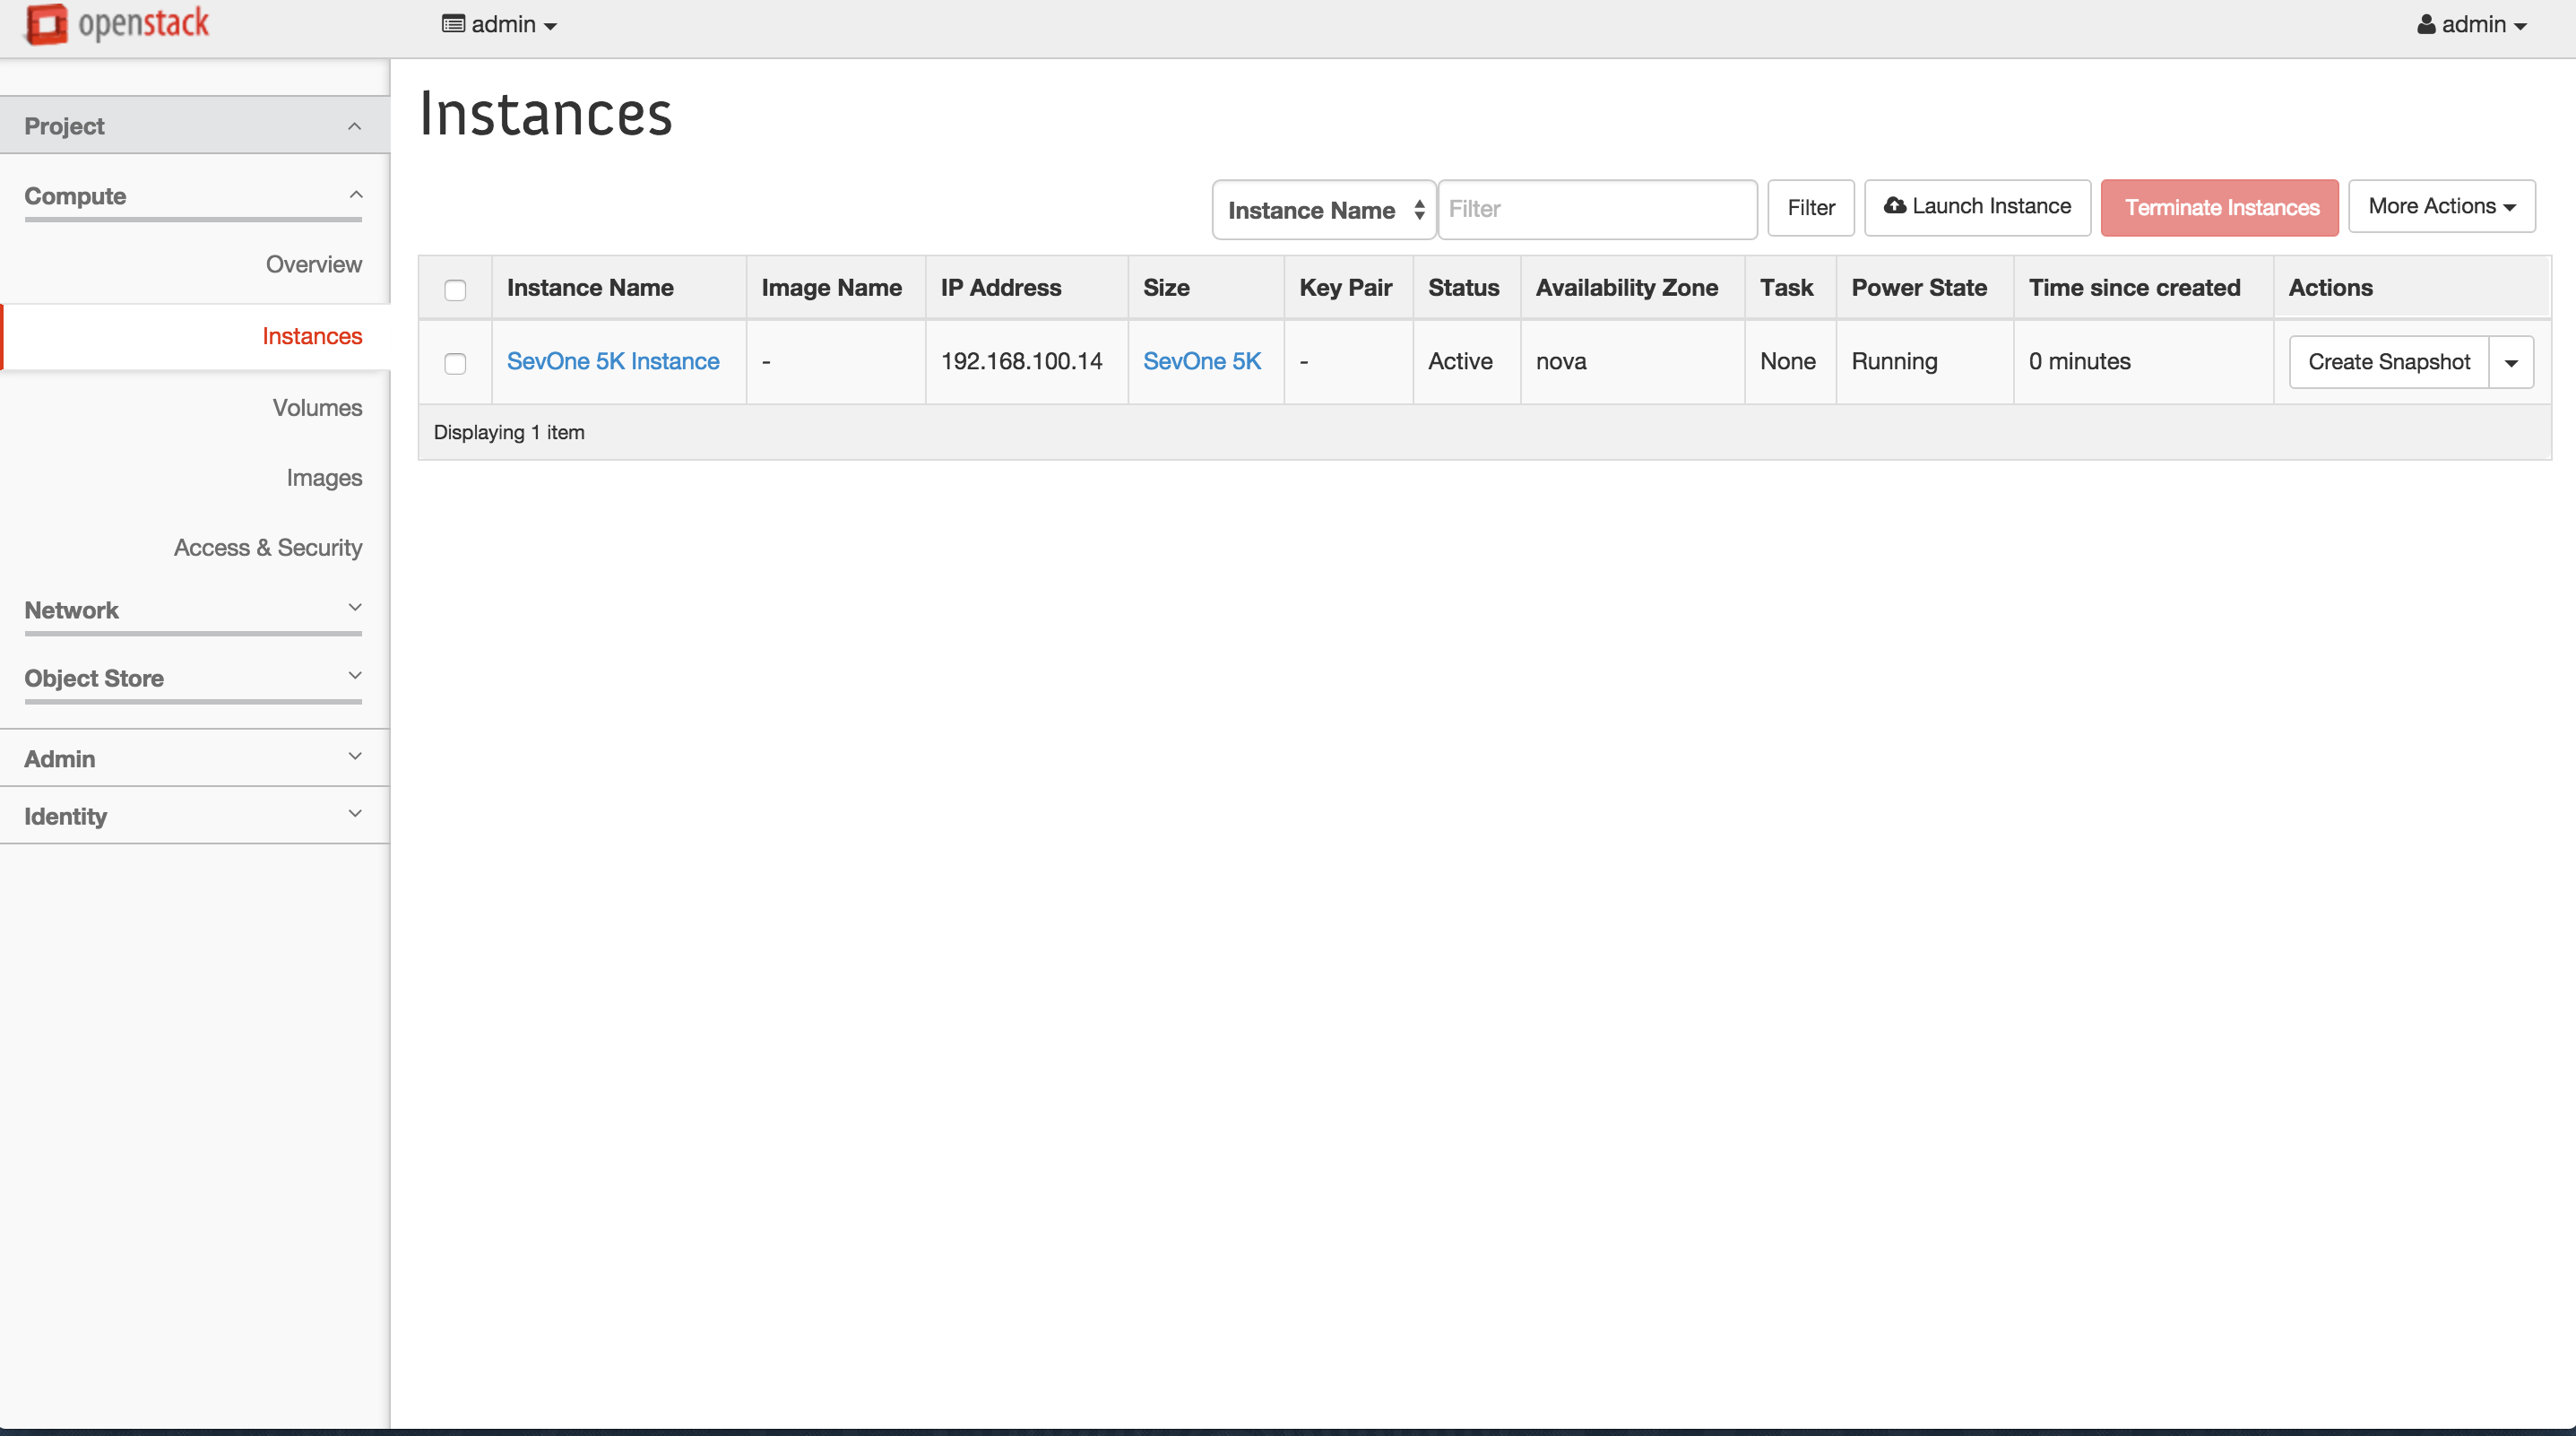
Click Launch to return to the Instances page and to add the new instance to the Instances list.
The Instances list now displays your instance.
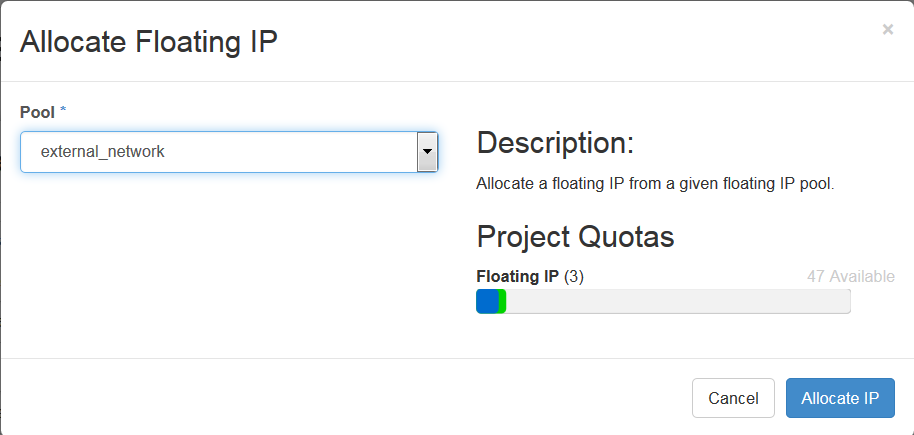
Perform the following steps to associate a floating IP address to the instance.
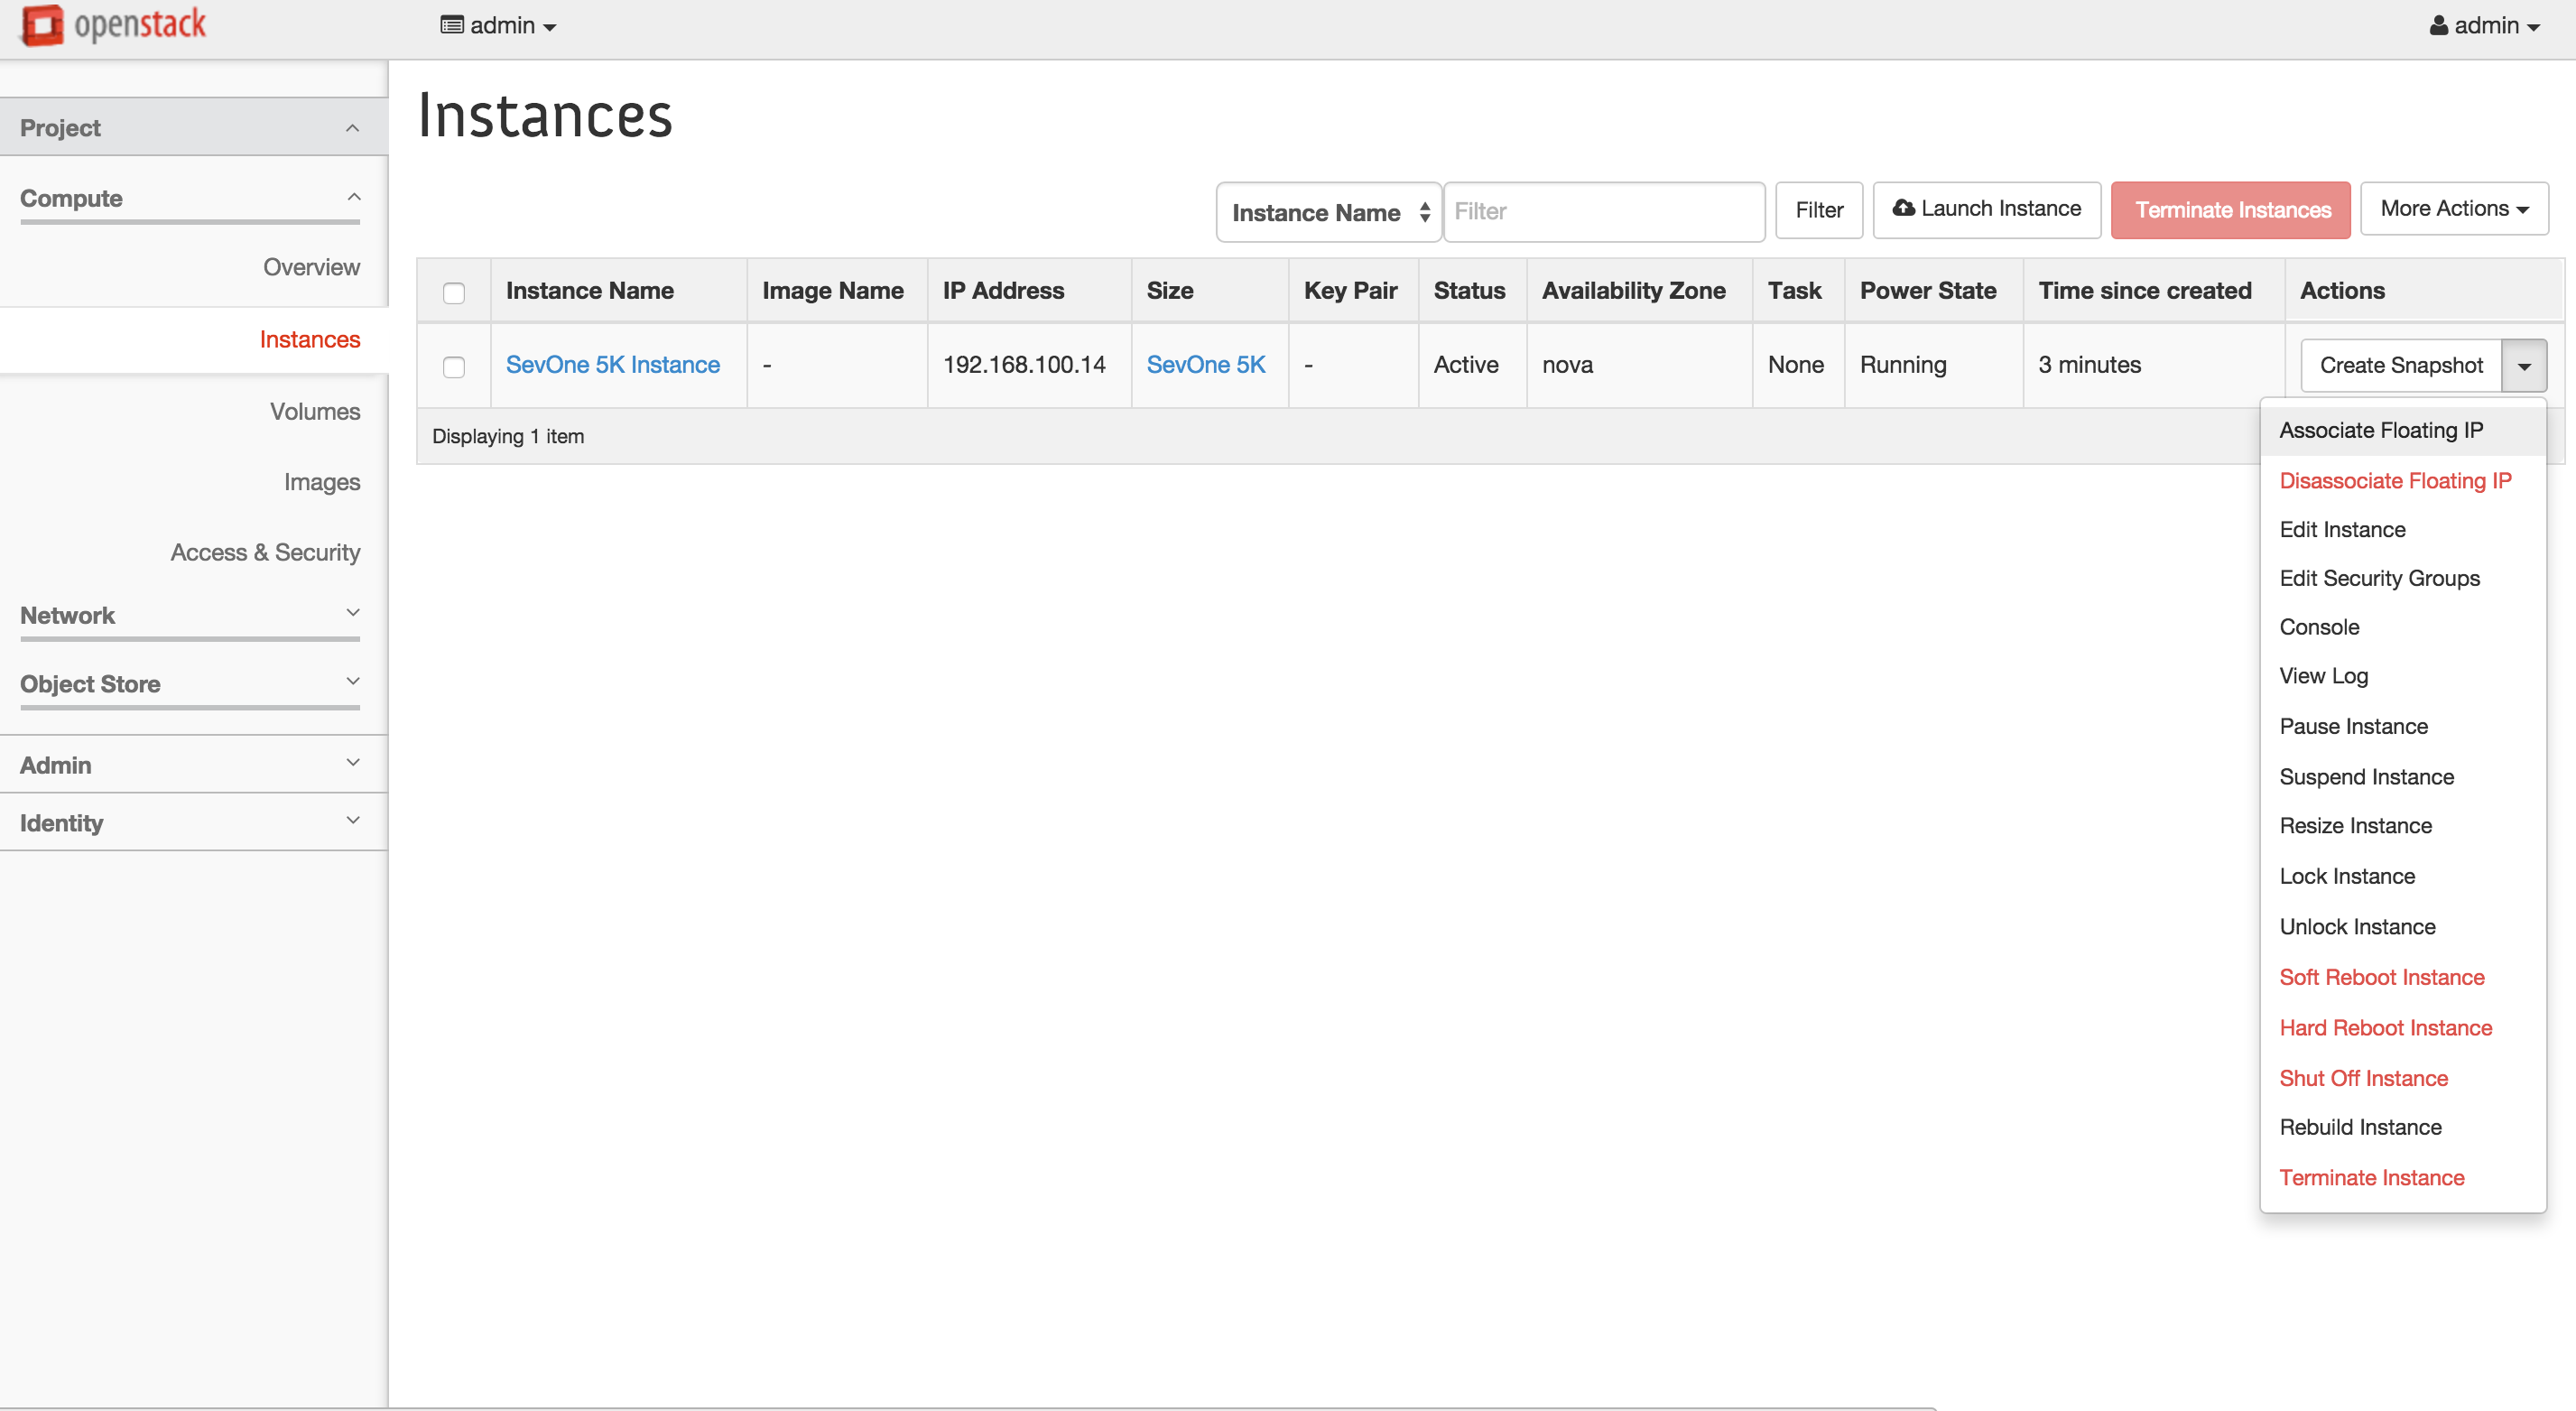
-
Click the Create Snapshot drop-down and select Associate Floating IP to display the Allocate Floating IP page.
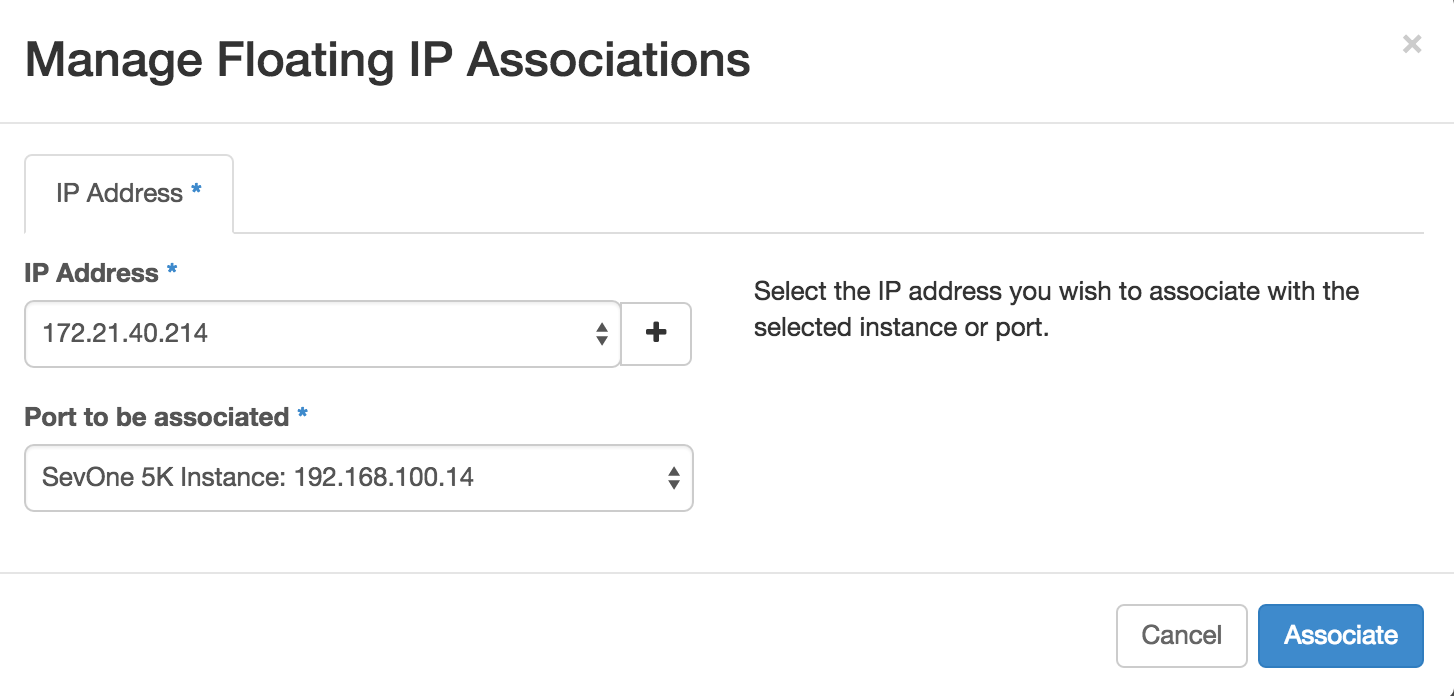
-
Click the IP Address drop-down and select an IP address or click + next to the IP Address field to display the the Allocate Floating IP pop-up.
-
Click the Port to be Associated drop-down and select the instance for the virtual appliance.
-
Click Associate.
Enter the following command to boot the SevOne KVM implemented appliance.
$ qemu SevOne.qcow -boot c -net nic -net user -m 196 -localtimeOpenstack / KVM Command Line Implementation
If you do not have the Openstack GUI or you prefer to install the virtual appliance via an Openstack command prompt, please execute the following command.
$ openstack server create --image <virtual appliance size>_CentOS_v6.<x.y>-kvm.qcow2 --flavor <virtual appliance size> --security-group default --nic net-id=421d3d2d-4b29-4a43-89fa-4717f506fcb3 <virtual appliance size>_CentOS_v6.<x.y>-kvm-qcow2-test$ openstack server create --image vPAS20K_CentOS_v6.<x.y>-kvm.qcow2 --flavor vPAS20K --security-group default --nic net-id=421d3d2d-4b29-4a43-89fa-4717f506fcb3 vPAS20K_CentOS_v6.<x.y>-kvm-qcow2-testif x = 3 and y = 0, version is for SevOne NMS 6.3.0 release.
Alternatively, you can use the following command from the KVM command prompt.
$ virt-install \-n <virtual appliance size> \--description "<description>" \--os-type=Linux \--os-variant=virtio26 \--ram=4096 \--vcpus=4 \--disk path=/var/lib/libvirt/images/NAME-OF-SEVONE-IMAGE.qcow2,bus=virtio,size=600 \--graphics none \--network bridge:br0$ virt-install \-n sevone-vpas-20k \--description "SevOne vPAS 20K" \--os-type=Linux \--os-variant=virtio26 \--ram=4096 \--vcpus=4 \--disk path=/var/lib/libvirt/images/NAME-OF-SEVONE-IMAGE.qcow2,bus=virtio,size=600 \--graphics none \--network bridge:br0where,
-
n - name of your Virtual Machine.
-
description - some valid description about your Virtual Machine.
-
os-type - operating system type. For SevOne virtual appliances, use Linux.
-
os-variant - distribution type for the above os-type. For SevOne virtual appliances, use virtio26.
-
ram - memory for the Virtual Machine in MB. For details, please refer to section Hardware Requirements.
-
vcpu - total number of virtual CPUs for the Virtual Machine. For details, please refer to section Hardware Requirements.
-
disk path - path where the SevOne virtual appliance image files are stored. For example, /var/lib/libvirt/images/NAME-OF-SEVONE-IMAGE.qcow2,bus=virtio,size=600. The size is in GB. In this example, the image file is 600GB.
-
graphics - this instructs virt-install to use a text console on the Virtual Machine serial port instead of graphical VNC window. If you have the xmanager set up, then you can ignore this parameter.
-
network - SevOne Virtual Machine uses bridged adapter br0. For example, bridge:br0.
KVM Drive Configuration
It is assumed that the SAN volume space has been created (blank) and attached to the KVM image in Openstack (or other management system). Additionally, it is assumed that the volume is attached as /dev/vdb. If the attachment differs from this, please use the correct path for your environment.
Prior to deployment, determine the size of the hard drive required based on the virtual appliance you are deploying. For details, please refer to section Hardware Requirements.
For Data Volume Configuration, perform the steps below.
$ mkfs.xfs /dev/vdb
$ mkdir -p /mnt/data_volume
Using a text editor of your choice, manually add the following entry to fstab to avoid formatting issues.
$ sed -i '$ a /dev/vdb /mnt/data_volume xfs defaults 1 2' /etc/fstab$ mount -a
The following is a precautionary step.
$ supervisorctl stop mysqld mysqld2 SevOne-netflowd SevOne-polld$ mv /data /mnt/data_volume$ mv /data2 /mnt/data_volume$ ln -s /mnt/data_volume/data /data $ ln -s /mnt/data_volume/data2 /data2 $ ln -s /mnt/data_volume/data/index /index$ chown -R mysql:mysql /data /data2 /mnt/data_volume
The following is a precautionary step.
$ supervisorctl start mysqld mysqld2 SevOne-netflowd SevOne-polld$ for directory in system index data; do SevOne-ballast fill-all $directory; doneSevOne Appliance Configuration
Please refer to SevOne NMS Appliance Configuration Guide for details on how to set the correct application configuration for the customer’s license type and count.
Deploy a Virtual Appliance Using a VHD on Azure
For steps to deploy a virtual appliance using a .vhd file on Microsoft Azure, see Microsoft's documentation at https://docs.microsoft.com/en-us/azure/virtual-machines/linux/create-upload-centos.
Deploy NMS on IBM Cloud using Virtual Private Cloud (VPC) Infrastructure
To deploy IBM SevOne NPM component, NMS, on IBM Cloud, the following steps are required.
-
create or utilize an existing IBM Cloud Object Storage location to upload IBM SevOne NPM .qcow2 image for component, SevOne NMS.
-
create a custom image for VPC.
-
create a new Virtual Server instance for VPC and boot the newly created custom image.
-
configure the boot and data drives.
-
set the appliance size and type.
-
You must download IBM SevOne NPM KVM/Openstack .qcow2 image for component, SevOne NMS, from IBM Passport Advantage (https://www.ibm.com/software/passportadvantage/pao_download_software.html) via Passport Advantage Online.
-
You must have experience with IBM Cloud and have an account with required permissions to create infrastructure such as, storage, custom images, and virtual server instances.
-
For details on how to create a standard IBM Cloud component, please refer to https://cloud.ibm.com/docs or contact SevOne Support Team or your Technical Account Manager.
The free tier of IBM Cloud cannot be utilized for deploying IBM SevOne NPM components.
In this section, deployment is demonstrated using the IBM Cloud web interface. However, you may utilize any other IBM Cloud methods such as, API.
SevOne NMS image is cloud-init enabled. This means that it will configure its hostname, network configuration, and SSH key automatically as part of the boot process on IBM Cloud.
Upload image to IBM Cloud Object Storage
Execute the following steps.
-
Create or utilize an existing IBM Cloud Object Storage instance and bucket. For details on how to configure these, please refer to https://cloud.ibm.com/docs .
-
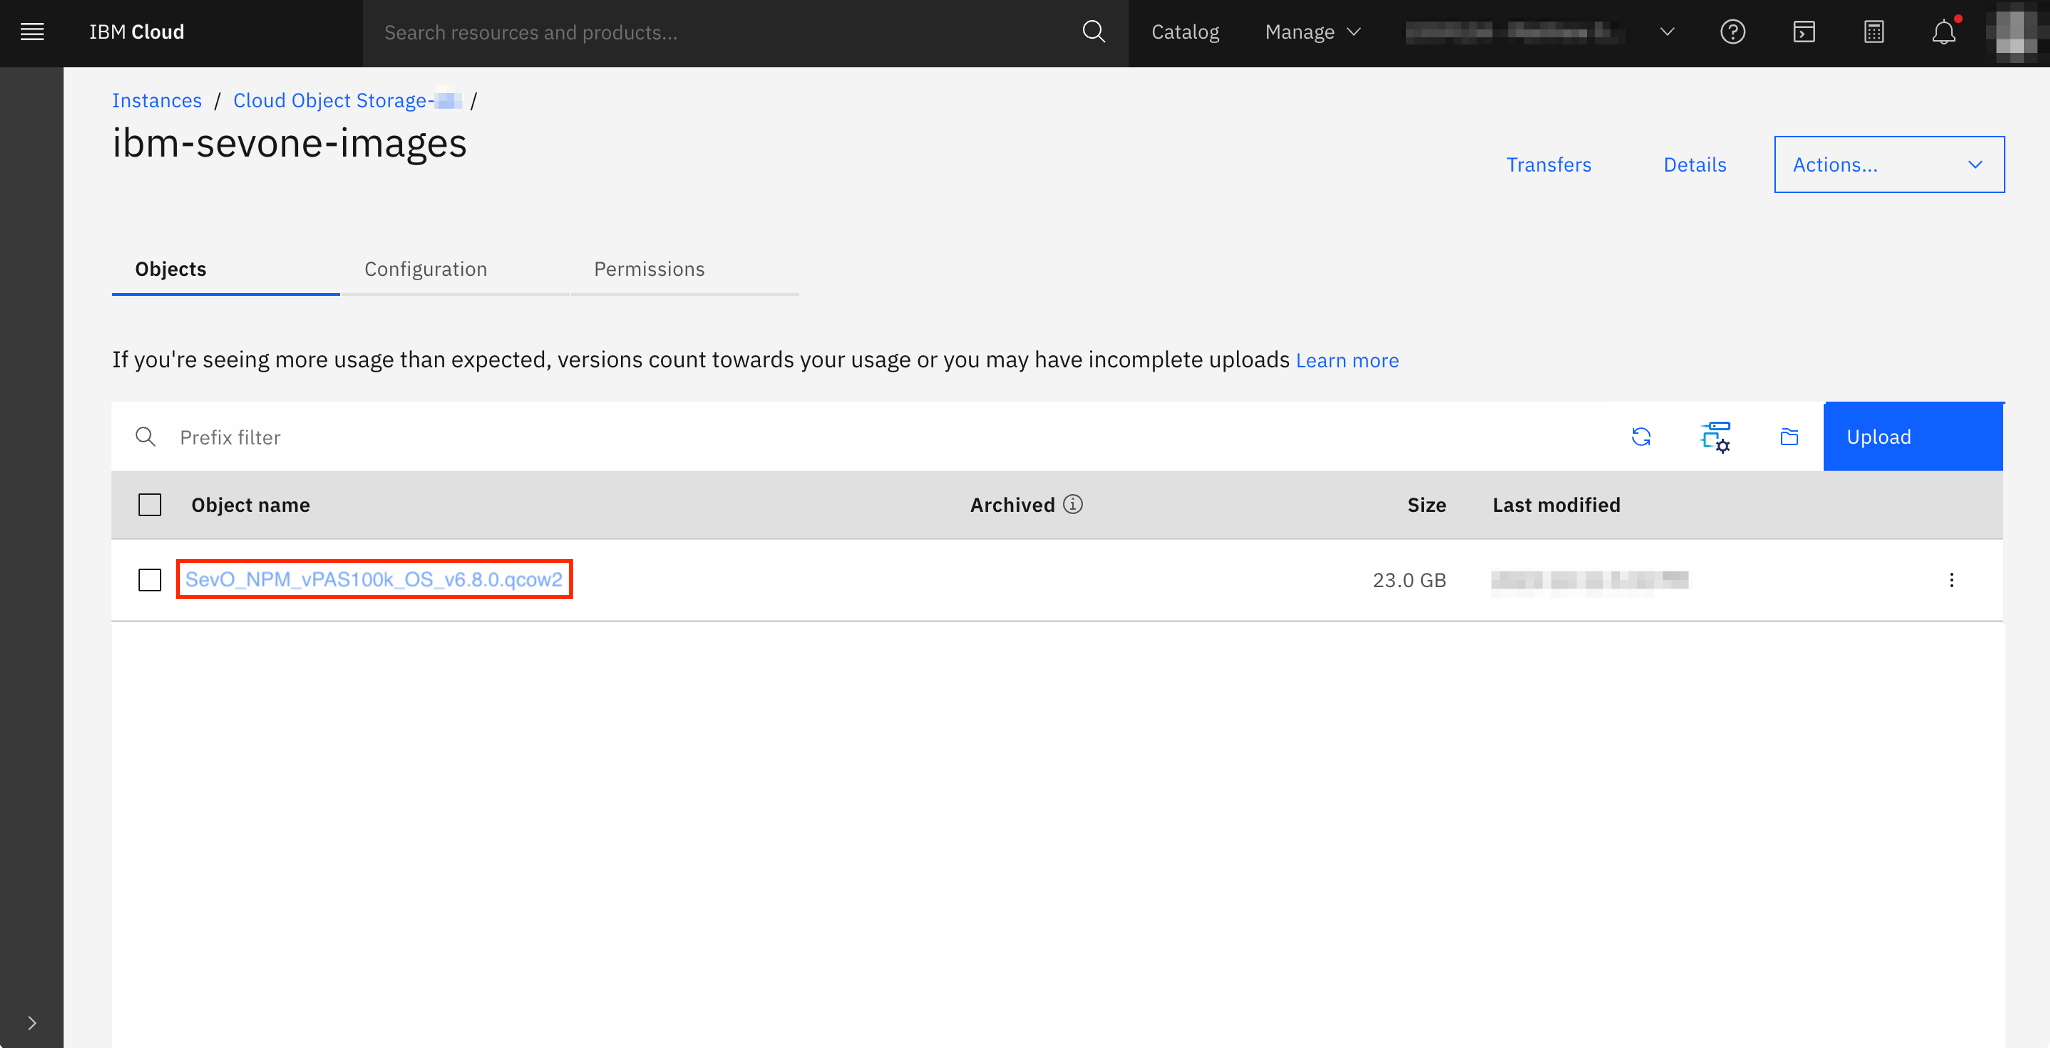
Once an IBM Cloud Object Storage instance and bucket are configured, browse to the bucket and click the Upload button.
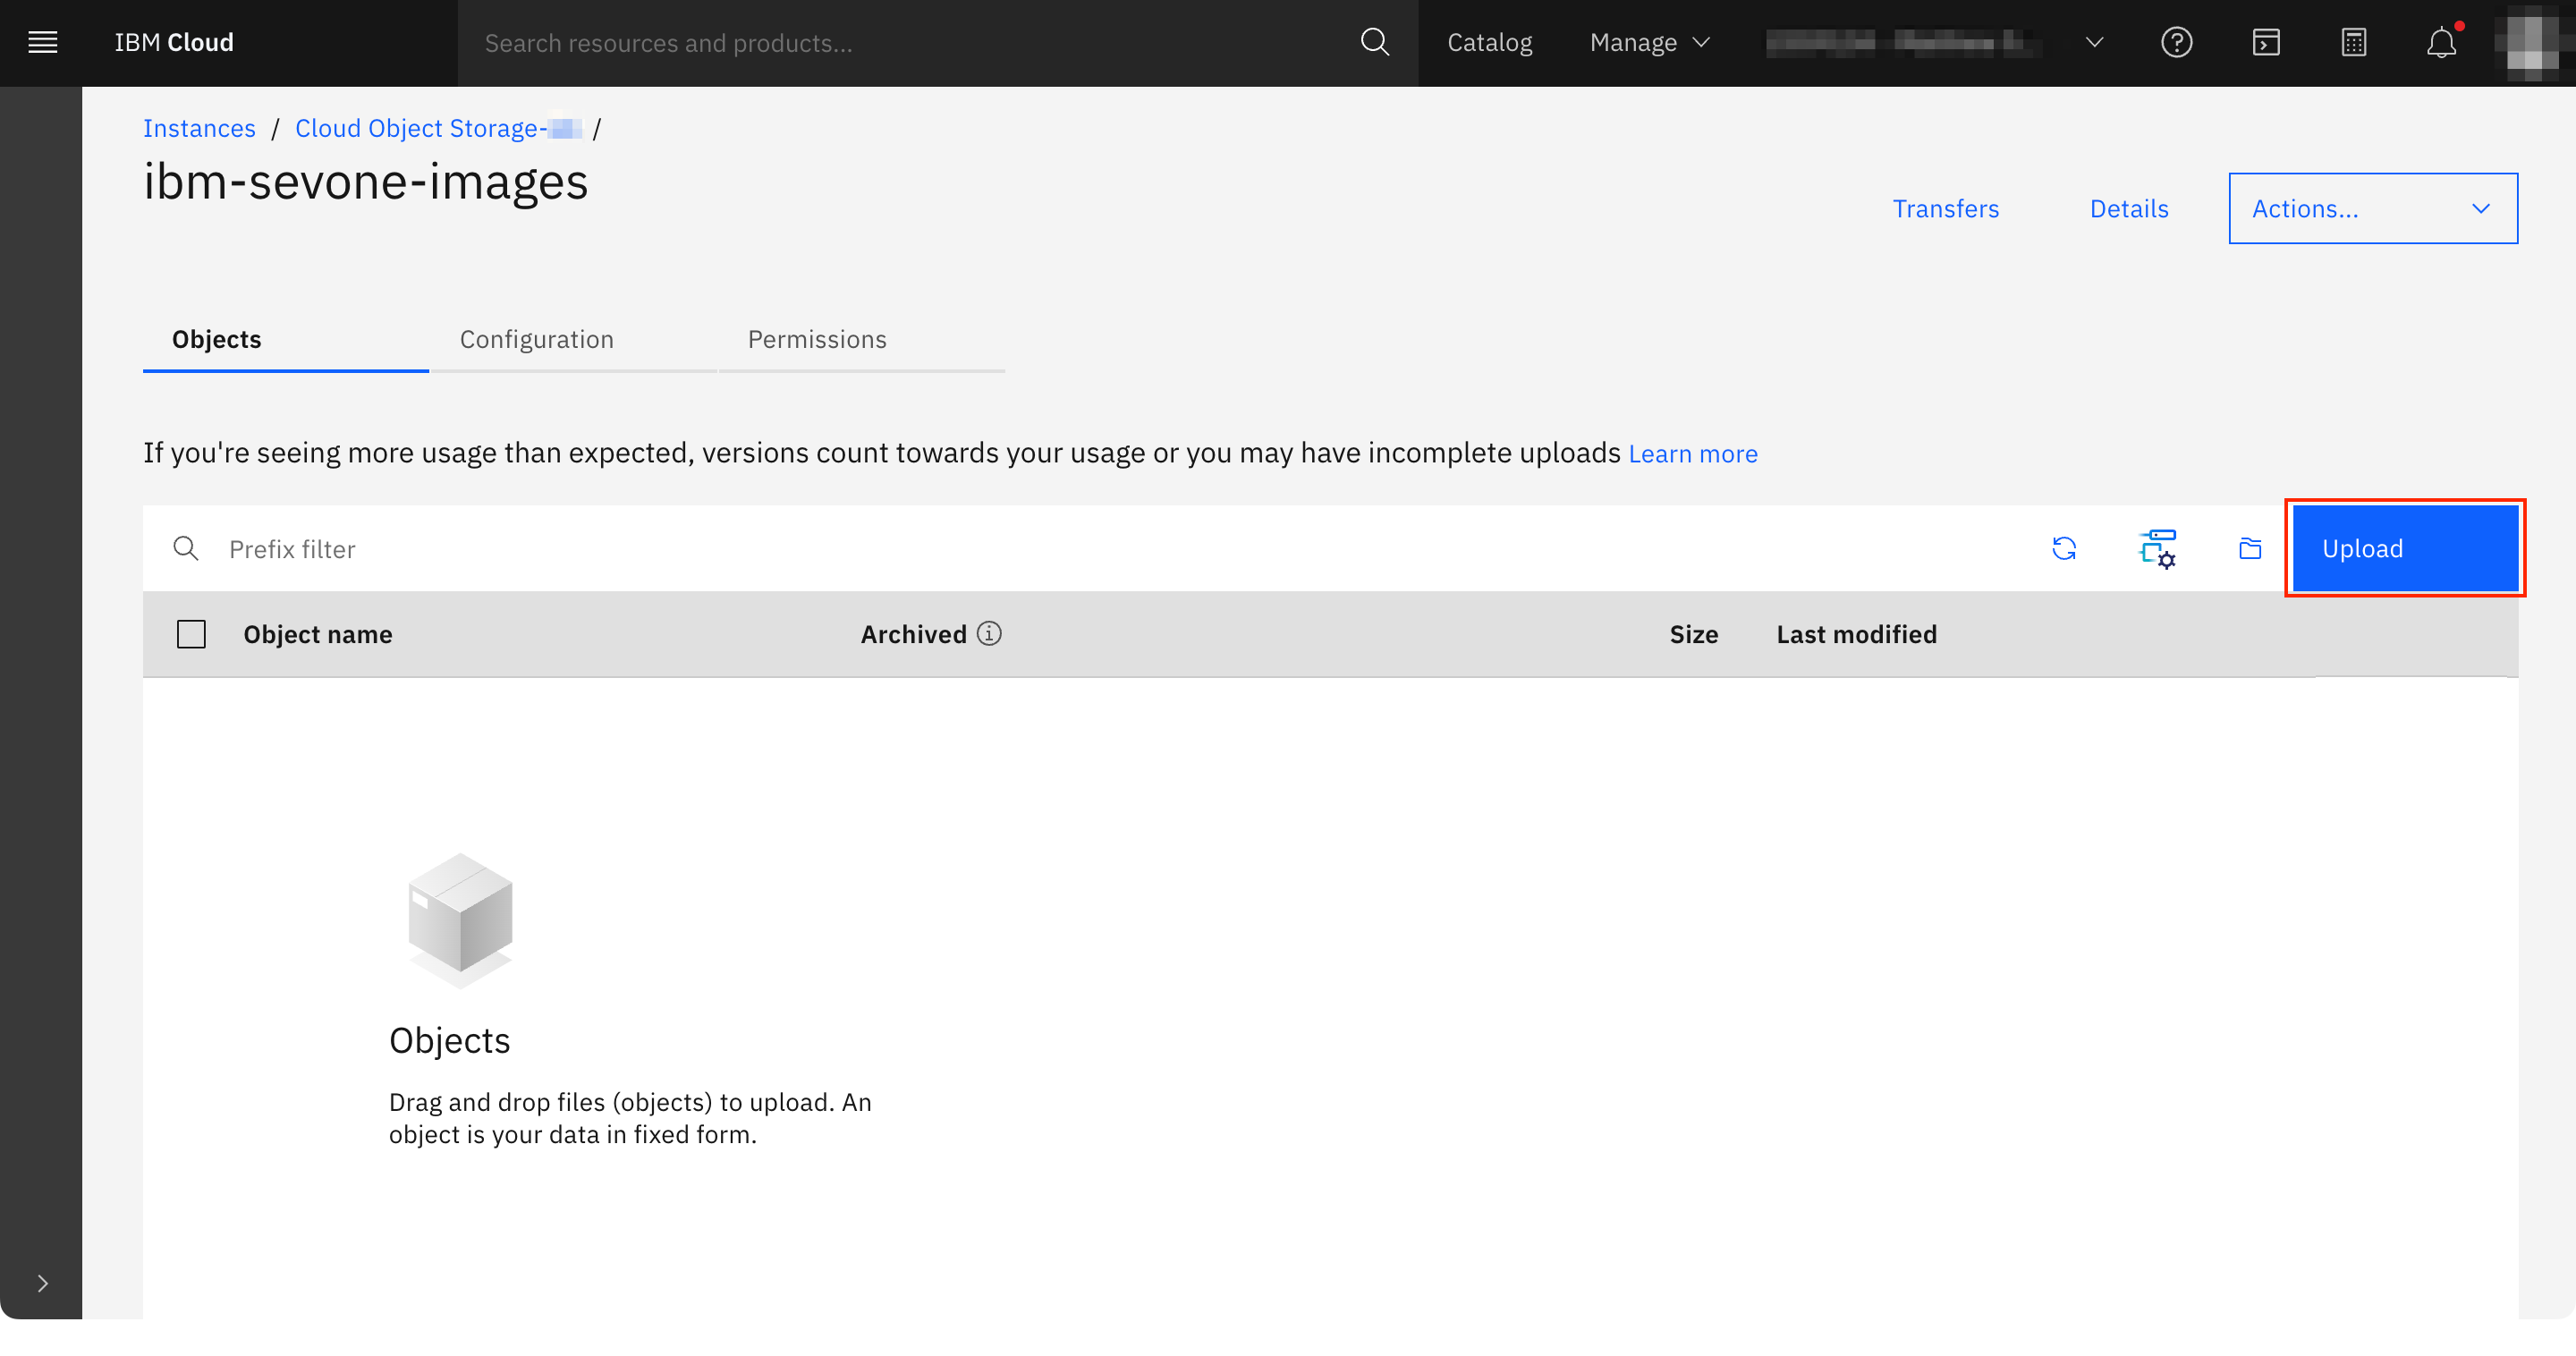
-
An Upload menu will open.
Upload menu...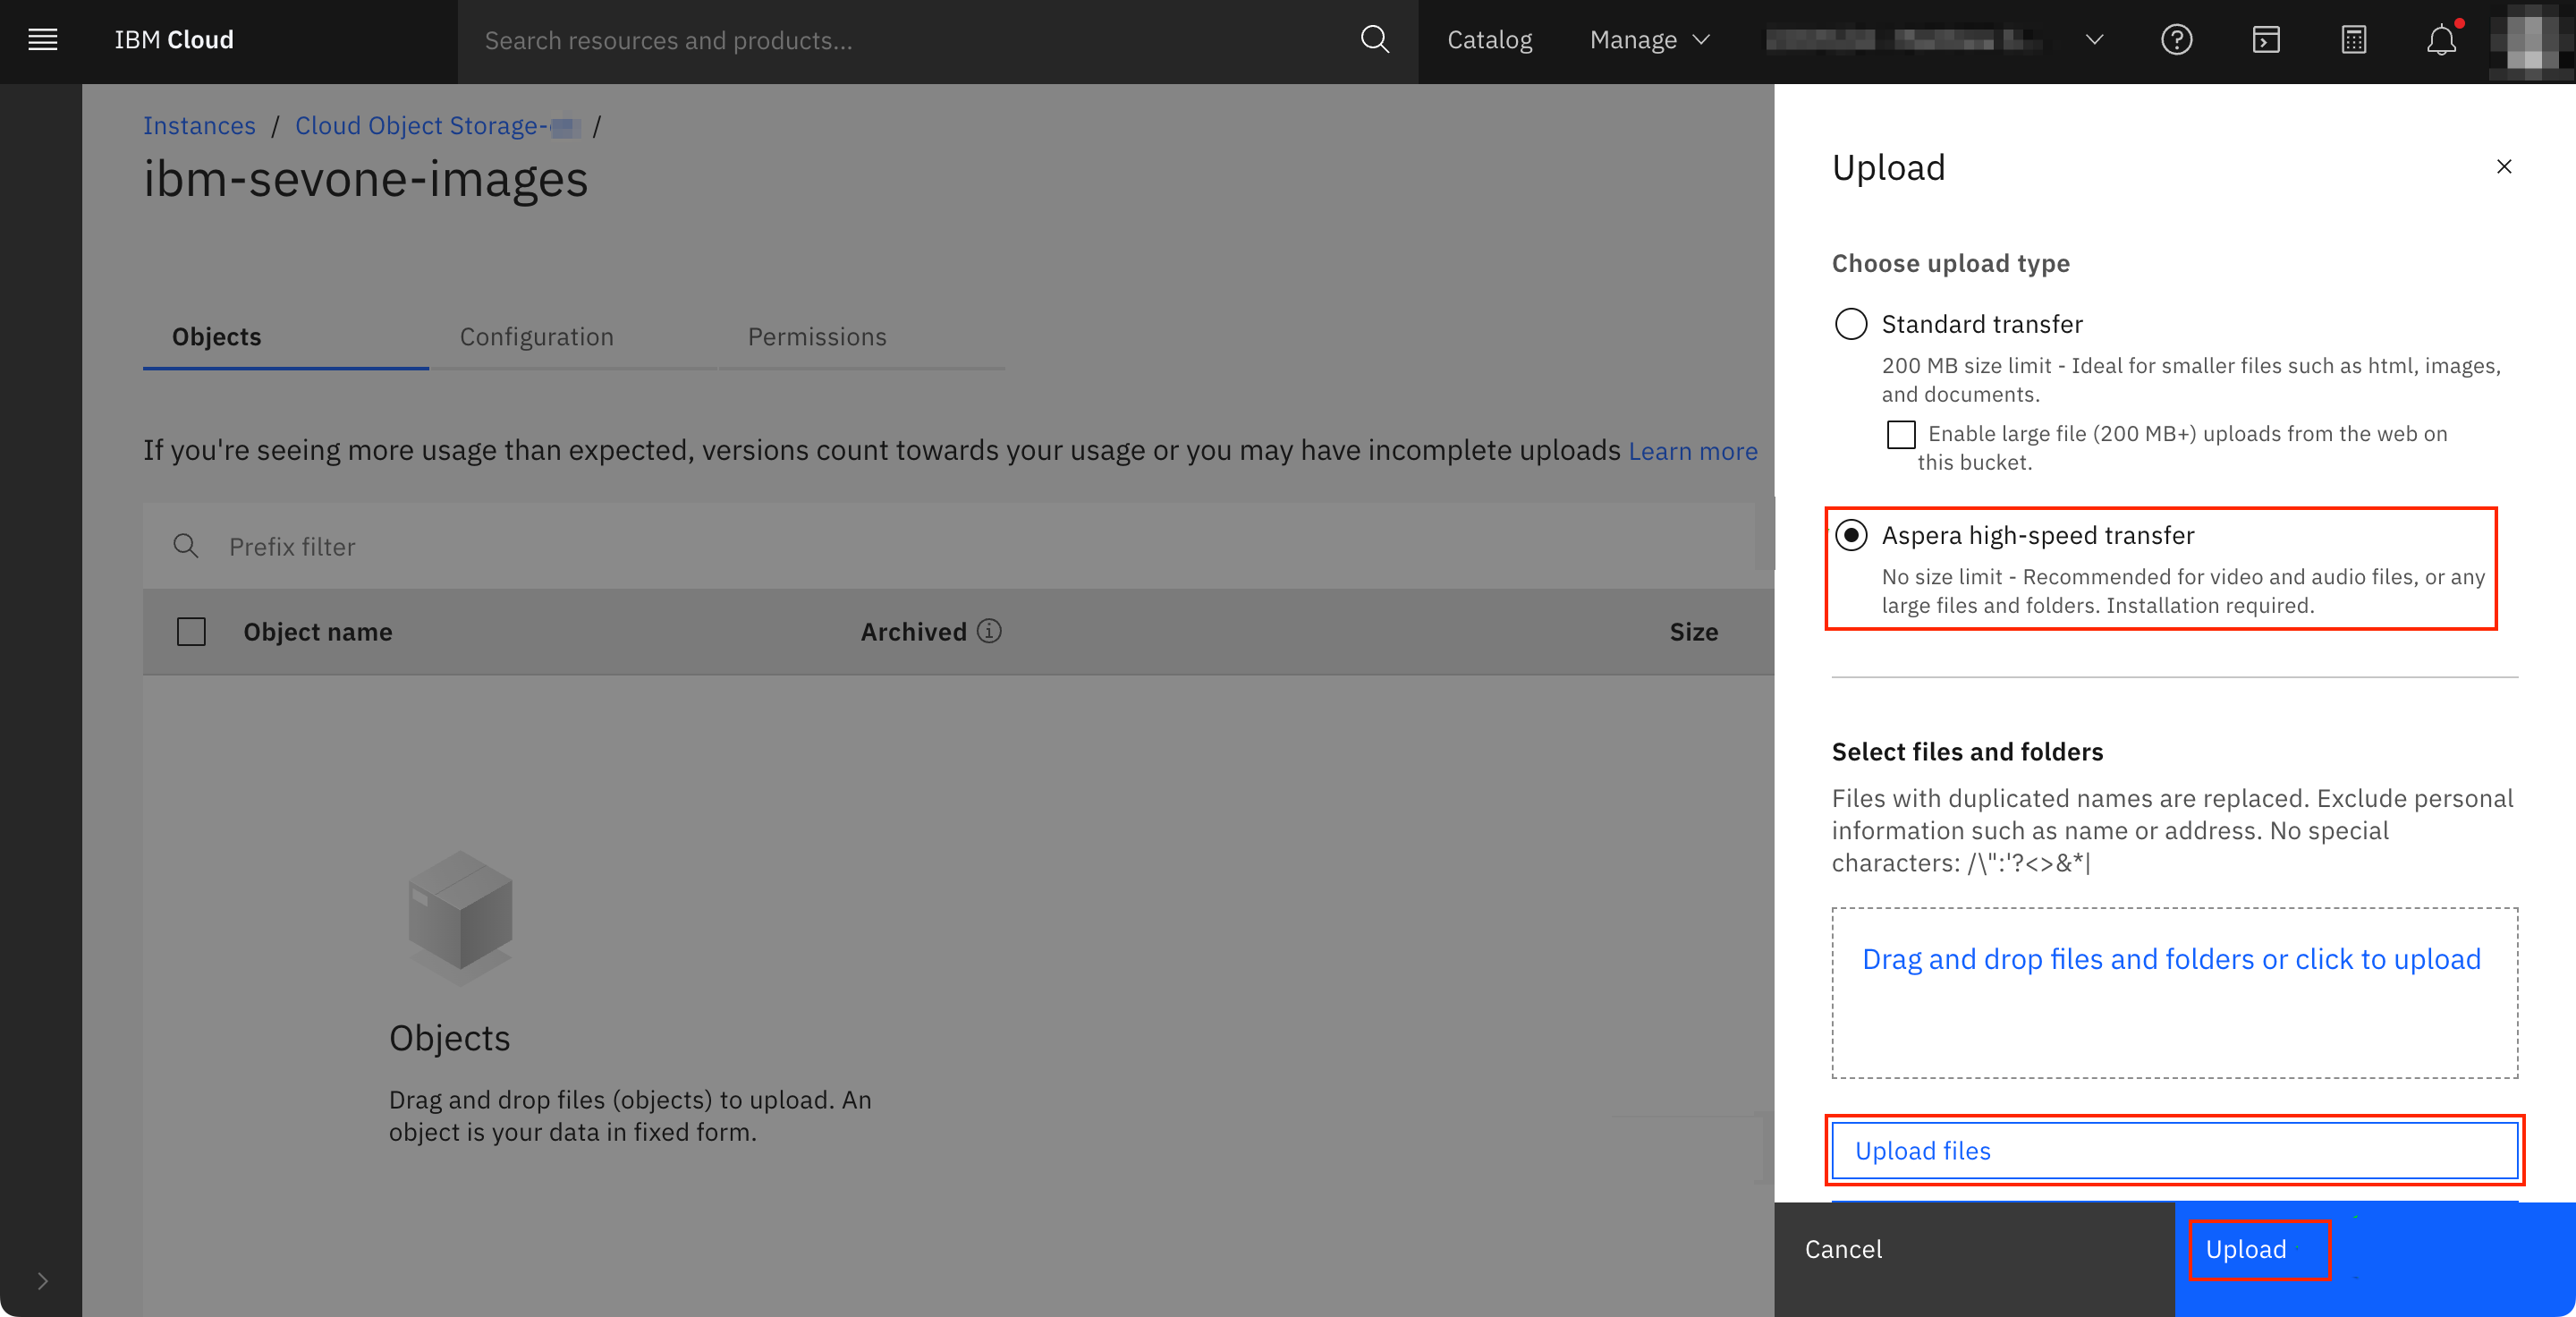
-
Select Aspera high-speed transfer radio button; this option is recommended for large files.
You may be prompted to install the IBM Aspera Connect file transfer utility.
-
Click Upload files button to open the file browser and select the SevO_NPM_vPAS100K_OS_v<#.#.#>.qcow2 file from your local machine.
The file must have a .qcow2 extension. If the file extension is .gz then you will first need to decompress the file using an archive utility.
-
Click Upload button to start the transfer.
You must wait for the file transfer to complete.
This may take some time depending on your connection speed to the IBM Cloud.
Once the upload has completed, SevO_NPM_vPAS100K_OS_vX.X.X.qcow2 file will be available in the bucket.
-
Upload of .qcow2 file to IBM Cloud Object Storage is now complete. You may now proceed to section Create a Custom image for VPC to create a custom VPC image.
-
Create a Custom image for VPC
Execute the following steps.
-
To create a custom image for virtual private cloud, .qcow2 image is required. This image is converted to a bootable image which can be attached to a VPC virtual server instance.
-
Under VPC Infrastructure in left panel, click Images.
-
In the right panel, tab Custom images, click the Create button.
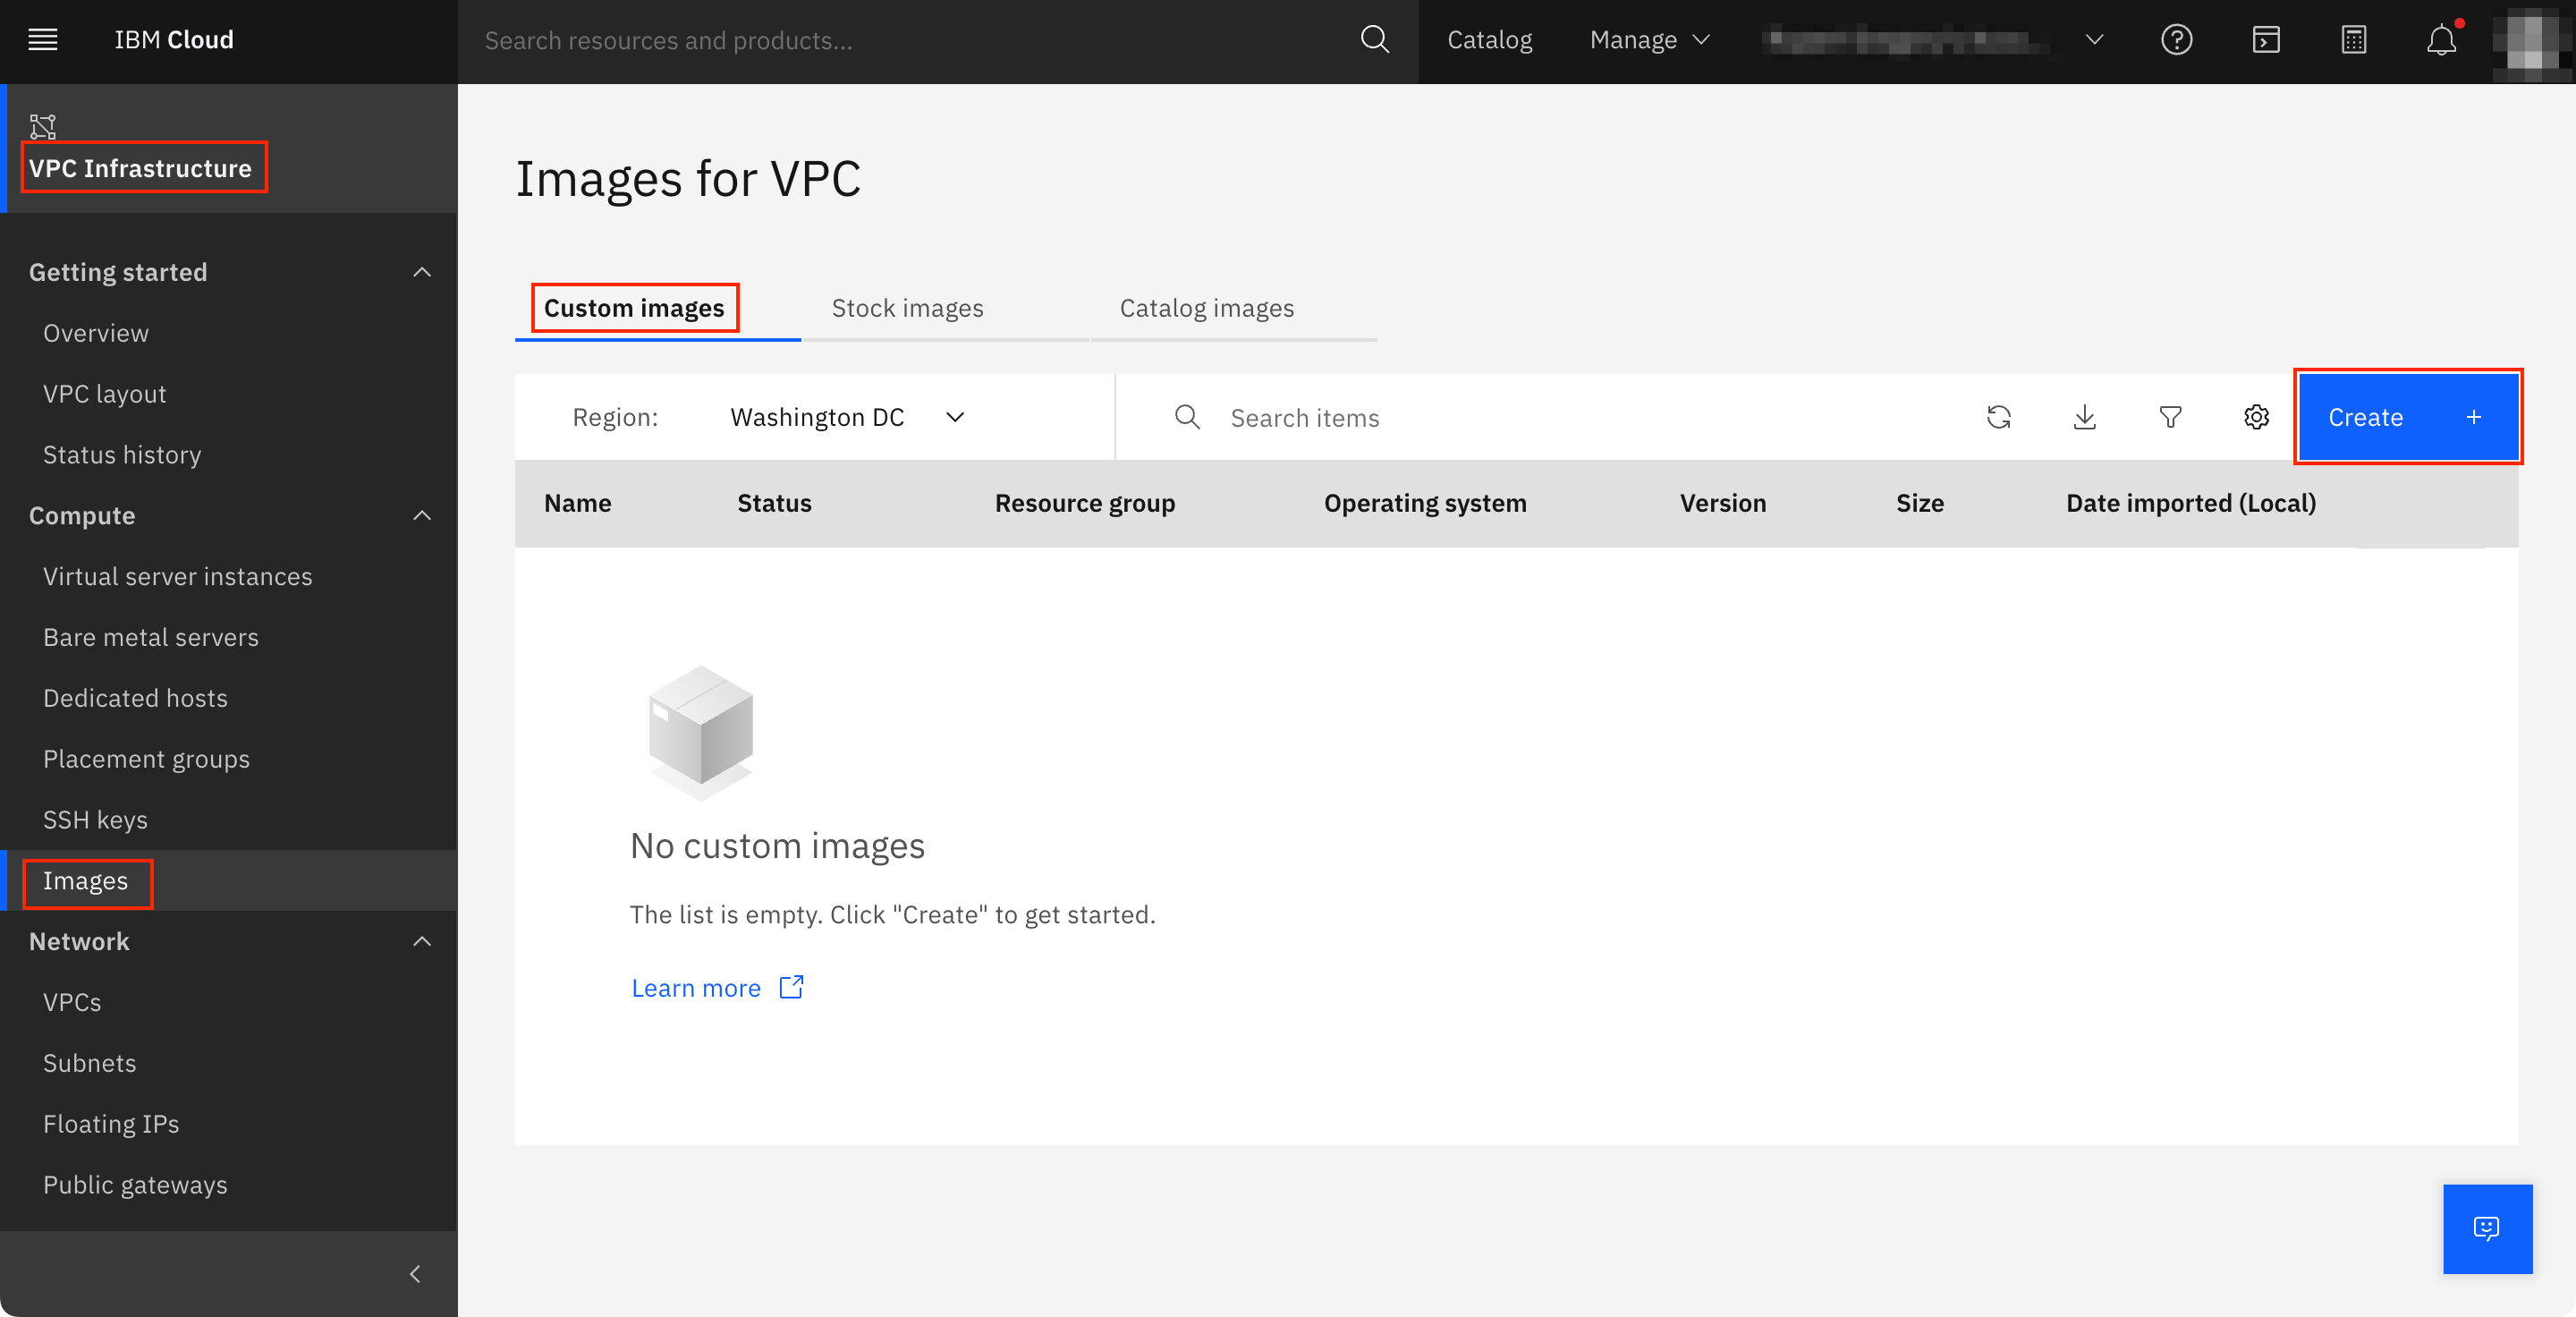
-
When you click on Create button, Custom image for VPC workflow will open.
Example
-
Name - enter the name for the image. For example, SevO_NPM_vPAS100K_OS_v<#.#.#>. For consistency, do not enter extension .qcow2.
-
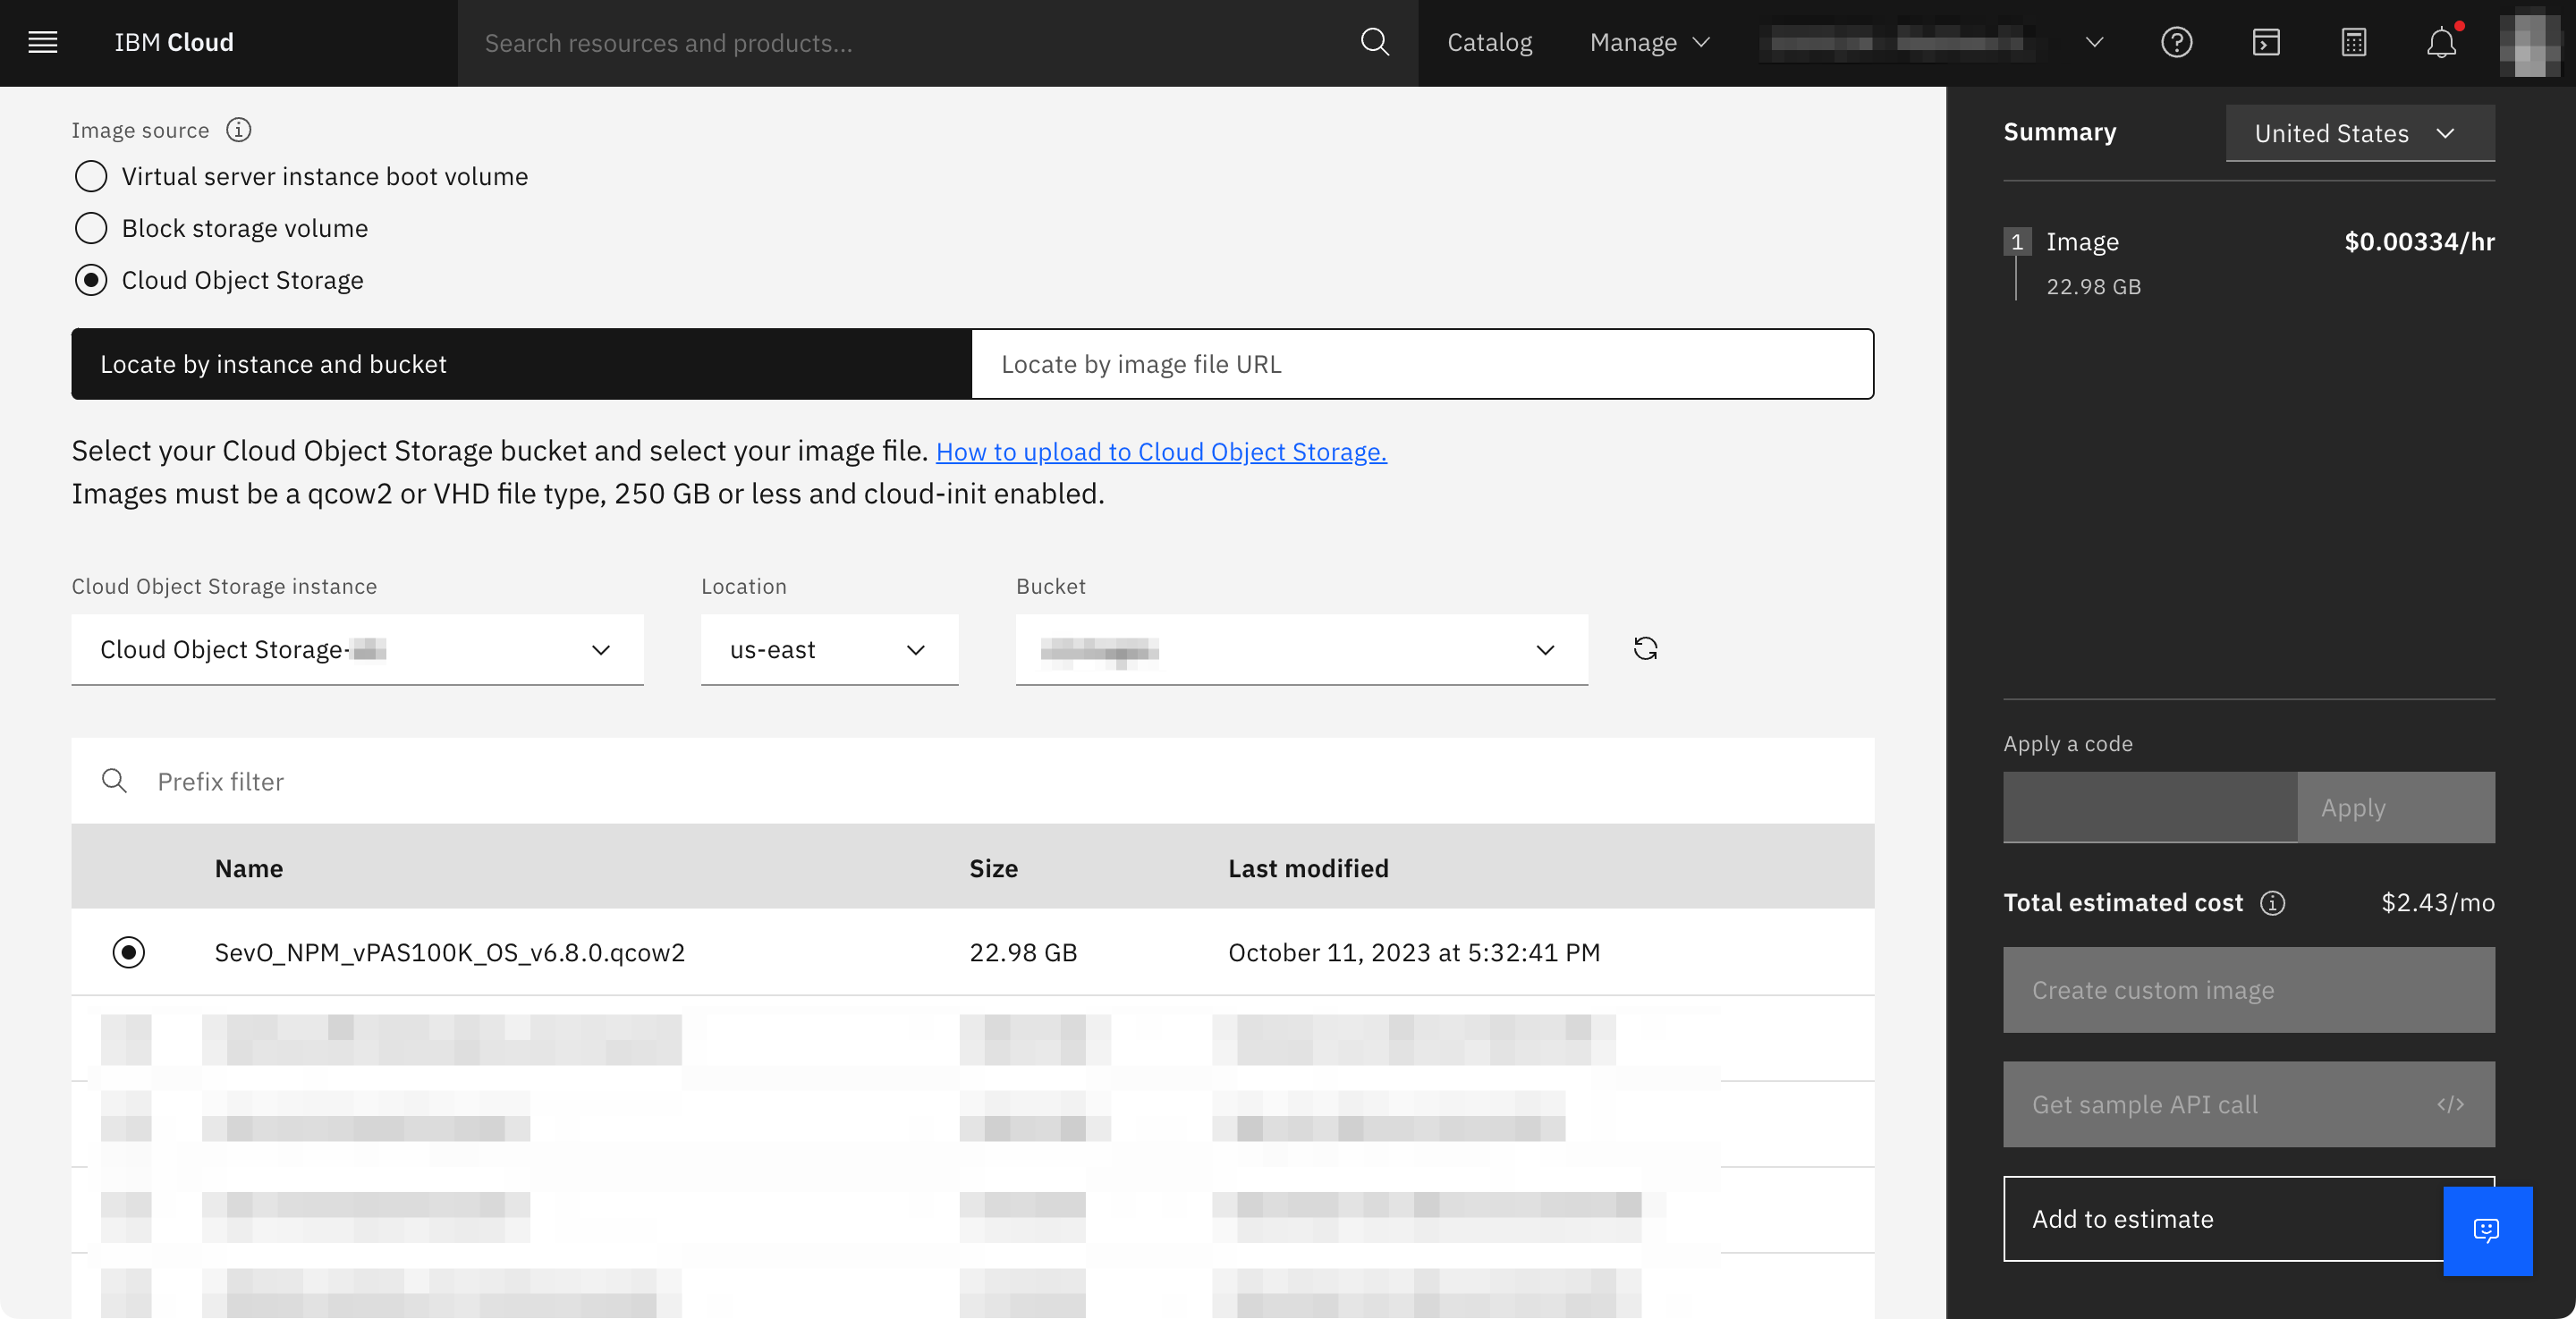
Image source - choose radio button Cloud Object Storage.
-
select Locate by instance and bucket.
-
set the Cloud Object Storage instance, Location, and Bucket from the respective drop-downs. The instance and bucket must match to where you uploaded the image in the previous step.
-
locate your .qcow2 image in the file list and select the radio button next to it. For example, SevO_NPM_vPAS100K_OS_v6.8.0.qcow2.
-
-
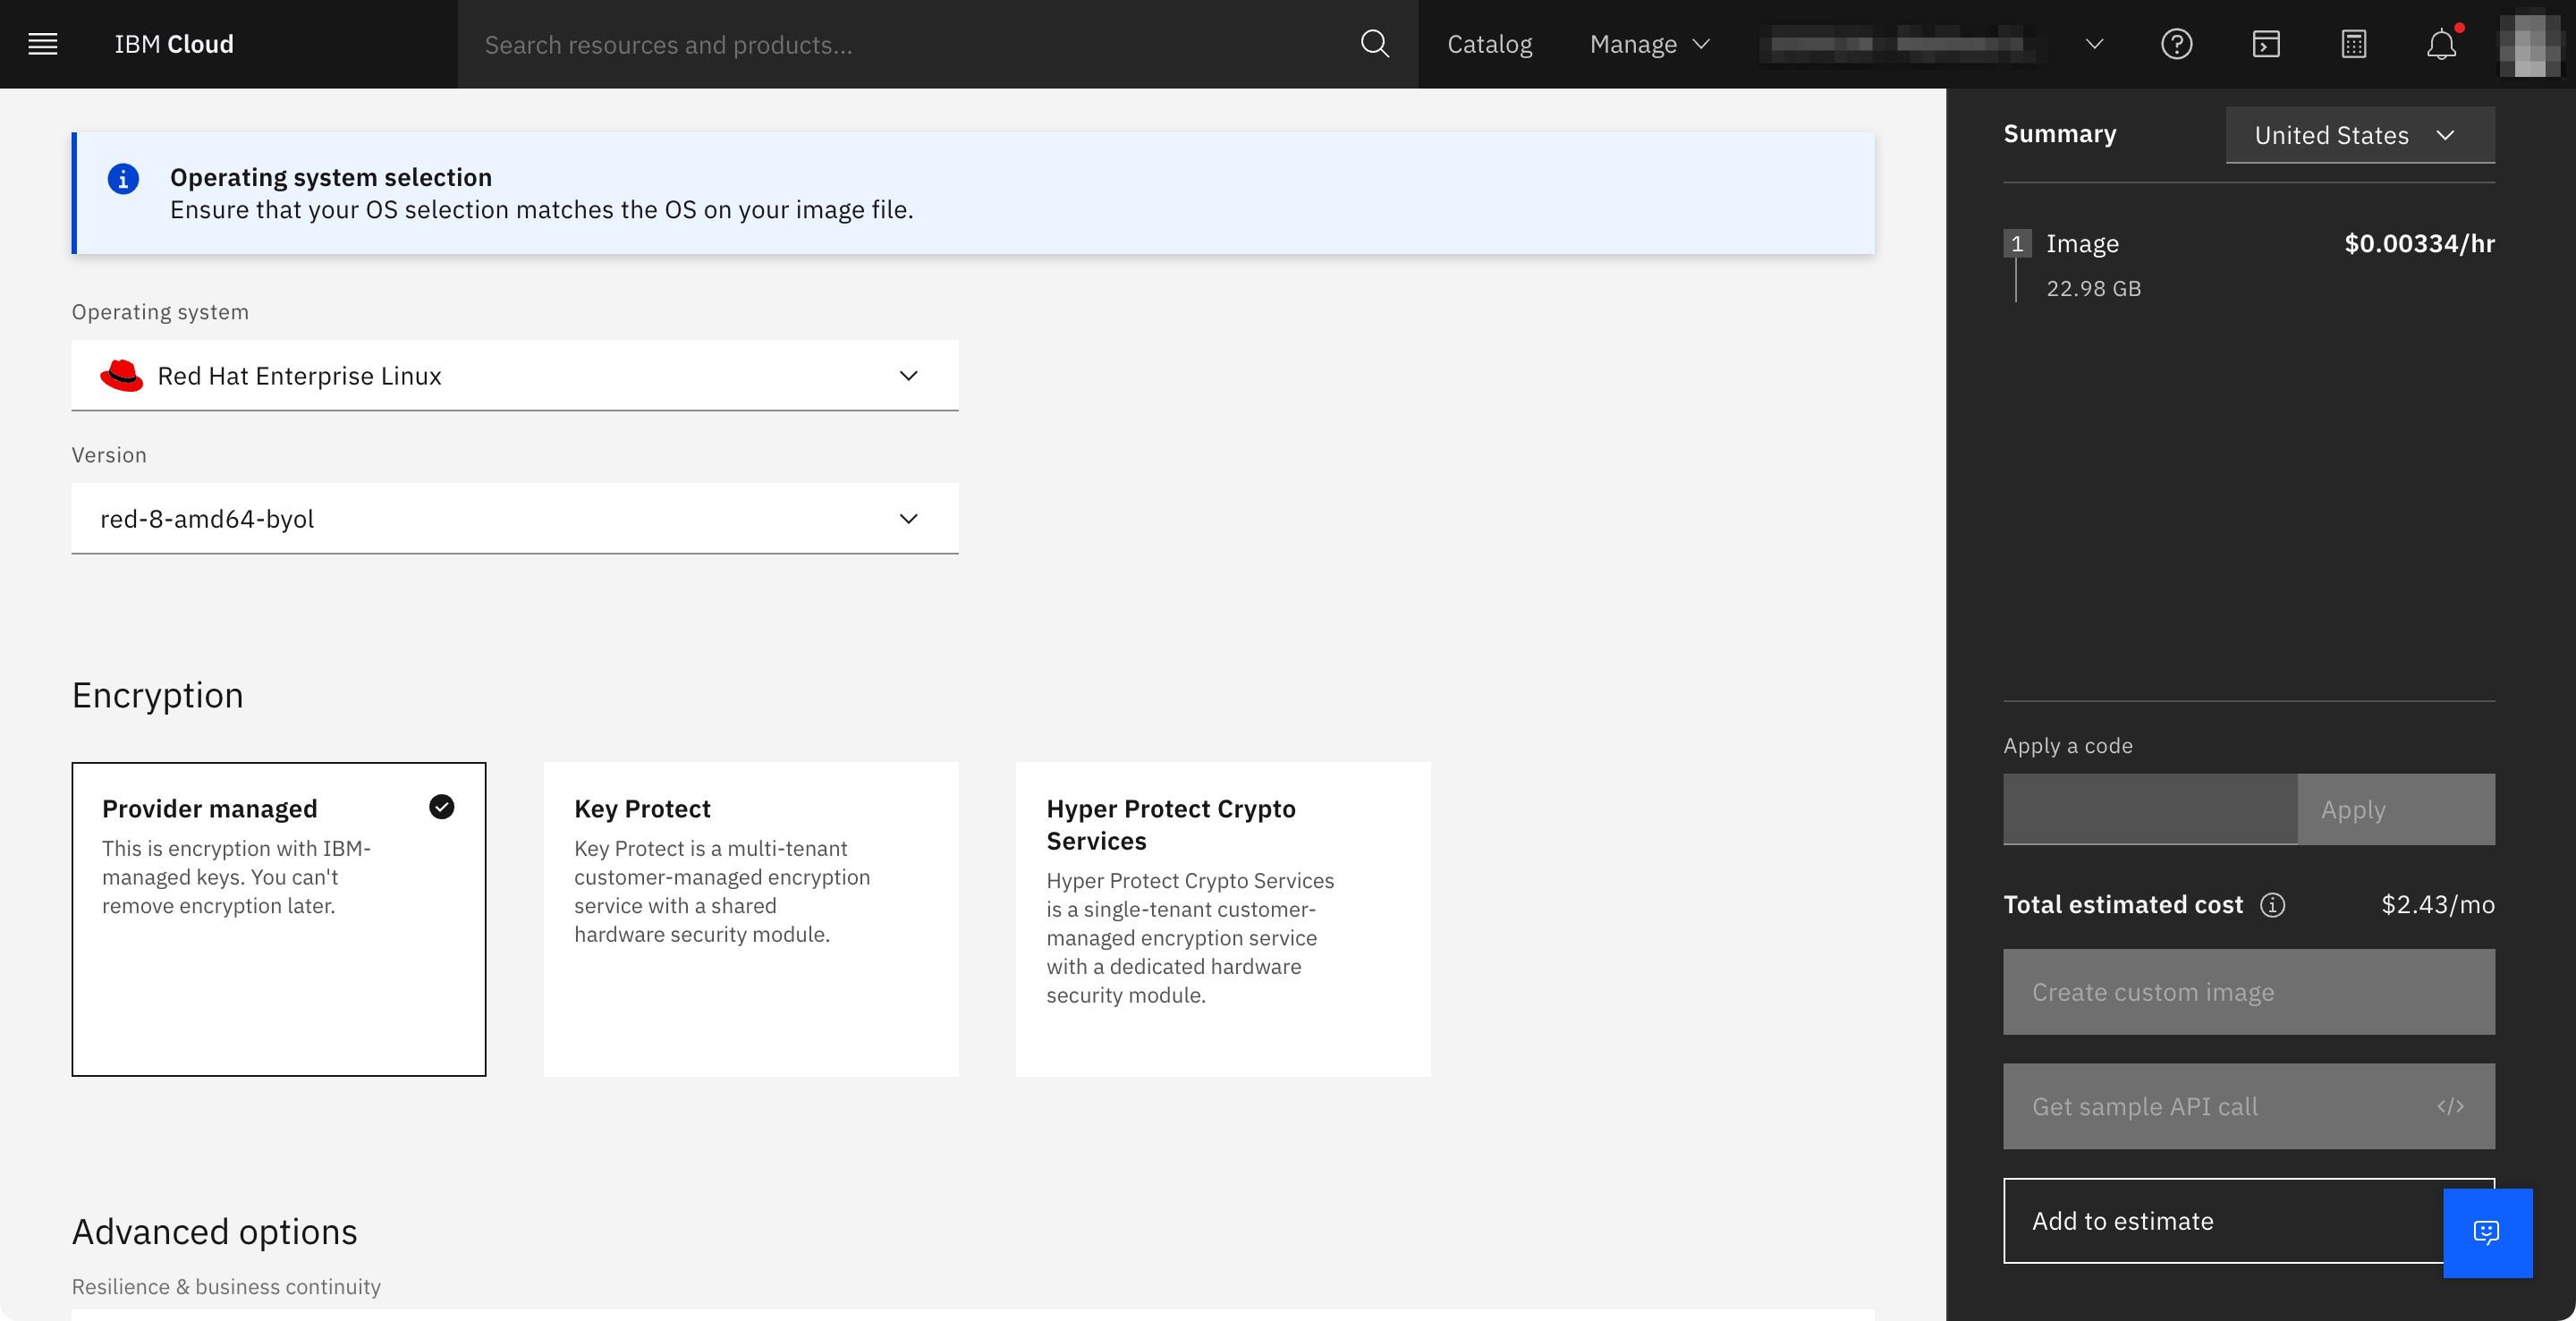
For SevOne NMS 6.x, choose the operating system.
-
Operating system - select Red Hat Enterprise Linux.
-
Version - select red-8-amd64-byol.
-
-
-
For any other settings such as, Encryption, Tags, Resource group, etc., please contact your IBM Cloud Administrator or leave the fields with the default values.
-
Click Create custom image button.
You have now created an image and you may perform the provisioning of one or more VPC virtual server instances for SevOne NMS.
Create a new Virtual server instance for VPC
-
Create a Virtual server instance for each node you intend to deploy in your SevOne NMS cluster.
-
Under VPC Infrastructure in left panel, click Virtual server instances.
-
In the right panel Virtual server instances for VPC, click the Create button.
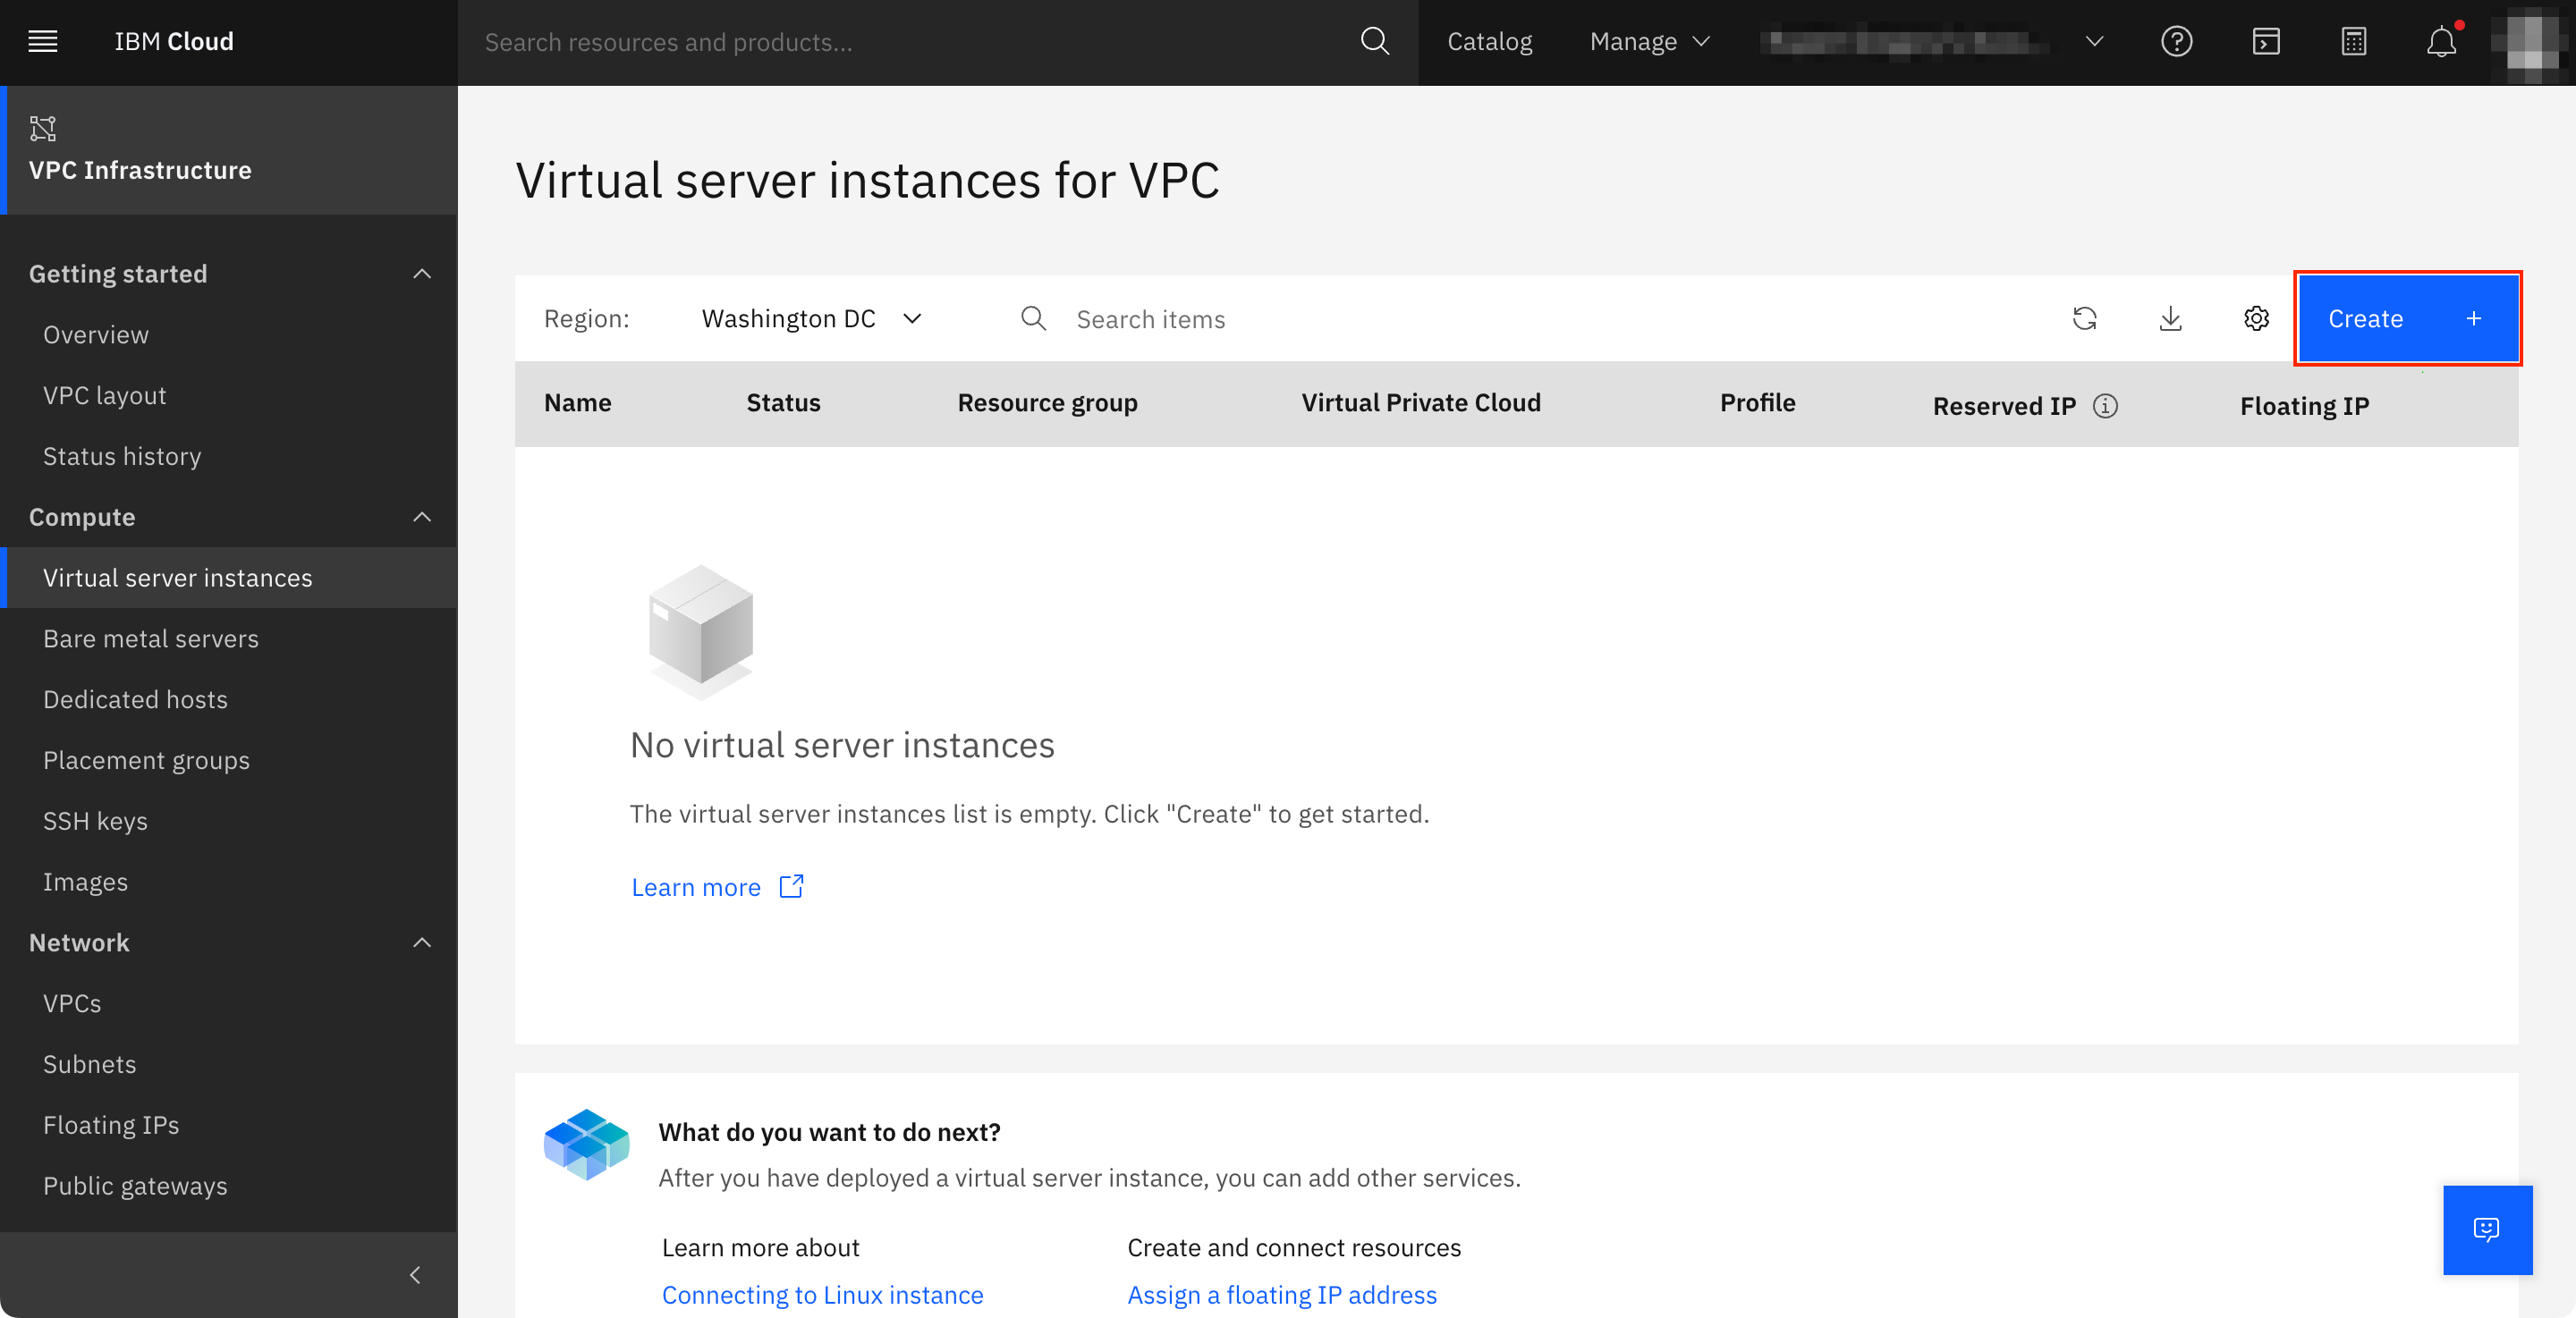
-
When you click on Create button, Virtual server for VPC workflow will open.
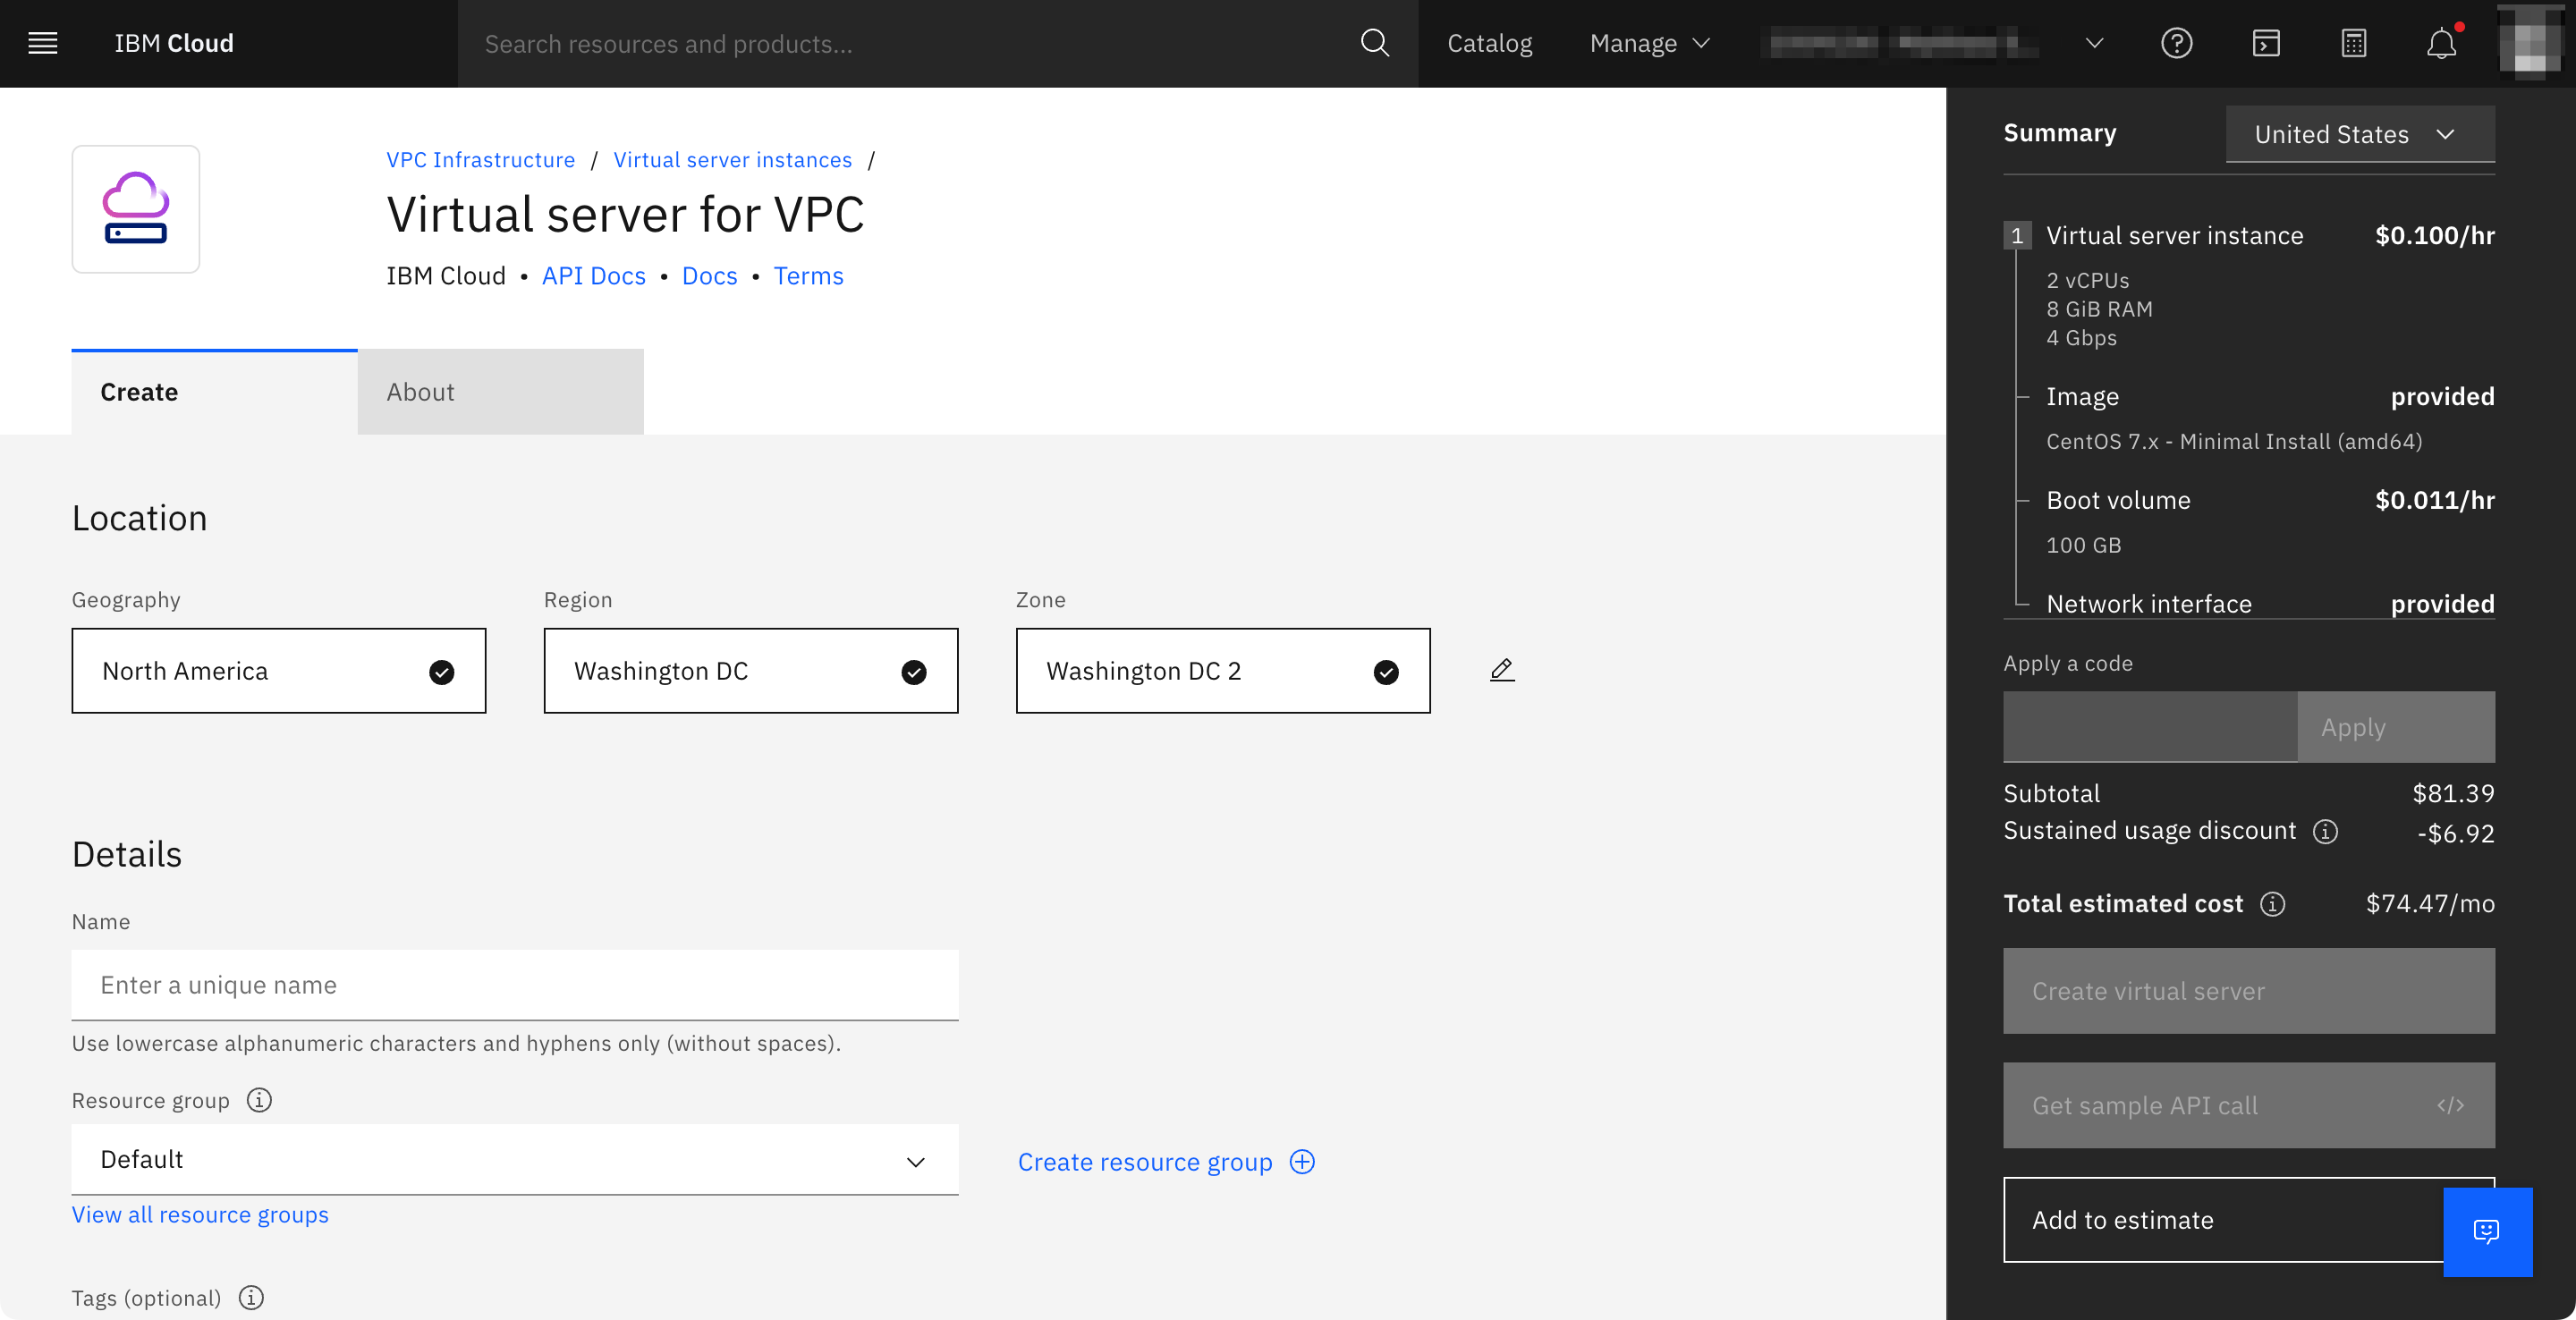
-
Name - enter the name for the specific instance. It is recommended to set this to the desired hostname.
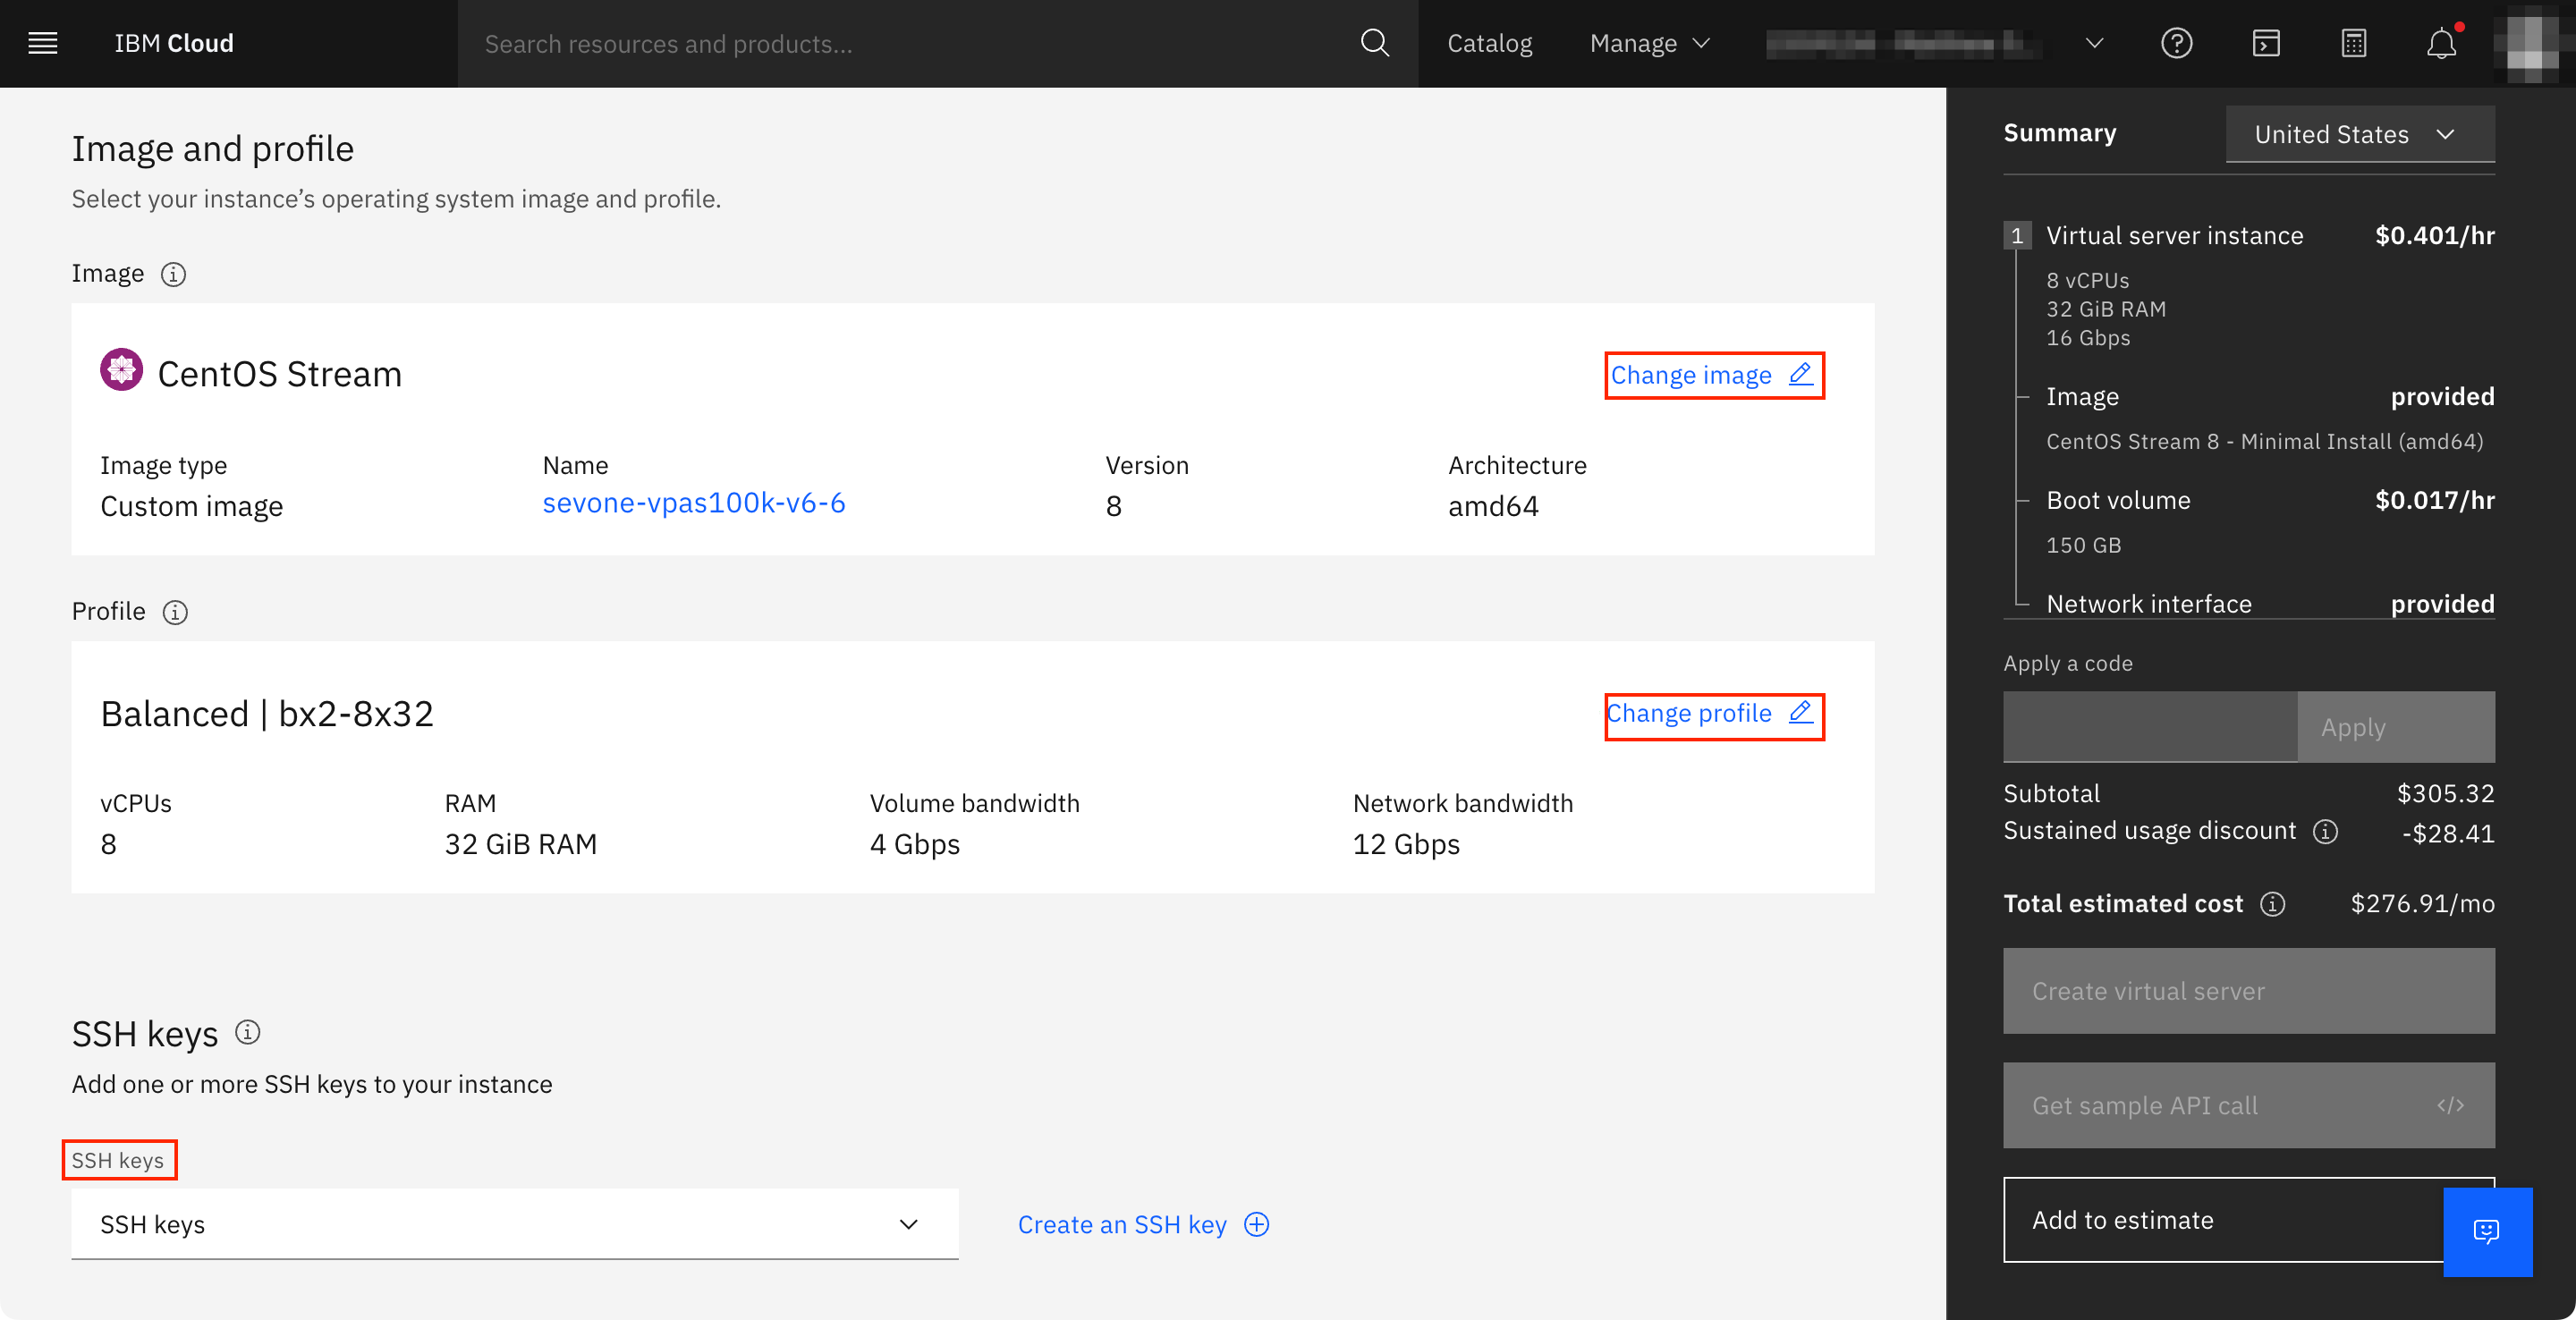
-
Image - click Change image and select the custom NMS image you created in the previous step.
-
Profile - click Change profile and select an appropriate compute profile to match or exceed the hardware requirements of the instance you are deploying.
Please refer to section Hardware Requirements to obtain compute requirements for each instance type.
For example, if you are deploying a vPAS100k, the minimum hardware requirements are,
-
vCPU Cores - 8
-
RAM - 96GB
-
Storage - 500GB / 2TB (Boot Drive / Data Storage)
Based on this, the closest IBM Cloud instance type is bx2-32x128 or cx2-64x128.
-
-
SSH keys - choose your SSH key.
-
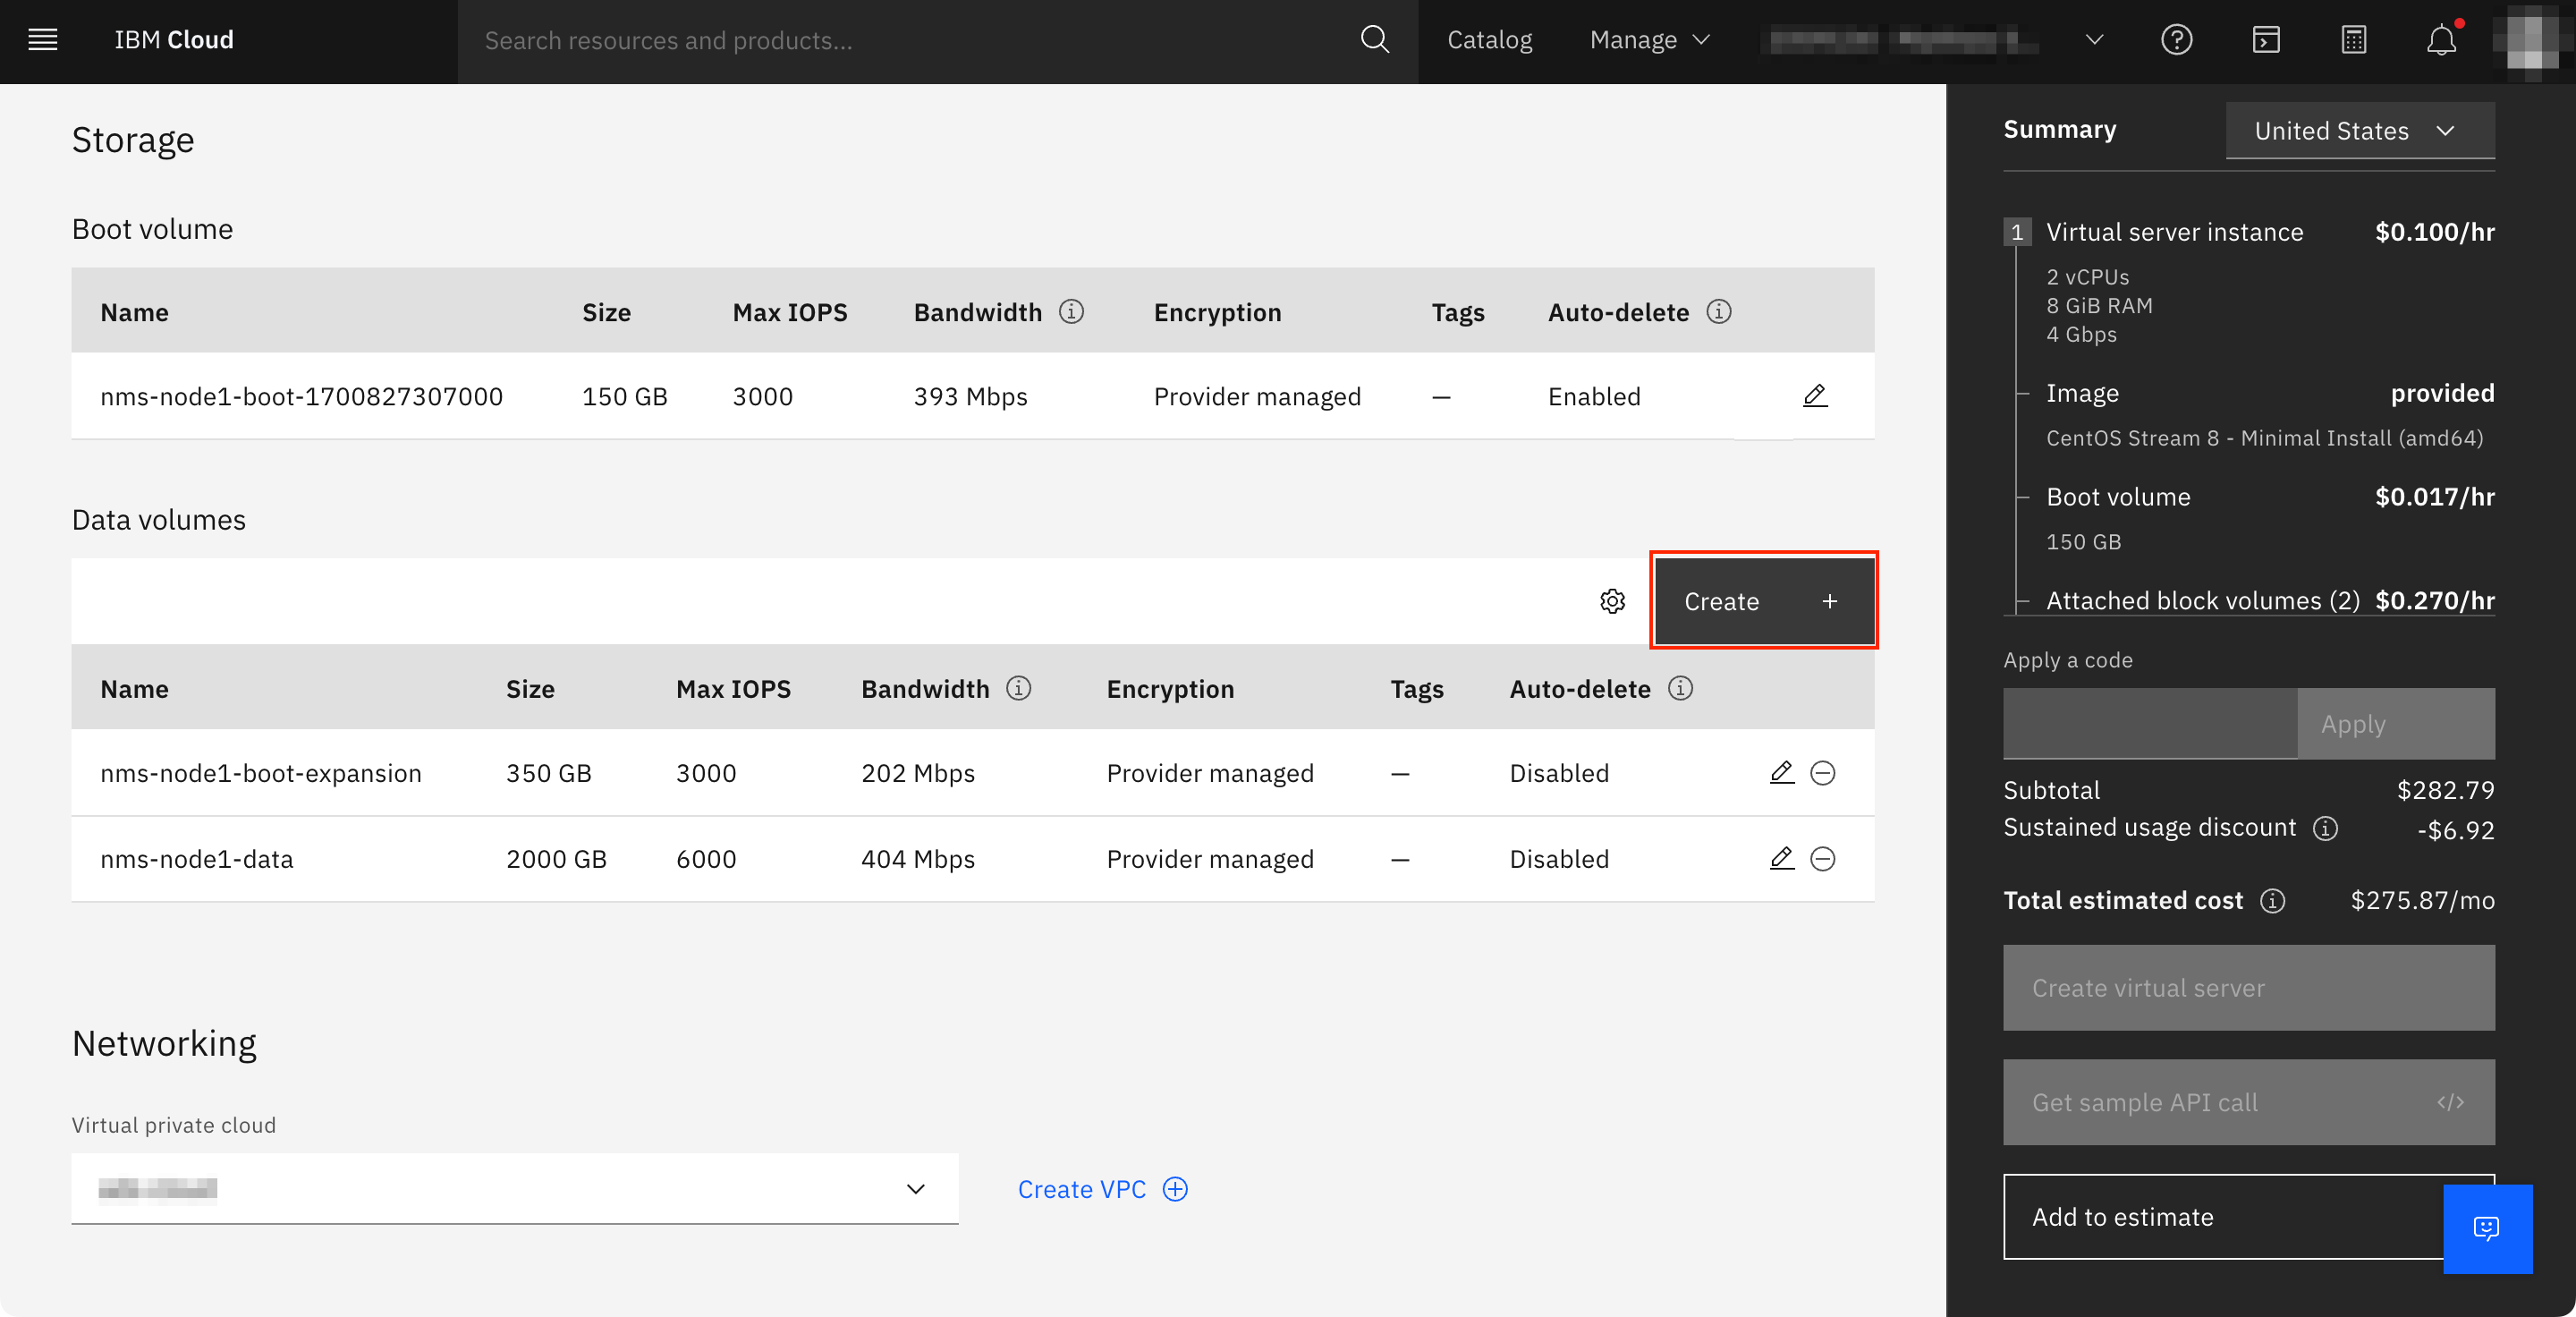
Storage
This does not apply to vPAS5k hardware component.
-
Leave the Boot volume as default. It is usually 150 GB.
-
Under Data volumes, add additional volumes as required.
ExampleFor vPAS100k, 500GB of boot drive is required. 150GB already configured. So, you need to add an additional 350GB volume to meet the 500GB total boot drive requirement. Additionally, for vPAS100k, you also require 2TB of data storage. For this, add 2TB volume.
-
-
For any other settings such as, Networking, Advanced options, Tags, Resource group, etc., please contact your IBM Cloud Administrator or leave the fields with the default values.
-
Click Create virtual server button. Repeat this process for each NMS instance you want to create.
Once the instance is created, it will automatically boot and become available from your Virtual Server Instance list.
-
Configure Boot & Data Drives
This does not apply to vPAS5k hardware component.
To configure the boot and data drives, i t is assumed that the additional storage volumes have been created as mentioned in the section above. Additionally, it is assumed that the volumes are attached as /dev/vd<x> . If the attachment differs from this, please use the correct paths for your environment.
To find the correct paths for your environment, execute the following command as root.
$ lsblkNAME MAJ:MIN RM SIZE RO TYPE MOUNTPOINTvda 252:0 0 150G 0 disk ├─vda1 252:1 0 500M 0 part /boot└─vda2 252:2 0 149.5G 0 part ├─root_vg-root 253:0 0 145.4G 0 lvm / └─root_vg-swap 253:1 0 4G 0 lvm [SWAP]vdb 252.16 0 350G 0 diskvdc 252.32 0 2T 0 diskvdd 252.48 0 368K 0 diskvde 252.64 0 44K 0 diskThere are two additional unmounted disks (vdb and vdc)
-
/dev/vdb - an additional 350GB for boot expansion.
-
/dev/vdc - 2TB for data storage.
Prior to deployment, determine the size of the hard drive required based on the virtual appliance you are deploying. For details, please refer to section Hardware Requirements .
Configure additional Boot Drive
This does not apply to vPAS5k hardware component.
To configure additional boot drive space, assume /dev/vdb as the additional boot drive.
Execute the commands below as root.
$ pvcreate /dev/vdb Physical volume "/dev/vdb" successfully created.$ vgextend root_vg /dev/vdb Volume group "root_vg" successfully extended$ lvextend -l +100%FREE /dev/root_vg/root -r Size of logical volume root_vg/root changed from <145.44 GiB (2327 extents) to <495.44 GiB (7927 extents). Logical volume root_vg/root successfully resized.meta-data=/dev/mapper/root_vg-root isize=512 agcount=4, agsize=9531392 blks = sectsz=512 attr=2, projid32bit=1 = crc=1 finobt=1, sparse=1, rmapbt=0 = reflink=1 bigtime=0 inobtcount=0data = bsize=4096 blocks=38125568, imaxpct=25 = sunit=0 swidth=0 blksnaming =version 2 bsize=4096 ascii-ci=0, ftype=1log =internal log bsize=4096 blocks=18616, version=2 = sectsz=512 sunit=0 blks, lazy-count=1realtime =none extsz=4096 blocks=0, rtextents=0data blocks changed from 38125568 to 129875968Verify that the boot disk has been expanded.
$ df -hT /Filesystem Type Size Used Avail Use% Mounted on/dev/mapper/root_vg-root xfs 496G 26G 471G 6% /This indicates that the boot drive (the slash drive) has now been resized to 500GB.
The size will report slightly under 500GB due to disk formatting. This is acceptable and the boot drive configuration is now complete.
Configure Data Drive
This does not apply to vPAS5k hardware component.
To configure the additional data drive space, assuming /dev/vdc is the data drive, perform the following steps as root.
$ mkfs.xfs /dev/vdc$ mkdir -p /mnt/data_volumeUsing a text editor of your choice, manually add the following entry to fstab to avoid formatting issues.
/dev/vdc /mnt/data_volume xfs defaults 1 2$ mount -a$ supervisorctl stop mysqld mysqld2 SevOne-netflowd SevOne-polld$ mv /data /mnt/data_volume$ mv /data2 /mnt/data_volume$ ln -s /mnt/data_volume/data /data$ ln -s /mnt/data_volume/data2 /data2$ ln -s /mnt/data_volume/data/index /index$ chown -R mysql:mysql /data /data2 /mnt/data_volume$ supervisorctl start mysqld mysqld2 SevOne-netflowd SevOne-polld$ for directory in system index data; do SevOne-ballast fill-all $directory; doneSet Appliance Size & Type
Allow the system to operate in the most optimal manner using all applicable resources you have allocated. Please refer to SevOne NMS Appliance Configuration Guide for details.
You have now completed the deployment of SevOne NMS component of IBM SevOne NPM on IBM Cloud.
Network Configuration Via the Config Shell for VMware, KVM, and Azure Implementations
Use the configshell to configure your network settings. For a KVM implementation, many of the config shell settings have already been entered. To access the config shell from a command prompt, enter the following command.
$ configshellTo configure your SevOne appliance, you will need the following information.
-
System Name (Host Name)
-
Host IP address and sub-netmask
-
Broadcast address
-
Default Gateway IP address
-
DNS primary & secondary IP address
-
NTP (Time Server) IP address
-
SNMP Settings
-
Domain Name

On the first page, press Enter to display the logon page that controls access to the Configuration Menu.
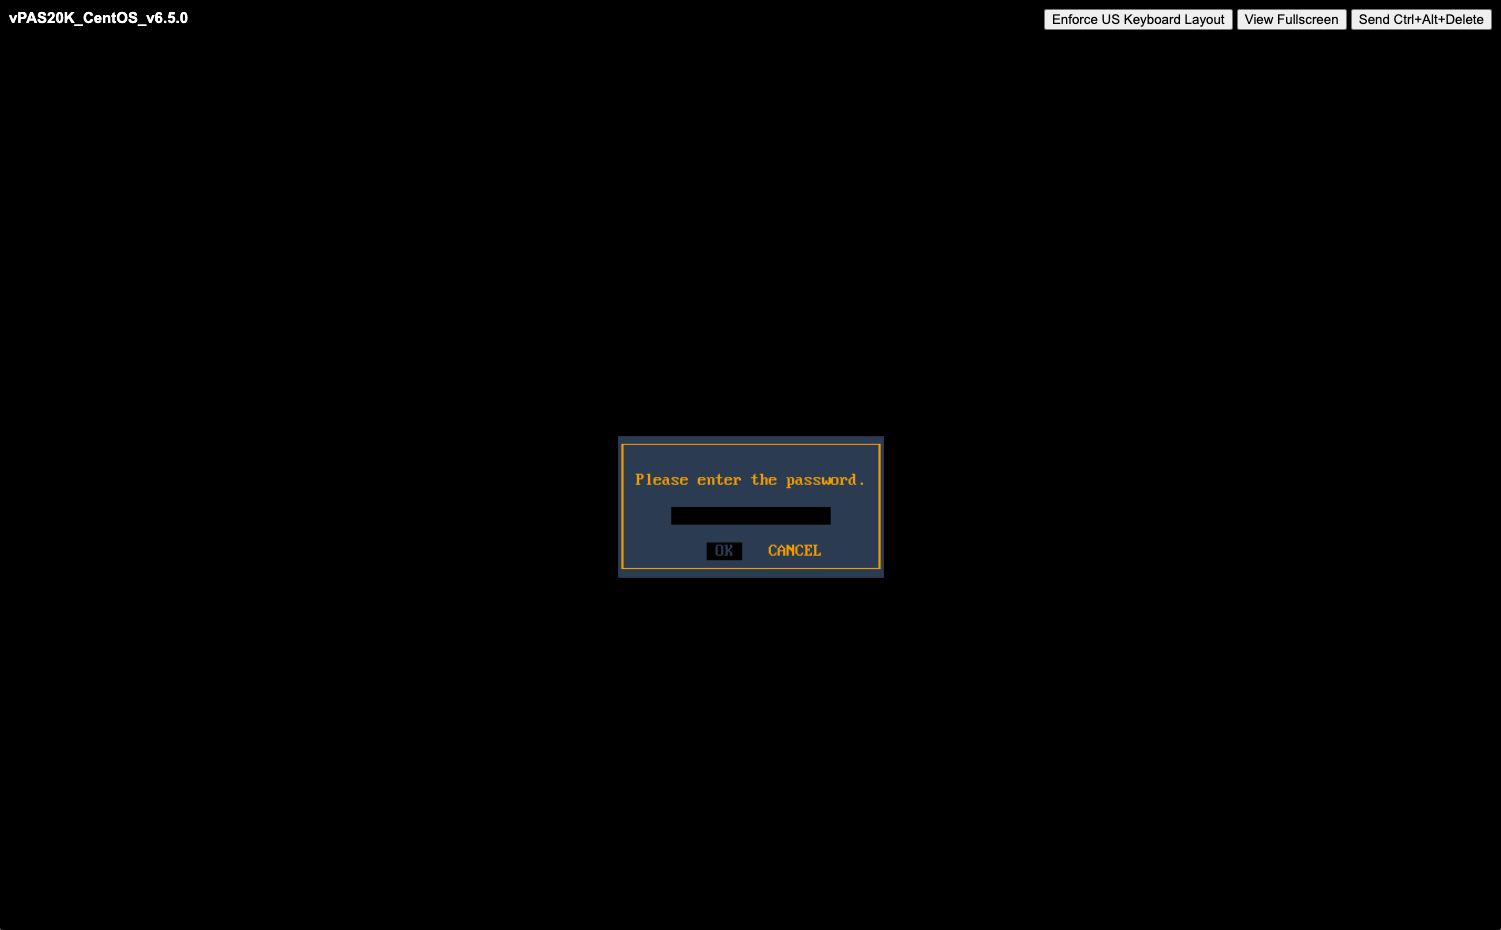
-
Enter the default password, supportuser.
When you log in here for the first time, you are logging as the user support. Steps for changing the default password for the support user are in the OS-level User Names and Passwords section. It is important that you change the default password.
Failure to change the default password presents a significant security risk.
-
Press Enter to display the system configuration menu.
Press the down arrow to select System Name in the left menu and press Enter to display the System Name fields on the right.
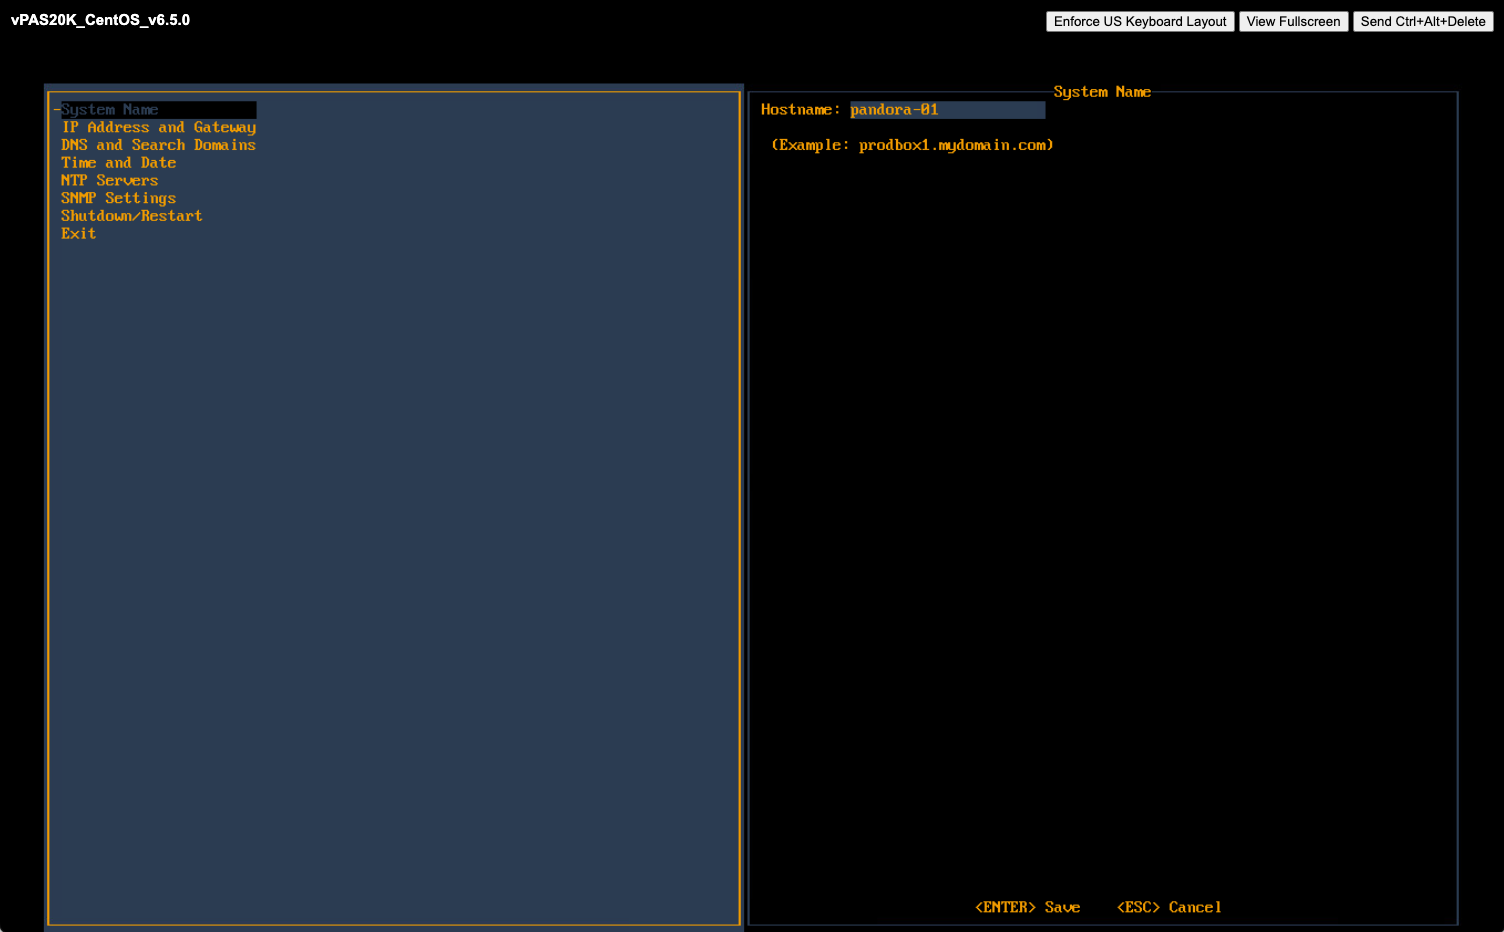
-
In the Hostname field, enter the hostname for the SevOne appliance.
-
Press Enter to save the System Name settings and return the focus to the menu on the left.
Press the down arrow to select IP Address and Gateway and press Enter to display the IP address and gateway fields on the right.
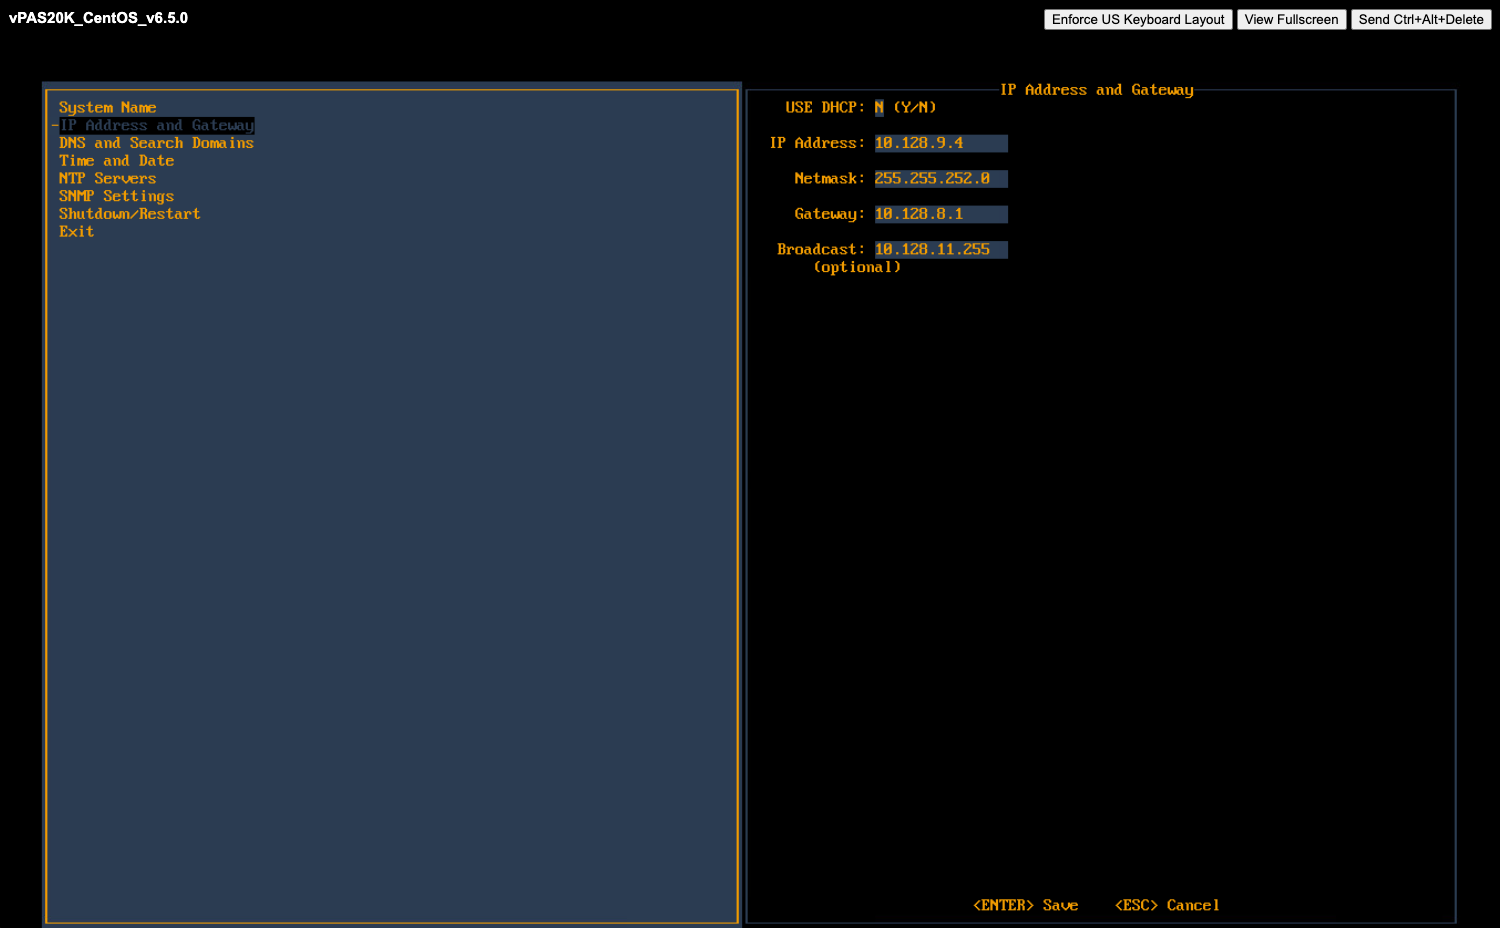
If your network uses DHCP type Y to disable the following fields and skip the IP Address and Gateway steps. If your network does not use DHCP, type N and complete the following fields.
-
In the IP Address field, enter IP address of the SevOne appliance and press Tab.
-
In the Netmask field, enter the netmask of the SevOne appliance and press Tab.
-
In the Gateway field, enter the IP address of the SevOne appliance and press Tab.
-
In the Broadcast (optional) field, enter the SevOne appliance broadcast IP address.
-
Press Enter to save the IP Address and Gateway settings and return the focus to the menu on the left.
Press the down arrow to select DNS and Search Domains and press Enter to display the DNS and Search Domains fields on the right.
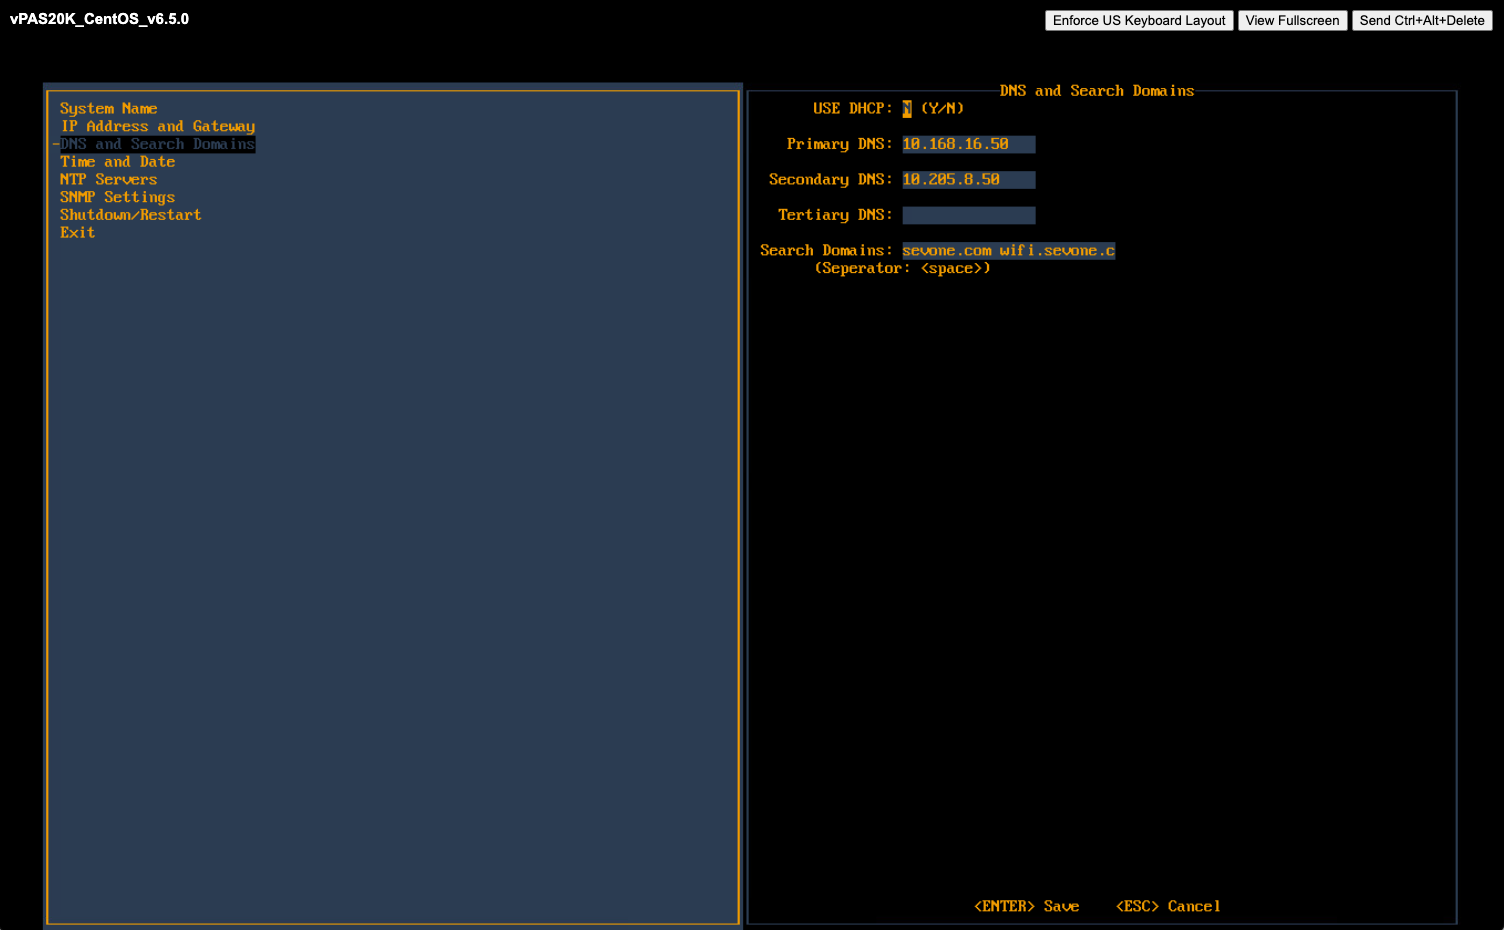
-
In the Primary DNS field, enter the IP address of the DNS server for the SevOne appliance to use first and press Tab.
-
In the Secondary DNS field, enter the IP address for the SevOne appliance to use second, if applicable and press Tab.
-
In the Tertiary DNS field, enter the IP address of the DNS server for the SevOne appliance to use third, if applicable and press Tab.
-
In the Search Domains field, enter the domain names or IP addresses for the search domains for the SevOne appliance to use (separated by a space).
-
Press Enter to save your DNS and Search Domains settings and return the focus to the menu on the left.
Press the down arrow to select Time and Date and press Enter to display the Time and Date fields on the right.
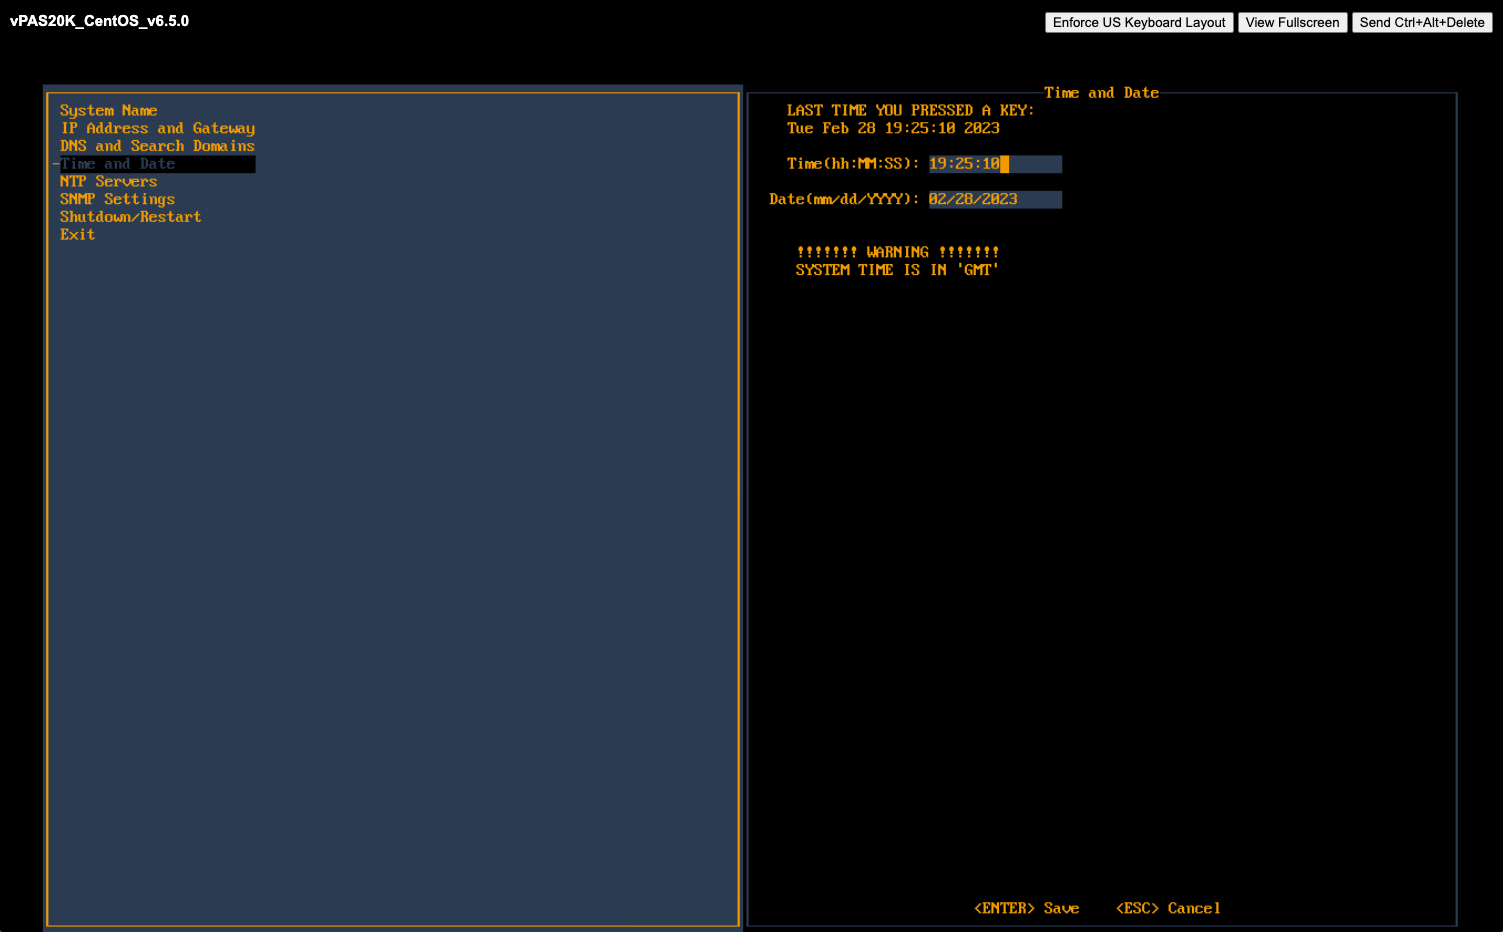
-
Confirm that the time and date are correct for Greenwich Mean Time (GMT) (a.k.a. Coordinated Universal Time (UTC)). This is SevOne NMS system time. You define time and date settings for users, devices, and reports via the SevOne NMS graphical user interface in a later step.
-
If needed, enter the time and date using the appropriate format in the fields provided.
-
Press Enter to save the Time and Date settings and to return the focus to the menu on the left.
Press the down arrow to select NTP Servers and press Enter to display the NTP Servers fields on the right.

-
In the Servers field, enter the DNS name or IP address of the time server for the SevOne appliance to use to maintain time settings.
-
Press Enter to save the NTP Servers settings and to return the focus to the menu on the left.
Press the down arrow to select SNMP Settings and press Enter to display the SNMP Settings fields on the right.
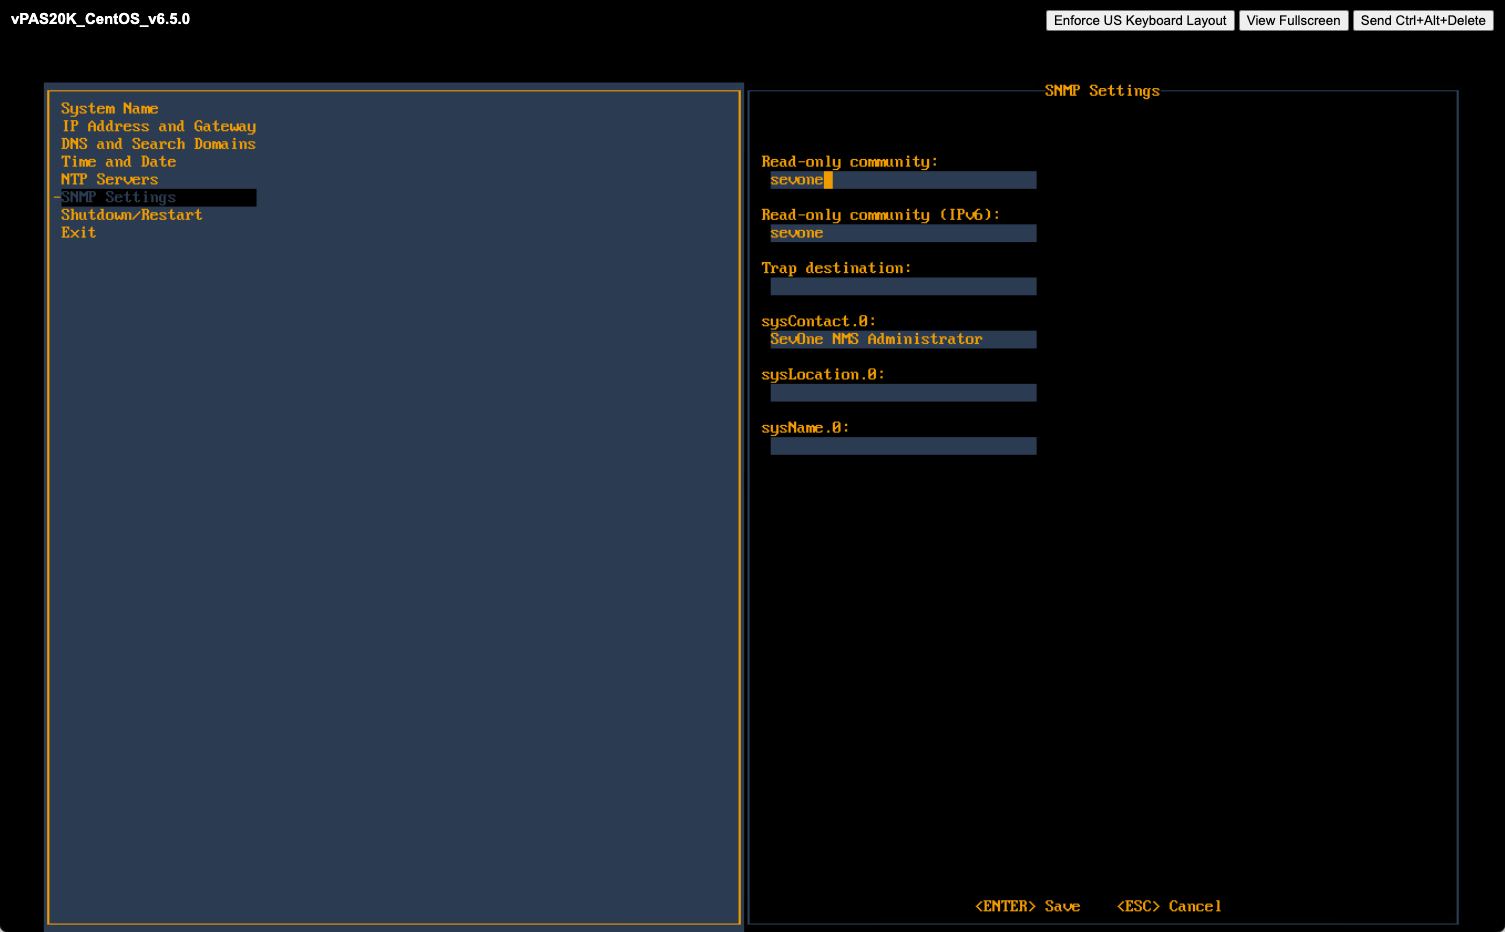
-
In the Read Only Community field, enter the SNMP read community string for other devices to use to poll SNMP data on the SevOne appliance when communicating via IPv4 and press Tab.
-
In the Read Only Community (IPv6) field, enter the SNMP read community string for other devices to use to poll SNMP data on the SevOne appliance when communicating via IPv6 and press Tab.
-
In the Trap Destination field, enter the IP address or hostname of the destination where traps the SevOne appliance generates are to be sent and press Tab.
-
In the sysContact.0 field, enter the text you get when you SNMP walk the sysContact OID and press Tab.
-
In the sysLocation.0 field, enter the text you get when you SNMP walk the sysLocation OID and press Tab.
-
In the sysName.0 field, enter the text you get when you SNMP walk the sysName OID.
-
Press Enter to save the SNMP Servers settings and to return the focus to the menu on the left.
If you changed the System Name settings or the IP Address and Gateway settings, press the down arrow to select Shutdown and Restart and press Enter to display a Shutdown option and a Restart option on the right.
For all other configuration setting changes, you can press the down arrow to select Exit.
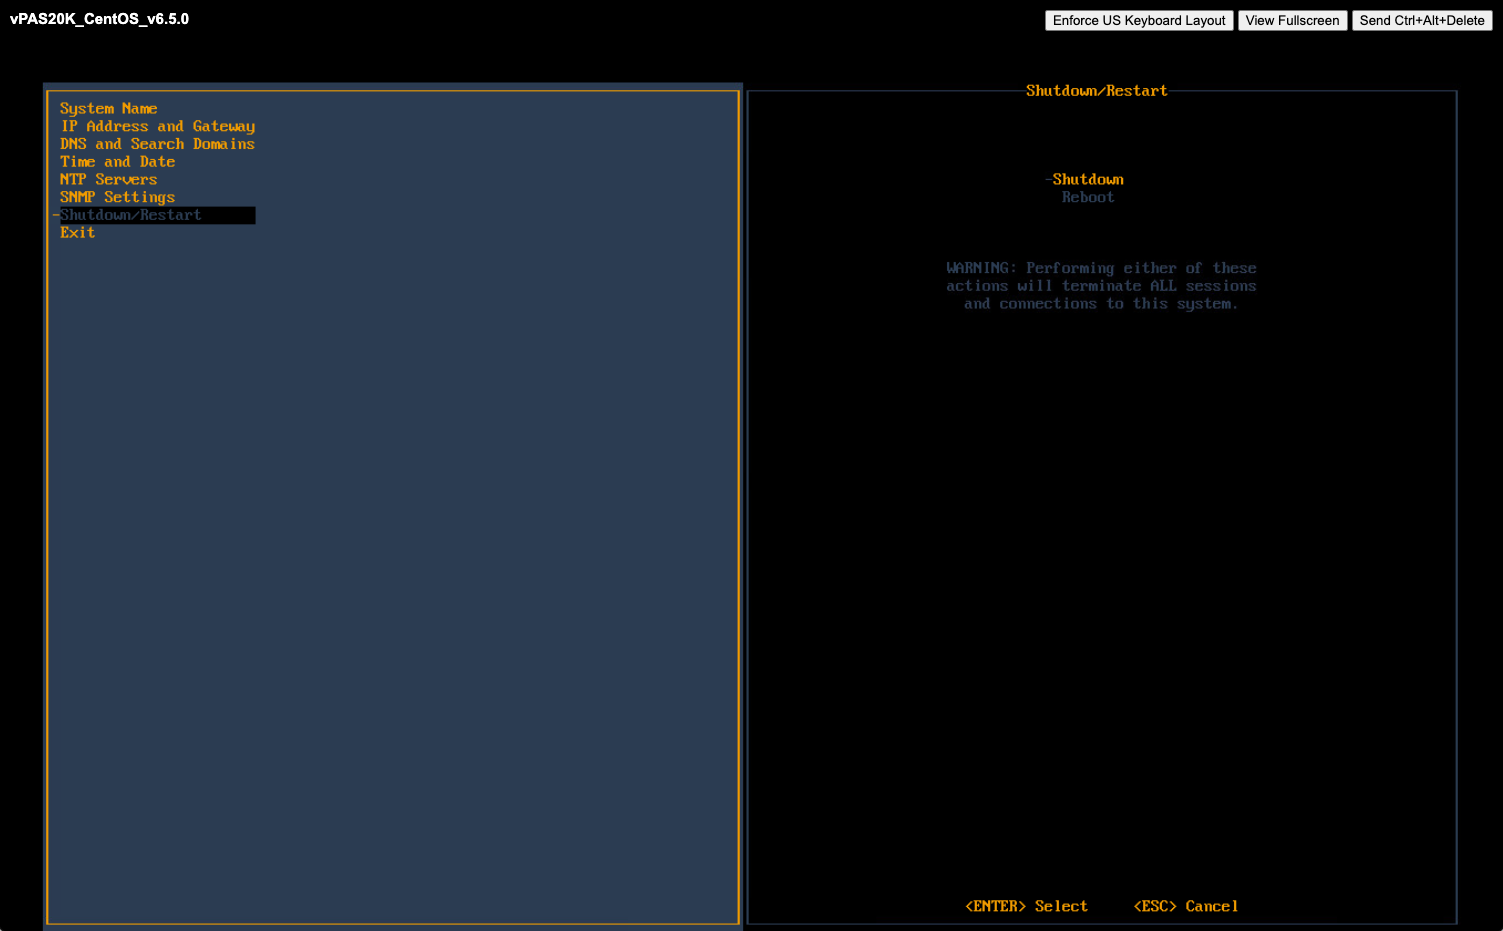
In the Shutdown/Restart section select an option and press Enter to shut down or reboot the SevOne appliance.
If you highlight Exit, when you press Enter the initial Configuration Menu Welcome page appears.
For details on advanced Network Configurations such as configuring Virtual IP (CentOS) or peer communication over NAT, please refer to SevOne NMS Advanced Network Configuration Guide for details.
OS-level User Names and Passwords
You will need to change the default passwords for the admin, root, and support user accounts. This is important for security reasons.
Failure to change the default passwords presents a significant security risk. This publication includes default passwords and this document has probably been made available to the public.
Change Admin Password
The admin user is not used by any SevOne utilities. It exists for administrators/customers. This password should be changed on all peers. Perform the following steps to change the password for admin.
-
SSH into your SevOne NMS appliance and log in as admin.
-
At the Password prompt, enter adminuser.
$sshadmin@10.128.9.4(admin@10.128.9.4) Password: <enter'adminuser'>(admin@10.128.9.4) You are required to change your password immediately (administrator enforced)Current password: <enter'adminuser'>(admin@10.128.9.4) New password: <enter new password>(admin@10.128.9.4) Retype new password: <re-enter new password>Example$sshadmin@10.128.9.4(admin@10.128.9.4) Password: adminuser(admin@10.128.9.4) You are required to change your password immediately (administrator enforced)Current password: adminuser(admin@10.128.9.4) New password: te5ting123(admin@10.128.9.4) Retype new password: te5ting123 -
You will be prompted and required to change the admin user password. Enter a new password when prompted.
-
Exit the session when you are done.
Change Root Password
You must change the root password for new appliances when you SSH into the system. You will be prompted for the default password and will be required to change the password. This must be completed before incorporating the new peer into a cluster. Security concerns prevent incorporation of peers that use the default password.
SevOne NMS uses the root account for everything. This password should be changed on all peers. Perform the following steps to change the password for root.
-
SSH into your SevOne NMS appliance and log in as root.
-
At the Password prompt, enter dRum&5853.
$sshroot@10.128.9.4(root@10.128.9.4) Password: <enter'dRum&5853'>(root@10.128.9.4) You are required to change your password immediately (administrator enforced)Current password: <enter'dRum&5853'>(root@10.128.9.4) New password: <enter new password>(root@10.128.9.4) Retype new password: <re-enter new password>Example$sshroot@10.128.9.4(root@10.128.9.4) Password: dRum&5853(root@10.128.9.4) You are required to change your password immediately (administrator enforced)Current password: dRum&5853(root@10.128.9.4) New password: te5ting123(root@10.128.9.4) Retype new password: te5ting123 -
You will be prompted and required to change the root user password. Enter a new password when prompted.
-
Exit the session when you are done.
Change Support Password
The support user is used by configshell. Configshell does not store the password for this account anywhere. You will need the password you specify here when logging in to configshell. This password should be changed on all peers. Perform the following steps to change the password for support.
-
SSH into your SevOne NMS appliance and log in as support.
-
At the Password prompt, enter supportuser.
$sshsupport@10.128.9.4(support@10.128.9.4) Password: <enter'supportuser'>(support@10.128.9.4) You are required to change your password immediately (administrator enforced)Current password: <enter'supportuser'>(support@10.128.9.4) New password: <enter new password>(support@10.128.9.4) Retype new password: <re-enter new password>Example$sshsupport@10.128.9.4(support@10.128.9.4) Password: supportuser(support@10.128.9.4) You are required to change your password immediately (administrator enforced)Current password: supportuser(support@10.128.9.4) New password: te5ting123(support@10.128.9.4) Retype new password: te5ting123 -
You will be prompted and required to change the support user password. Enter a new password when prompted.
-
Exit the session when you are done.
For details on how to change the IP address on a SevOne appliance or how to configure networking bonding, please refer to the respective sections in SevOne NMS Advanced Network Configuration Guide.
Enable Firewall
Firewall can be enabled / disabled at cluster-level or on a selected peer.
at Cluster-level
By default, firewall service is disabled for the cluster. Please refer to SevOne NMS System Administration Guide > section Cluster Manager > Cluster Settings tab > Firewall subtab for details.
at Peer-level
By default, Override Cluster Settings is disabled. To override cluster-level firewall settings with firewall settings at the selected peer-level, enable Override Cluster Settings. Once Override Cluster Settings field is enabled, field Enable Firewall becomes available. By default, Enable Firewall is disabled. Please refer to SevOne NMS System Administration Guide > section Cluster Manager > select a peer > click Peer Settings tab > Firewall subtab for details.
Shut Down and Reboot SevOne NMS
SevOne NMS can run for extended periods of time. Occasionally it is necessary to shut down or reboot an appliance. SevOne NMS stores data in cache and writes to the disk on a regular basis.
Use the configshell to shut down the software or the following shell commands back up the memory ring tables to the database on the disk to ensure that you do not lose data.
$ SevOne-shutdown shutdown
$ SevOne-shutdown reboot