Table of Contents (Start)
- Topics
- Introducing SevOne
- Login
- Startup Wizard
- Dashboard
- Global Search - Advanced Search
- Report Manager
- Report Attachment Wizard
- Report Properties
- Report Interactions
- Instant Graphs
- TopN Reports
- Alerts
- Alert Archives
- Alert Summary
- Instant Status
- Status Map Manager
- Edit Maps
- View Maps
- FlowFalcon Reports
- NBAR Reports
- Logged Traps
- Unknown Traps
- Trap Event Editor
- Trap Destinations
- Trap Destination Associations
- Policy Browser
- Create and Edit Policies
- Webhook Definition Manager
- Threshold Browser
- Create and Edit Thresholds
- Probe Manager
- Discovery Manager
- Device Manager
- New Device
- Edit Device
- Object Manager
- High Frequency Poller
- Device Summary
- Device Mover
- Device Groups
- Object Groups
- Object Summary
- Object Rules
- VMware Browser
- AWS Plugin
- Azure Plugin (Public Preview)
- Calculation Plugin
- Database Manager
- Deferred Data Plugin
- DNS Plugin
- HTTP Plugin
- ICMP Plugin
- IP SLA Plugin
- JMX Plugin
- NAM
- NBAR Plugin
- Portshaker Plugin
- Process Plugin
- Proxy Ping Plugin
- SDWAN Plugin
- SNMP Plugin
- VMware Plugin
- Web Status Plugin
- WMI Plugin
- xStats Plugin
- Indicator Type Maps
- Device Types
- Object Types
- Object Subtype Manager
- Calculation Editor
- xStats Source Manager
- User Role Manager
- User Manager
- Session Manager
- Authentication Settings
- Preferences
- Cluster Manager
- Maintenance Windows
- Processes and Logs
- Metadata Schema
- Baseline Manager
- FlowFalcon View Editor
- Map Flow Objects
- FlowFalcon Views
- Flow Rules
- Flow Interface Manager
- MPLS Flow Mapping
- Network Segment Manager
- Flow Protocols and Services
- xStats Log Viewer
- SNMP Walk
- SNMP OID Browser
- MIB Manager
- Work Hours
- Administrative Messages
- Enable Flow Technologies
- Enable JMX
- Enable NBAR
- Enable SNMP
- Enable Web Status
- Enable WMI
- IP SLA
- SNMP
- SevOne Data Publisher
- Quality of Service
- Perl Regular Expressions
- Trap Revisions
- Integrate SevOne NMS With Other Applications
- Email Tips and Tricks
- SevOne NMS PHP Statistics
- SevOne NMS Usage Statistics
- Glossary and Concepts
- Map Flow Devices
- Trap v3 Receiver
- Guides
- Quick Start Guides
- AWS Quick Start Guide
- Azure Quick Start Guide (Public Preview)
- Data Miner Quick Start Guide
- Flow Quick Start Guide
- Group Aggregated Indicators Quick Start Guide
- IP SLA Quick Start Guide
- JMX Quick Start Guide
- Metadata Quick Start Guide
- RESTful API Quick Start Guide
- Self-monitoring Quick Start Guide
- SevOne NMS Admin Notifications Quick Start Guide
- SNMP Quick Start Guide
- Synthetic Indicator Types Quick Start Guide
- Topology Quick Start Guide
- VMware Quick Start Guide
- Web Status Quick Start Guide
- WMI Quick Start Guide
- xStats Quick Start Guide
- xStats Adapter - Accedian Vision EMS (TM) Quick Start Guide
- Deployment Guides
- Automated Build / Rebuild (Customer) Instructions
- Generate a Self-Signed Certificate or a Certificate Signing Request
- SevOne Best Practices Guide - Cluster, Peer, and HSA
- SevOne Data Platform Security Guide
- SevOne NMS Implementation Guide
- SevOne NMS Installation Guide - Virtual Appliance
- SevOne NMS Advanced Network Configuration Guide
- SevOne NMS Installation Guide
- SevOne NMS Port Number Requirements Guide
- SevOne NMS Upgrade Process Guide
- SevOne Physical Appliance Pre-Build BIOS and RAID Configuration Guide
- SevOne SAML Single Sign-On Setup Guide
- Cloud Platforms
- Other Guides
- Quick Start Guides
Maintenance Windows
The Maintenance Window Manager enables you to view, create, edit, and delete proactive and retroactive device-level maintenance windows.
To access the Maintenance Window Manager from the navigation bar, click the Administration menu and select Maintenance Windows.
In order to use the Maintenance Window Manager, you will need to have the page permission Maintenance Window Configuration enabled (go to Administration -> Access Configuration -> User Role Manager).
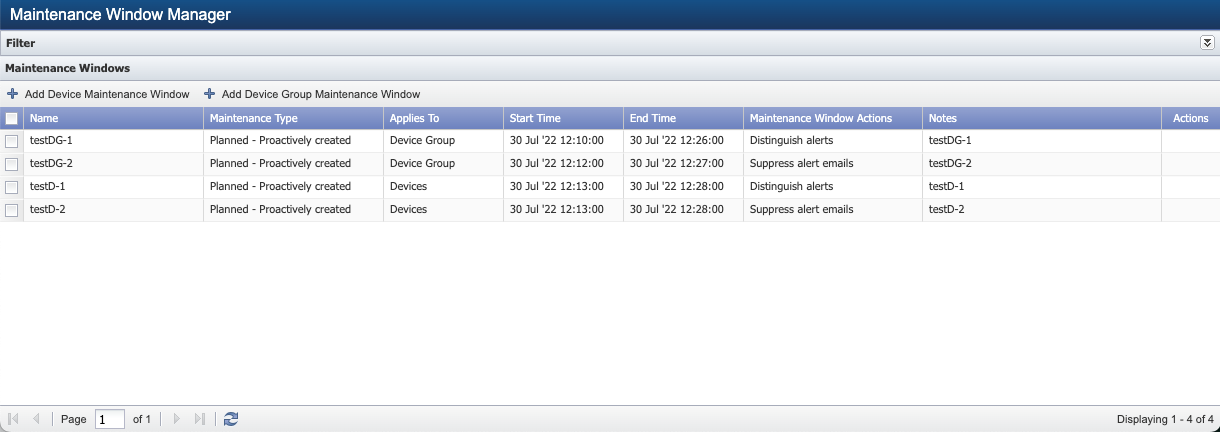
The following information is available for all maintenance windows. To view information for completed maintenance windows or other time ranges, use the Filter panel (please refer to section Apply a Filter below). You can sort on the Name, Start Time, End Time, and Notes columns.
-
Name - The name you give to a maintenance window when you configure it.
-
Maintenance Type - The type of maintenance being performed.
-
Applies To - What the maintenance applies to (for example, Devices).
-
Start Time - The maintenance window start time.
-
End Time - The maintenance window end time.
-
Maintenance Window Actions - The action(s) that the maintenance window performs.
-
Notes - Any additional information that you add when configuring the maintenance window.
-
Actions - Select
 to edit a maintenance window or
  delete a maintenance window. You can also right-click on a row and choose the option Edit, to edit the maintenance window or Delete, to delete the maintenance window.
When you delete a maintenance window, it will be permanently removed from the system. All functions referencing the maintenance window, including overlays on graphs, will also be removed from the system.
You can also add a UUID column to view the UUIDs for maintenance windows. To do so, perform the following steps:
-
Hover over any of the existing columns and click
 .
.
-
Select Columns.
-
Select the check box for UUID.
Create/Edit Maintenance Windows
Perform the following steps to create or edit a maintenance window. The only required fields for a maintenance window are Name, Start Time, and End Time.
Device Maintenance Window
Allows you to select from a list of available devices.
-
Click Add Device Maintenance Window to display the pop-up to create a new maintenance window for one or more devices. To edit an existing maintenance window, click
under Actions. For a maintenance window that is already in progress, you can edit only the Name, Note, and End Time fields.
-
In the Name field, enter a name for the maintenance window.
-
In the Note field, enter any additional information that you would like to include.
-
Click the Start Time field and select a start date and time for the maintenance window. Click Save. If you specify a start time in the past, the Actions options below will be unavailable.
-
Click the End Time field and select an end date and time for the maintenance window. The maintenance window must last at least three minutes. Click Save.
-
Click the Devices drop-down and select one or more devices to apply the maintenance window to.
-
Next to Actions, select the check box for one or more of the following options. These options are disabled for retroactive maintenance windows.
-
Suppress alert emails, traps, and webhooks during the maintenance window - to trigger alerts without sending email notifications or traps or webhook messages.
-
Distinguish alerts within the maintenance window - to tag alerts in a maintenance window and cap the Severity level at Info. Tagged alerts are used to distinguish between normal alerts and maintenance alerts in the SevOne NMS Alert Summary and in Alerts reports. Tagged alerts will include the prefix Maintenance Window in their name. This option is selected by default.
-
Exclude data from TopN and Group Metrics aggregations during the maintenance window - to exclude data during the maintenance window from TopN and Group Metrics aggregation calculations.
-
Exclude data from baselines during the maintenance window - to exclude data during the maintenance window from baseline calculations.
-
-
Click Create to create a new maintenance window or Save to save changes to an existing maintenance window.
Device Group Maintenance Window
Allows you to select a device group with contains one or more devices. When an instance of Device Group maintenance window becomes active, it converts to Device maintenance window and lists all the devices that are contained in the device group selected.
-
Click Add Device Group Maintenance Window to display the pop-up to create a new maintenance window for a device group. To edit an existing maintenance window, click
under Actions. For a maintenance window that is already in progress, you can edit only the Name, Note, and End Time fields.
-
In the Name field, enter a name for the maintenance window.
-
In the Note field, enter any additional information that you would like to include.
-
Click the Start Time field and select a start date and time for the maintenance window. Click Save. If you specify a start time in the past, the Actions options below will be unavailable.
-
Click the End Time field and select an end date and time for the maintenance window. The maintenance window must last at least three minutes. Click Save.
-
Click the Device Group drop-down and select a device group to apply the maintenance window to. Only one device group can be selected.
When an instance of the maintenance window becomes active, field Device Group converts to Devices and it lists all the devices that belong to the chosen Device Group.
If the membership of the Device Group changes while the instance of the maintenance window is active, the change will not impact the instance already in progress (active). A snapshot of Device Group membership at the start time is maintained until the end time. Dynamic changes to the Device Group membership when maintenance window is active, can be rectified ad-hoc by administrators using the retroactive maintenance windows feature.
-
Next to Actions, select the check box for one or more of the following options. These options are disabled for retroactive maintenance windows.
-
Suppress alert emails, traps, and webhooks during the maintenance window - to trigger alerts without sending email notifications or traps or webhook messages.
-
Distinguish alerts within the maintenance window - to tag alerts in a maintenance window and cap the Severity level at Info. Tagged alerts are used to distinguish between normal alerts and maintenance alerts in the SevOne NMS Alert Summary and in Alerts reports. Tagged alerts will include the prefix Maintenance Window in their name. This option is selected by default.
-
Exclude data from TopN and Group Metrics aggregations during the maintenance window - to exclude data during the maintenance window from TopN and Group Metrics aggregation calculations.
-
Exclude data from baselines during the maintenance window - to exclude data during the maintenance window from baseline calculations.
-
-
Click Create to create a new maintenance window or Save to save changes to an existing maintenance window.
Apply a Filter
Perform the following steps to filter which maintenance windows display in the Maintenance Windows section.
Filtering applies to Devices only and cannot be done on Device Groups.
-
In the Filter section, click
 to display filter options.
-
Under Search, click the Devices drop-down and select one or more devices to display maintenance windows for.
-
Under Time, select one of the following options:
-
Active & future windows - to display active maintenance windows and future maintenance windows.
-
Active windows - to display only active maintenance windows.
-
Future windows - to display only future maintenance windows.
-
Completed windows - to display only completed maintenance windows.
-
Start time between Beginning of range and End of range - to display maintenance windows within the range you specify. When you select this option, a calendar pop-up appears, enabling you to specify the start date and time as well as the end date and time.
-
-
Click Apply Filter to apply the filter.
Configure Maintenance Windows through REST API
In order to use SevOne's RESTful API, you must have a valid account in SevOne NMS.
Access Maintenance Windows Endpoints
-
Perform the following actions to sign in:
-
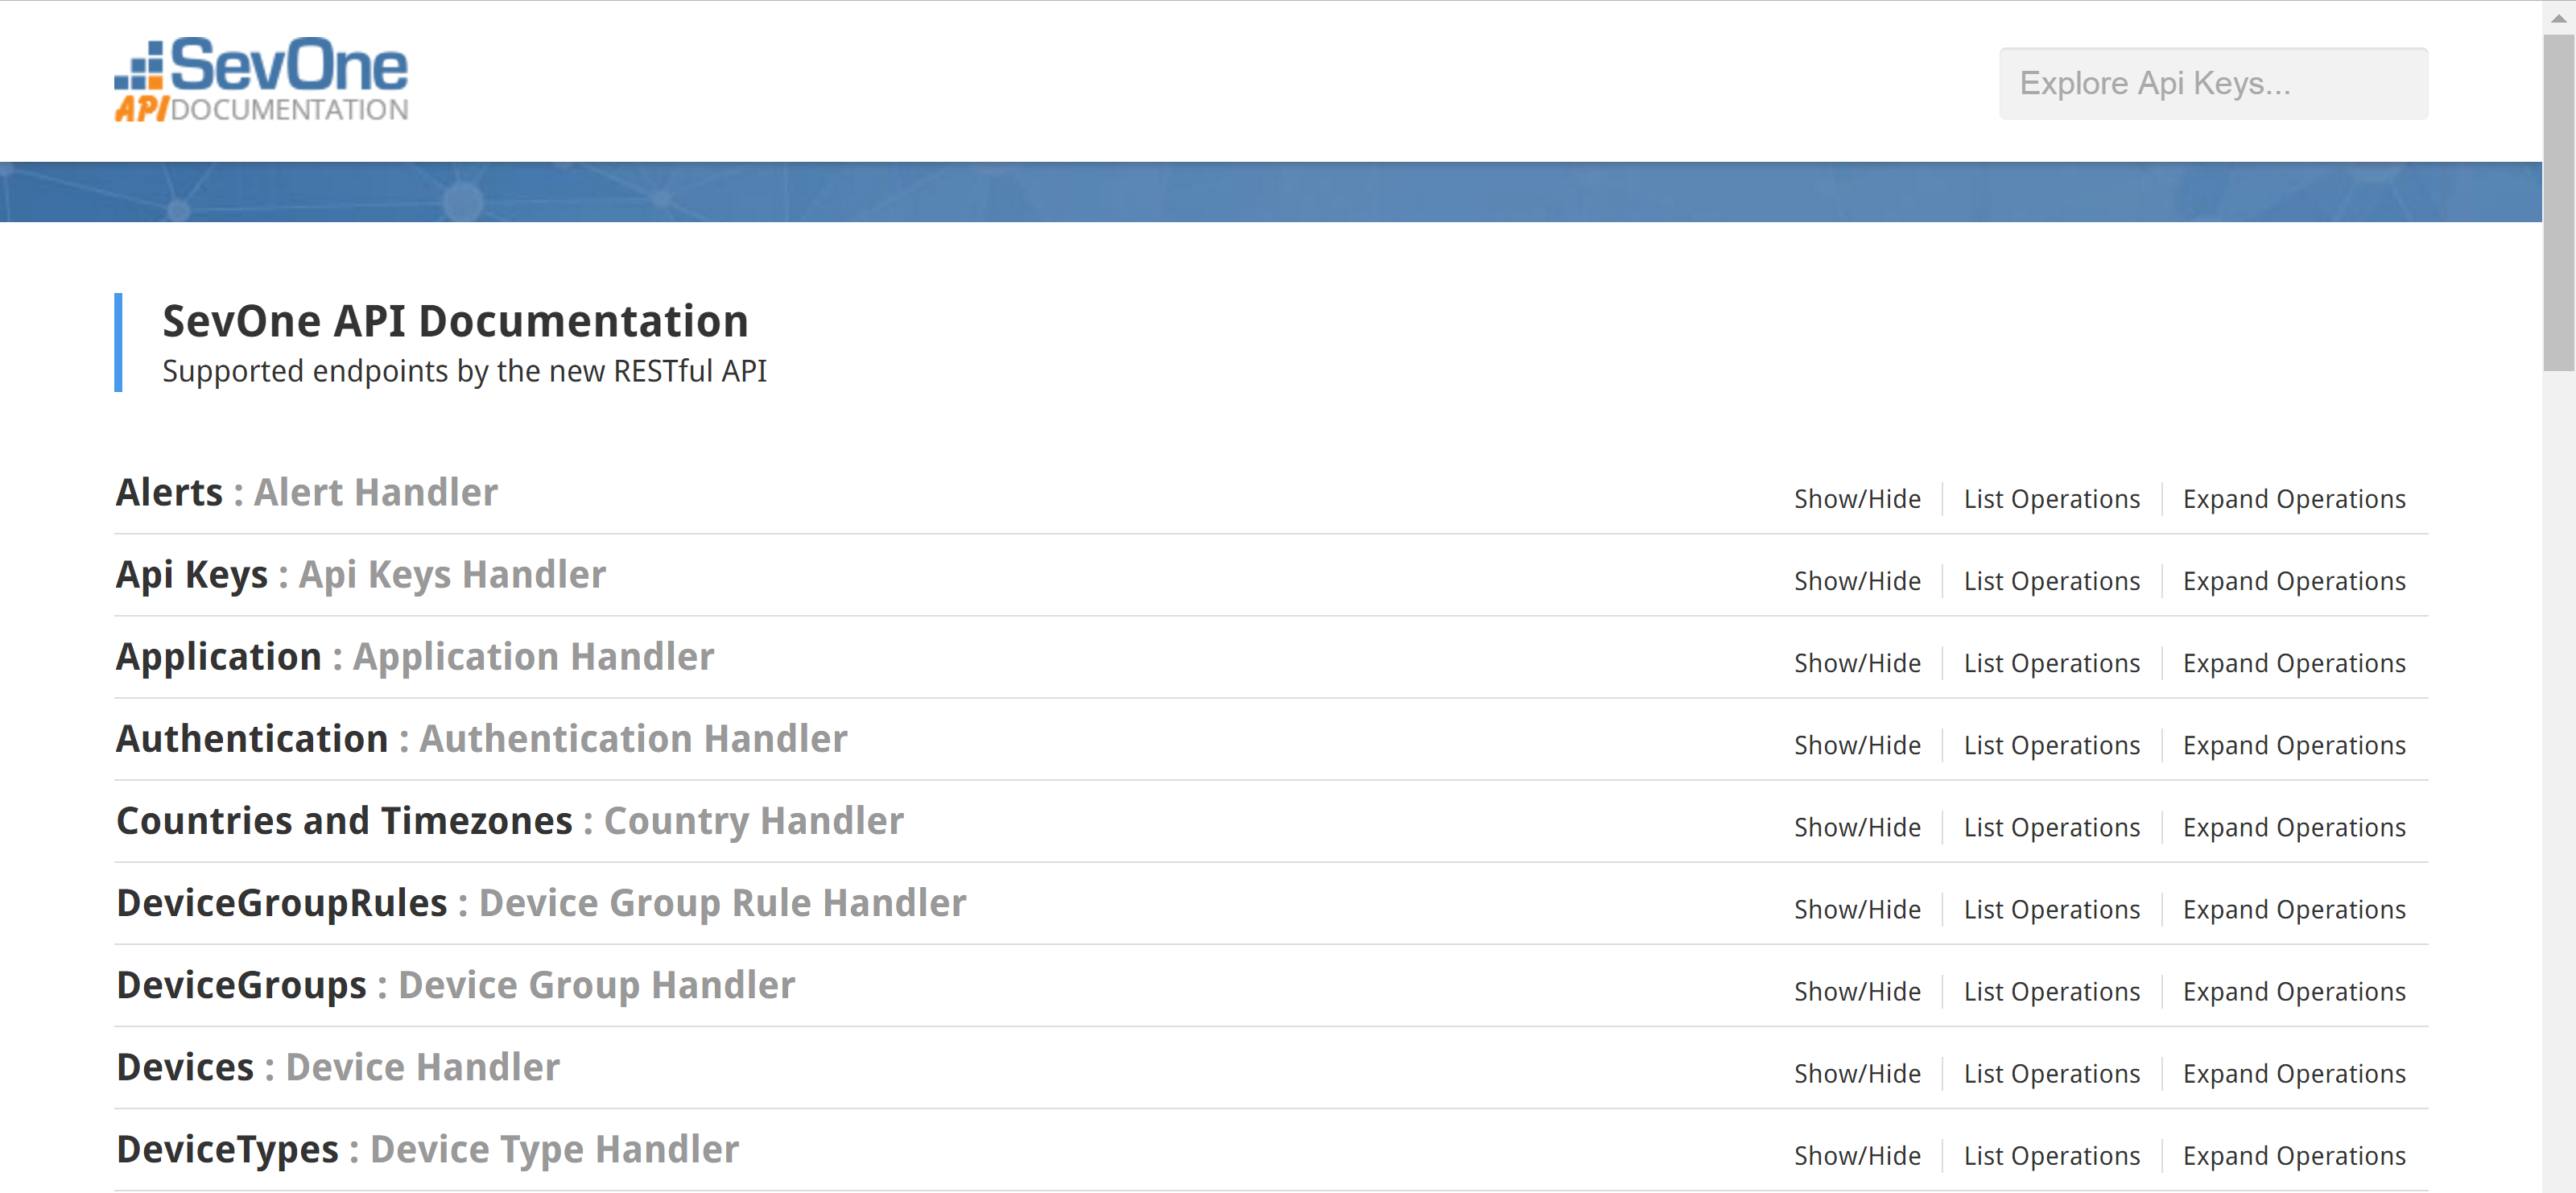
Go to http://<PAS hostname or IP address>/api/docs/ (for example, http://10.129.12.61/api/docs/).
-
Click on Authentication to view Authentication operations.
-
Under Authentication, click on POST.
-
Under Parameters, all the way to the right, locate the Model Schema field. Click on the field to copy its content to the user field.
-
On the left side of the Parameters section, locate the user field. After "name":, replace string with a SevOne NMS user name. Make sure to enter it within the quotes.
-
After "password":, replace string with the corresponding SevOne NMS password. Make sure to enter it within the quotes.
-
At the bottom of the POST section, click the Try it out! button.
-
Scroll down to the Response Body field. You should see a long alphanumeric string after <token>. This is the token that you need. Double-click the token to select it. Then copy it.
-
In the upper right corner of the SevOne API Documentation page, locate the Explore Api Keys... field. Paste the token into this field. You should now have permissions to perform operations.
-
-
Click on Maintenance Windows to view Maintenance Window Handler operations.
-
Continue to the Operations section to perform specific operations related to maintenance windows.
Operations
The available operations allow you to create, update, and delete maintenance windows. You can also view information about existing maintenance windows. A description of each operation appears on the right side of the page. Additional documentation appears for each item below when you click the Model tab under Response Class (Status 200).
Create Maintenance Windows
Perform the following actions to create maintenance windows for devices.
-
Click on POST /api/v1/maintenancewindows to create a maintenance window for one or more devices.
-
On the right side of the page, click on the Model Schema field to copy its content to the maintenanceWindowDto field.
-
The following settings can be configured:
-
actions - The action(s) to apply to the maintenance window. Options include the following:
When creating a maintenance window with a start date in the past, do not provide input for any of the actions below. Actions are not available for retroactive maintenance windows.
-
SUPPRESS_ALERT_NOTIFICATIONS - to trigger alerts without sending traps or email notifications or webhook messages.
-
CATEGORIZE_ALERTS - to tag alerts in a maintenance window and cap the Severity level at Info. Tagged alerts are used to distinguish between normal alerts and maintenance alerts in the SevOne NMS Alert Summary and in Alerts reports. Tagged alerts will include the prefix Maintenance Window in their name.
-
EXCLUDE_DATA_FROM_AGGREGATION - to exclude data during the maintenance window from TopN and Group Metrics aggregation calculations.
-
EXCLUDE_DATA_FROM_BASELINES - to exclude data during the maintenance window from baseline calculations.
-
-
deviceIds - The device(s) that the maintenance window applies to. Provide one or more device IDs and separate device IDs using a comma. Use the REST API to get device IDs for the devices that the maintenance window applies to.
-
maintenanceType - The type of maintenance. Currently the only option here is PLANNED.
-
name - The name you give to the maintenance window. The default is set to string, which means you will need to give the maintenance window a name. Otherwise, the name will appear as string in the SevOne NMS Maintenance Window Manager.
-
notes - Additional information that you would like to include. To leave this blank, delete string from the line "notes": "string". Otherwise, the text string will apper under Notes in the SevOne NMS Maintenance Window Manager.
-
scheduleInstance - The time range of the maintenance window. The default format is UNIX timestamp in milliseconds (for example, 1498177530000). Times can also be expressed using ISO 8601 format. You can specify the format in the Date-Format header (under Parameters). The specified time must be UTC, and the maintenance window must last at least three minutes.
-
beginDateTime - The date and time that the maintenance window should start.
-
endDateTime - The date and time that the maintenance window should end. The maintenance window must last at least three minutes.
-
-
-
After configuring the maintenance window, click Try it out! at the bottom of the section.
View Maintenance Windows
Perform the steps below to view information for maintenance windows.
View All Maintenance Windows
-
Click on GET /api/v1/maintenancewindows.
-
At the bottom of the section, click Try it out!.
-
See the Response Body field for information about existing maintenance windows. totalElements indicates the total number of maintenance windows. Scroll down to view specific information about each maintenance window, including the maintenance window ID.
View a Maintenance Window Using an ID
-
You will need the ID for the maintenance window that you want to view information for. You can get IDs for existing maintenance windows by performing the steps above (View All Maintenance Windows). Copy the ID for the maintenance window you would like to view (for example, 20f3db94-9577-4ceb-92cd-b988d66fcaaf).
-
Click on GET /api/v1/maintenancewindows/{id}.
-
Under Parameter, in the id field, paste the ID for the maintenance window you would like to view information for.
-
Click Try it out!.
-
See the Response Body field for information about that maintenance window.
View Maintenance Windows Using a Filter
-
Click on POST /api/v1/maintenancewindows/filter.
-
On the right side of the page, click on the Model Schema field to copy its content to the filter field.
-
Provide input for actions, deviceIds, etc., depending on how you would like to filter results.
Filter parameters support inexact matches:
-
name - will match any maintenance window containing the specified substring.
-
actions - will match a maintenance window if it contains any of the specified actions.
-
beginDateTime/endDateTime - will match any maintenance window overlapping the specified period.
-
deviceIds - will match a maintenance window if it contains any of the specified devices.
-
-
Click Try it out!.
-
See the Response Body field for results.
Edit Maintenance Windows
-
You will need the ID for the maintenance window that you want to edit. You can get IDs for existing maintenance windows by performing the steps above (View All Maintenance Windows). Copy the ID for the maintenance window you would like to edit (for example, 20f3db94-9577-4ceb-92cd-b988d66fcaaf). For a maintenance window that is already in progress, you can edit only the name, notes, and endDateTime fields. If the maintenance window has already ended, you can edit only the name and notes fields.
-
Click on PUT /api/v1/maintenancewindows/{id}.
-
Under Parameter, in the id field, paste the ID for the maintenance window you would like to edit.
-
On the right side of the page, click on the Model Schema field to copy its content to the maintenanceWindowDto field.
-
In the maintenanceWindowDto field, provide input for any information you would like to modify. Make sure to provide input for all fields, including fields that you aren't modifying. If you omit any fields, the data for those fields will be deleted.
-
Click Try it out!.
Delete Maintenance Windows
-
You will need the ID for the maintenance window that you want to delete. You can get IDs for existing maintenance windows by performing the steps above (View All Maintenance Windows). Copy the ID for the maintenance window you would like to delete (for example, 20f3db94-9577-4ceb-92cd-b988d66fcaaf).
-
Click on DELETE /api/v1/maintenancewindows/{id}.
-
Under Parameter, in the id field, paste the ID for the maintenance window you would like to delete.
-
Click Try it out!.
Alert Scenarios
Alert processing does not stop during a scheduled maintenance window when you select the check box for Distinguish alerts within the maintenance window. Instead, alerts that trigger during a scheduled maintenance window are annotated differently than normal alerts. Whether an alert is or is not classified as occurring within a maintenance window is based on the timestamp indicating when the alert conditions trigger. This classification is not based on timestamps associated with collected data samples. The difference between the timestamp of the final collected sample that triggered the alert and the evaluation time of the alert should be small (within one or two poll intervals). This behavior is consistent with the check box option Suppress alert emails, traps, and webhooks during the maintenance window.
The following table describes the expected system behavior for different alert scenarios, based on the timing of the alert trigger.
|
Alert Trigger Timing Relative to Maintenance Window |
System Behavior |
|
Alert triggers before a maintenance window and stops triggering before a maintenance window. |
|
|
Alert triggers after a maintenance window ends. |
|
|
Alert triggers before a maintenance window begins and stops triggering during a maintenance window. |
|
|
Alert triggers during a maintenance window and stops triggering after a maintenance window. |
|
|
Alert triggers during a maintenance window and stops triggering within the same maintenance window. |
|
|
Alert triggers prior to a maintenance window, continues to trigger during the maintenance window, and stops triggering after the maintenance window has ended. |
|