Table of Contents (Start)
- Topics
- Introducing SevOne
- Login
- Startup Wizard
- Dashboard
- Global Search - Advanced Search
- Report Manager
- Report Attachment Wizard
- Report Properties
- Report Interactions
- Instant Graphs
- TopN Reports
- Alerts
- Alert Archives
- Alert Summary
- Instant Status
- Status Map Manager
- Edit Maps
- View Maps
- FlowFalcon Reports
- NBAR Reports
- Logged Traps
- Unknown Traps
- Trap Event Editor
- Trap Destinations
- Trap Destination Associations
- Policy Browser
- Create and Edit Policies
- Webhook Definition Manager
- Threshold Browser
- Create and Edit Thresholds
- Probe Manager
- Discovery Manager
- Device Manager
- New Device
- Edit Device
- Object Manager
- High Frequency Poller
- Device Summary
- Device Mover
- Device Groups
- Object Groups
- Object Summary
- Object Rules
- VMware Browser
- AWS Plugin
- Azure Plugin (Public Preview)
- Calculation Plugin
- Database Manager
- Deferred Data Plugin
- DNS Plugin
- HTTP Plugin
- ICMP Plugin
- IP SLA Plugin
- JMX Plugin
- NAM
- NBAR Plugin
- Portshaker Plugin
- Process Plugin
- Proxy Ping Plugin
- SDWAN Plugin
- SNMP Plugin
- VMware Plugin
- Web Status Plugin
- WMI Plugin
- xStats Plugin
- Indicator Type Maps
- Device Types
- Object Types
- Object Subtype Manager
- Calculation Editor
- xStats Source Manager
- User Role Manager
- User Manager
- Session Manager
- Authentication Settings
- Preferences
- Cluster Manager
- Maintenance Windows
- Processes and Logs
- Metadata Schema
- Baseline Manager
- FlowFalcon View Editor
- Map Flow Objects
- FlowFalcon Views
- Flow Rules
- Flow Interface Manager
- MPLS Flow Mapping
- Network Segment Manager
- Flow Protocols and Services
- xStats Log Viewer
- SNMP Walk
- SNMP OID Browser
- MIB Manager
- Work Hours
- Administrative Messages
- Enable Flow Technologies
- Enable JMX
- Enable NBAR
- Enable SNMP
- Enable Web Status
- Enable WMI
- IP SLA
- SNMP
- SevOne Data Publisher
- Quality of Service
- Perl Regular Expressions
- Trap Revisions
- Integrate SevOne NMS With Other Applications
- Email Tips and Tricks
- SevOne NMS PHP Statistics
- SevOne NMS Usage Statistics
- Glossary and Concepts
- Map Flow Devices
- Trap v3 Receiver
- Guides
- Quick Start Guides
- AWS Quick Start Guide
- Azure Quick Start Guide (Public Preview)
- Data Miner Quick Start Guide
- Flow Quick Start Guide
- Group Aggregated Indicators Quick Start Guide
- IP SLA Quick Start Guide
- JMX Quick Start Guide
- Metadata Quick Start Guide
- RESTful API Quick Start Guide
- Self-monitoring Quick Start Guide
- SevOne NMS Admin Notifications Quick Start Guide
- SNMP Quick Start Guide
- Synthetic Indicator Types Quick Start Guide
- Topology Quick Start Guide
- VMware Quick Start Guide
- Web Status Quick Start Guide
- WMI Quick Start Guide
- xStats Quick Start Guide
- xStats Adapter - Accedian Vision EMS (TM) Quick Start Guide
- Deployment Guides
- Automated Build / Rebuild (Customer) Instructions
- Generate a Self-Signed Certificate or a Certificate Signing Request
- SevOne Best Practices Guide - Cluster, Peer, and HSA
- SevOne Data Platform Security Guide
- SevOne NMS Implementation Guide
- SevOne NMS Installation Guide - Virtual Appliance
- SevOne NMS Advanced Network Configuration Guide
- SevOne NMS Installation Guide
- SevOne NMS Port Number Requirements Guide
- SevOne NMS Upgrade Process Guide
- SevOne Physical Appliance Pre-Build BIOS and RAID Configuration Guide
- SevOne SAML Single Sign-On Setup Guide
- Cloud Platforms
- Other Guides
- Quick Start Guides
xStats Adapter - Accedian Vision EMS (TM) Quick Start Guide
SevOne Documentation
All documentation is available from the IBM SevOne Support customer portal.
© Copyright International Business Machines Corporation 2024.
All right, title, and interest in and to the software and documentation are and shall remain the exclusive property of IBM and its respective licensors. No part of this document may be reproduced by any means nor modified, decompiled, disassembled, published or distributed, in whole or in part, or translated to any electronic medium or other means without the written consent of IBM.
IN NO EVENT SHALL IBM, ITS SUPPLIERS, NOR ITS LICENSORS BE LIABLE FOR ANY DAMAGES, WHETHER ARISING IN TORT, CONTRACT OR ANY OTHER LEGAL THEORY EVEN IF IBM HAS BEEN ADVISED OF THE POSSIBILITY OF SUCH DAMAGES, AND IBM DISCLAIMS ALL WARRANTIES, CONDITIONS OR OTHER TERMS, EXPRESS OR IMPLIED, STATUTORY OR OTHERWISE, ON SOFTWARE AND DOCUMENTATION FURNISHED HEREUNDER INCLUDING WITHOUT LIMITATION THE WARRANTIES OF DESIGN, MERCHANTABILITY OR FITNESS FOR A PARTICULAR PURPOSE, AND NONINFRINGEMENT.
IBM, the IBM logo, and SevOne are trademarks or registered trademarks of International Business Machines Corporation, in the United States and/or other countries. Other product and service names might be trademarks of IBM or other companies. A current list of IBM trademarks is available on ibm.com/trademark.
About
This document describes the installation of the Accedian Vision EMS xStats adapters (CSV and NID XML) using SevOne NMS. The same procedure should work with prior releases but it has not be tested. The following topics are discussed in this document.
-
Install xStats package for the Accedian XML adapter and Accedian CSV adapter
-
Start / Stop the simulator for each adapter
-
Configure the collector for each adapter
With PHP version 8.1.17-1.el8, the generic CSV adapter version required is 1.4.2.
Prerequisites
Prior to installing your xStats adapters, you will need the following.
|
Requirement |
Description |
|
Snapshot of the vPAS |
If you are using a virtualized appliance, create a snapshot of your vPAS before getting started. This will be useful if you need to start over with a clean slate. |
|
IP address or hostname of the PAS |
Make sure to have the IP address or hostname of the PAS so you can connect to it via SSH. |
|
IP address of the hot standby appliance (HSA) pair |
This applies only if you have an HSA pair. |
|
Root access to the PAS |
You will need the root username and password for your SSH session. |
|
An SSH client |
To SSH into the PAS, you will need an SSH client such as PuTTY. |
|
PAS version |
It is a good idea to know which version of SevOne NMS is installed on the PAS. |
|
AccedianCSVTransform-<version>.phar.spk |
Installation package for your Accedian xStats CSV adapter. For example, AccedianCSVTransform-v2.1.1.phar.spk. The latest .phar.spk file can be downloaded IBM Passport Advantage ( https://www.ibm.com/software/passportadvantage/pao_download_software.html ) via Passport Advantage Online . However, if you are on a legacy / flexible SevOne contract and do not have access to IBM Passport Advantage but have an active Support contract, please contact SevOne Support Team for the file. |
|
AccedianNIDXMLTransform-<version>.phar.spk |
Installation package for your Accedian xStats XML adapter. For example, AccedianNidXmlTransform-v2.2.1.phar.spk. The latest .phar.spk file can be downloaded IBM Passport Advantage ( https://www.ibm.com/software/passportadvantage/pao_download_software.html ) via Passport Advantage Online . However, if you are on a legacy / flexible SevOne contract and do not have access to IBM Passport Advantage but have an active Support contract, please contact SevOne Support Team for the file. |
|
Key xStats Terms |
Description |
|
Collector |
A script responsible for collecting data files from a remote or foreign host. |
|
File Collector Aggregator Daemon (fcad) |
A daemon responsible for collecting data files and processing them into a format that allows the data to be inserted into the SevOne data database. |
|
Package |
A component that is installed on a customer's PAS and contains the xStats adapter along with xStats configuration information, including the parser source code and device-object-indicator settings for all objects and indicators. |
If you have a cluster and you are installing the xStats adapters on only one of the peers, SevOne recommends installing on the least utilized peer. You can also install adapters on multiple peers.
Download Accedian Adapter(s)
This section describes how to download the Accedian adapter obtained from IBM Passport Advantage via Passport Advantage Online or SevOne Support Team..
-
Using ssh, log into SevOne NMS appliance as root.
$sshroot@<NMS appliance> -
You will require the latest Accedian adapter packages (.phar.spk). Download the latest .phar.spk file IBM Passport Advantage via Passport Advantage Online or SevOne Support Team directly to your SevOne NMS appliance using wget to the /root directory.
$ wget <location to download .phar.spk files from> -P/rootFor example, AccedianCSVTransform-v2.1.1.phar.spk and/or AccedianNidXmlTransform-v2.2.1.phar.spk files.
-
Ensure the .phar.spk files have been downloaded successfully without any errors.
$cd/root$ls-al
Accedian CSV Adapter
Using ssh, log into SevOne NMS appliance as root.
$ ssh root@<NMS appliance>Install Accedian CSV Adapter
-
Extract the CSV package.
Example$cd/root$ php AccedianCSVTransform-v2.1.1.phar.spk#!/usr/bin/phpThe ADK shared library was updated!Packagesourcemoved to:/opt/sevone-xstats/AccedianCSVTransformNo HSA foundforthis peer. -
Change directory to where the adapter has extracted the files.
Example$cd/opt/sevone-xstats/AccedianCSVTransform -
Check to ensure the parser source can be installed. Option -c only performs the check.
Example$ php bin/console.phpinstall-cAdapter version requirements are compatible with the NMS VersionAdapter sources can be inserted into database.Object types can be inserted into database. -
Install the parser stub.
Example$ php bin/console.phpinstallAdapter version requirements are compatible with the NMS VersionAdapter sources can be inserted into database.Object types can be inserted into database.Adapter sources were installed successfully.Object were inserted into database. -
The xStats source will not install with the configure command. Actual data is required to be able to create a source.
Example$ php bin/console.php configure --fileconfig/collector.json -
Install the xStats source. This will create source_1.
Example$ php bin/console.php configureSource name can be created.Cron entries can be created.Logs and rotation can be created.Addingsourceto database.Source has been inserted into database.Collector crons have been configured.Logdirand rotations have been configured.Configuration was successful.$ls-al/opt/sevone-xstats/AccedianCSVTransform/sourcestotal 0drwxr-sr-x. 3 ingestion ingestion 22 Apr 21 2019 .drwxr-sr-x. 8 ingestion ingestion 244 Apr 21 2019 ..drwxr-sr-x. 3 ingestion ingestion 18 Apr 21 2019 source_1 -
Using a browser of your choice, log into SevOne NMS.
-
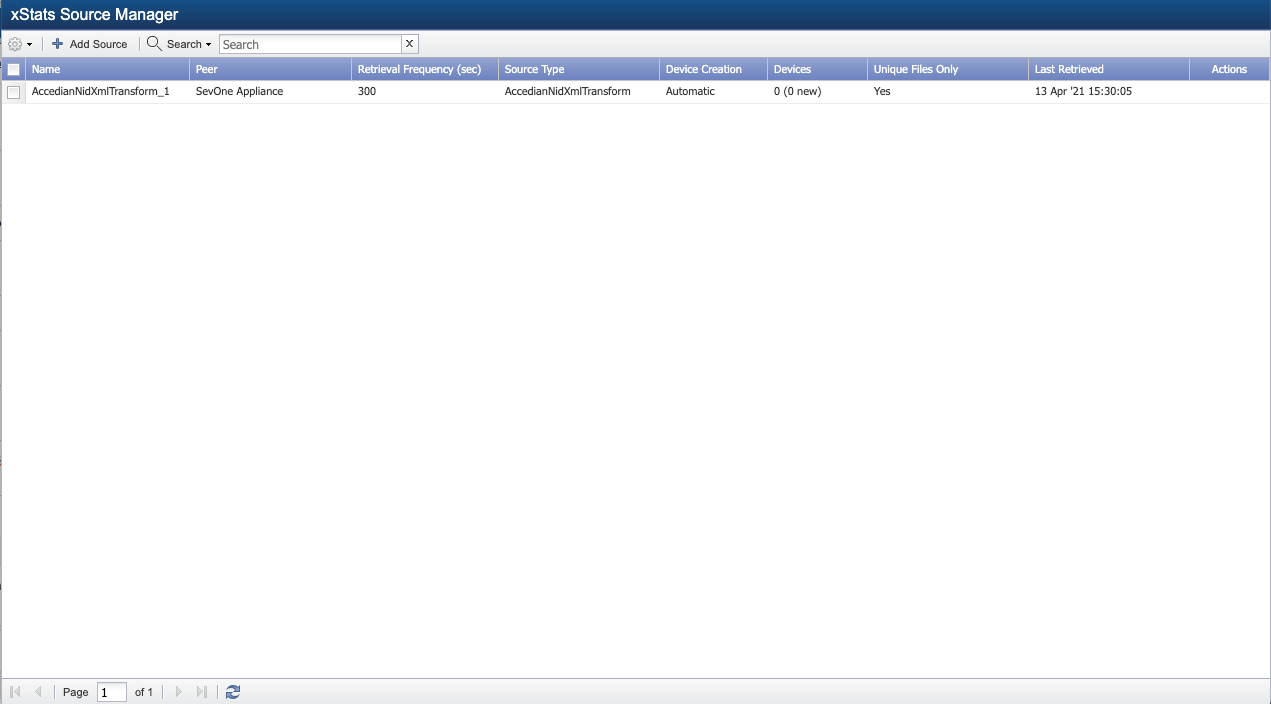
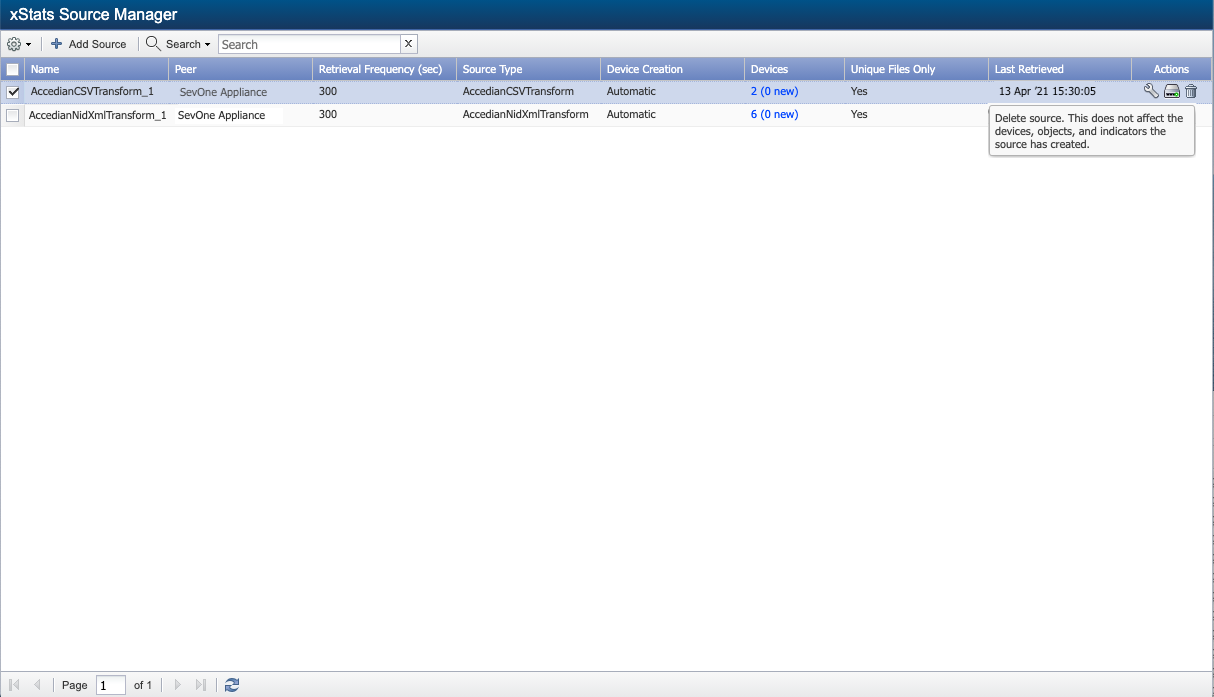
Go to Administration > Monitoring Configuration > xStats Source Manager. Confirm that your new xStats collection source, AccedianCSVTransform_1, appears in the list.
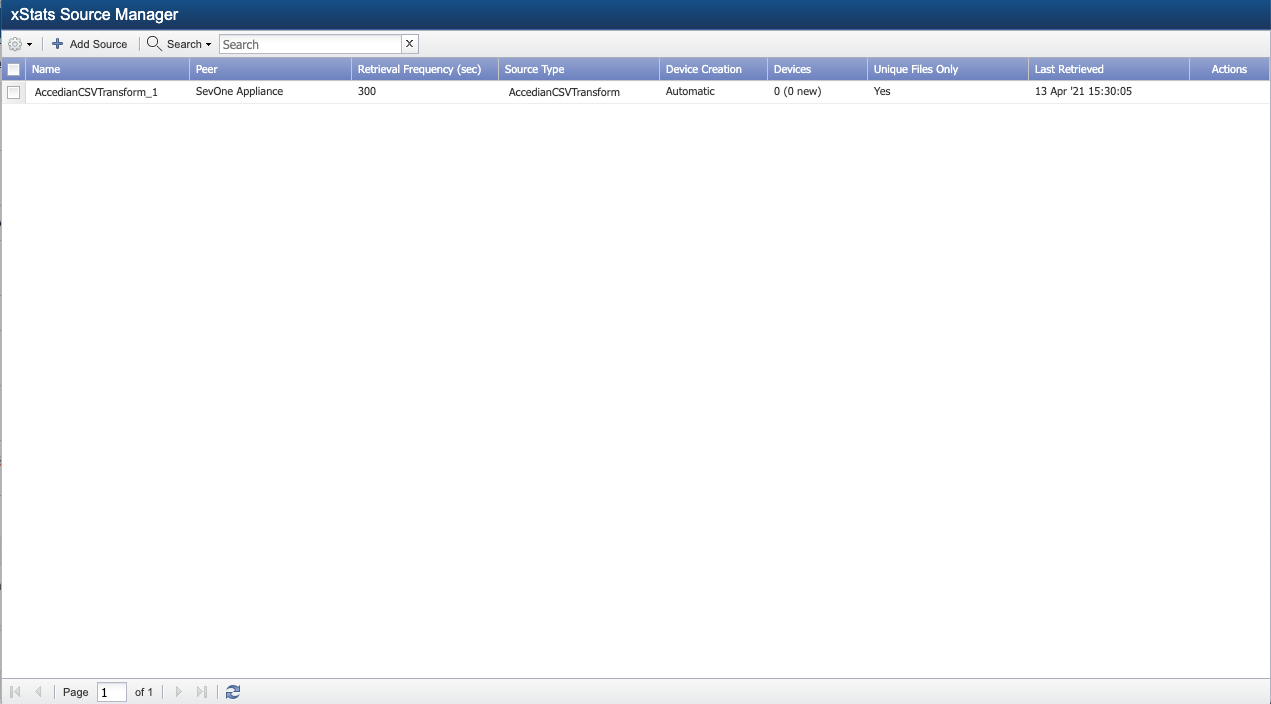
There are no devices or data at this time. You need to start the CSV simulator to add the devices and collect data.
Start Accedian CSV Simulator & Collect Data
The Accedian CSV simulator creates a one-time batch of CSV files with pre-formatted data in the specified source_<x> data folder. In order to have multiple points of data, the start-simulator command must be re-entered multiple times. Or, to have a constant stream of data, you will need an entry of its own in the crontab file.
-
Run the CSV simulator.
Example: for Source 1$ php bin/console.php start-simulator -s 1simulator_SLM_file_2021-04-13_15h43m26s_all_300.csv generated!simulator_PORT_file_2021-04-13_15h43m26s_all_300.csv generated!simulator_PAA_file_2021-04-13_15h43m26s_all_300.csv generated!simulator_REG_file_2021-04-13_15h43m26s_all_300.csv generated!simulator_TWAMP_file_2021-04-13_15h43m26s_all_300.csv generated!simulator_FLO_file_2021-04-13_15h43m26s_all_300.csv generated!simulator_DMM_file_2021-04-13_15h43m26s_all_300.csv generated!simulator_PL_file_2021-04-13_15h43m26s_all_300.csv generated! -
Using a browser of your choice, log into SevOne NMS.
-
Go to Administration > Monitoring Configuration > xStats Source Manager. Confirm that your new xStats collection source, AccedianCSVTransform_1, appears in the list and device(s) are available.

-
Perform the following actions to confirm that the Object Types and Indicator Types for the Accedian CSV adapter have been created in SevOne NMS.
-
Return to your SSH client and enter the following command to view the object types and indicator types for the Accedian CSV adapter.
Example$more/opt/sevone-xstats/AccedianCSVTransform/config/object_types.json{"Accedian NID SLM Test": {"field_identifiers":"Accedian NID SLM Test","is_ignore": 0,"indicators": [{"indicator":"Largest gap","description":"Largest gap","type":"GAUGE","percentable":"0","units":"Number","data_units":"Number","is_default":"1","is_ignore":"0"},{"indicator":"Number of gaps","description":"Number of gaps","type":"GAUGE","percentable":"0","units":"Number","data_units":"Number","is_default":"1","is_ignore":"0"},{"indicator":"Period","description":"Period","type":"GAUGE","percentable":"0","units":"Number","data_units":"Number","is_default":"1","is_ignore":"0"},......{"indicator":"Packets lost far end","description":"Packets lost far end","type":"GAUGE","percentable":"0","units":"Number","data_units":"Number","is_default":"1","is_ignore":"0"}]},......"Accedian NID TWAMP Test": {"field_identifiers":"Accedian NID TWAMP Test","is_ignore": 0,"indicators": [{"indicator":"Duplicate Packets","description":"Duplicate Packets","type":"GAUGE","percentable":"0","units":"Number","data_units":"Number","is_default":"1","is_ignore":"0"},{"indicator":"Far-End One-Way Average Delay","description":"Far-End One-Way Average Delay","type":"GAUGE","percentable":"0","units":"Microseconds","data_units":"Microseconds","is_default":"1","is_ignore":"0"},{"indicator":"Far-End One-Way Average Delay Variation","description":"Far-End One-Way Average Delay Variation","type":"GAUGE","percentable":"0","units":"Microseconds","data_units":"Microseconds","is_default":"1","is_ignore":"0"},......{"indicator":"Tx Packets","description":"Tx Packets","type":"GAUGE","percentable":"0","units":"Number","data_units":"Number","is_default":"1","is_ignore":"0"}]}}
-
Under each object type, you will find its indicator types. In the example above, one of the object types is Accedian NID SLM Test and its indicator types are Largest gap, Number of gaps, etc.
-
Using a browser of your choice, log back into SevOne NMS.
-
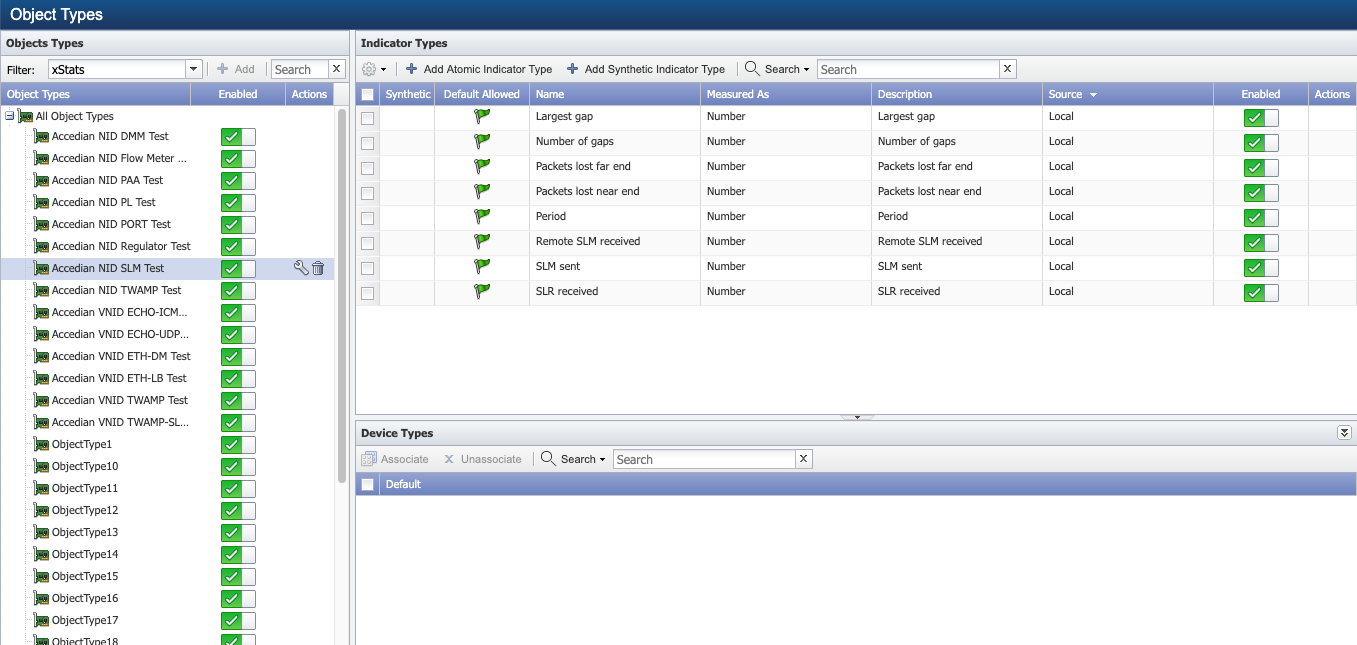
Go to Administration > Monitoring Configuration > Object Types.
-
Filter on xStats. In the left-panel, click object type Accedian NID SLM Test, for example. In the right-panel, its indicator types are listed. These must match with the details in /opt/sevone-xstats/AccedianCSVTransform/config/object_types.json file.
-
Repeat this process to confirm that each object type and its indicator types in /opt/sevone-xstats/AccedianCSVTransform/config/object_types.json and SevOne NMS user interface match.
-
-
Perform the following actions to view the objects for the Accedian CSV adapter.
-
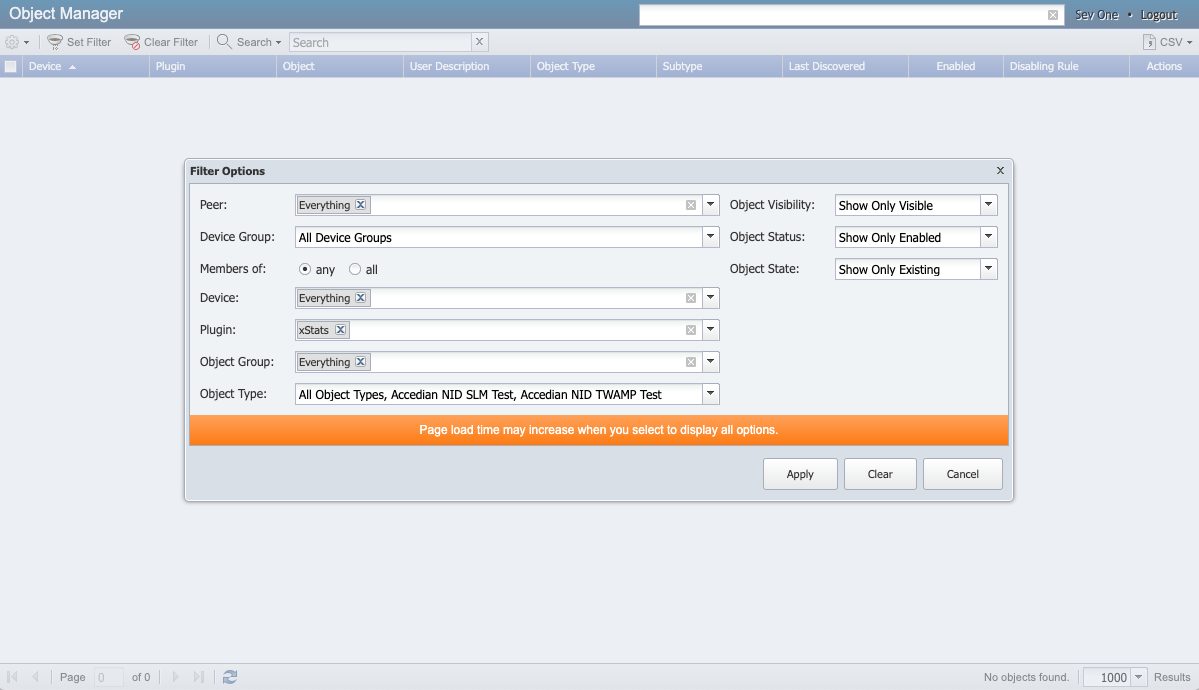
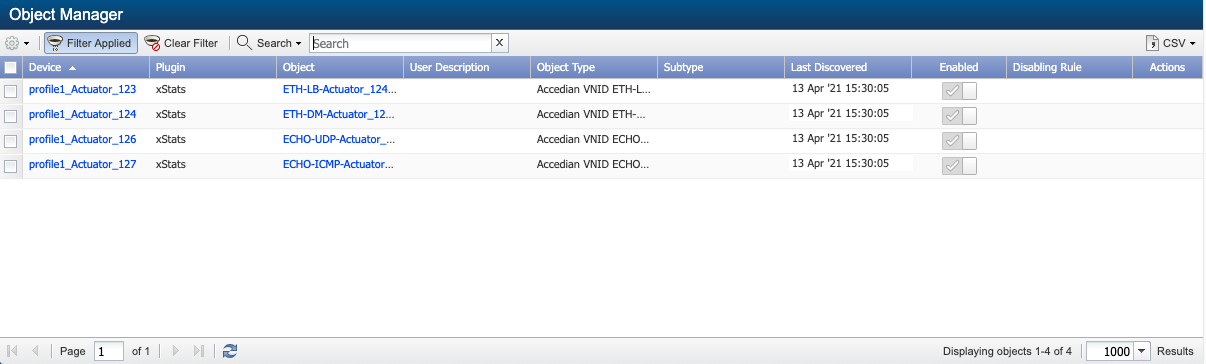
From the navigation bar, go to Devices and select Object Manager.
-
On the Filter Options pop-up, click the Plugin drop-down and select xStats.
-
Click the Object Type drop-down and select the object types for the Accedian CSV adapter.
-
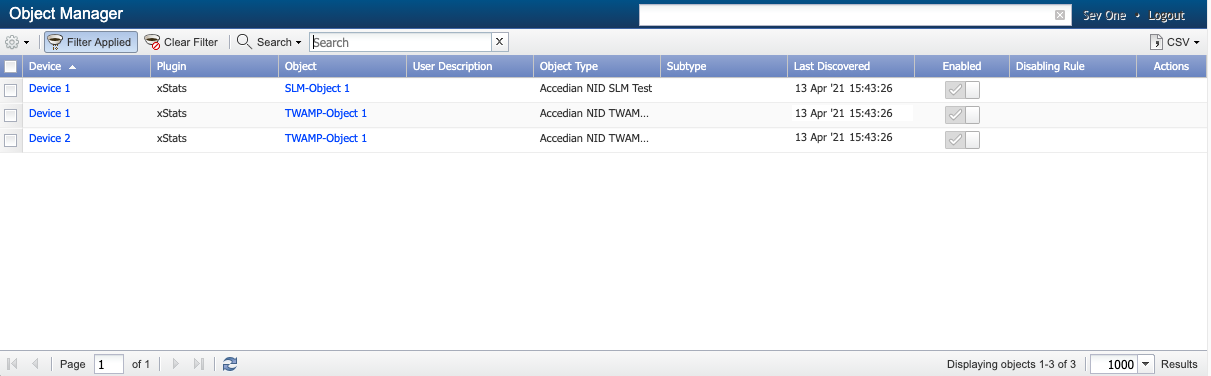
Click Apply to view a list of objects for the Accedian CSV adapter.
-
-
From Reports > Instant Graphs, after selecting the indicators to graph, click Draw Graph. You will see the simulator has introduced two devices, Device 1 and Device 2.
-
(Optional) Add a crontab entry for the simulator to run every 5 minutes in /etc/cron.d/xstats-AccedianCSVTransform.
*/5* * * * ingestion php/opt/sevone-xstats/AccedianCSVTransform/bin/console.php start-simulator -s1 &>>/var/log/xstats/AccedianCSVTransform/simulator.log
Accedian NID XML Adapter
Using ssh, log into SevOne NMS appliance as root.
$ ssh root@<NMS appliance>Install NID XML Adapter
-
Extract the NID XML package.
Example$cd/root$ php AccedianNidXmlTransform-v2.2.1.phar.spk#!/usr/bin/phpThe ADK shared library was updated!Packagesourcemoved to:/opt/sevone-xstats/AccedianNidXmlTransformNo HSA foundforthis peer. -
Change directory to where the adapter has extracted the files.
Example$cd/opt/sevone-xstats/AccedianNidXmlTransform -
Check to ensure the parser source can be installed. Option -c only performs the check.
Example$ php bin/console.phpinstall-cAdapter version requirements are compatible with the NMS VersionAdapter sources can be inserted into database.Object types can be inserted into database. -
Install the parser stub.
Example$ php bin/console.phpinstallAdapter version requirements are compatible with the NMS VersionAdapter sources can be inserted into database.Object types can be inserted into database.Adapter sources were installed successfully.Object were inserted into database. -
The xStats source will not install with the configure command. Actual data is required to be able to create a source.
Example$ php bin/console.php configure --fileconfig/collector.json -
The source is created once the data comes in from the simulator.
-
Using a browser of your choice, log into SevOne NMS.
-
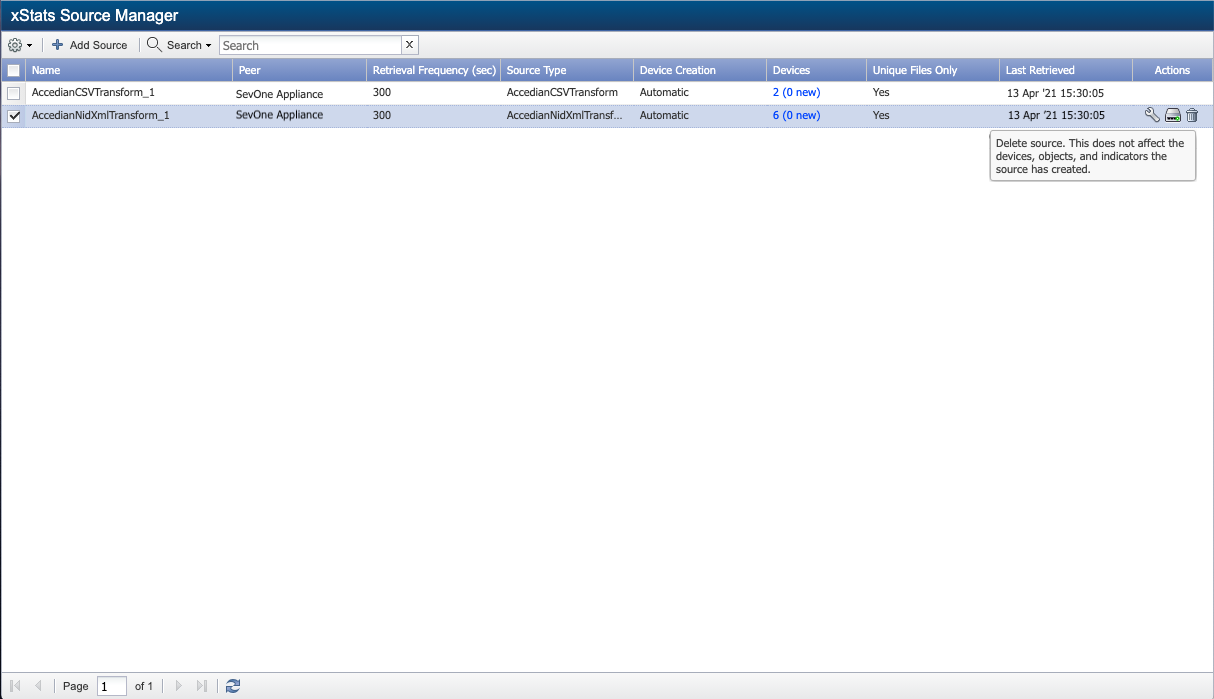
Go to Administration > Monitoring Configuration > xStats Source Manager. Confirm that your new xStats collection source, AccedianNidXmlTransform_1, appears in the list.
There are no devices or data at this time. You need to start the NID XML simulator to add the devices and collect data.
Start Accedian NID XML Simulator & Collect Data
-
Start the simulator.
The simulator is setup on port 8103 on SevOne NMS to simulate the Accedian requests. To stop the simulator, kill the process id specified by netstat.
$ php bin/console.php start-simulatorSimulator started$netstat-tulpn |grep8103tcp 0 0 127.0.0.1:8103 0.0.0.0:* LISTEN 27168/phpAnother way to run the simulatorThis can be run in screen session for extended period of time.
$cd/opt/sevone-xstats/AccedianNidXmlTransform/simulator$ php -S localhost:8103 simulator.phpPHP 5.6.39 Development Server started at Tue Apr 13 15:05:04 2021Listening on http://localhost:8103Document root is/opt/sevone-xstats/AccedianNidXmlTransform/simulatorPress Ctrl-C to quit. -
Create the xStats source.
$cd/opt/sevone-xstats/AccedianNidXmlTransform$ php bin/console.phpinstallAdapter version requirements are compatible with the NMS VersionAdapter sources can be inserted into database.Object types can be inserted into database.Adapter sources were installed successfully.Object were inserted into database. -
Configure the xStats source with config.simulator.json file.
$cd/opt/sevone-xstats/AccedianNidXmlTransform/config$cd/opt/sevone-xstats/AccedianNidXmlTransform$ php bin/console.php configure --fileconfig/collector.simulator.jsonSource name can be created.Configurationfileseems OK.Cron entries can be created.Logs and rotation can be created.Addingsourceto database.Source has been inserted into database.Collector configuration saved to:/opt/sevone-xstats/AccedianNidXmlTransform/sources/source_1/config/collector.json.Collector crons have been configured.Logdirand rotations have been configured.Configuration was successful.--2021-04-13 15:18:14-- http://127.0.0.1:8103/export/ExportConnecting to 127.0.0.1:8103... connected.HTTP request sent, awaiting response... 200 OKLength: unspecified [text/html]Saving to: ‘Export’[ <=>] 96 --.-K/sin0s2021-04-13 15:18:14 (15.2 MB/s) - ‘Export’ saved [96]Prepare sources DONE!!!
-
Using a browser of your choice, log into SevOne NMS.
-
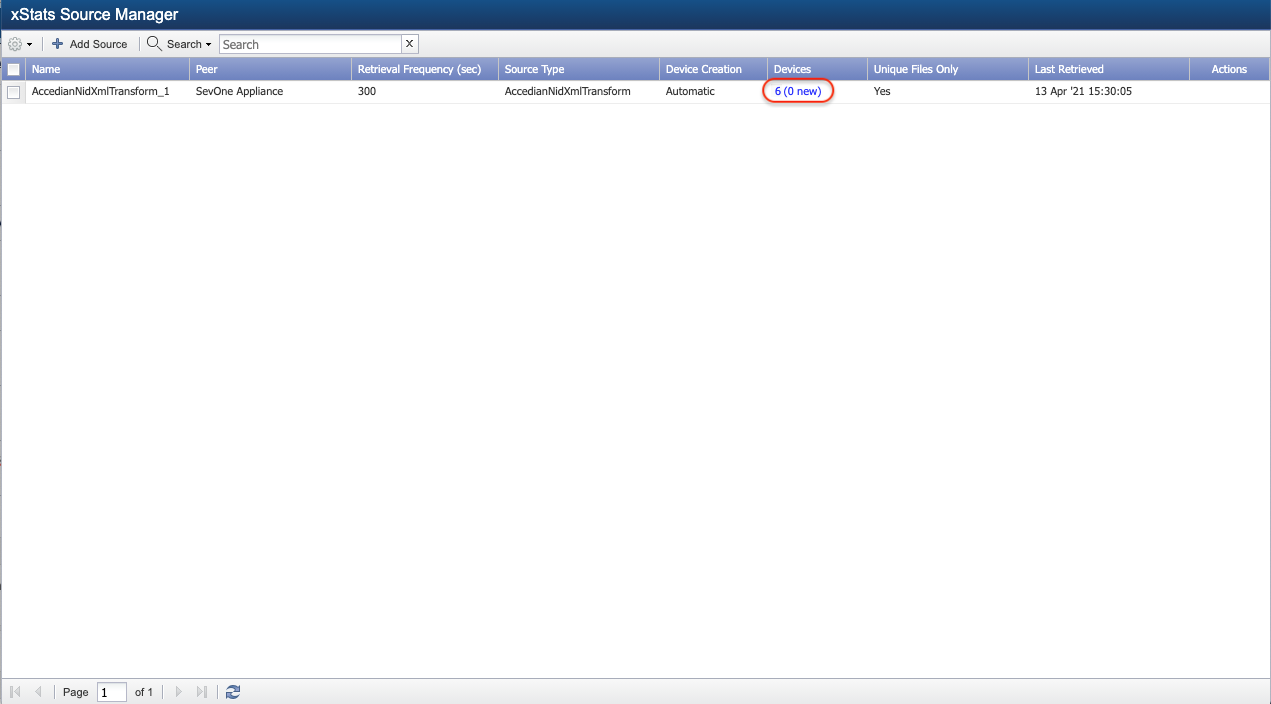
Go to Administration > Monitoring Configuration > xStats Source Manager. Confirm that your new xStats collection source, AccedianNidXmlTransform_1, appears in the list and device(s) are available.
-
Perform the following actions to confirm that the Object Types and Indicator Types for the Accedian XML adapter have been created in SevOne NMS.
-
Return to your SSH client and enter the following command to view the object types and indicator types for the Accedian XML adapter.
Example$more/opt/sevone-xstats/AccedianNidXmlTransform/config/object_types.json{"Accedian VNID ECHO-ICMP Test": {"field_identifiers":"Accedian VNID ECHO-ICMP Test","is_ignore": 0,"indicators": [{"indicator":"ROUNDTRIP Burst Len Loss Max","description":"ROUNDTRIP Burst Len Loss Max","type":"GAUGE","percentable":"0","units":"Number","data_units":"Number","is_default":"1","is_ignore":"0"},{"indicator":"ROUNDTRIP Burst Len Loss Min","description":"ROUNDTRIP Burst Len Loss Min","type":"GAUGE","percentable":"0","units":"Number","data_units":"Number","is_default":"1","is_ignore":"0"},{"indicator":"ROUNDTRIP Bytes Received","description":"ROUNDTRIP Bytes Received","type":"GAUGE","percentable":"0","units":"Bytes","data_units":"Bytes","is_default":"1","is_ignore":"0"},{"indicator":"ROUNDTRIP Delay Max","description":"ROUNDTRIP Delay Max","type":"GAUGE","percentable":"0","units":"Microseconds","data_units":"Microseconds","is_default":"1","is_ignore":"0"},......{"indicator":"ROUNDTRIP R Value","description":"ROUNDTRIP R Value","type":"GAUGE","percentable":"0","units":"Number","data_units":"Number","is_default":"1","is_ignore":"0"}]},......"Accedian VNID TWAMP-SL Test": {"field_identifiers":"Accedian VNID TWAMP-SL Test","is_ignore": 0,"indicators": [{"indicator":"P2R Delay Max","description":"P2R Delay Max","type":"GAUGE","percentable":"0","units":"Microseconds","data_units":"Microseconds","is_default":"1","is_ignore":"0"},{"indicator":"P2R Delay Mean","description":"P2R Delay Mean","type":"GAUGE","percentable":"0","units":"Microseconds","data_units":"Microseconds","is_default":"1","is_ignore":"0"},{"indicator":"P2R Delay Min","description":"P2R Delay Min","type":"GAUGE","percentable":"0","units":"Microseconds","data_units":"Microseconds","is_default":"1","is_ignore":"0"},......{"indicator":"ROUNDTRIP TTL Min","description":"ROUNDTRIP TTL Min","type":"GAUGE","percentable":"0","units":"Number","data_units":"Number","is_default":"1","is_ignore":"0"}]}}
-
Under each object type, you will find its indicator types. In the example above, one of the object types is Accedian VNID ECHO-ICMP Test and its indicator types are ROUNDTRIP Burst Len Loss Max, ROUNDTRIP Burst Len Loss Min, etc.
-
Using a browser of your choice, log back into SevOne NMS.
-
Go to Administration > Monitoring Configuration > Object Types.
-
Filter on xStats. In the left-panel, click object type Accedian VNID ECHO-ICMP Test, for example. In the right-panel, its indicator types are listed. These must match with the details in /opt/sevone-xstats/AccedianNidXmlTransform/config/object_types.json file.
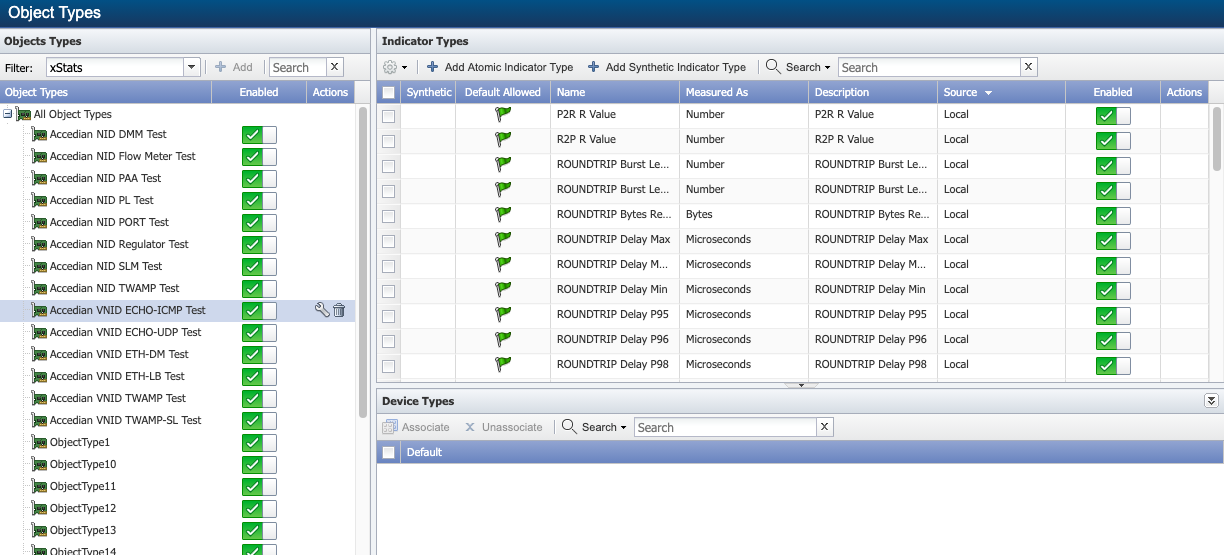
-
-
Repeat this process to confirm that each object type and its indicator types in /opt/sevone-xstats/AccedianNidXmlTransform/config/object_types.json and SevOne NMS user interface match.
-
Perform the following actions to view the objects for the Accedian XML adapter.
-
From the navigation bar, go to Devices and select Object Manager.
-
On the Filter Options pop-up, click the Plugin drop-down and select xStats.
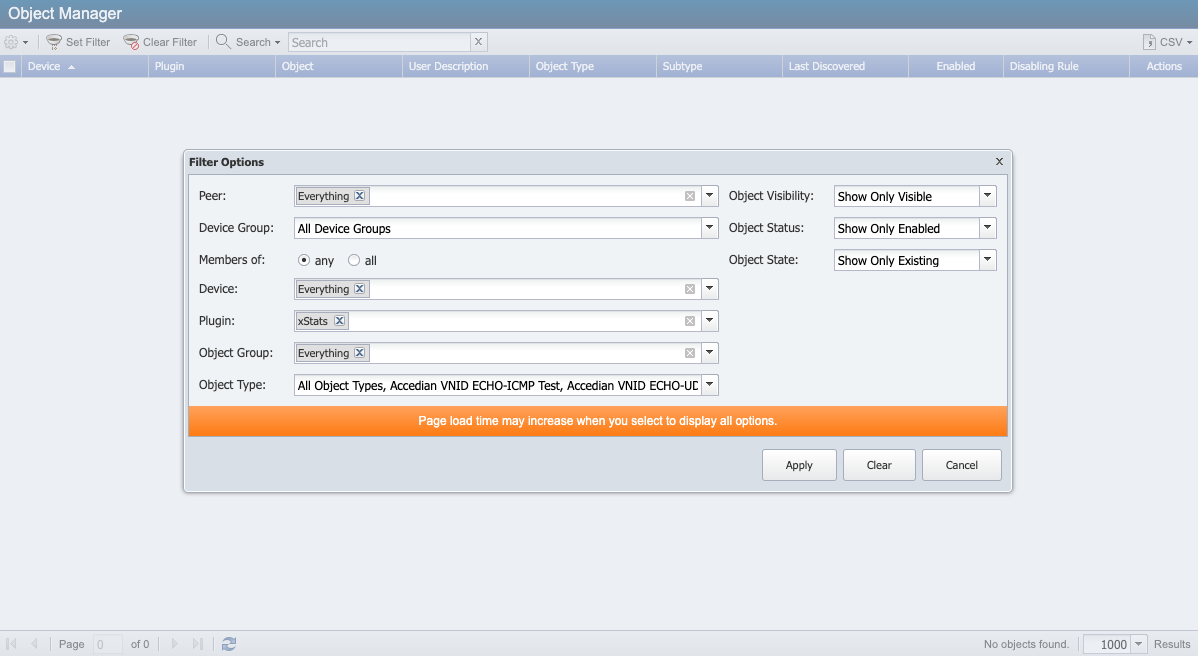
-
Click the Object Type drop-down and select the object types for the Accedian XML adapter.
-
Click Apply to view a list of objects for the Accedian XML adapter.
-
-
After a few minutes, from Reports > Instant Graphs, check for the data.
FAQs
How can I stop the simulator?
Using ssh, log into SevOne NMS appliance as root.
$ ssh root@<NMS appliance>Accedian CSV Adapter
-
Get a process ID (PID) for the simulator.
$ps-ef |grepsimulatorroot 5993 4748 0 06:29 pts/500:00:00grep--color=auto simulatorroot 19058 1 0 Sep30 ? 00:00:00 SCREEN -dm php -S 0.0.0.0:8100 simulator.phproot 19059 19058 0 Sep30 pts/000:00:43 php -S 0.0.0.0:8100 simulator.phproot 24890 1 0 Sep30 ? 00:00:00 SCREEN -dm php -S 127.0.0.1:8081/opt/sevone-xstats/AccedianCSVTransform/simulator/simulator.phproot 24891 24890 0 Sep30 pts/200:00:13 php -S 127.0.0.1:8081/opt/sevone-xstats/AccedianCSVTransform/simulator/simulator.phproot 27554 1 0 Sep30 ? 00:00:00 SCREEN -dm php -S 127.0.0.1:8103/opt/sevone-xstats/AccedianNidXmlTransform/simulator/simulator.phproot 27555 27554 0 Sep30 pts/100:00:10 php -S 127.0.0.1:8103/opt/sevone-xstats/AccedianNidXmlTransform/simulator/simulator.php -
Choose a PID to use. In the output for the command above, there are two listings for /opt/sevone-xstats/AccedianCSVTransform/simulator/simulator.php. You may use either PID.
-
Enter the following command to stop the simulator.
$kill<PID>Example: Kill PID$kill24891 -
Confirm that the simulator has stopped running by executing the grep command again. You should no longer see the two entries for AcceidanCSVTransform simulator.php.
$ps-ef |grepsimulatorroot 5993 4748 0 06:29 pts/500:00:00grep--color=auto simulatorroot 19058 1 0 Sep30 ? 00:00:00 SCREEN -dm php -S 0.0.0.0:8100 simulator.phproot 19059 19058 0 Sep30 pts/000:00:43 php -S 0.0.0.0:8100 simulator.phproot 27554 1 0 Sep30 ? 00:00:00 SCREEN -dm php -S 127.0.0.1:8103/opt/sevone-xstats/AccedianNidXmlTransform/simulator/simulator.phproot 27555 27554 0 Sep30 pts/100:00:10 php -S 127.0.0.1:8103/opt/sevone-xstats/AccedianNidXmlTransform/simulator/simulator.php
Accedian NID XML Adapter
-
Get a process ID (PID) for the simulator.
$ps-ef |grepsimulatorroot 5993 4748 0 06:29 pts/500:00:00grep--color=auto simulatorroot 19058 1 0 Sep30 ? 00:00:00 SCREEN -dm php -S 0.0.0.0:8100 simulator.phproot 19059 19058 0 Sep30 pts/000:00:43 php -S 0.0.0.0:8100 simulator.phproot 24890 1 0 Sep30 ? 00:00:00 SCREEN -dm php -S 127.0.0.1:8081/opt/sevone-xstats/AccedianCSVTransform/simulator/simulator.phproot 24891 24890 0 Sep30 pts/200:00:13 php -S 127.0.0.1:8081/opt/sevone-xstats/AccedianCSVTransform/simulator/simulator.phproot 27554 1 0 Sep30 ? 00:00:00 SCREEN -dm php -S 127.0.0.1:8103/opt/sevone-xstats/AccedianNidXmlTransform/simulator/simulator.phproot 27555 27554 0 Sep30 pts/100:00:10 php -S 127.0.0.1:8103/opt/sevone-xstats/AccedianNidXmlTransform/simulator/simulator.php -
Choose a PID to use. In the output for the command above, there are two listings for /opt/sevone-xstats/AccedianNidXmlTransform/simulator/simulator.php. You may use either PID.
-
Enter the following command to stop the simulator.
$kill<PID>Example: Kill PID$kill27555 -
Confirm that the simulator has stopped running by executing the grep command again. You should no longer see the two entries for AccedianNidXmlTransform simulator.php.
$ps-ef |grepsimulatorroot 5993 4748 0 06:29 pts/500:00:00grep--color=auto simulatorroot 19058 1 0 Sep30 ? 00:00:00 SCREEN -dm php -S 0.0.0.0:8100 simulator.phproot 19059 19058 0 Sep30 pts/000:00:43 php -S 0.0.0.0:8100 simulator.phproot 24890 1 0 Sep30 ? 00:00:00 SCREEN -dm php -S 127.0.0.1:8081/opt/sevone-xstats/AccedianCSVTransform/simulator/simulator.phproot 24891 24890 0 Sep30 pts/200:00:13 php -S 127.0.0.1:8081/opt/sevone-xstats/AccedianCSVTransform/simulator/simulator.php
How can I delete the xStats Collection Source?
Accedian CSV Adapter
Perform the following steps to delete the Accedian CSV adapter xStats collection source from SevOne NMS. Make sure to perform the steps in the order listed below.
-
Delete the cron file for the Accedian CSV adapter.
$rm-r/etc/cron.d/xstats-AccedianCSVTransform
-
Delete the xStats collection source in SevOne NMS. From the navigation bar, go to Administration > Monitoring Configuration > xStats Source Manager. Delete the AccedianCSVTransform_1 xStats collection source.
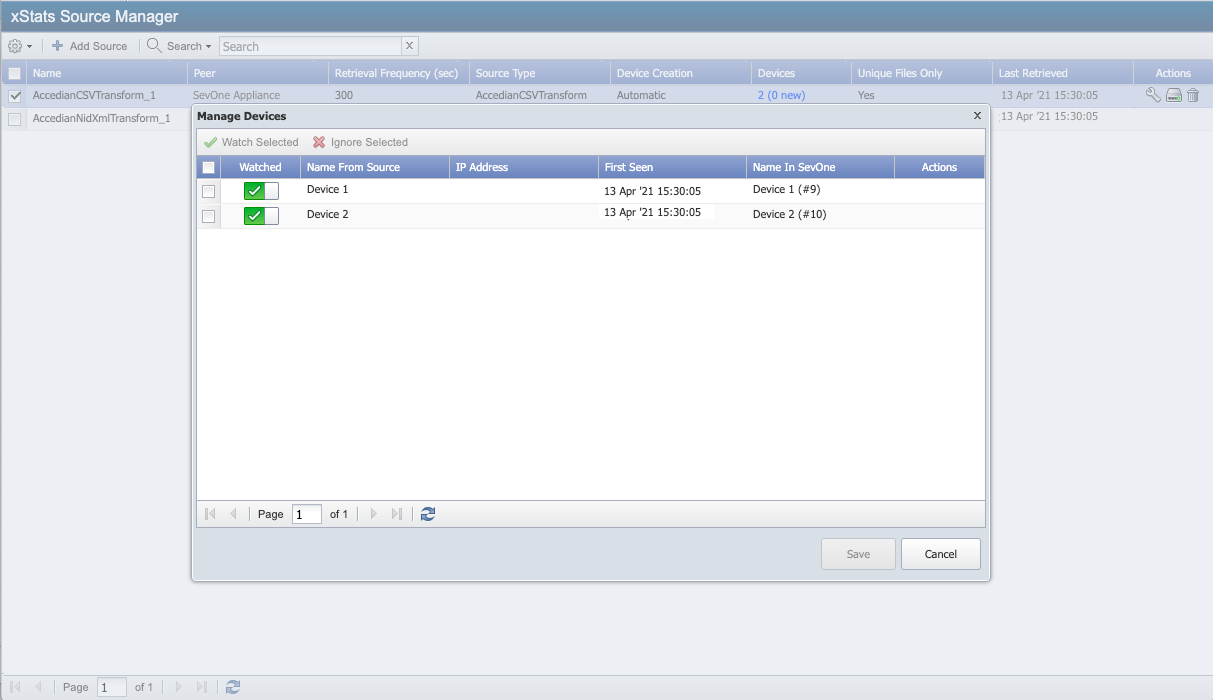
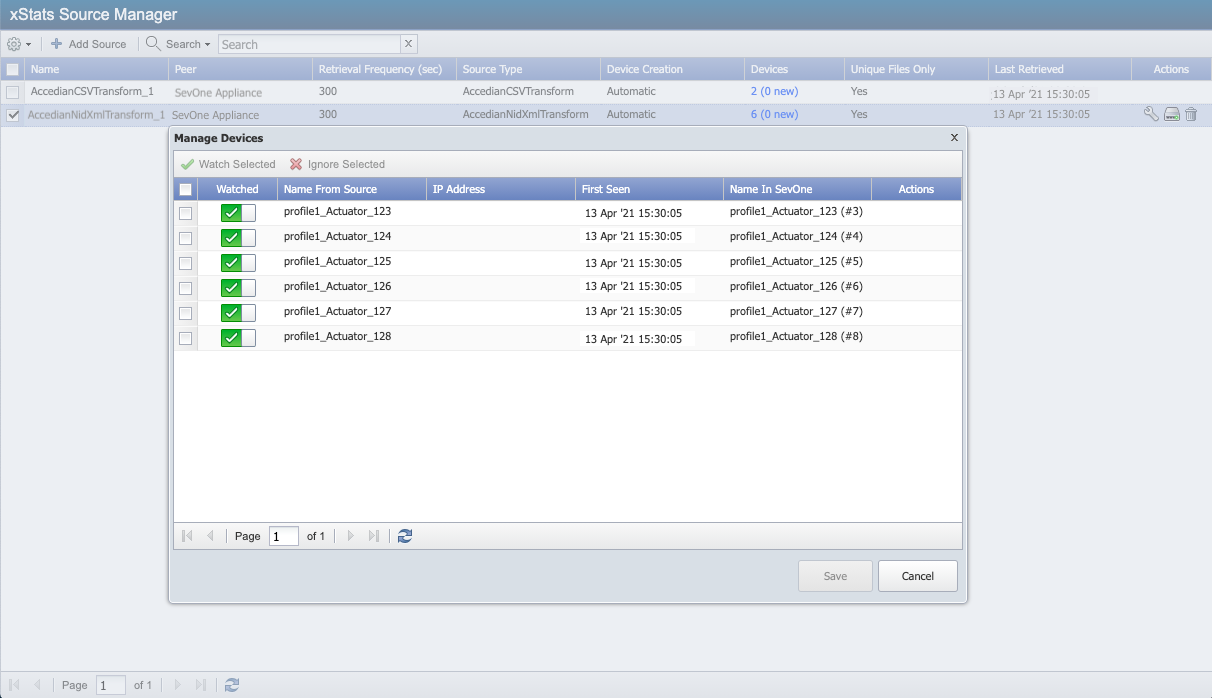
You will need to delete the devices for this xStats collection source. To view the devices before deleting the xStats collection source, locate AccedianCSVTransform_1 in xStats Source Manager and click the link under Devices. This will bring up a list of the devices that need to be deleted.
-
Delete the log files.
$rm-r/var/log/xstats/AccedianCSVTransform -
Delete the object types in SevOne NMS.
-
From the navigation bar, go to Administration > Monitoring Configuration > Object Types.
-
To delete the object types for the Accedian CSV adapter, place the cursor on a Accedian CSV adapter object type in the left-panel and click
 to delete it.
To display a list of all the object types (and indicator types) associated with this xStats collection source, SSH into your PAS and enter the following command.
$more/opt/sevone-xstats/AccedianCSVTransform/config/object_types.json
-
-
Delete the devices in SevOne NMS. Please refer to section on how to delete device(s) added by the Accedian xStats Adapter(s).
-
From the navigation bar, go to Devices > Device Manager.
-
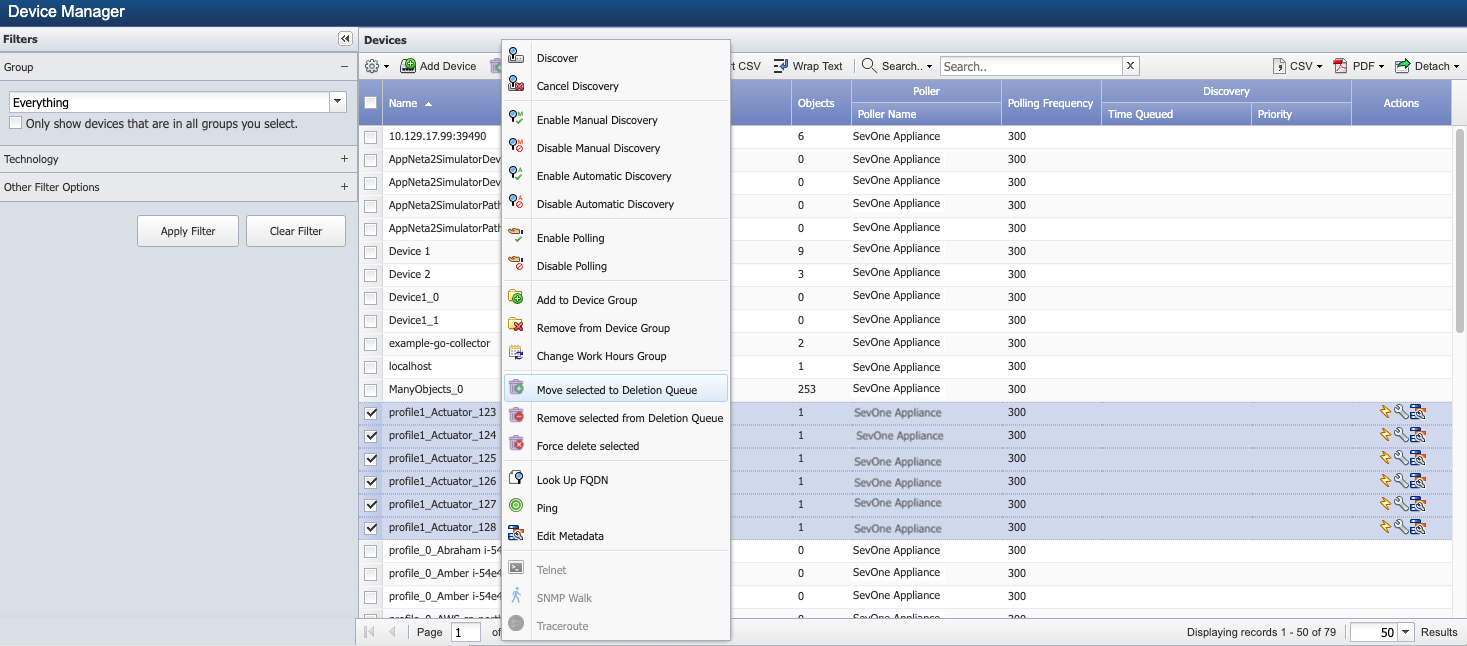
To delete the devices for the Accedian CSV adapter, select one or more devices and click Move selected to Deletion Queue.
-
-
Delete the /opt/sevone-xstats/AccedianCSVTransform directory.
$rm-r/opt/sevone-xstats/AccedianCSVTransform/
Accedian NID XML Adapter
Perform the following steps to delete the Accedian XML adapter xStats collection source from SevOne NMS. Make sure to perform the steps in the order listed below.
-
Delete the cron file for the Accedian XML adapter.
$rm-r/etc/cron.d/xstats-AccedianNidXmlTransform -
Delete the xStats collection source in SevOne NMS. From the navigation bar, go to Administration > Monitoring Configuration > xStats Source Manager. Delete the AccedianNidXmlTransform_1 xStats collection source.
You will need to delete the devices for this xStats collection source. To view the devices before deleting the xStats collection source, locate AccedianNiXmlTransform_1 in xStats Source Manager and click the link under Devices. This will bring up a list of the devices that need to be deleted.
-
Delete the log files.
$rm-r/var/log/xstats/AccedianNidXmlTransform -
Delete the object types in SevOne NMS.
-
From the navigation bar, go to Administration > Monitoring Configuration > Object Types.
-
To delete the object types for the Accedian XML adapter, place the cursor on a Accedian XML adapter object type in the left-panel and click
to delete it.
To display a list of all the object types (and indicator types) associated with this xStats collection source, SSH into your PAS and enter the following command.
$more/opt/sevone-xstats/AccedianNIDXMLTransform/config/object_types.json
-
-
Delete the devices in SevOne NMS. Please refer to section on how to delete device(s) added by the Accedian xStats Adapter(s).
-
From the navigation bar, go to Devices > Device Manager.
-
To delete the devices for the Accedian XML adapter, select one or more devices and click Move selected to Deletion Queue.
-
-
Delete the /opt/sevone-xstats/AccedianNidXmlTransform directory.
$rm-r/opt/sevone-xstats/AccedianNidXmlTransform
How can I delete the device(s) added by the Accedian xStats Adapter(s)?
Accedian CSV Adapter
Perform the following actions in SevOne NMS to delete the devices.
-
You can view a list of the devices associated with the simulator using the xStats Source Manager. From the navigation bar, go to Administration and select Monitoring Configuration. Then select xStats Source Manager. Locate AccedianCSVTransform_1 and click the link under Devices column for the list of devices available.
-
From the navigation bar, go to Devices and select Device Manager.
-
Select the check box for each device associated with the simulator to delete and click Move selected to Deletion Queue.

In addition to stopping the simulator, you will need to delete the collector profile for the simulator found in /opt/sevone-xstats/AccedianCSVTransform/config.
Accedian NID XML Adapter
Perform the following actions in SevOne NMS to delete the devices.
-
You can view a list of the devices associated with the simulator using the xStats Source Manager. From the navigation bar, go to Administration and select Monitoring Configuration. Then select xStats Source Manager. Locate AccedianNidXmlTransform_1 and click the link under Devices column for the list of devices available.
-
From the navigation bar, go to Devices and select Device Manager.
-
Select the check box for each device associated with the simulator to delete and click Move selected to Deletion Queue.
In addition to stopping the simulator, you will need to delete the collector profile for the simulator found in /opt/sevone-xstats/AccedianNidXmlTransform/config.
How can I check the xStats Adapter Version?
Execute the following commands to verify the version of each Accedian adapter.
Accedian CSV Adapter
$ php /opt/sevone-xstats/AccedianCSVTransform/bin/console.php show-version --gitHashVersion: 2.1.1Git hash: 2a6fb977f4c783f5be51e3df0363426ebdca6304Accedian NID XML Adapter
$ php /opt/sevone-xstats/AccedianNidXmlTransform/bin/console.php show-version --gitHashVersion: 2.2.1Git hash: ef57d2f22843215be83541ce5be95377a79184ad
How can I check the Collector and Parser status?
You can see the status of the collector or the parser by looking at the heartbeat file associated with it.
Accedian CSV Adapter
-
To check the collector status, enter the following command to view the collector heartbeat file.
$cat/var/log/xstats/AccedianCSVTransform/collector_heartbeat.csv200,2021-04-14T00:00:11+0000,AccedianCSVTransform,2,148,36445200,2021-04-14T00:00:12+0000,AccedianCSVTransform,5,21,36445200,2021-04-14T00:05:03+0000,AccedianCSVTransform,5,33,35721200,2021-04-14T00:05:04+0000,AccedianCSVTransform,2,25,35721200,2021-04-14T00:10:06+0000,AccedianCSVTransform,2,65,35799200,2021-04-14T00:10:06+0000,AccedianCSVTransform,5,23,35799200,2021-04-14T00:15:04+0000,AccedianCSVTransform,2,28,36162200,2021-04-14T00:15:05+0000,AccedianCSVTransform,5,25,36162......The collector heartbeat file for each adapter provides the following information.
-
status - HTTP-like status code. 200 indicates that the request has succeeded, while 500 indicates an error.
-
timestamp - Timestamp marking the last time the collector was invoked.
-
package - Name of the collector.
-
collection_source - The name of the xStats collection source.
-
transfer_time - The amount of time that it took to retrieve files or objects from the xStats collection source.
-
data_volume - The amount of data transferred.
-
-
To check the parser status, enter the following command to view the parser heartbeat file.
$cat/var/log/xstats/AccedianCSVTransform/parser_heartbeat.csvstatus,timestamp,package,parser,parse_time,total_parsed_entries,parsed_file200,2021-04-16T00:05:03+0000,AccedianCSVTransform,AccedianCSVTransform_1,33,744,simulator_REG_file_2021-04-16_00h05m02s_all_300.csv200,2021-04-16T00:05:03+0000,AccedianCSVTransform,AccedianCSVTransform_1,56,1485,simulator_PAA_file_2021-04-16_00h05m02s_all_300.csv200,2021-04-16T00:05:03+0000,AccedianCSVTransform,AccedianCSVTransform_1,22,374,simulator_PORT_file_2021-04-16_00h05m02s_all_300.csv200,2021-04-16T00:05:03+0000,AccedianCSVTransform,AccedianCSVTransform_1,8,88,simulator_SLM_file_2021-04-16_00h05m02s_all_300.csv200,2021-04-16T00:05:03+0000,AccedianCSVTransform,AccedianCSVTransform_1,12,66,simulator_PL_file_2021-04-16_00h05m02s_all_300.csv200,2021-04-16T00:05:03+0000,AccedianCSVTransform,AccedianCSVTransform_1,18,319,simulator_DMM_file_2021-04-16_00h05m02s_all_300.csv......The parser heartbeat file for each adapter provides the following information
-
status - HTTP-like status code. 200 indicates that the request has succeeded, while 500 indicates an error.
-
timestamp - Timestamp when the parser was invoked.
-
package - Name of the xStats adapter.
-
parser - Name of the parser.
-
parse_time - Amount of time to parse.
-
total_parsed_entries - Number of times the indicator values were translated and sent for ingestion. This excludes ignored and unknown values.
-
parsed_file - Name of the parsed file.
-
Accedian NID XML Adapter
-
To check the collector status, enter the following command to view the collector heartbeat file.
$cat/var/log/xstats/AccedianNidXmlTransform/collector_heartbeat.csv500,2021-04-14T00:00:11+0000,AccedianNidXmlTransform,1,0,0500,2021-04-14T00:00:12+0000,AccedianNidXmlTransform,4,0,0200,2021-04-14T00:05:03+0000,AccedianCSVTransform,5,33,35721200,2021-04-14T00:05:04+0000,AccedianNidXmlTransform,2,25,35721200,2021-04-14T00:10:06+0000,AccedianNidXmlTransform,2,65,35799200,2021-04-14T00:10:06+0000,AccedianNidXmlTransform,5,23,35799200,2021-04-14T00:15:04+0000,AccedianNidXmlTransform,2,28,36162200,2021-04-14T00:15:05+0000,AccedianNidXmlTransform,5,25,36162......The collector heartbeat file for each adapter provides the following information.
-
status - HTTP-like status code. 200 indicates that the request has succeeded, while 500 indicates an error.
-
timestamp - Timestamp marking the last time the collector was invoked.
-
package - Name of the collector.
-
collection_source - The name of the xStats collection source.
-
transfer_time - The amount of time that it took to retrieve files or objects from the xStats collection source.
-
data_volume - The amount of data transferred.
-
-
To check the parser status, enter the following command to view the parser heartbeat file.
$cat/var/log/xstats/AccedianNidXmlTransform/parser_heartbeat.csvstatus,timestamp,package,parser,parse_time,total_parsed_entries,parsed_file200,2021-04-14T00:00:13+0000,AccedianNidXmlTransform,source1,52,1800,profile1__._1270018103_._1601510412__5f751c0c2a6d9.xml200,2021-04-14T00:05:05+0000,AccedianNidXmlTransform,source1,41,1800,profile1__._1270018103_._1601510703__5f751d2fec330.xml200,2021-04-14T00:10:07+0000,AccedianNidXmlTransform,source1,37,1800,profile1__._1270018103_._1601511006__5f751e5e1eb22.xml200,2021-04-14T00:15:07+0000,AccedianNidXmlTransform,source1,72,1800,profile1__._1270018103_._1601511305__5f751f892dec2.xml200,2021-04-14T00:20:06+0000,AccedianNidXmlTransform,source1,29,1800,profile1__._1270018103_._1601511605__5f7520b512eaf.xml200,2021-04-14T00:25:06+0000,AccedianNidXmlTransform,source1,23,1800,profile1__._1270018103_._1601511904__5f7521e0ca55f.xml200,2021-04-14T00:30:07+0000,AccedianNidXmlTransform,source1,33,1800,profile1__._1270018103_._1601512206__5f75230e0c39b.xml200,2021-04-14T00:35:06+0000,AccedianNidXmlTransform,source1,51,1800,profile1__._1270018103_._1601512504__5f752438b8363.xml......The parser heartbeat file for each adapter provides the following information
-
status - HTTP-like status code. 200 indicates that the request has succeeded, while 500 indicates an error.
-
timestamp - Timestamp when the parser was invoked.
-
package - Name of the xStats adapter.
-
parser - Name of the parser.
-
parse_time - Amount of time to parse.
-
total_parsed_entries - Number of times the indicator values were translated and sent for ingestion. This excludes ignored and unknown values.
-
parsed_file - Name of the parsed file.
-
What if I am using a Jump Box?
If you are using a jump box, you will need to manually install the collector on the jump box and connect to the SevOne appliance via SFTP.
What if my cluster has HSA pairs and multiple peers?
Please refer to Accedian CSV Adapter or Accedian NID XML Adapter sections for details.
HSA Installation
To install the Accedian adapters on HSA pair, please follow the steps below.
-
Copy the installation package (.phar.spk) for each adapter to active and passive appliances.
-
Using ssh, log into the active and passive appliances as root.
-
Execute the following commands on both appliances.
$ php AccedianCSVTransform-<version>.phar.spk$ php AccedianNidXmlTransform-<version>.phar.spkExample$ php AccedianCSVTransform-v2.1.1.phar.spk$ php AccedianNidXmlTransform-v2.2.1.phar.spk
-
The adapters must be installed on the active appliance only. If you try to install the adapters on the passive appliance, you will receive an error message stating that the appliance is not active and therefore, the process cannot continue.
Even though you will not be installing the adapters on the passive appliance, the xStats collection sources for the adapters will appear in the xStats Source Manager (Administration > Monitoring Configuration > xStats Source Manager) on the passive appliance, just as they do on the active appliance, as a result of database replication.
-
Configure the collector for each adapter on both the active and the passive appliances. Also, make sure to configure the collector exactly the same on both appliances.
For the Accedian CSV adapter, using the collector is optional.
-
For the Accedian CSV adapter, you will need to configure a service, such as SFTP or SCP, to push files to the active appliance in an HSA pair.
The IP address must be the IP address of the HSA pair - not the IP address of an individual PAS.
This step does not apply to Accedian XML adapter.
SCP command to copy the .csv files from the remote server to the /data directory on the active appliance, using the IP address of the HSA pair$scp/<full_path_to_Accedian_CSV_files>/*.csv \<user_name>@<IP_address_of_HSA_pair>:/opt/sevone-xstats/AccedianCSVTransform/sources/source_<##>/dataExample: SCP command$scp/Accedian/CSV-files/*.csv \root@192.168.136.224:/opt/sevone-xstats/AccedianCSVTransform/sources/source_1/data
Multiple Peers Installation
Installing the Accedian adapters on multiple peers in a cluster does not require anything special. You will install the adapters on each relevant peer in the same way.
The adapters recognize the Peer ID and this ID is used to name the xStats collection sources. For example,
-
If you install your Accedian CSV adapter package on a peer with an ID of 1, the xStats collection source for the Accedian CSV adapter will be named as AccedianCSVTransform_1.
-
If you install the Accedian CSV adapter on another peer in the same cluster, and that peer has an ID of 5, the xStats collection source for the Accedian CSV adapter will be AccedianCSVTransform_5.
In this example, Accedian adapters are installed on two peers in a cluster and each peer has an HSA setup. Execute the steps below.
-
For each adapter, execute the following commands.
$ php AccedianCSVTransform-<version>.phar.spk$ php AccedianNidXmlTransform-<version>.phar.spk -
Install each adapter.
-
Configure the collector for each adapter.
The collector is optional for the Accedian CSV adapter.
-
For each adapter, execute the following commands.
$ php AccedianCSVTransform-<version>.phar.spk$ php AccedianNidXmlTransform-<version>.phar.spk -
Configure the collector for each adapter.
-
The collector is optional for the Accedian CSV adapter.
-
The exact same specifications used to configure the collector (for each adapter) on the active appliance must be used on the passive appliance.
-
-
For each adapter, execute the following commands.
$ php AccedianCSVTransform-<version>.phar.spk$ php AccedianNidXmlTransform-<version>.phar.spk -
Install each adapter.
-
Configure the collector for each adapter.
The collector is optional for the Accedian CSV adapter.
-
For each adapter, execute the following commands.
$ php AccedianCSVTransform-<version>.phar.spk$ php AccedianNidXmlTransform-<version>.phar.spk -
Configure the collector for each adapter.
-
The collector is optional for the Accedian CSV adapter.
-
The exact same specifications used to configure the collector (for each adapter) on the active appliance must be used on the passive appliance.
-
Troubleshooting
Collector Issues
Unable to connect to remote device - SFTP issue
Most collectors require SFTP to be enabled. If you are having trouble connecting to the remote device that you are collecting data files from, it is possible that SFTP needs to be enabled on that device. One way to test this is to simply try connecting to the remote device with SFTP. If you are unable to connect via SFTP, it could mean that the SFTP server is not running on the remote device. In this case, you will need to enable the SFTP server. If your collector requires SFTP to be enabled on the remote device, this will likely resolve the issue.
Unable to connect to remote device - Authentication issue
The collector needs to successfully authenticate to the remote device before it can collect data files. If you are having trouble authenticating, it could be a result of one of the following problems.
-
The username/password combination is incorrect.
-
The password on the remote device has expired.
xStats Issues
Package does not install correctly
If you encounter errors during the package installation, please report them to the Professional Services Development team.
xStats collection source has been created, but no devices are showing up
Devices will show up only after the collector has delivered new files to the retrieval directory. If your collector runs every thirty minutes, for example, you will have to wait a bit. If there are files already in the local directory, it is possible that fcad may not pick them up immediately. In this case, you can use the touch command to trick fcad into thinking that those files just arrived.
Go to the /data directory for the relevant Accedian adapter and type touch [filename], then hit Enter. After that, refresh the xStats Source Manager page. One or more devices should show up then.
-
CSV adapter: /opt/sevone-xstats/AccedianCSVTransform/sources/source_<##>/data
-
XML adapter: /opt/sevone-xstats/AccedianNidXmlTransform/sources/source_<##>/data
Devices still do not show up, even after you have touched the files
From the xStats Source Manager, edit the xStats collection source for the adapter that does not have devices showing up and make sure that the retrieval directory is correct. The default retrieval directories for the Accedian xStats adapters are:
-
CSV adapter: /opt/sevone-xstats/AccedianCSVTransform/sources/source_<##>/data
-
XML adapter: /opt/sevone-xstats/AccedianNidXmlTransform/sources/source_<##>/data
If everything checks out, there may be a problem with the package that you installed. Contact the Professional Services Development team for resolution.
Devices show up, but no objects appear for them
When objects fail to show up, it is often related to the discovery process. The following steps will walk you through the discovery process in SevOne NMS.
-
Go to the Device Manager.
-
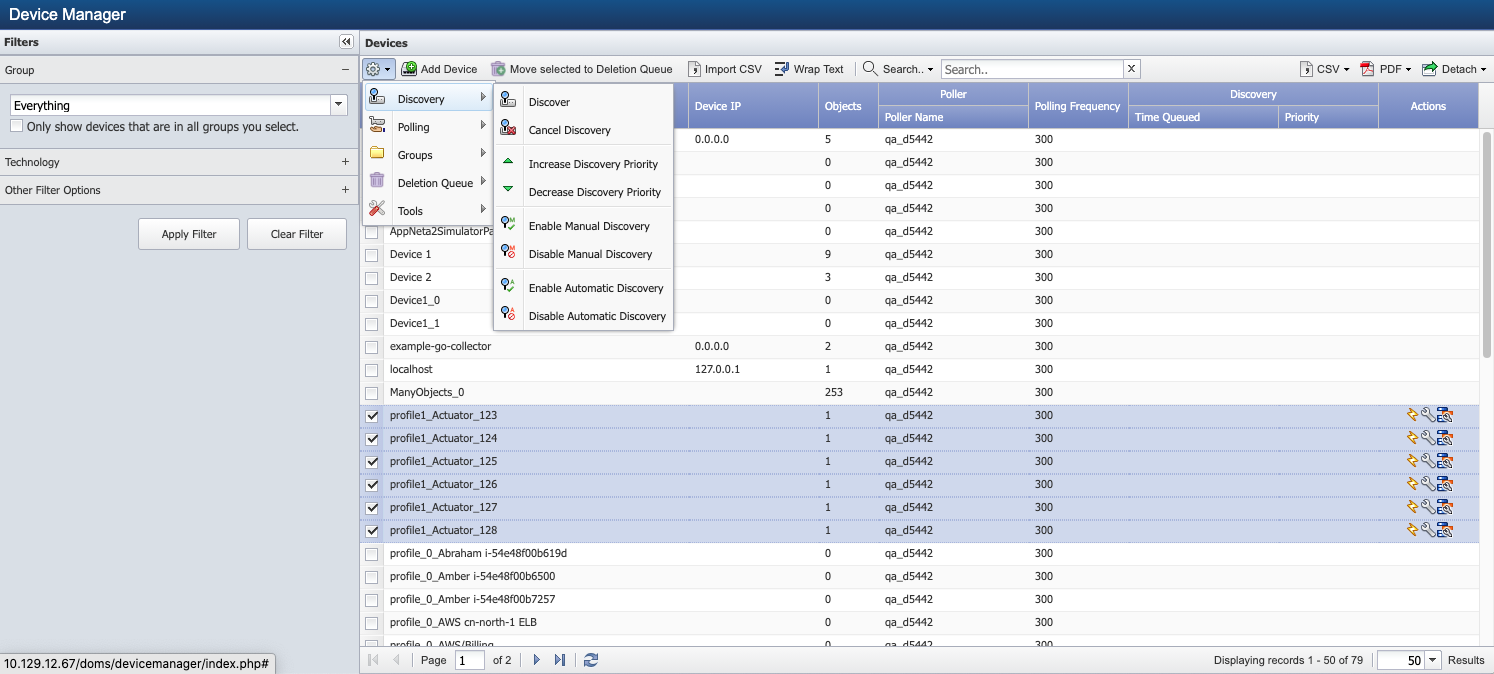
Select the device(s) in question. Once you have made your selection, click
 and select Discovery. Then select Discover. Give Discovery a chance to run its course. Click
  to refresh the page. Objects should start showing up.
Objects and indicators show up for a device, but no data appears in the graphs
This is likely a backfill problem, which can result from running an adapter for the first time with a large number of data files. Data should start showing up in a bit. Sometimes it can take up to an hour in this case.