Table of Contents (Start)
- Topics
- Introducing SevOne
- Login
- Startup Wizard
- Dashboard
- Global Search - Advanced Search
- Report Manager
- Report Attachment Wizard
- Report Properties
- Report Interactions
- Instant Graphs
- TopN Reports
- Alerts
- Alert Archives
- Alert Summary
- Instant Status
- Status Map Manager
- Edit Maps
- View Maps
- FlowFalcon Reports
- NBAR Reports
- Logged Traps
- Unknown Traps
- Trap Event Editor
- Trap Destinations
- Trap Destination Associations
- Policy Browser
- Create and Edit Policies
- Webhook Definition Manager
- Threshold Browser
- Create and Edit Thresholds
- Probe Manager
- Discovery Manager
- Device Manager
- New Device
- Edit Device
- Object Manager
- High Frequency Poller
- Device Summary
- Device Mover
- Device Groups
- Object Groups
- Object Summary
- Object Rules
- VMware Browser
- AWS Plugin
- Azure Plugin (Public Preview)
- Calculation Plugin
- Database Manager
- Deferred Data Plugin
- DNS Plugin
- HTTP Plugin
- ICMP Plugin
- IP SLA Plugin
- JMX Plugin
- NAM
- NBAR Plugin
- Portshaker Plugin
- Process Plugin
- Proxy Ping Plugin
- SDWAN Plugin
- SNMP Plugin
- VMware Plugin
- Web Status Plugin
- WMI Plugin
- xStats Plugin
- Indicator Type Maps
- Device Types
- Object Types
- Object Subtype Manager
- Calculation Editor
- xStats Source Manager
- User Role Manager
- User Manager
- Session Manager
- Authentication Settings
- Preferences
- Cluster Manager
- Maintenance Windows
- Processes and Logs
- Metadata Schema
- Baseline Manager
- FlowFalcon View Editor
- Map Flow Objects
- FlowFalcon Views
- Flow Rules
- Flow Interface Manager
- MPLS Flow Mapping
- Network Segment Manager
- Flow Protocols and Services
- xStats Log Viewer
- SNMP Walk
- SNMP OID Browser
- MIB Manager
- Work Hours
- Administrative Messages
- Enable Flow Technologies
- Enable JMX
- Enable NBAR
- Enable SNMP
- Enable Web Status
- Enable WMI
- IP SLA
- SNMP
- SevOne Data Publisher
- Quality of Service
- Perl Regular Expressions
- Trap Revisions
- Integrate SevOne NMS With Other Applications
- Email Tips and Tricks
- SevOne NMS PHP Statistics
- SevOne NMS Usage Statistics
- Glossary and Concepts
- Map Flow Devices
- Trap v3 Receiver
- Guides
- Quick Start Guides
- AWS Quick Start Guide
- Azure Quick Start Guide (Public Preview)
- Data Miner Quick Start Guide
- Flow Quick Start Guide
- Group Aggregated Indicators Quick Start Guide
- IP SLA Quick Start Guide
- JMX Quick Start Guide
- Metadata Quick Start Guide
- RESTful API Quick Start Guide
- Self-monitoring Quick Start Guide
- SevOne NMS Admin Notifications Quick Start Guide
- SNMP Quick Start Guide
- Synthetic Indicator Types Quick Start Guide
- Topology Quick Start Guide
- VMware Quick Start Guide
- Web Status Quick Start Guide
- WMI Quick Start Guide
- xStats Quick Start Guide
- xStats Adapter - Accedian Vision EMS (TM) Quick Start Guide
- Deployment Guides
- Automated Build / Rebuild (Customer) Instructions
- Generate a Self-Signed Certificate or a Certificate Signing Request
- SevOne Best Practices Guide - Cluster, Peer, and HSA
- SevOne Data Platform Security Guide
- SevOne NMS Implementation Guide
- SevOne NMS Installation Guide - Virtual Appliance
- SevOne NMS Advanced Network Configuration Guide
- SevOne NMS Installation Guide
- SevOne NMS Port Number Requirements Guide
- SevOne NMS Upgrade Process Guide
- SevOne Physical Appliance Pre-Build BIOS and RAID Configuration Guide
- SevOne SAML Single Sign-On Setup Guide
- Cloud Platforms
- Other Guides
- Quick Start Guides
Object Rules
The Object Rules page enables you to define rules to manage the polling of objects. SevOne NMS can monitor virtually everything in your network with minimal user input. The data from some objects may not be useful for you.
To access the Object Rule page from the navigation bar, click the Administration menu, select Monitoring Configuration, and then select Object Rules.
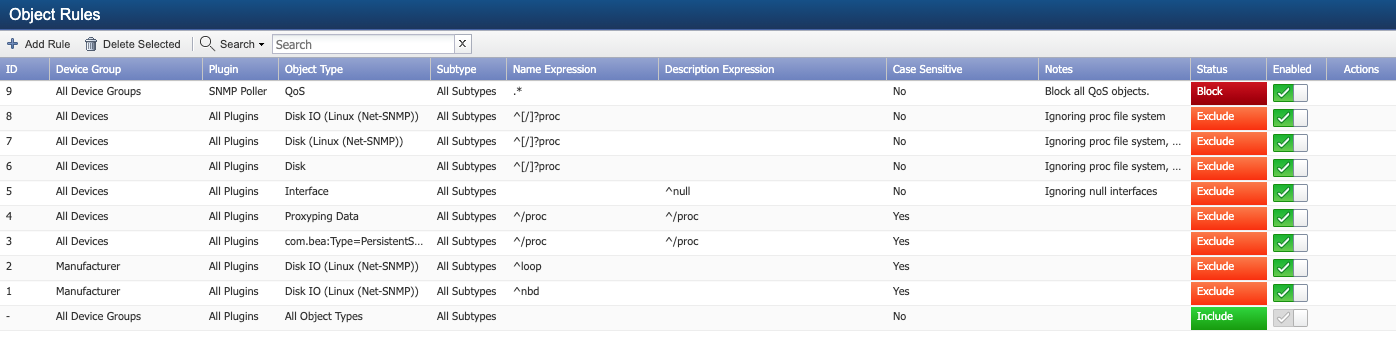
Object Rules List
Rules are applied in the sequence in which they appear in the list from top to bottom. The rule list stops (i.e. short-circuits) when a rule is matched.
Click  and
and  in the Actions column to change the rule sequence. The list displays the following information.
-
Device Group - Displays the device group/device type to which the rule applies.
-
Plugin - Displays the name of the plugin to which the rule applies.
-
Object Type - Displays the name of the object type to which the rule applies and displays the rule conditions.
-
Subtype - Displays the name of the object subtype to which the rule applies.
-
Name Expression - Displays the Perl Regular Expressions applied to the object name used to define the rule.
-
Description Expression - Displays the Perl Regular Expressions applied to the object type description used to define the rule.
-
Case Sensitive - Displays Yes if the rule is case sensitive or displays No if the rule is not case sensitive.
-
Notes - Displays notes you enter for the rule to explain the purpose of the rule.
-
Status - Displays whether discovery should include, exclude, or block objects to which the rule applies.
-
Exclude means that the object will be disabled by the rule. However, the object will be stored in the database.
-
Include means that the object will be included by the rule.
-
Block means that the object goes through the discovery process however, no information of the object discovered will be stored in the database.
Important considerations-
The advantage of Exclude over Block is that it allows you to enable the object without re-discovery. For example, for troubleshooting purposes.
-
The disadvantage of Exclude over Block is that it requires (minimal) additional storage for objects. As a rule of thumb, you can have approximately 3x your object license limit of disabled objects. For example, PAS200k can have up to 600k disabled objects.
-
-
Enabled - Displays the status of the rule. Rules can be enabled or disabled at your discretion.
Manage Object Rules
You create object rules to define exceptions to the normal object discovery. The global rule to include the All Device Groups, appears at the bottom of the list and you cannot edit, delete, or move the global rule.
-
The /proc file system on the Linux operating system is a read-only system-level file system that is always full, and it is rarely important to monitor. There are policies set up to alert on full file systems and you would always receive an alert for the /proc file system. You would have to disable the thresholds to prevent this. A better option is to define an object rule to block or exclude polling these objects.
-
It makes sense to disable unused interfaces that are administratively up but not actually in use, such as Un-routed VLAN interfaces.
The general rule denoted by a '-' cannot be edited or deleted.
The rules you define on the Object Rules page override the interface synchronization settings you define on the Cluster Manager > Cluster Settings tab and in the SNMP plugin definition on the Edit Device page. For details, please refer to section Edit Device in SevOne NMS User Guide.
If you create a rule to "block all /proc" file systems, and then you delete the "block all /procs" rule, all "/proc" file system objects remain blocked until the next discovery.
-
Click Add Rule or click
 to display the Add/Edit Rule pop-up.
 Object rules can exclude, include, or block the polling of objects.
-
Click the Device Group or Type drop-down and select the device group/device type to which to apply the rule.
-
Click the Plugin drop-down and select the plugin that polls the object type to report on.
-
Click the Object Type drop-down and select an object type.
-
Click the Subtype drop-down and select an object subtype, when applicable.
-
Click the Match the object name with this expression drop-down
-
Select Match to define the rule to apply when the object name expression matches the expression you enter in the text field.
-
Select Do Not Match to define the rule to apply when the object name expression does not match the expression you enter in the text field.
-
-
In the text field enter the Perl Regular Expressions to either match or not match. Leave this field blank to not use the object name expression in the rule.
-
Click the Match the object description with this expression drop-down.
-
Select Match to define the rule to apply when the object description expression matches the expression you enter in the text field.
-
Select Do Not Match to define the rule to apply when the object description expression does not match the expression you enter in the text field.
-
-
In the text field enter the Perl Regular Expressions to either match or not match. Leave this field blank to not use the object name expression in the rule.
-
Select the Case Sensitive check box to apply the rule only when the Perl regular expression matches/does not match including upper and lower case of the letters you enter.
-
Click the Enabled check box to enable the rule.
-
Click the Status drop-down and select Include, Exclude, or Block.
-
In the Notes field, enter a note to associate with the rule.
-
Click Save.